Anviz M5 Plus Manual de usuario

Outdoor Fingerprint & Card
Reader/Controller
M5 Plus
Quick Guide V1.5
POWERING A SMARTER WORLD

1
Package List
RFID Card
X4
USB Quick GuideRJ45 ConnectorScrewsDevice
Notification:
1. Please check if the package contains all the items listed above. Contact
the distributor if there is any problem.
2. Please keep the product away from the magnetic field, and avoid causing
any damage to the device.
3. Please use the original power supply or refer to the instruction to get
the right power supply.
4. Please strictly follow the instructions to install the product. Any damage
to it caused by incorrect operation and wiring are not under warranty.

Illustration for placing finger
Always place finger in
the center of the sensor.
Try to place your finger covers the entire sensor.
Correct method
Incorrect method
DO NOT slide your finger
during the fingerpint
verification process.
DO NOT just use your fingertip.
DO NOT place finger
at an angle.
DO NOT place finger away from
the center of the sensor.
DO NOT move your finger before
the sensor backlight turns off.
DO NOT take off finger during
the fingerprint verification
process. 2
( Straighten your finger and then place it on the sensor Ensure the finger is flat
and covers the entire sensor)
.

Installation Diagram
Appearance
Steps: Steps:
Screw Hole
Mini USB Port
Function Button
Indicator LED
Three color: Red,
Blue and Green.
Fingerprint Sensor
Place the finger here.
3
Card Reader Area
Swipe the card here.
Step1: Drill holes in the wall
follow the hole position on
back panel.
Step2: Install and fix back
panel, connect related cables.
Step3: Place M5 Pro on back
panel, fix screw at the bottom
of M5 Pro.
Step1
Step2
Step3
Without back panel install way:Back panel install way:
64mm(2.52")
36mm(1.42")
10.5mm(0.41")
Install M5 screws directly to the
bottom shell behind the wall , the
depth of screws is 8mm(0.31"). This
install method is unique, safe and
convenient. Package list does not
include these screws,
please select matchable screws
accroding to the wall thickness.
""
"

4
Wiring Instruction
Black
Black
DC12V
GND
GND
GND
RS485A
RS485B
NO
COM
NC
Wiegand DATA0 Output
Wiegand DATA1 Output
D/S
Tamper alarm
Tamper alarm
Access Control Power Supply
Access Control Power Supply
Power off to unlock
Power on to unlock
+ 12V
GND
10
11
13
2
1
Switching Power Supply
Important notice:
Please carefully follow this wiring instruction. Any damage caused by incorrect wiring is not covered by warranty.
Switch Power
Supply
Cable Color
Function
Power
Tamper alarm
Wiegand
Output
Pulse signal
Relay Output
Description
1
2
3
4
5
6
7
8
PIN
Wiegand 0 Input/Output
Wiegand 1 Input/Output
Light brown
Brown
Pink (Thick)
Exit Button
Tamper Alarm Signal
Green
RS485B
RS485A
White
GND
DC12 V
9
10
11
Light green
Blue
Door Magnetic
NO
Light blue
Black (Thick)
Black
Red (Thick)
12
Orange
COM
NC
Connect RJ45

Switch Power
Supply
Switch Power
Supply
5
Power off to unlock
Power off to unlock
Power on to unlock
Important notice:
.
Wiring Type Access Controller
11
10
+12V
+12V
Anviz Wiegand Wiring:
SC011 and the device are paired by
Anviz wiegand to be a distributed access
control system.
4
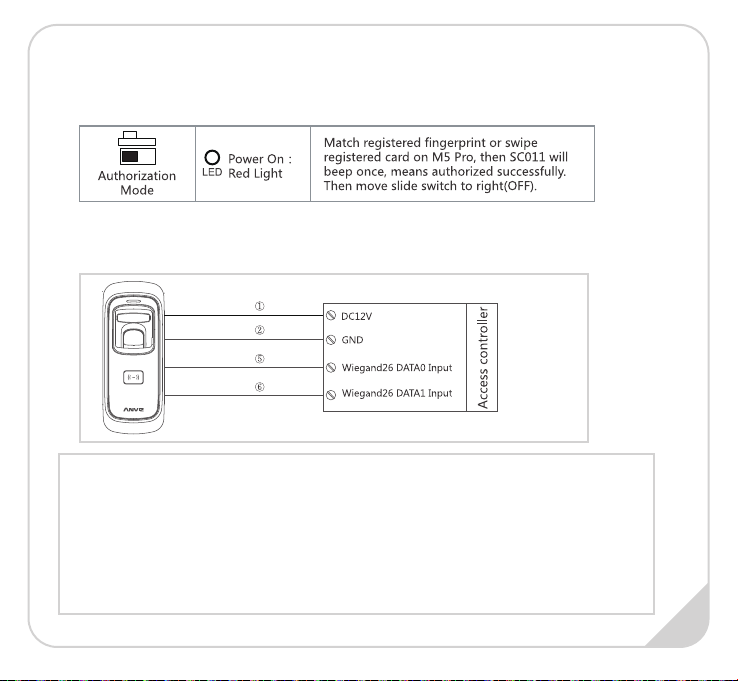
Make sure correct wiring between M5 Plus and SC011, power on them, then move
slide switch to ‘PROGRAM MODE’ as below:
Between M5 Plus and Anviz SAC844 or other Access Controller as below:
1. Anviz Wiegand data output format:
ALL registered users output devieces’ last eight serial number.(For example, SN
of one device is 1050000014470004, then Anviz Wiegand output 14470004.)
2. Wiegand data output format:
Card user:Output card number.(Decimal)
Fingerprint user:Output ID number
3. Wiegand output format can be set by PC software
Wiegand Wiring:
SC011 authorization setting:
Switch in‘PROGRAM’on the SC011: Move slide swith to left(ON).
Wiegand data output format:
6

7
*
*
*
*Pro Proto
Function Button

IMPORTANT:
Operation Guide
Register User:
1. Swipe
Enroll Card
1Exit
Enrollment
Add One Fingerprint per User Only:
Blue LED
flashes
2. Place finger 3. Place finger
again
Blue LED flashes fast
and fingerprint
sensor lights up
Green LED lights up
with 4 short beeps,
registration successed
5. Continue to register another user
Blue LED
flashes
2. Swipe
User Card 3. Swipe User
Card again
Note: 1. After finish enrolling current user,
please swipe enroll card and then continue
register another user.
2. After finish enrollment, please swipe
enroll card TWICE to exit enroll status.
Notice:
When you place finger on M5 Pro, Red LED
flashing with two long beeps means the finger has
been registered.
Add Card Only:
8
6. Swipe Enroll
Card TWICE to end
the enrollment
Notice:
When you swipe card on M5 Pro, Red LED
flashing with two long beeps means the card has
been registered.
1. Swipe
Enroll Card
Note: 1. After finish enrolling current user,
please swipe enroll card and then continue
register another user.
2. After finish enrollment, please swipe
enroll card TWICE to exit enroll status.
4. Swipe Enroll
Card once
1
6. Swipe Enroll Card
TWICE to end the
enrollment
Green LED lights up
with 4 short beeps,
registration
successed
Blue LED flashes
fast and
FingerPrint
sensor lights up
5. Continue to register another user
Exit
Enrollment
M5 Pro is suitable for DC12V power supply only. When connect to DC12V power supply, the indicator
light displays blue and flashes fast. Meanwhile, the backlights of fingerprint sensor turn on with beeps.
4. Swipe Enroll
Card once

Operation Guide
4. Continue to register the 2nd finger
Blue LED
flashes
2/5. Place the
1st/2nd finger 3/6. Place the 1st/2nd
finger again
Blue LED flashes fast
and FingerPrint
sensor lights up
8. Continue to register another user
Blue LED
flashes
4. Swipe
User Card 5. Swipe User
Card again
Add Two Fingerprints of one User:
Add Fingerprint and Card of one User:
2. Place finger 3. Place finger
again
9
Note: 1. After finish enrolling current user,
please swipe enroll card and then continue
register another user.
2. After finish enrollment, please swipe
enroll card TWICE to exit enroll status.1. Swipe
Enroll Card
1Exit
Enrollment
9. Swipe Enroll
Card TWICE to
end the
enrollment
Green LED lights up
with 4 short beeps,
registration
successed
1. Swipe
Enroll Card
Exit
Enrollment
9. Swipe Enroll Card
TWICE to end the
enrollment
Green LED lights up
with 4 short beeps,
registration
successed
Blue LED
flashes fast and
FingerPrint
sensor lights up
Green LED lights up
with 4 short beeps,
registration
successed
Blue LED
flashes fast and
FingerPrint
sensor lights up
8. Continue to register another user
Note:
1. After finish enrolling current user, please swipe enroll card and then continue register another user.
2. After finish enrollment, please swipe enroll card TWICE to exit enroll status.
7. Swipe Enroll
Card once
1
* Two fingerprints belongs to one user ID.
* The wiegand output of fingerprint and card are the same.
7. Swipe Enroll
Card once
Tabla de contenidos
Otros manuales de Controladores de Anviz


