AMC E200T Manual de usuario

HD IP TRACKING PTZ
Color Video Camera
User Manual V1.0


SAFETY NOTICE-IMPORTANT!!!
The following important notes must be followed carefully to run the camera and respective
accessories in total safety. The camera and relative accessories are called video system in
this section.
Before installing the camera, please read this manual carefully. Please follow installation
instructions indicated in this manual during installation. Please keep this manual for future
use.
The installation should be performed by qualified service personnel or system installers in
accordance with all local rules.
Before powering on the camera, please check the power voltage carefully. Make sure that
you are using the correct power source.
Please put the power cable, video cable and control cable in safe place.
Do not operate the camera beyond the specified temperature and humidity. Working
temperature range of the camera is between 0℃and +40℃. The ambient humidity range is
less than 95﹪.
During transporting, avoid violent shake or force to the camera.
To prevent electric shock, do not remove screws or housing of the camera. There are no
self-serviceable parts inside. Refer to qualified service personnel for servicing.
Video cable and RS485 cable should be kept far away from other cables. Shielded and
independent wiring is necessary for video and control cables.
Never aim the lens of the camera at the sun or other extremely bright objects. Otherwise, it
may cause damage.
When cleaning the camera, please use soft cloth. If the camera is very dirty, wipe it off
gently with a soft cloth moistened with a weak solution of water and a neutral kitchen
detergent. Wring all liquid from the cloth before wiping the camera, then wipe off all
remaining dirt with a soft, dry cloth. Use lens cleaning paper to clean the lens.

Do not move the camera head manually. In doing so would result in malfunction of the
camera. Do not hold the camera head when carrying the video camera.
This camera is for indoor use only. It is not designed for outdoor use.
Make sure the camera is not directly exposed to rain and water.
Make sure the camera is far away from area where radiation, X-rays, strong electric
waves, or magnetism is generated.

Attention
If you need to extend the power cable, please extend the power cable
from the part 1 on below picture (220V/110V), do not extend from part
2 on below picture (DC12V), otherwise it will cause unexpected
damage to the device.

CONTENTS
ABOUT THE PRODUCT -------------------------------------------------------- 1
QUICK GUIDE ------------------------------------------------------------------------------ 1
FEATURES -------------------------------------------------------------------------------- 2
CHARACTERISTICS &FUNCTIONS ----------------------------------------------------------- 2
LIST OF PARTS &ACCESSORIES ------------------------------------------------------------ 2
MAIN PARTS &IINTERFACES ---------------------------------------------------------------- 3
REMOTE CONTROLLER --------------------------------------------------------------------- 4
INSTALLATION ----------------------------------------------------------------- 6
DESKTOP MOUNT INSTALLATION ------------------------------------------------------------ 6
WALL MOUNT INSTALLATION ---------------------------------------------------------------- 6
CONNECTIONS ----------------------------------------------------------------- 7
ROOM TRACKER --------------------------------------------------------------- 8
SOFTWARE CONNECTION ------------------------------------------------------------------- 8
PARAMETERS --------------------------------------------------------------------------- 10
SETTING PROCESS ------------------------------------------------------------------------ 10
PARAMETER SETTING --------------------------------------------------------------------- 10
MENU SETTINGS -------------------------------------------------------------- 1 3
MENU CONFIGURATION -------------------------------------------------------------------- 13
MENU EXPLANATION ---------------------------------------------------------------------- 17
VIDEO ----------------------------------------------------------------------------------- 17
EXPOSURE ------------------------------------------------------------------------------- 18
WHITE BALANCE -------------------------------------------------------------------------- 19
PAN/TILT/ZOOM --------------------------------------------------------------------------- 19
SYSTEM ---------------------------------------------------------------------------------- 20
STATUS ---------------------------------------------------------------------------------- 20
RESTORE DEFAULTS ---------------------------------------------------------------------- 20
NETWORK SETTING ----------------------------------------------------------------------- 20
ANNEX 1 TECHNICAL SPECIFICATIONS ------------------------------------- 21
ANNEX 2 SIZE AND DIMENSION ---------------------------------------------- 23
TROUBLESHOOTING --------------------------------------------------------- 24
1
ABOUT THE PRODUCT
Quick Guide
AMC can be accessed and controlled via the
following ways:
Client software Room Tracker: tracking setting,
camera search and control, network setting
etc;
RTSP: view of main stream and sub video
stream;
Internet Explorer: view of main stream video
stream, camera control, network setting;
SDK: providing interface for secondary
development;
Onvif: version 2.1 supported
Room Tracker Software
1.Make sure PC and AMC in the same LAN;
2.Setup and open Room Tracker to find and
display PTZ devices online in cam list;
3.In CONFIGURE menu, set camera IP and
port;
4.Click CONFIGURE to set tracking
parameters;
RTSP
1.Make sure PC and AMC in the same LAN
2.Main stream: rtsp://IP:port/main.h264
3.Sub stream: rtsp://IP:port/sub.h264
4.The IP and port number can be checked with
Room Tracker software.
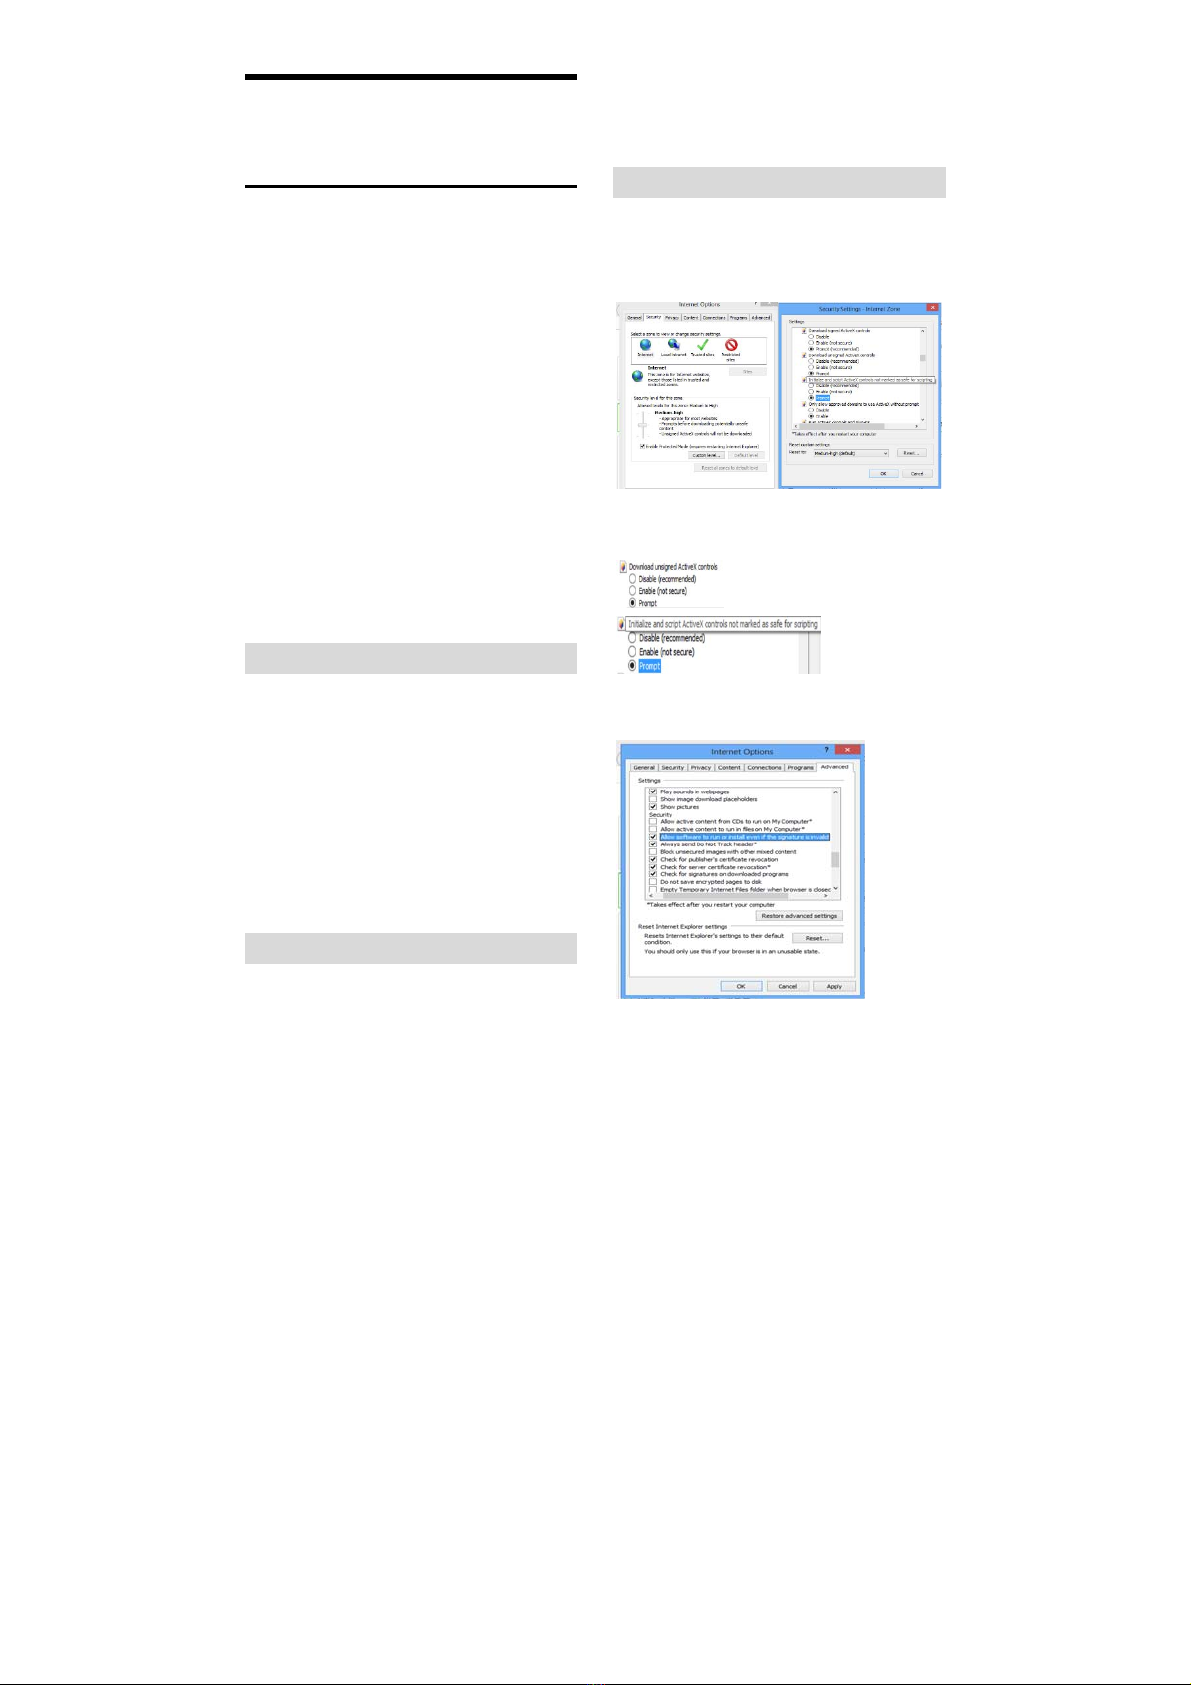
Internet Explorer
1.Make sure PC and AMC in the same LAN;
2.Open Internet Explorer and Enter Internet
Options for Security Setting;
Mainly setting over the following two
options:
Meanwhile make sure the following setting
options are checked;
3. Input IP address+ port number 88 (default
is88) in the IE address bar:

2
http://IP:88, such as
http://192.168.18.229:88;
4.Install plugin;
5.Name: admin Password: NULL.
SDK
The disc included contains SDK demo,
instructions and library.
Features
The tracking AMC camera adopts the most
advanced face and motion detection
technology, it can lock and track moving
attendee; it can realize smooth tracking
performance automatically; it can precisely
adjust P/T degree and zoom times.
With its stability, easy-to-use and excellent
performance, it is widely used in electronic
classroom, distance learning, technical
training and video conferencing room, etc.
Characteristics & Functions
Featured Advantages
Advanced face and motion detection
technology. Getting perfect shot automatically
with suitable P/T degree and zoom times, as
per the attendee number and location;
The distance between attendees and camera
not more than 8 meters;
Integrated wide-angle full-view camera;
Max 1080p60 output;
Support SDI, DVI-D, RJ45 and USB 3.0
outputs;
H.264 video compression;
Support Main/Sub dual stream;
IR remote and RS-232/RS-485 control;
User-friendly interface and easy setup.
List Of Parts & Accessories
When you open the box, check all accessories
according to the packing list.
Camera (1)
Power Adapter (1)
Remote Controller (1)
RS-232 Control Cable (1)

3
USB Cable x 1
Main Parts & Interfaces
Camera
Front View
1 Camera Module
2 Remote Controller Indicator
3 Power Indicator
4 Communication Indicator
5 Full-view camera
Rear View
6 Audio
7 TF Card Slot
8 RJ45 (Network)
9 DVI Video Output
10 3G-SDI
11 RS-232 / RS-485
12 USB
13 Power(DC12V)
Bottom View
14 Mounting Hole
1/4”inch screw thread for fixing camera.
15 Locating Hole
To define installation direction of camera.

4
Remote Controller
1 HOME
Press HOME button, camera moves to
initial position where both pan and tilt angle
is zero.
2 Camera Selection Button
Used to switch among 4 cameras, press 1-4
number buttons to control cameras with 1-4
addresses respectively. For example, press
button 1 to control the camera with address
1.
3 Focus
Press “AUTO” button to switch to Auto
Focus, press “MANU” button to switch to
Manual Focus mode.
“ ”button to Focus Near
“ ”button to Focus Far
“ ”button to Auto Focus once every time
it is pressed, then switch back to Manual
Focus mode.
4 Iris
Press“ ”button to reset iris value to
default. “ ”button to Iris Open
“ ”button to Iris Close.
5 Menu
Press MENU button to enter / exit menu.
6 Data
Press DATA button to set on / off the
display of pan tilt angel, zoom times and
other prompt message.
7 Number Keys
Used to input numbers, for example, preset
number.
Tabla de contenidos


