Altius AT4GR-BCF Manual de usuario
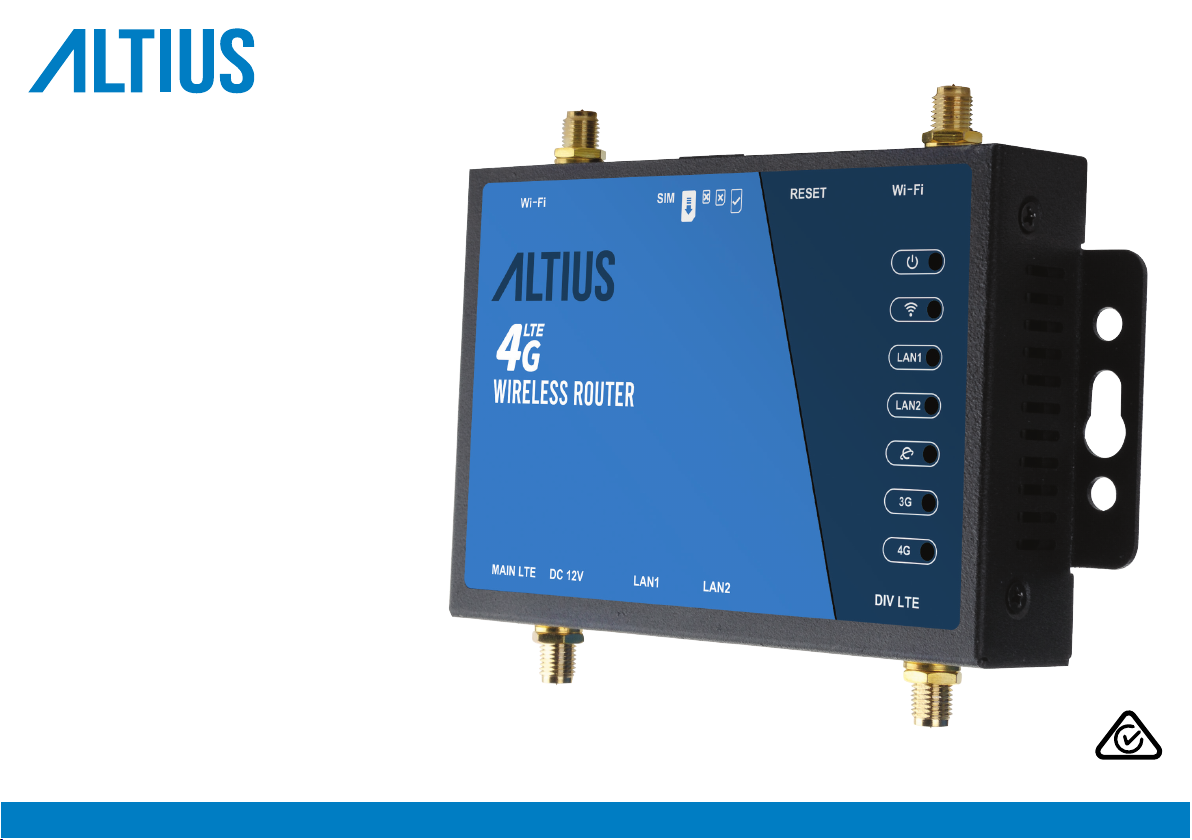
AT4GR-BCF
USER MANUAL
4G WiRELESS RoUTER

2 |
We hope you enjoy your purchase!
ALTIUS products are carefully designed and produced to the highest standards of performance and safety,
backed by our comprehensive 1 Year Warranty.
This user manual will provide all the information required for you to setup and use your new product.
WELCoME

| 3
CoNTENTS
WELCOME 2
PRODUCT OVERVIEW 4
SETUP AND CONNECTION 6
TROUBLESHOOTING 9
SPECIFICATIONS 10
COMPLIANCE AND RESPONSIBLE DISPOSAL 11
4 |
PRodUCT ovERviEW
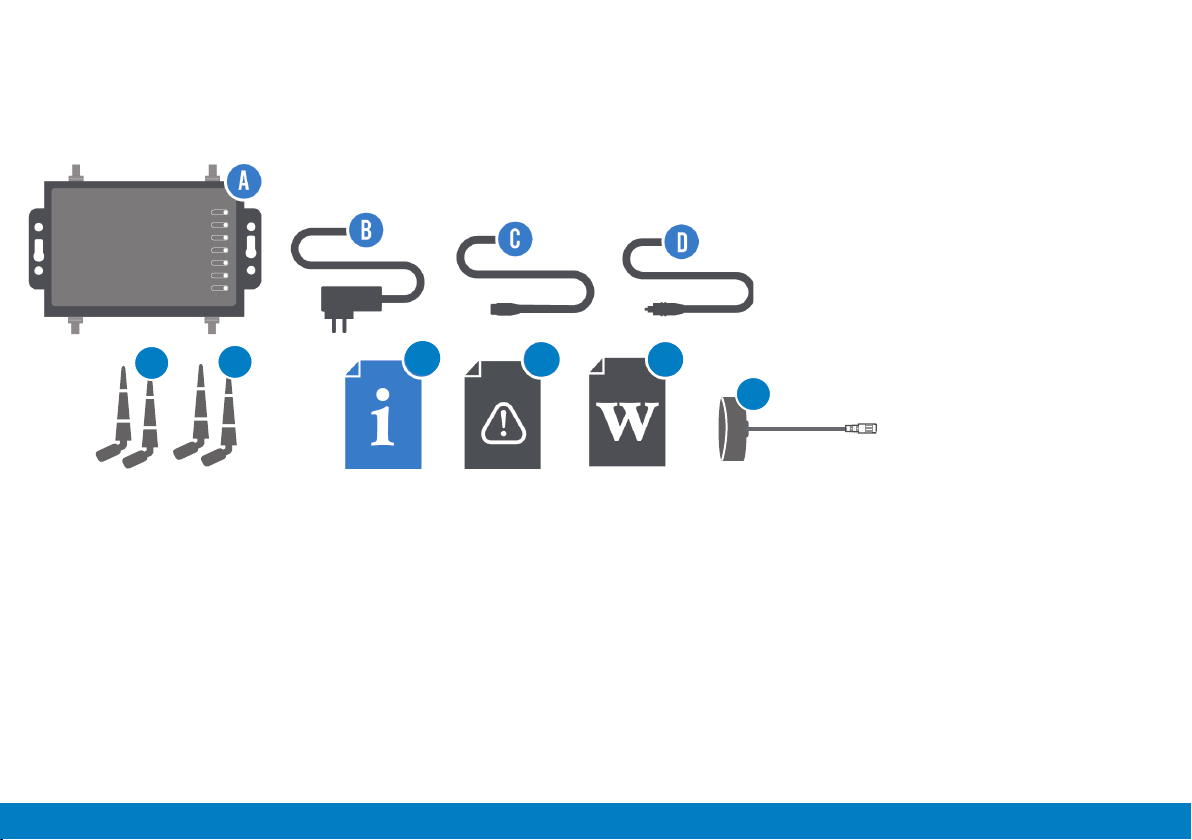
Before setting up your new product,
check you have everything:
A. 4G Wireless Router
B. Power Adaptor
C. Ethernet Cable
D. 12V Cigarette Adaptor
WhAT'S iN ThE Box
E. 2 x LTE Antenna
F. 2 x WI-FI Antenna
G. User Manual
H. General Safety Warnings
I. Warranty Certicate
J. 1 x External Main LTE Antenna
LT
E
LT
E
W
iF
i
W
iF
i
F
EGh i
J
| 5
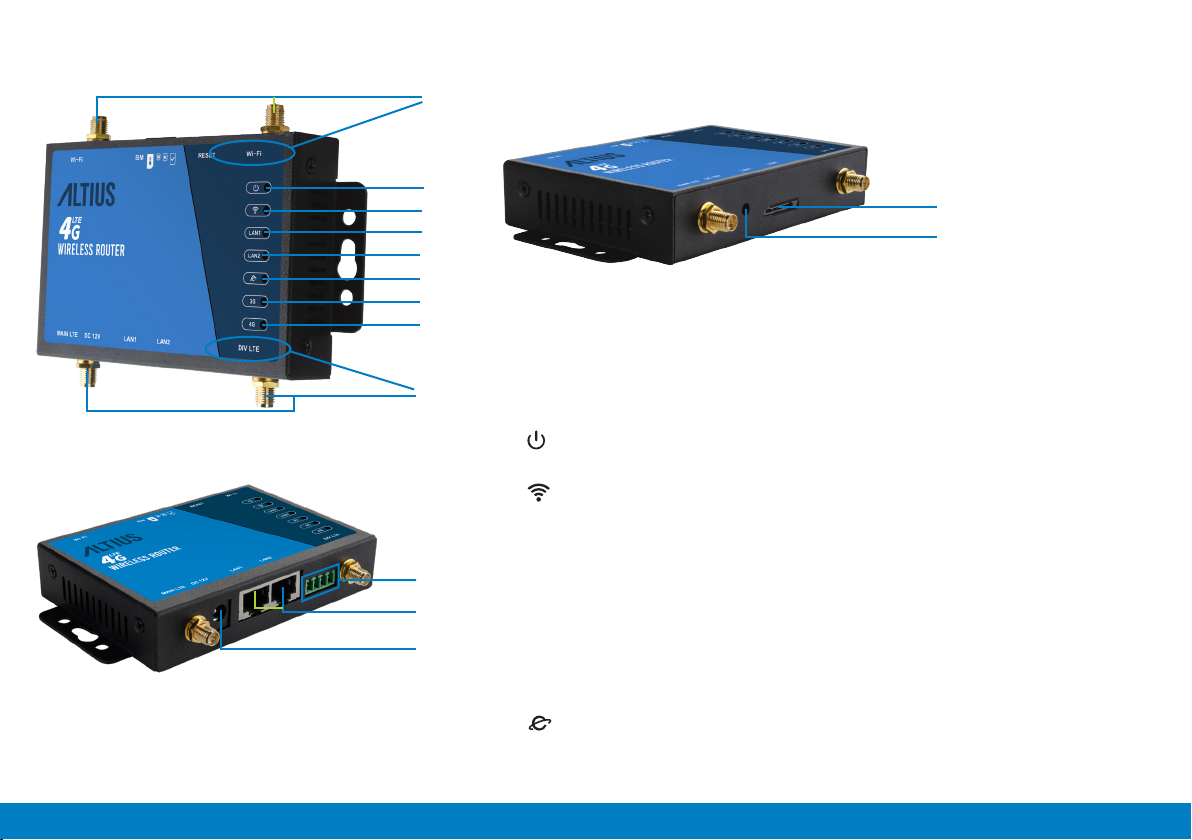
A. Antenna ports - connect the two
supplied Wi-Fi antennas.
B. Antenna ports - connect the two
supplied LTE antennas.
C. : when lit up, indicates that the
product is on.
D. : when lit up, indicates WiFi
is enabled. Flashes during data
transmission.
E. LAN 1 : when lit up, indicates LAN 1
interface is connected to network cable.
Flashes during data transmission.
F. LAN 2 : when lit up, indicates LAN 2
interface is connected to network cable.
Flashes during data transmission.
G. : when ashing, indicate internet
connection is successful.
A
B
C
D
E
F
G
H
I
J
K
L
M
N
H. 3G : When lit, indicates the 3G
connection is established.
I. 4G: When lit, indicates the 4G
connection is established.
J. SIM card slot : insert a standard SIM
card.
K. Use a paper clip to press and
hold the reset button for 5 seconds,
then release. After approximately 8s,
the router indicators will light up,
signalling initilisation has started.
L. Factory service port.
M. Ethernet port : plug in the
supplied ethernet cable.
N. Power socket : plug in the supplied
AC-DC adaptor or 12V Cigarette
Adaptor.
6 |
SETUP ANd CoNNECTioN
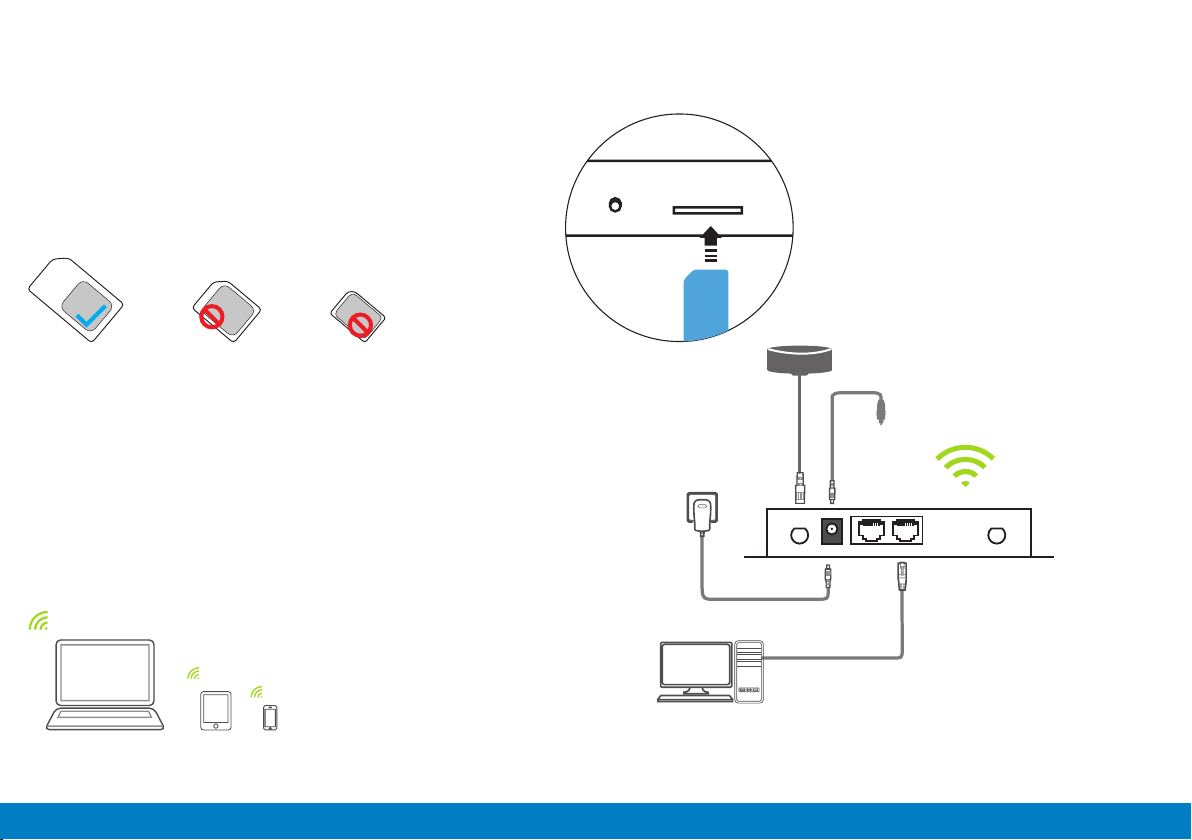
Insert SIM card (not included) to the SIM cards slot on the
device. Ensure the metal contact and angle of the SIM card
aligns with the port. When you hear a “click” sound, this
indicates the SIM card is securely inserted into the port.
NOTE: DO NOT turn on the device before inserting the SIM card.
Connect the supplied AC-DC power adaptor to the power
socket on the product and the other end to an external power
supply (you can also use the supplied 12V Cigarette Adaptor
when using from a car).
You can also connect the supplied Ethernet cable to the
Ethernet port on the device and the other end to a computer.
Standard SIM
Micro SIM
Nano SIM
Power supply socket
LAN network port
Wired connection
(optional)
The default Wi-Fi name (SSID)
and password are available on
the product label.
12V Cigarette Adaptor
External Main LTE Antenna
If you are experiencing a weak signal,
we recommend connecting the
external LTE antenna as shown below.
| 7
CoNNECTiNG viA WiRELESS (SMART PhoNE)
CoNNECTiNG viA WiREd (CoMPUTER)
On your smart device, enter Wi-Fi settings to connect to the
router. The Wi-Fi name and password will be located on the
product label.
Once successfully connected, you will be able to connect
through the 4G router as well as share this connection to other
devices.
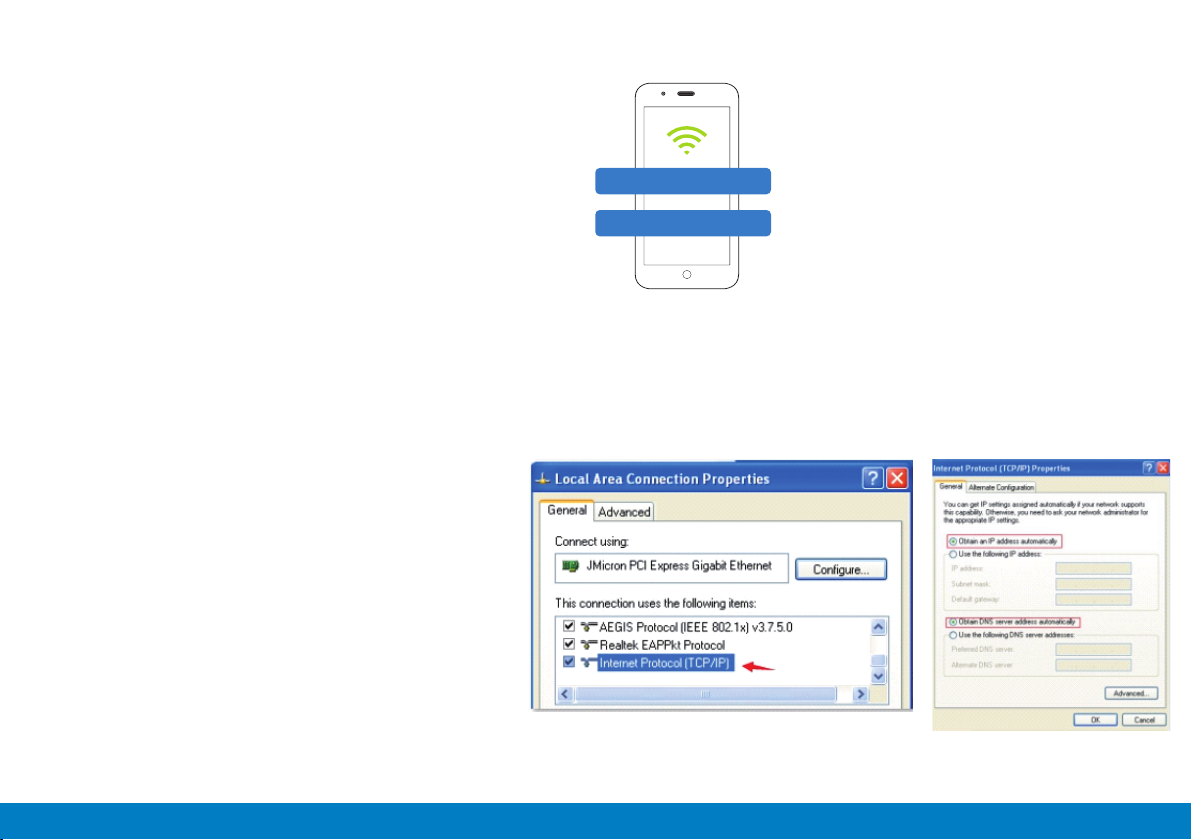
Connect the supplied Ethernet cable to the Ethernet port on the router and the other end to your computer. Usually the
connection will be setup automatically, without intervention. However you can nd the correct settings from windows below.
1. Network > Properties > Change adaptor settings
2. Local connection (for wired connection) or
WLAN (for wireless connection)
3. Internet Protocol Version 4 (TCP/IPv4)
4. Select “obtain IP address automatically”
5. Select “obtain DNS service address
automatically”
6. Select “Ok”
LTE-WiFi_XXXX
Password: xxxxxx
Images are for reference only, the images will depend
on your computer software version.
8 |
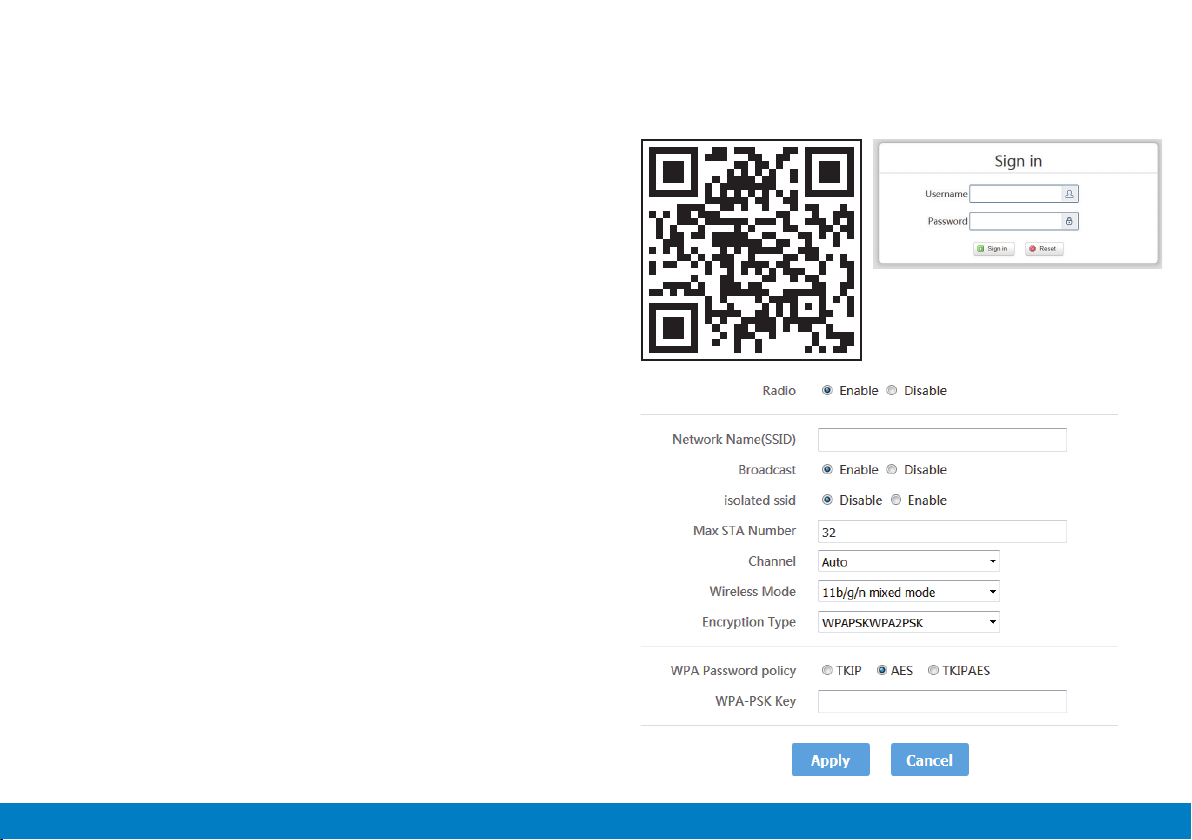
CoNFiGURATioN
SETTiNG NETWoRK NAME ANd PASSWoRd
• Scan the QR code as shown or enter: 192.168.188.1 on your
computer to enter the management background.
• Enter the default login username and password. After
successfully logging in, you will access the management
interface where you can set the relevant settings.
• On the management background, select “LAN settings” on
the navigation bar then select “Wi-Fi 2.4G”.
• Enter the desired name under “Network name (SSID)”.
• Select “AES” under “WPA password policy” and enter the
“wpa-psk-key”. Enter the desired passport and select “Apply”
to conrm the setting changes.
Note: after setting up, your connection may be disconnected.
Reconnect using the new Wi-Fi name and password you set.
The routers setup screen may vary slightly after upgrading the
software.
Username: admin
Password: admin

| 9
If you experience problems with your product, check below for advice. If you don't find a solution here, contact After Sales Support on 1300 886 649.
TRoUBLEShooTiNG
Problem Solution
The router is not
switching on
1. Make sure that the AC-DC power adapter is securely plugged into the wall outlet.
2. Check the power indicator of the router is lit.
3. Before using the 12V accessory adapter in a vehicle. Please ensure the power supply is 12V to avoid
damaging the router.
Forgot settings,
SSID, username or
password
1. Use a paper clip to press and hold the reset button for 5 seconds, then release. After about 8s, the
router indicators will light up, signalling initialisation has started.
2. The router will need to be setup again after resetting to the factory default.
Cannot access
internet
1.Make sure the SIM card is inserted correctly.
2.Check with your ISP to ensure that your SIM card is in your ISP’s service area.
3. Check with your ISP that you are in a roaming service area and data roaming is enabled.
4. Verify your SIM has sufficient balance if prepaid.
5. Check with your ISP to verify the APN settings.
6. Check your PC’s firewall settings or temporarily turn off (for troubleshooting only; do not browse
without security enabled)
Weak signal and
data transmission
speed is slow
1. Check the Wi-Fi and LTE antenna connection, ensuring the correct antennas are connected to the
correct port.
2. Use the external Main LTE Antenna when far from a mobile network.
Note: This router doesn’t support the mobile 5G network.

10 |
SPECiFiCATioNS
Power sources: AC-DC Power Adaptor Input: 100-240V~ 50/60 Hz 0.4 A
AC-DC Power Adaptor Output: 12V ⎓1A
12V Accessory Adaptor Input: 12V ⎓1A
12V Accessory Adaptor Output: 12V ⎓1A
Antenna: 2 x LTE Antenna, 2 x Wi-Fi Antenna, 1 x External Main LTE Antenna (optional)
Wireless:
4G LTE FDD: B1/B3/B5/B7/B8/B28
4G LTE TDD: B40
3G WCDMA: B1/B5/B8
Wi-Fi Frequency: 2.4GHz
Maximum users: Wi-Fi: Connects up to 32 devices
Ethernet: 2 x LAN
Environment: Operating Temperature: 0°C~35°C
Storage Temperature: -20°C~60°C
Dimensions (W x D x H): 132 x 95 x 23mm
Weight (product only): 0.26Kg
For Technical and Warranty Support
1300 886 649
tempo.org/support
Distributed by Tempo (Aust) Pty Ltd,
PO Box 132, Frenchs Forest NSW 1640
Tabla de contenidos
Manuales populares de Enrutador de red de otras marcas


NETGEAR
NETGEAR FS526T - Switch Manual de usuario

Korenix
Korenix JetNet 5710G Series Manual de usuario

Automated Logic
Automated Logic ZN551 Manual del propietario

Cisco
Cisco ASR 1000 Series Manual del operador

EnGenius
EnGenius ESR-9710 Manual de usuario

Cisco
Cisco 805 Series Instrucciones de funcionamiento y seguridad