Aigo DC-T35 Manual de usuario

i
Precautions
yBefore using the camera, please ensure that you read and understand the safety
precautions described below. Always ensure that the camera is operated correctly.
yDo not aim the camera directly into the sun or other intense light sources which
could damage your eyesight.
yDo not try to open the case of the camera or attempt to modify this camera in any
way. High-voltage internal components create the risk of electric shock when
exposed. Maintenance and repairs should be carried out only by authorized service
providers.
yDo not fire the flash too close to the eyes of animals or people, especially for young
children. Eye damage may result. In particular, remain at least one meter away from
infants when using flash.
yKeep the camera away from water and other liquids. Do not use the camera with
wet hands. Never use the camera in the rain or snow. Moisture creates the danger
of electric shock.
yKeep the camera and its accessories out of the reach of children and animals to
prevent accidents or damage to the camera.
yIf you notice smoke or a strange odor coming from the camera, turn the power off
immediately. Take the camera to the nearest authorized service center for repair.
Never attempt to repair the camera on your own.
yUse only the recommended power accessories. Use of power sources not
expressly recommended for this equipment may lead to overheating, distortion of
the equipment, fire, electrical shock or other hazards.
FCC Compliance and Advisory
This device complies with Part 15 of the FCC Rules. Operation is subject to the following two conditions:
1.) this device may not cause harmful interference, and 2.) this device must accept any interference
received, including interference that may cause unsatisfactory operation.
This equipment has been tested and found to comply with the limits for a Class B peripheral, pursuant to
Part 15 of the FCC Rules. These limits are designed to provide reasonable protection against harmful
interference in a residential installation. This equipment generates, uses, and can radiate radio frequency
energy and, if not installed and used in accordance with the instructions, may cause harmful interference
to radio communication. However, there is no guarantee that interference will not occur in a particular
installation. If this equipment does cause harmful interference to radio or television reception, which can
be determined by turning the equipment off and on, the user is encouraged to try to correct the
interference by one or more of the following measures.
yReorient or relocate the receiving antenna.
yIncrease the separation between the equipment and receiver.
yConnect the equipment to an outlet on a circuit different from that to which the receiver is connected.
yConsult the dealer or an experienced radio/TV technician for help.
Any changes or modifications not expressly approved by the party responsible for compliance could void
the user’s authority to operate the equipment. When shielded interface cables have been provided with
the product or when specified additional components or accessories have elsewhere been designated to
be used with the installation of the product, they must be used in order to ensure compliance with FCC
regulations.
Get user manuals: See SafeManuals.com

ii
Contents
PRECAUTIONS I
GETTING STARTED 1
USING THIS MENU 1
UNPACKING 2
PARTS OF THE CAMERA 3
INSERTING THE BATTERIES 5
LOW BATTERY INDICATOR 5
CHARGING THE BATTERY PACK 6
INSERTING THE MEMORY CARD 7
ABOUT CAMERA MEMORY 8
DCF PROTOCOL 8
SETTING THE DISPLAY LANGUAGE /DATE
&TIME 8
SETTING THE DISPLAY LANGUAGE 8
SETTING THE DATE &TIME 9
USING THE LCD MONITOR 10
REC MODE 10
PLAYBACK MODE 11
CHANGING THE LCD STATUS 12
BASIC OPERATION 13
TURNING THE POWER ON AND OFF 13
POWER SAVING FUNCTION 13
CHANGING THE MODE 14
SWITCHING BETWEEN REC MODE AND
PLAYBACK MODE 14
SELECTING THE REC MODE 14
SELECTING THE ASM MODE 16
USING THE MENUS 17
REC MENU 17
SETUP MENU 18
BASIC RECORDING 21
RECORDING STILL IMAGES 21
USING THE QMODE 22
SETTING IMAGE SIZE AND QUALITY 23
USING THE ZOOM FUNCTION 24
USING THE FLASH 25
USING THE MACRO 26
USING THE SELF-TIMER &BURST 27
USING THE APERTURE PRIORITY 28
USING THE SHUTTER PRIORITY 28
USING THE MANUAL EXPOSURE 29
USER THE SMILE CAPTURE 29
RECORDING MOVIE CLIPS 30
SETTING THE MOVIE SIZE 30
YOUTUBE MODE 31
RECORDINGAUDIO CLIPS 31
PLAYING BACK AUDIO CLIPS 32
RECORDINGAVOICE MEMO 32
PLAYING BACK A VOICE MEMO 33
OTHER RECORDING FUNCTIONS 34
SETTING THE METERING 34
SETTING THE WHITE BALANCE 34
SETTING THE ISO 35
SETTING THE EXPOSURE 35
SETTING THE AEB 35
SETTING THE HIGHLIGHT 35
SETTING THE SHARPNESS 36
SETTING THE PHOTO EFFECT 36
SETTING DATE STAMP 36
SETTING STABILIZER 37
SETTING FACE TRACKING 37
SETTING PHOTO FRAME 37
SETTINGAFLAMP 37
PLAYBACK 38
PLAYING BACK IMAGES 38
PLAYING BACK MOVIE CLIPS 38
MAGNIFYING &TRIMMING STILL IMAGES
39
VIEWING IN THUMBNAIL 40
PLAYING A SLIDE SHOW 40
Get user manuals: See SafeManuals.com

iii
DELETING FILES 41
ELETING A SINGLE FILE 41
DELETING MULTIPLE FILES 42
DELETING ALL FILES 43
PROTECTING A SINGLE FILE 43
PROTECTING ALL FILES 44
PROTECTING MULTIPLE FILES 45
EDITING IMAGES 46
ROTATING STILL IMAGES 46
CHANGING THE IMAGE SIZE 46
CHANGING THE IMAGE WITH EFFECTS 47
CHOOSING THE IMAGE WITH PHOTO
FRAME 47
COPYING THE FILES 48
SETTING THE DPOF 49
CHOOSINGASTARTUP IMAGE 50
MAKING CONNECTIONS 51
CONNECTING THE CAMERA TO A TV 51
CONNECTING THE CAMERA TO A PC 52
USING THE CARD READER 52
CONNECTING THE CAMERA TO A
COMPUTER WITH THE USB CABLE 52
APPENDIX 53
ABOUT THE FOLDER &FILE NAME 53
FOLDER STRUCTURE 53
FILE NAMING 54
TROUBLESHOOTING 55
SPECIFICATIONS 56
FUNCTION AVAILABLE LIST 58
Get user manuals: See SafeManuals.com

1
Getting Started
Using This Menu
Getting Started
This section contains information you should know before using this camera.
Basic Operation
This section explains all recording features of this camera.
Basic Recording
This section explains how to record still images, movies, and audio files.
Other Recording Functions
This section explains common operations about recording images.
Playback
This section explains playback, delete, and edit functions of still images, movies and
audio files.
Making Connections
This section tells you how to connect this camera to a computer or TV.
Appendix
This section describes the troubleshooting and the camera specification.
The meanings of the symbols used in this user's manual are explained below:
This indicates cautions that should be read before using these
functions.
This indicates the useful information when using this camera.
This indicates the reference page.
T
Ti
ip
ps
s
C
Ca
au
ut
ti
io
on
n
Get user manuals: See SafeManuals.com
2
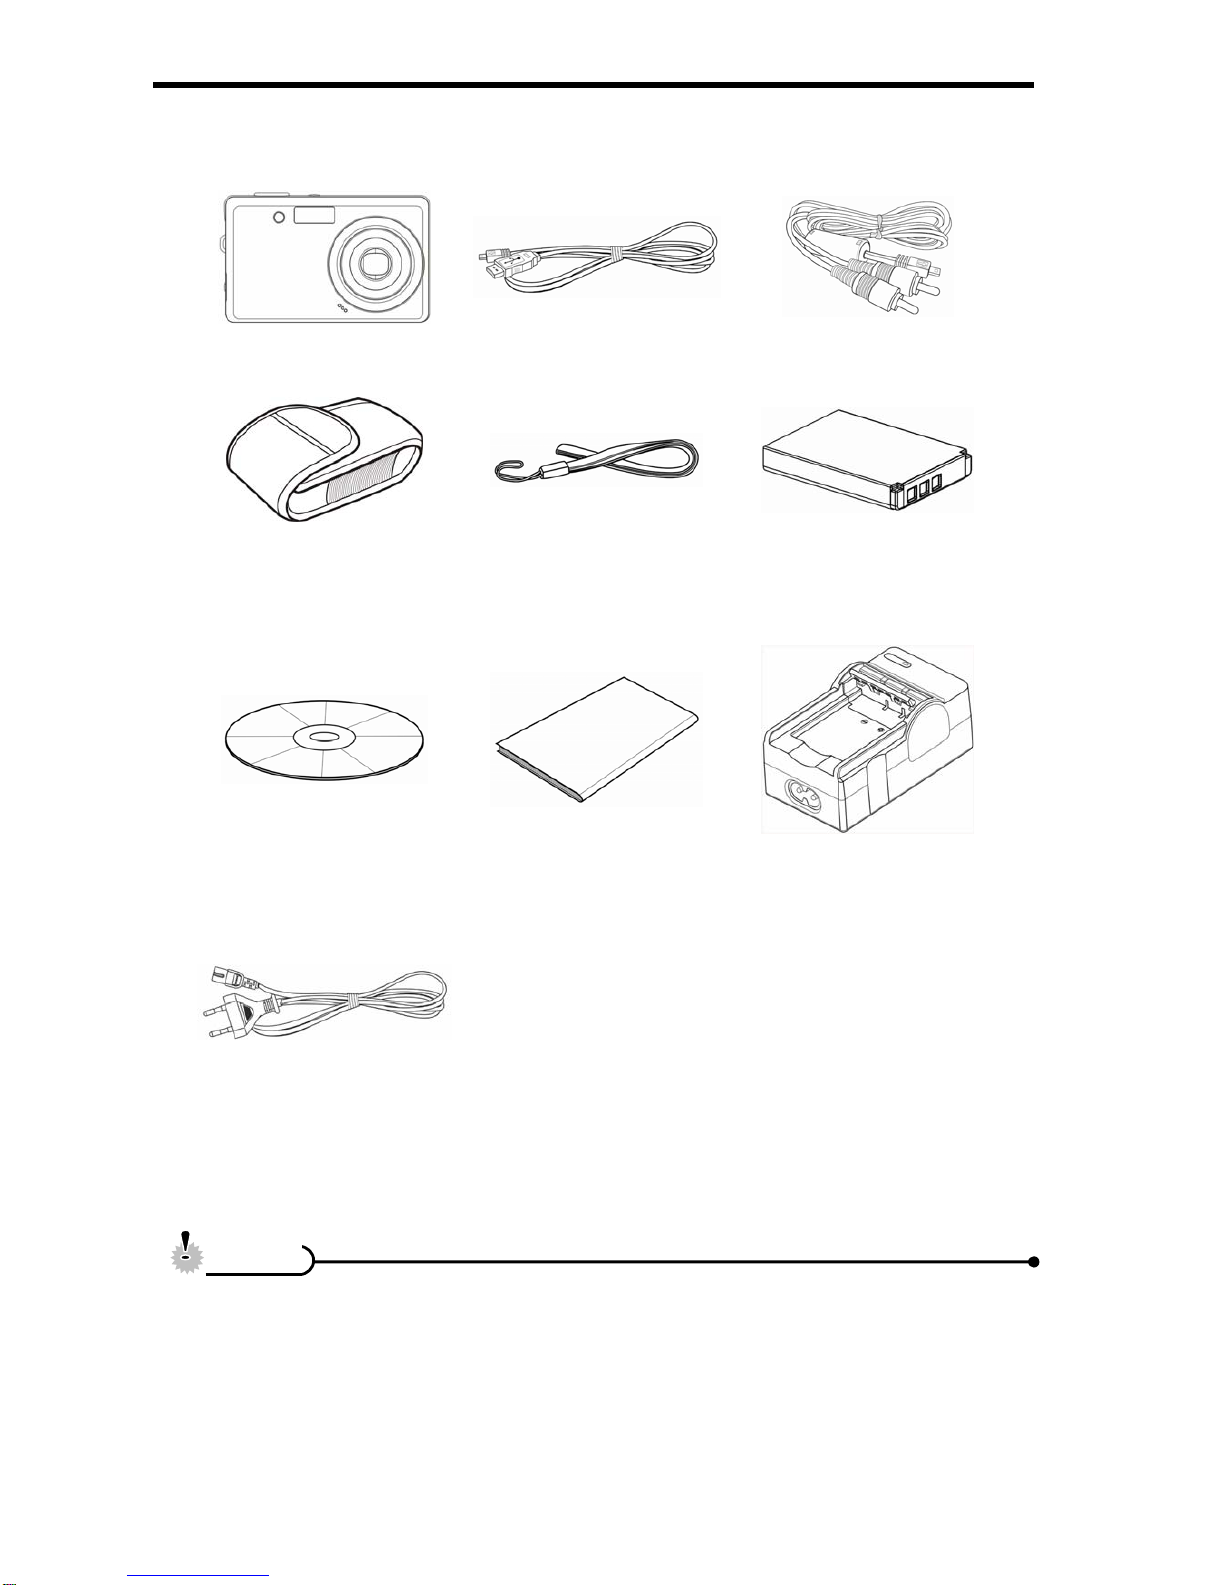
Unpacking
Camera USB Cable AV Cable(*)
Soft Case(*) Strap Rechargeable Lithium-ion
Battery
Software Installation
CD-ROM Quick Start Guide Battery Charger
Adaptor
yActual accessories may be different.
yItems marked with (*) are available as optional accessories.
yNote that the shape of the charger plug depends on the area where you
purchased the camera.
yDo not swing the camera around by the strap.
C
Ca
au
ut
ti
io
on
n
Get user manuals: See SafeManuals.com

3
Parts of the Camera
1. AF Lamp / Self-timer Lamp
2. Flash ( page 25)
3. Lens
4. Microphone
5. Operation Lamp
6. Zoom Button ( page 24)
yThumbnail ( page 40)
yPlayback Zoom
(page 39)
7. Playback Button
( page 14)
8. Menu Button ( page 17)
9. Mode Button ( page 14)
10. ASM Button ( page 16)
yDelete Button ( page 41)
11. LCD Monitor ( page 10)
12. Flash Button ( page 25)
13. SET/DISP Button
( page 12)
14. Macro Button ( page 26)
Get user manuals: See SafeManuals.com


5
Inserting the Batteries
The camera is powered by a rechargeable lithium-ion battery (Li-Ion 820 mAh).
Open the battery cover.
ySlide the battery cover in the
direction indicated by the
arrow.
Insert the batteries.
yInstall the battery with the
terminal facing inside the
camera.
Close the battery cover.
Low Battery Indicator
A low battery indicator appears on the LCD screen when the batteries are nearly
exhausted. Batteries should be replaced promptly when the low battery indicator
appears.
1
2
3
Get user manuals: See SafeManuals.com

6
Charging the Battery Pack
The battery is not charged when you purchase the camera. You need to charge the
battery before using the camera
Place the battery pack in the charger with
the label facing up.
Connect the AC adaptor to the charger,
and then plug it into a power outlet.
yThe charger lamp lights red and battery
charging begins. When charging is
completed, the lamp becomes green.
yRisk of explosion if battery is replaced by an incorrect type dispose of used
batteries according to the instructions.
yBe sure to turn off the camera power before insert or remove batteries.
yRemove batteries if you will not be using them for a long time.
yThe camera body may feel warm after extended use. This is normal.
yUse only the special rechargeable lithium-ion battery to power this camera.
yCharging time is varying with current battery capacity and charging conditions.
C
Ca
au
ut
ti
io
on
n
1
2
Get user manuals: See SafeManuals.com

7
Inserting the Memory Card
You can use SD Card with this digital camera. The memory card slot is located beneath
the battery cover, adjacent to the battery compartment.
Open the battery cover.
ySlide the battery cover in the
direction indicated by the
arrow.
Insert the card.
yInsert the card with the label
facing up and the arrow
pointing in.
yTo remove the card, gently press on the edge of the card and release it. Pull
the card out and close the battery cover.
Close the battery cover.
yIt may cause damage to the card if removed while the camera is on.
yDo not touch the connection terminals on the back side of the card.
1
2
3
C
Ca
au
ut
ti
io
on
n
T
Ti
ip
ps
s
Get user manuals: See SafeManuals.com
Otros manuales para DC-T35
1
Tabla de contenidos
Otros manuales de Cámara digital de Aigo


