AEI Security & Communications DG258 igiSender HQ2 Manual de usuario

150309-5
DigiSender HQ2
MODEL: DG258
Twin Input 5.8GHz Wireless AV Sender
®
PLEASE KEEP THIS I STRUCTIO MA UAL FOR FUTURE REFERE CE

DG258 - DigiSender® HQ2 - Twin Input 5.8GHz Wireless AV Sender
Please read this instruction manual carefully prior to installationPage 02
Table of Contents
Introduction 03
STEP 1 - Unpack your DigiSender® HQ2 04
STEP 2 - Install the DigiSender® HQ2 Transmitter 05-06
STEP 3 - Install the I Systeme Technik™ 07
STEP 4 - Install the DigiSender® HQ2 eceiver 08
STEP 5 - Using the DigiSender® HQ2 09-12
The DigiSender® Remote Control 10
DigiSender® HQ2 Basic Functions 11
DigiSender® HQ2 Advanced Function 12
Upgrades and Accessories 13
Troubleshooting 14-17
Picture Problems 14-15
Audio Problems 16
Problems Controlling Your Source Equipment 17
Technical Support 18
Document of Conformity 19
WAR I G
To prevent damage do not
expose this unit to rain or
moisture.

Please read this instruction manual carefully prior to installation Page 03
DG258 - DigiSender® HQ2 - Twin Input 5.8GHz Wireless AV Sender
Introduction
Congratulations on purchasing the DigiSender® HQ2 - Twin Input 5.8GHz Wireless AV Sender. This
product represents state of the art wireless audio and video technology and the most advanced
Infra-Red relay technology at exceptional value for money.
You can now enjoy DVD quality video and Hi-Fi stereo sound from your Satellite, Cable, Freeview,
DVD or VCR in another room in your home.
The DigiSender® HQ2 is a twin input wireless AV sender with a difference. Because it uses 5.8GHz
to transmit rather than the much more common 2.4GHz, you can use the DigiSender® HQ2 without
the worry of interference from wireless routers, Bluetooth devices and other wireless products. It
also incorporates our advanced DigiEye™ remote relay technology allowing flawless operation with
every set top box ever made.
Benef t from 5.8GHz transm ss on, 2 SCART Inputs, 4 Aud o/V deo Channels, 4 Remote Relay
Channels and unsurpassed compat b l ty w th the new D g Sender® HQ2!
DG258 - DigiSender® HQ2 - Twin Input 5.8GHz Wireless AV Sender
Please read this instruction manual carefully prior to installationPage 04
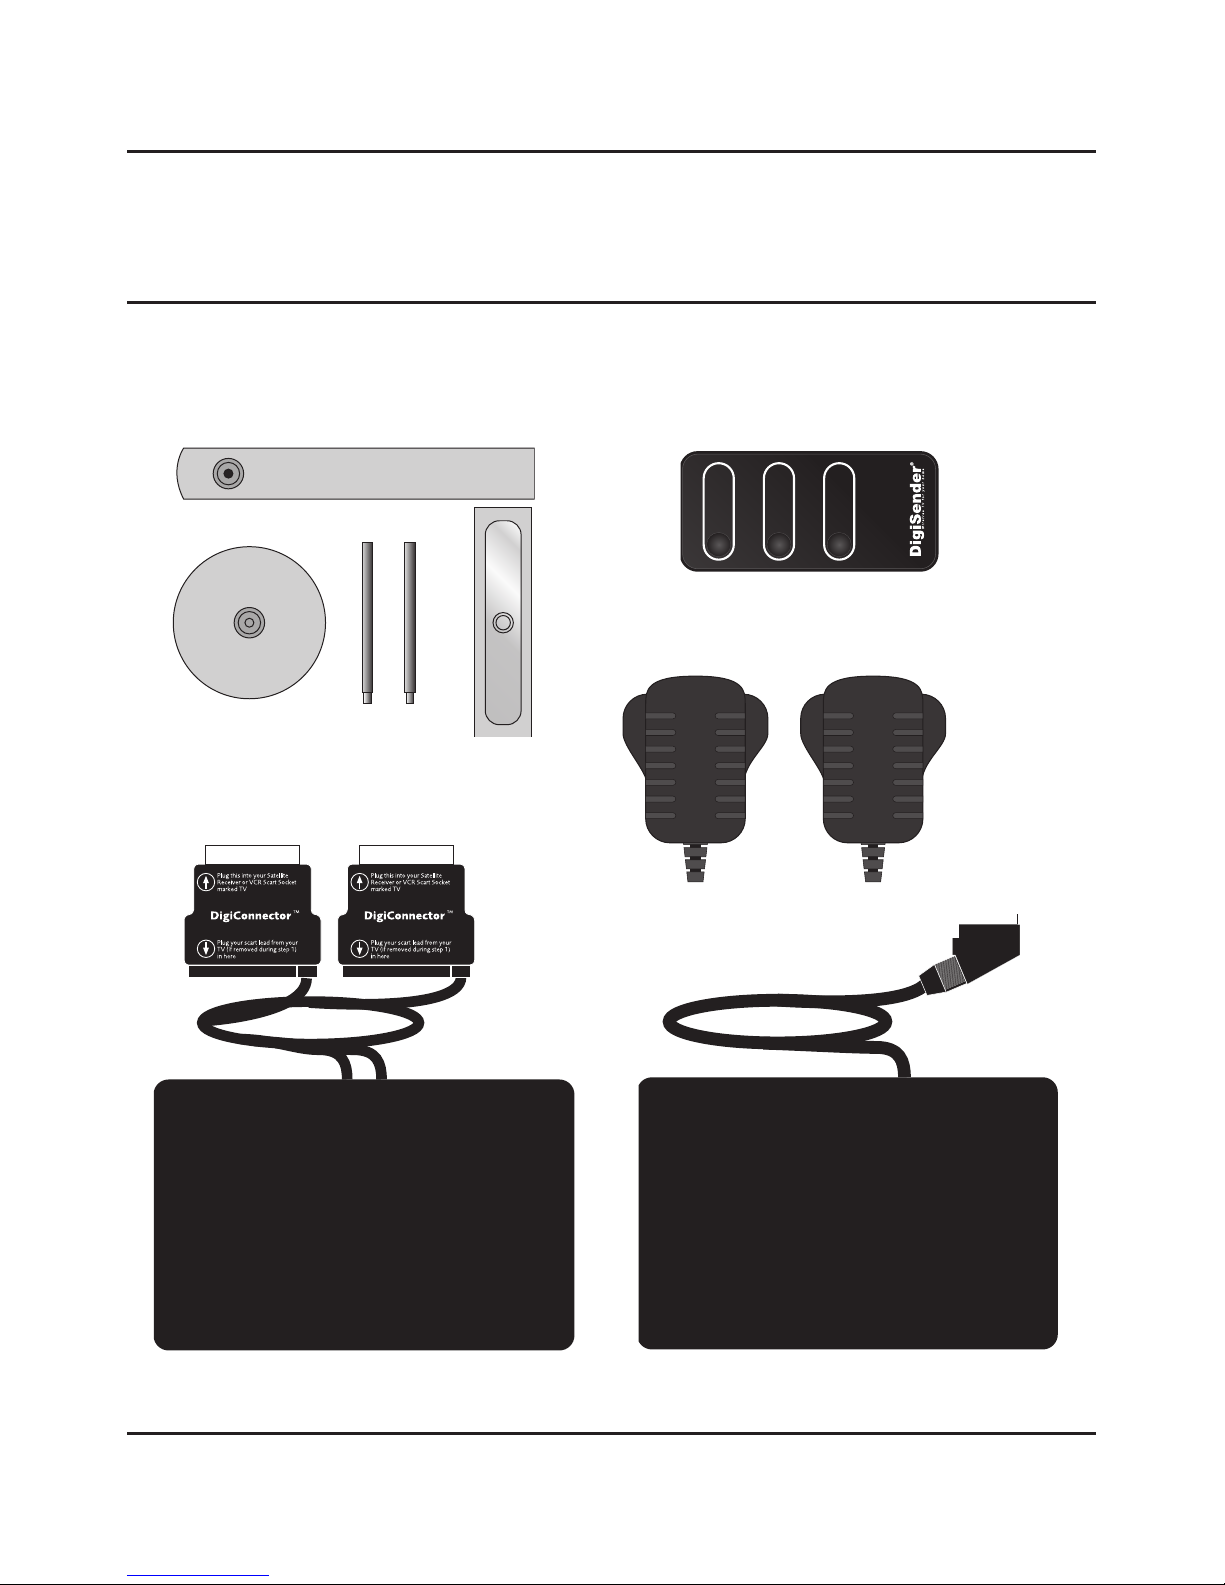
STEP 1 - Unpack your DigiSender® HQ2
All DigiSender® orders are computer weight checked when packed. However, it is a good idea to
check all kit contents are present before proceeding with the installation.
POWER 12
POWER 12
ReceiverTransmitter
2 x Power Supply
IR Systeme Technik™
POWER
Input 1
DigiConnector™ 1
Input 2
DigiConnector™ 2
Remote Control

Please read this instruction manual carefully prior to installation Page 05
DG258 - DigiSender® HQ2 - Twin Input 5.8GHz Wireless AV Sender
STEP 2 - Install the DigiSender® HQ2 Transmitter
Ensure that the Audio/Video and emote elay
Channel switches on the back of the DG258
Transmitter are set to 1.
3.
Connect DigiConnector™ 1 to your Satellite,
Cable or Freeview box. Use the SCART socket
labelled ‘TV’ or ‘OUT’. Connect any existing
CART lead into the rear of the DigiConnector™.
1.
Connect DigiConnector™ 2 to your DVD Player,
HDD ecorder or VC . Use the SCART socket
labelled ‘TV’ or ‘OUT’. Connect any existing
CART lead into the rear of the DigiConnector™.
2.
The DG258 Transmitter will send the audio and video from two connected sources (your Satellite
receiver and DVD Player for example) to the DG258 Receiver, located in another room in your home.
Connect the I Emitter to the socket labelled ‘I ’
on the back of the DG258 Transmitter. ee Page
07 for more information on installing the IR
ysteme Technik™.
4.

DG258 - DigiSender® HQ2 - Twin Input 5.8GHz Wireless AV Sender
Please read this instruction manual carefully prior to installationPage 06
continued...
Connect the Power Supply Unit (PSU) to the
socket labelled ‘PSU’ on the rear of the DG258
Transmitter.
5.
Connect the Power Supply Unit (PSU) to an
available mains socket.
6.
What’s the A/B switch for??
The Contrast (A/B) switch is present to compen-
sate for differences in equipment set-ups.
Once installation is
complete, if you
experience a poor
picture try
adjusting the
A/B setting.
Note: Try to avoid positioning the DG258 Transmitter directly on top of other electrical devices as this could
lead to a poor picture.

Please read this instruction manual carefully prior to installation Page 07
DG258 - DigiSender® HQ2 - Twin Input 5.8GHz Wireless AV Sender
STEP 3 - Install the IR Systeme Technik™
Once set up correctly, the IR Systeme Technik™ will enable you to control your source equipment
from the receiving location in your home.
Because everyone’s set up is different there are many ways you can install the IR Systeme Technik™
and the various included accessories will help you in setting it up correctly.
Mount the I Emitter vertically using acces-
sories 1 and 2. Ensure the ED is facing the
remote control pick up point on your source
equipment.
Mount the I Emitter horizontally using the sup-
plied sticky pad. Ensure the ED is facing the
remote control pick up point on your source
equipment.
Example 1 Example 2
Accessory #1 Extension Pieces
Accessory #2
IR Emitter

Ensure that the Audio/Video and emote elay
Channel switches on the back of the DG258
eceiver are set to 1.
2.
DG258 - DigiSender® HQ2 - Twin Input 5.8GHz Wireless AV Sender
Please read this instruction manual carefully prior to installationPage 08
STEP 4 - Install the DigiSender® HQ2 Receiver
The DG258 Receiver will pick up the signals being sent by your DG258 Transmitter and output them
to a connected TV.
Connect the Power Supply Unit (PSU) to the
socket labelled ‘PSU’ on the DG258 eceiver.
3.
Locate a vacant SCA T socket on the back of
your receiving TV and insert the DigiSender®
SCA T cable.
1.
Connect the Power Supply Unit (PSU) to an
available mains socket.
4.

Please read this instruction manual carefully prior to installation Page 09
DG258 - DigiSender® HQ2 - Twin Input 5.8GHz Wireless AV Sender
STEP 5 - Using the DigiSender® HQ2
Switch on the source equipment ( atellite,
Freeview, DVD, VCR, etc.).
1.
Turn on the DG258 Transmitter and eceiver by
pushing the Power button on the front of the
units. The Power button will light up blue to indi-
cate the unit is switched on. Alternatively press the
Power button on the Digi ender® Remote Control.
2.
On the receiving TV, select the SCA T channel
assigned to the SCA T socket that you plugged
the DG258 eceiver in to. This may be labelled as
CART, AUX, AV, VIDEO, VCR or .
4.
Select Input 1 or 2 by pressing the Power but-
ton once for Input 1 or twice for Input 2 on the
Transmitter. The red Input ED will light to indi-
cate which source is active.Alternatively press the
‘Input 1’ or ‘Input 2’ button on the Digi ender®
Remote Control at the transmitting location.
3.

1. POWE
The POWE button will turn your DigiSender®
HQ2 Transmitter or Receiver On or Off.
2. Input 1
The Input 1 button will select Input 1 on the
Transmitter and Receiver. Input 1 will be what
ever source equipment is connected to
DigiConnector™ 1. For example, your atellite,
Cable or Freeview box.
2. Input 2
The Input 2 button will select Input 2 on the
Transmitter and Receiver. Input 2 will be what
ever source equipment is connected to
DigiConnector™ 2. For example, your DVD
Player, HDD Recorder or VCR.
DG258 - DigiSender® HQ2 - Twin Input 5.8GHz Wireless AV Sender
Please read this instruction manual carefully prior to installationPage 10
Using the DigiSender® HQ2
The DigiSender® Remote Control
POWER
Input 1
DigiConnector™ 1
Input 2
DigiConnector™ 2
1.
2.
3.
Otros manuales para DG258 igiSender HQ2
3
Tabla de contenidos
Otros manuales de Transmisor de AEI Security & Communications

Manuales populares de Transmisor de otras marcas


Dejero
Dejero EnGo 3x Manual de usuario

Rosemount
Rosemount 4600 Manual de usuario

Speaka Professional
Speaka Professional 2342740 Manual de usuario

trubomat
trubomat GAB 1000 Manual de usuario

Teledyne Analytical Instruments
Teledyne Analytical Instruments LXT-380 Manual de usuario

Rondish
Rondish UT-11 Manual de usuario


