
3Jtech TS8DWRWIFIROUTER Manual de usuario

Dedicated Wifi Router (DWR)
User’s Guide
Version: 1.1
Date: October 17, 2008
3JTech Co., Ltd.
2F, No. 342, Fu-Shing N. Rd.
Taipei, Taiwan
Tel: +886-2-2500 6916
e-mail: [email protected]

http://www.3jtech.com.tw
http://www.pnpipcameras.com
DWR User’s Guide
Copyright of 3JTech Co., Ltd. (also doing business asA3J Engineering Inc.)
2
Revision History
Version Date Changes
1.0 09/18/2008 First Release of DWR User’s Guide
1.1 10/17/2008 Add the FCC Caution
Table of Contents
Revision History-------------------------------------------------------- 2
TABLE OF CONTENTS -------------------------------------------------- 2
CHAPTER 1. PRODUCT OVERVIEW ----------------------------------------- 4
1.1 INTRODUCTION------------------------------------------------------ 4
1.2 FEATURES --------------------------------------------------------- 5
1.3 PACKAGE CONTENTS ------------------------------------------------- 5
CHAPTER 2. PHYSICAL DESCRIPTION -------------------------------------- 6
2.1 PANELS ---------------------------------------------------------- 6
2.1.1 Front and Rear Panels --------------------------------------------6
2.1.2 Bottom Panel---------------------------------------------------7
2.2 ILLUSTRATION ------------------------------------------------------7
2.2.1 Front and Rear Panel Information ----------------------------------- 8
WAN Port --------------------------------------------------------8
LAN1~LAN 4 Port Network Connectors --------------------------------- 8
wifi ANT SMA Connector -------------------------------------------- 8
Power Supply Connector --------------------------------------------8
LEDs ----------------------------------------------------------- 8
2.2.2 Bottom Panel Information -----------------------------------------8
Reset Button------------------------------------------------------ 8
2.2.3 LED Description on the Front Panel --------------------------------- 8
CHAPTER 3. INSTALLATION--------------------------------------------- 10
3.1 HARDWARE INSTALLATION --------------------------------------------- 10
3.2 SOFTWARE INSTALLATION --------------------------------------------- 10
3.2.1 Software Configuration ------------------------------------------ 10
3.2.2 Prepare your PC for DWR Configuration ----------------------------- 11
3.2.3 Connect to DWR ----------------------------------------------- 13
3.2.4 Management and Configuration on DWR ----------------------------- 13
3.2.4.1 Status ---------------------------------------------------- 13
3.2.4.2 Setup Wizard----------------------------------------------- 16
Operation Mode------------------------------------------------- 16
Time Zone Setting ----------------------------------------------- 17
LAN Interface Setup --------------------------------------------- 17
WAN Interface Setup --------------------------------------------- 17
3.2.4.3 Operation Mode--------------------------------------------- 18
3.2.4.4 Wireless - Basic Settings ------------------------------------- 19
3.2.4.5 Wireless - Advanced Settings ---------------------------------- 20
3.2.4.6 Wireless - Access Control ------------------------------------ 22

http://www.3jtech.com.tw
http://www.pnpipcameras.com
DWR User’s Guide
Copyright of 3JTech Co., Ltd. (also doing business asA3J Engineering Inc.)
3
3.2.4.7 WDS Settings ---------------------------------------------- 23
3.2.4.8 Site Survey ------------------------------------------------ 24
3.2.4.9 LAN Interface Setup ----------------------------------------- 25
3.2.4.10 WAN Interface Setup---------------------------------------- 27
Static IP ------------------------------------------------------ 27
DHCP Client --------------------------------------------------- 29
PPPoE -------------------------------------------------------- 30
PPTP--------------------------------------------------------- 33
3.2.4.11 Firewall - Port Filtering ------------------------------------- 35
3.2.4.12 Firewall - IP Filtering --------------------------------------- 36
3.2.4.13 Firewall - MAC Filtering ------------------------------------- 37
3.2.4.14 Firewall - Port Forwarding ----------------------------------- 38
3.2.4.15 Firewall – URL Filtering ------------------------------------- 39
3.2.4.16 Firewall - DMZ -------------------------------------------- 40
3.2.4.17 Management - Statistics ------------------------------------- 41
3.2.4.18 Management - DDNS --------------------------------------- 42
3.2.4.19 Management - Time Zone Setting ------------------------------ 43
3.2.4.20 Management – Denial-of-Service ------------------------------ 44
3.2.4.21 Management - Log ----------------------------------------- 45
3.2.4.22 Management - Upgrade Firmware------------------------------ 46
3.2.4.23 Management - Save/ Reload Settings --------------------------- 46
3.2.4.24 Management - Password Setup -------------------------------- 47
3.2.4.25 Logout--------------------------------------------------- 48
APPENDIX A – FCC CAUTION -------------------------------------------- 49

http://www.3jtech.com.tw
http://www.pnpipcameras.com
DWR User’s Guide
Copyright of 3JTech Co., Ltd. (also doing business asA3J Engineering Inc.)
4
1. Product Overview
1.1 Introduction
DWR (Dedicated WIFI Router), a special WiFi broadband router, not only it can be used as a
regular router but also make 3JTech WIFI cameras Plug-and-Play. With our proprietary wifiDHCP
technology, the WIFI cameras will get the SSID and WEP key automatically from the DWR via
Ethernet connection. The SSID and WEP key are randomly assigned upon the hardware reset of
DWR.

http://www.3jtech.com.tw
http://www.pnpipcameras.com
DWR User’s Guide
Copyright of 3JTech Co., Ltd. (also doing business as A3J Engineering Inc.)
5
1.2 Features
yAs VPN client or pass-through.
yOffer 3JTech’s Wifi camera to be Plug-and-Play wifi cameras.
1.3 Package Contents
─ 1 x DWR Router
─ 1 x CD with Quick Installation Guide and User’s Manual
─ 1 x RJ45 Ethernet Cable
─ 1 x Power Adapter

http://www.3jtech.com.tw
http://www.pnpipcameras.com
DWR User’s Guide
Copyright of 3JTech Co., Ltd. (also doing business as A3J Engineering Inc.)
6
2. Physical Description
The following information contains the physical description of DWR. This includes the functions and
the locations of each connector and indicator. This information provides useful reference when
installing the product. Please familiarize yourself with DWR.
2.1 Panels
2.1.1 Front and Rear Panels
For more related description, please refer to the Section 2.2 and Section 2.2.1.
2
35
1
4

http://www.3jtech.com.tw
http://www.pnpipcameras.com
DWR User’s Guide
Copyright of 3JTech Co., Ltd. (also doing business as A3J Engineering Inc.)
7
2.1.2 Bottom Panel
For more detailed description, please refer to the Section 2.2 and Section 2.2.2.
2.2 Illustration
No. in
Figures Name on DWR Description Remark
1 WAN Port For the access of Internet Refer to section 2.2.1 for front
and real panels information.
2 LAN1~LAN 4 Port
Network Connectors
To connect to the device and
Ethernet port via RJ45 cable Refer to section 2.2.1 for front
and real panels information.
3 wifi ANT SMA
Connector To connect with the wifi
antenna Refer to section 2.2.1 for front
and real panels information.
4 Power Supply
Connector
To connect with DWR and
the power adapter Refer to section 2.2.1 for front
and real panels information.
5 LEDs To display the status of
DWR
Refer to section 2.2.3 for LED
description on the front panel.
6 Reset Button To reset DWR to its factory
defaults Refer to section 2.2.2 for bottom
panel information.
6
http://www.3jtech.com.tw
http://www.pnpipcameras.com
DWR User’s Guide
Copyright of 3JTech Co., Ltd. (also doing business as A3J Engineering Inc.)
8
2.2.1 Front and Rear Panel Information
WAN Port
Offer the access of Internet.
LAN1~LAN 4 Port Network Connectors
DWR is designed for 10/100Mbps Ethernet networks. DWR connects to the network via category 5
cable.
wifi ANT SMA Connector
Support WEP and WPA modes for wireless access.
Power Supply Connector
Plug the power adapter. The specifications of DWR’s power adapter are as follows:
Input: 100 ~ 240V AC, 50/60Hz
Output: 12V DC / 1.5A
LEDs
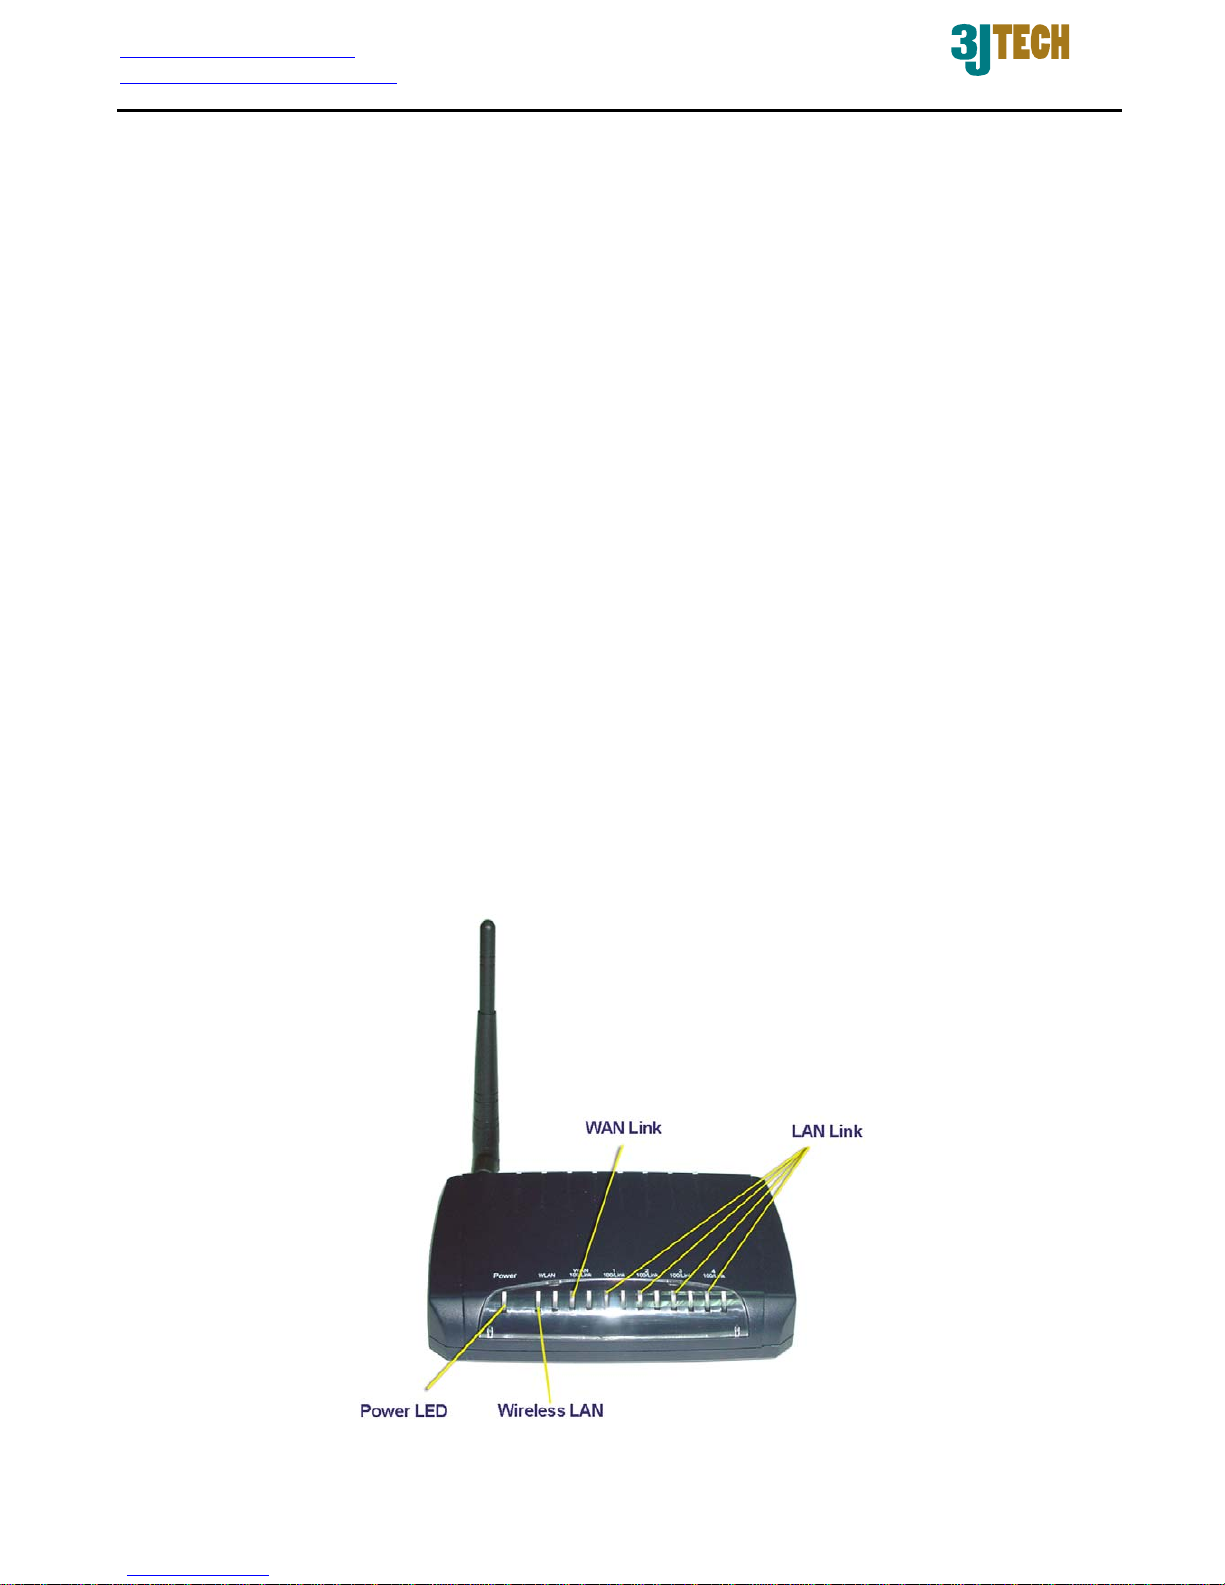
Include the LEDs of POWER, WLAN (Wireless LAN), WAN Link and LAN Link.
2.2.2 Bottom Panel Information
Reset Button
Support the hardware reset function.
2.2.3 LED Description on the Front Panel

http://www.3jtech.com.tw
http://www.pnpipcameras.com
DWR User’s Guide
Copyright of 3JTech Co., Ltd. (also doing business as A3J Engineering Inc.)
9
LED Color Status
POWER Green Lit when +12V DC power is on and working.
WLAN(Wireless LAN) Green Lit when device is normal.
Flash when any traffic is present.
WAN Link Green Lit when connection with remote device is good.
Flash when any traffic is present.
Off when cable connection is not good.
LAN Link Green Lit when connection with remote device is good.
Flash when any traffic is present.
Off when cable connection is not good.

http://www.3jtech.com.tw
http://www.pnpipcameras.com
DWR User’s Guide
Copyright of 3JTech Co., Ltd. (also doing business as A3J Engineering Inc.)
10
3. Installation
3.1 Hardware Installation
Step 1: Place DWR to the best optimum transmission location. The best transmission location for
your DWR is usually at the geographic center of your wireless network, with line of sign
to all of your mobile stations.
Step 2: Connect DWR to your wired network. Connect the Ethernet WAN interface of DWR by
category 5 Ethernet cable to your switch/ hub/ xDSL modem or cable modem. A
straight-through Ethernet cable with appropriate cable length is needed.
Step 3: Supply DC power to DWR. Use only the AC/DC power adapter supplied with DWR; it
may occur damage by using a different type of power adapter.
3.2 Software Installation
There is no software drivers, patches or utilities installation needed, but only the configuration
settings. Please refer to this chapter which will instruct you how to configure and manage DWR
through the web user interface it supports. With this facility, you can easily access and monitor
through any one LAN port of DWR.
NOTE:
It will take about 55 seconds to complete the boot up sequence after powering on DWR.
3.2.1 Software Configuration
In DWR, it supports a simple user management function to configure the system. The DWR is
delivered with the following factory default parameters on the Ethernet LAN interfaces.
Default IPAddress: 192.168.8.1
Default IP subnet mask: 255.255.255.0
WEB login User Name: cameras
WEB login Password: cameras
Tabla de contenidos
Otros manuales de Enrutador inalámbrico de 3Jtech


