10-8 Video Digital Evidence Solutions 10-8 Body Camera Manual de usuario

2015r2
User Manual
10-8 Body Camera

2 3
Warranty & Return Information
Warranty Details
• One(1)yearfreereplacementofanyfailedcomponent.
How to Get Support
1. VisittheWarrantyPartsReplacementformonourwebsite:
hp://www.10-8video.com/support/warranty-form/
2. Filloutandsubmittheform.
Shipping Address
10-8VideoDigitalEvidenceSolutions
1423Huntsville,Hwy.
Fayeeville,TN37334
Phone Numbers
(888)788-1048•(931)262-2221
(931)233-1263(FAX)
Copyright © 2011-2015 10-8 Video Digital Evidence Solutions. • All rights reserved.
Disclaimer: 10-8VideoDigitalEvidenceSolutionsreservestherighttomakechangesin
specicationsatanytimeandwithoutnotice.Theinformationprovidedbythisdocument
isbelievedtobeaccurateandreliable.However,noresponsibilityisassumedby10-8Video
DigitalEvidenceSolutionsforitsuse;noranyinfringementsofpatentsorotherrightsof
thirdpartiesresultingfromitsuse.Nolicenseisgrantedunderanypatentsorpatentrights
of10-8VideoDigitalEvidenceSolutions.
Othercompanyandproductnamesmentionedhereinmaybetrademarksoftheirrespective
companies.
10-8 Digital Video Evidence Solutions
1423 Huntsville Hwy.
Fayeeville, TN 37334
Tel: (888) 788-1048 • (931) 262-2221
Fax: (931) 233-1263
World Wide Web: www.10-8Video.com

4 5
Contents
Introduction 6
Overview 6
Package Contents 6
First-Time Usage 7
Body Camera Setup 7
Setting Up the BC-1 Software 7
First-Time Usage 8
Associating a BC-1 Camera with Its Ofcer Account 9
BC-1 Body Camera Diagram 10
Operation 11
Power On/Off 11
Power On: 11
Power Off: 11
Video Recording & Playback 12
Recording Video 12
Stop Recording Video 12
Video Playback 12
Stop Video Playback 12
Recording and Playing Audio 14
Recording Audio 14
Stop Recording Audio 14
Audio Playback 14
Stop Audio Playback 14
Taking a Photo 15
View Photos 15
Exit Playback Mode 15
Charging the Battery 16
Charging Battery with USB Cable 16
Battery Status Icons 16
Factory Reset 17
Software 18
Using the Software 18
Managing Files 18
Viewing a File 18
Editing a File’s Info or “Tags” 19
Deleting Files 19
Backing Up Files 19
Viewing a File’s Access Log 20
Managing Call Types 20
Changing Your Software Password 20
Administrating Software User Accounts 21
Creating a New Software User Account 21
Editing a Software User Account 21
Change Ofcer Name 21
Change User’s Administrator Rights 21
Deactivate a User’s Account 21
User Account Permissions 22
Deleting a Software User Account 22
Reassigning A BC-1 Camera To An Ofcer 23
System Messages 24
LED Status Indicator Lights 24
Audio Indicators 24
Specications 25

6 7
Introduction
Overview
ThisdigitalpoliceenforcementDVRprovidestheocerwithstateofthe
artcapabilitiessuchashigh-denitiondigitalvideorecording,stillimage
capturecapabilities,high-speedUSBdatatransmissionandUSBcharging.
Package Contents
Your10-8BC-1BodyCamerawillhaveshippedwiththefollowingitems,
pleasetakethetimetoconrmyouhavethefollowingitems:
• 1-BodyCamera
• 1-InstructionManual
• 1-12VCarCharger
• 1-120VCharger
• 1-USBCable
• 1-MicCable(Optional)
Thankyouforpurchasingthe10-8BC-1BodyCamera.Topreventany
damagetotheunitcausingareductionofitslifespan,werecommend
readingthisUserManualcarefullybeforeusingthedevice.
BeforeusingyournewBC-1BodyCameraforthersttime,we
recommendperformingthefollowingstepstomaximizetheusabilityof
yournewBC-1BodyCamera.
Body Camera Setup
1. ChargetheBC-1BodyCamerausingthe120Volt,12VoltorUSB
cable.
SeeCharging the Baerysectionfordetails.
2. InstallthesoftwareusingtheInstalling the BC-1 Softwaresection
belowasaguide.
First-Time Usage
Setting Up the BC-1 Software
ThesoftwareisdesignedtoinstalllikeanytypicalWindowsprogram.
ThersttimeyouruntheBC-1softwareyouwillneedtocongureit.This
processonlyneedstobecompletedonce.Read through these instructions
completely before beginning.
1. StarttheBC-1BodyCamerasoftware.Awelcomescreenwilldisplay
whileitisloading.
2. Therstscreenyouwillbepresentedwithwillestablishtheprimary
administratoraccount.Thispersonwillbetheprimaryuserand
softwareadministrator.
3. EntertheAdministrator’susernameandpasswordandclickonthe
“Next” buon.
IMPORTANT!
READ THIS FIRST
For maximum security we recommend using random characters,
symbols and numbers in your password. For more tips on
creating secure passwords read this article: http://goo.gl/vZG9PZ

8 9
First-Time Usage
First-Time Usage
4. Nowchoosethelocationonthecomputer’sharddrivewherevideos
fromyourBC-1BodyCamerawillbestored.Thislocationcanbe
anywhereonthelocalsystemoronanetwork.
5. ChoosewhethertoenabletheAutoDeleteFeatureanditsdurationby
enteringanumberintheboxordisablingitbyleavingtheeldalone.
6. Clickonthe“Next” buontocontinue.
7. Nextyou’llsetupthebasiccalltypesthatwillbeavailabletohelp
ocerscategorizeandtagvideos.ExamplecalltypeswouldbeDUI,
Assault,Domestic,etc.Youcanaddmorelaterifneeded.
7. Clickonthe“Next” buontocontinue.
8. NowyouwillbeaddingocersthatwillbeissuedtheBC-1Body
Cameras.Youwillalsoneedtodecidewhohasadministratorrightsto
thesoftware.
9. Entertheocer’sbadgeID,theirnameandsettheiraccesslevel.The
ocer’sbadgenumberalongwiththedateandtimewillberecorded
oneachvideotheBC-1BodyCamerarecords.
10.Clickonthe“Save Ocer Account” buontosavetheiraccount.
11.Whenyouarenishedaddingoceraccounts,clickonthe“Next”
buonattheboomofthewindow.
12.NowyouaregoingtoassociateeachBC-1BodyCamerawiththe
oceraccountsyoujustsetup.
Administrators have more authority and can change passwords,
review all user videos, etc.
Non-Administrator users can archive and tag videos and only
review videos taken by them.
Ensure the location you choose to store your les has sufcient
space. Video les can consume large amounts of storage space.
Associating a BC-1 Camera with Its Ofcer Account
1. PluginasingleBC-1BodyCameratothecomputer
2. OncethecomputerdetectstheBC-1BodyCamera,theBC-1Body
CamerawillbeepandtheLCDscreenwillturno.
3. Clickonthe“Find Device” buon.Thesoftwareandcomputerwill
searchfortheBC-1BodyCamera.
4. OncethesoftwaredetectstheBC-1BodyCamera,assignanocerto
itbychoosingtheocer’saccountandclickingthe“Assign” buon.
5. WhenthesoftwarehasnishingassigningtheocertotheBC-1Body
CameradisconnecttheBC-1BodyCamerafromthecomputer.
6. Repeatsteps1-6asneeded.Whencomplete,clickthe“Done”buon.
If this is the rst time you have connected the BC-1 Body
Camera to this computer, you may have to wait for your
computer to automatically install the proper drivers.
If you connect the BC-1 Body Camera to a computer and do not
have the software running, it will only charge its battery and you
cannot access the camera’s internal les.
However, if you have the BC-1 Body Camera software running
while the BC-1 Body Camera is connected, you can also use
Windows Explorer to access it as a ash drive.
10 11
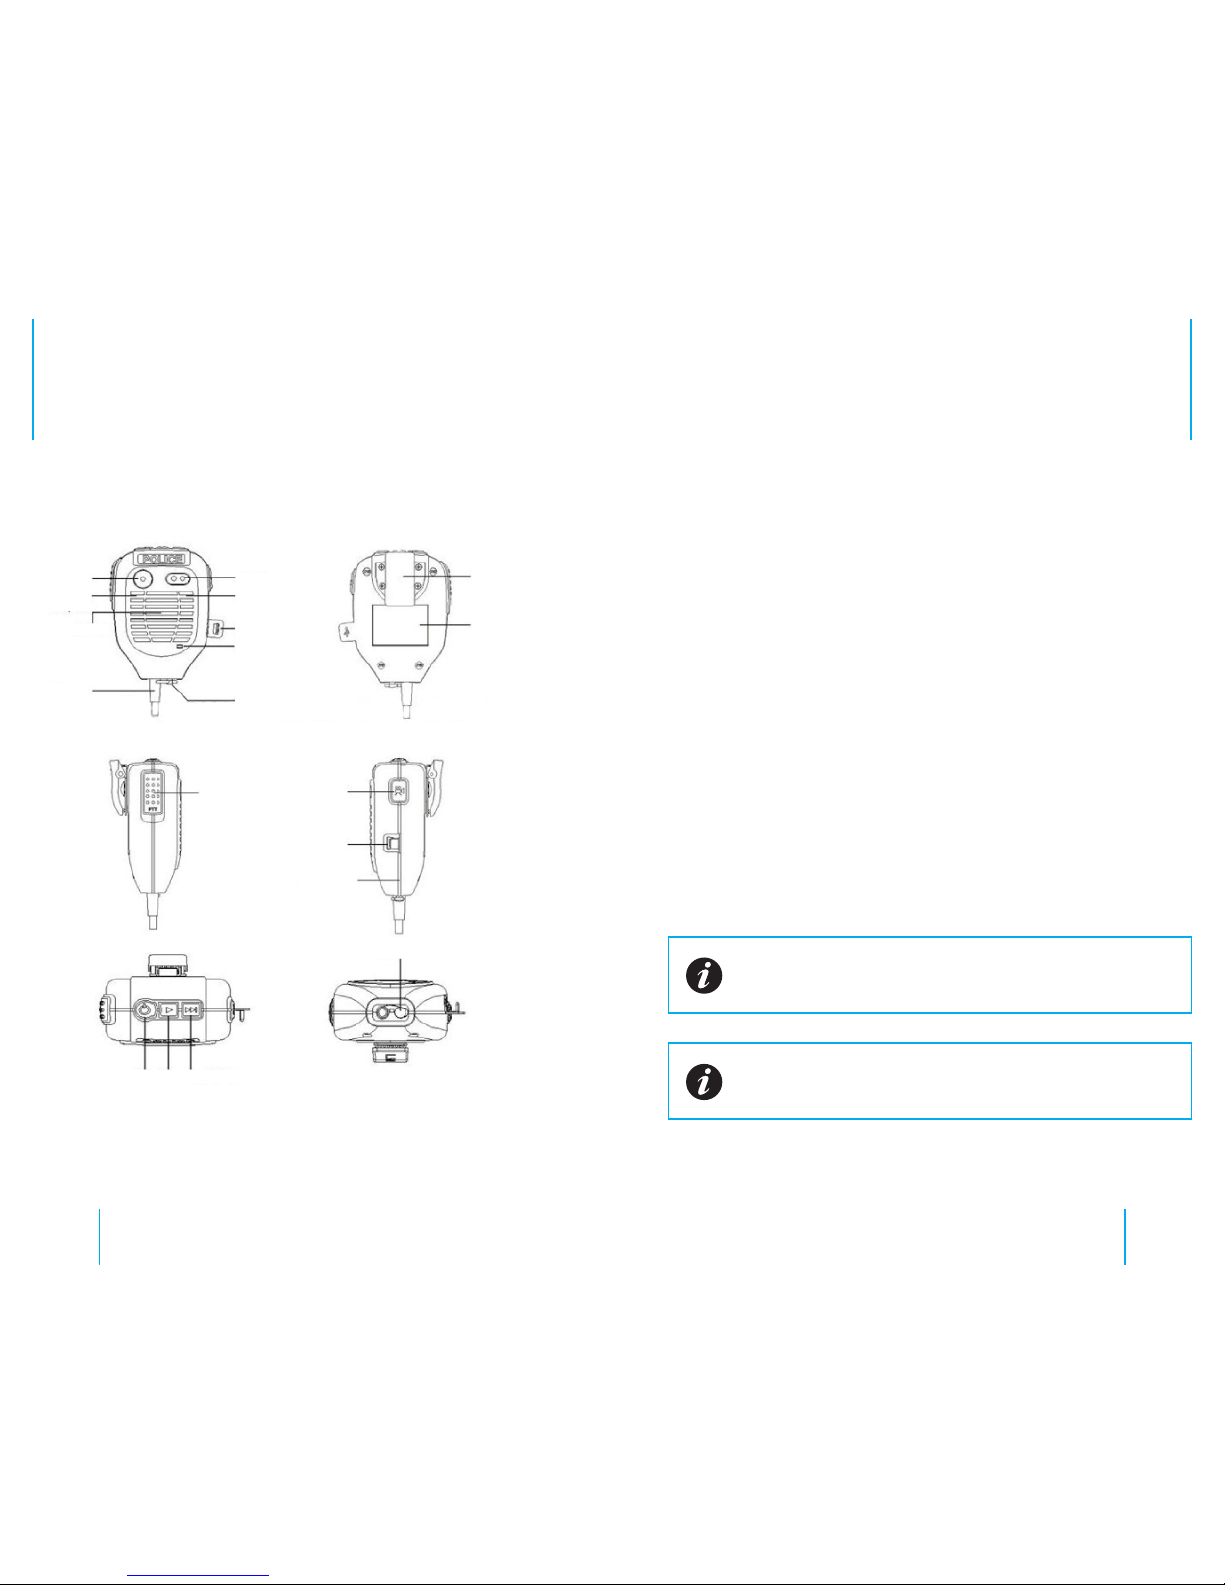
BC-1 Body Camera Diagram
IR LEDS
Lens
Recording
Microphone
Speaker
Microphone
USB
LED Status Indicator
Clamp
1.5” LCD Screen
Earphone
Water Tight
Seal
REC/Down
USB Port
Earphone Jack
Talk
Selection
PlayPower
Walkie
Cable
FIG. 1
Body Camera Diagram
Power On/Off
Power On:
1. Pressandholdthe“Power” buonuntilthedevicebeeps.
2. TheLED Status IndicatorwilllightupgreenandtheLCD screenwill
displaythe10-8Videologo.
3. Afterafewminutesofinactivity,thesystemwillthenenterinto
recording standby modeandtheLED Status Indicatorwillremainlit
green.
4. TheLCD screenwilldisplaythecurrentlyrecordinginterfaceand
yourbodycameraisreadytouse.
Power Off:
1. Pressandholdthe“Power”buonforatleastthreeseconds.
2. Thecurrentlewillbesavedtotheinternalstorageandthedevice
willpowerdown.
When the recorder is in standby mode if there is no interaction
with it for more than thirty (30) seconds the LCD screen will turn
off.
The recorder will automatically power off when the battery is low.
Operation

12 13
Operation
Video Recording & Playback
Recording Video
1. Brieypressthe“REC” buonuntiltheLED Status Indicatorlights
upred.TheBC=1BodyCamerawillbeepaudibly.
2. TheBC-1BodyCamerawillenterintoVideo Recording Mode(FIG.2)
andbegintorecord.Itwillsavealeevery10minutes.
Stop Recording Video
1. Pressthe“REC” buonuntiltheLED Status Indicatorlightsup
green.
2. TheBC-1BodyCamerawillenterRecording Standby Mode.(FIG.3)
Video Playback
1. Pressthe“Play” buonuntiltheBC-1BodyCameraentersinto
Playback Mode.(FIG.4)
2. Toplaythecurrentlyrecordingle,pressthe“Play” buonagain.
3. Toplayanotherle,usethe“Selection” buontocyclethroughthe
les.Pressthe“Play” buonwhenyou’vefoundtheletoplayit.
Stop Video Playback
1. Pressthe“Play” buontostopthecurrentlyplayingleandenter
intoPlayback Standby Mode.(FIG.5)
FIG. 2
Video Recording Mode
FIG. 4
Playback Mode
FIG. 3
Video Standby Mode
FIG. 5
Playback Standby Mode
Battery Status Icon
Recording Time
Playback Mode Icon
Play Status
Playing Time
Current Playback Time
Video File Icon
Focus Area Current Date & Time
Current File Number
Recording Status Icon
Remaining Recording Time
Operation
If lighting is insufcient, the recorder will automatically enable
Night Mode and the IR LED. It will automatically return to the
normal recording mode when lighting conditions improve.

14 15
Operation
Operation
Recording and Playing Audio
Recording Audio
1. Pressandholdthe“REC” buonforabout2seconds.
2. TheBC-1BodyCamerawillbeep,andtheLED Status Indicatorwill
lightupyellowindicatingithasbegunrecordingaudioonly.
3. TheLCD ScreenwillshowtheAudio Recording Mode Screen(FIG.6)
Stop Recording Audio
1. Pressthe“REC” buonuntiltheLED Status Indicatorlightsup
green.
2. TheBC-1BodyCamerawillenterRecording Standby Mode.(FIG.3)
Audio Playback
1. Pressandholdthe“Playback” buonuntiltheBC-1BodyCamera
entersintoPlayback Mode.(FIG.4)
2. Usethe“Selection” buontocyclethroughtheles.
3. Toplaythecurrentlyselectedle,pressthe“Play” buon.When
playinganaudiole,theAudio Playback Screenwilldisplay.(FIG.7)
Stop Audio Playback
1. Pressthe“Play” buontostopthecurrentlyplayingleandenter
intoPlayback Standby Mode.(FIG.5)
Taking a Photo
1. MakesuretheBC-1BodyCameraisinRecording Standby Modeby
exitinganycurrentlyactivemode.
2. Pressthe“Selection” buontotakeapictureandtheLED Status
Indicatorwillashred.
View Photos
1. Pressandholdthe“Playback” buonuntiltheBC-1BodyCamera
entersintoPlayback Mode.(FIG.4)
2. Usethe“Selection” buontocyclethroughtheles.
Exit Playback Mode
1. ToexitthePlayback Standby Mode,pressthePowerBuononce.
2. TheBC-1BodyCamerawillreturntotheRecording Standby Mode.
FIG. 6
Audio Recording Mode
FIG. 7
Audio Playback Mode

16 17
Operation
Charging the Battery
Therearethreewaystochargeyour10-8BC-1BodyCamera:
• 120VoltCharger(FastestChargeRate)
• 12Voltcarcharger(Fast)
• USBcableconnectedtoapoweredUSBcomputerport(Slow)
Charging Battery with USB Cable
1. ConnectaUSBcablewithacompatibleconnectortoacomputer.
2. ConnecttheUSBcabletotheUSBportonthebodycamera.
Battery Status Icons
Factory Reset
Pressandholdboththe“Power”and“REC”buonstoresettheBC-1
BodyCameratoitsfactorydefaults.
DuringchargingtheLED Status Indicatorwilllightupred,theLCD
screenwilldisplay“MSDC”andthebaeryicon.After10secondstheBC-1
BodyCamerawillenablethescreensaverfortheLCD.Pressanybuonon
theBC-1BodyCameratoexitthescreensaver.
Whenthebaeryisfullycharged,theredLED Status Indicatorwillturn
oandthebaerystatusiconwilldisplaythe“FullyCharged”icon.
Low Power Not Fully Charged Fully Charged
A new, or completely drained BC-1 Body Camera battery can
take 6-8 hours to charge fully.
Operation
Caution: Do not perform a Factory Reset while recording or while
the device is connected to a computer. Doing so may cause le
corruption and/or damage the internal memory.

18 19
Software
Using the Software
InordertoaccessthelesontheBC-1BodyCamera,thesoftwaremustbe
runningbeforepluggingtheBC-1BodyCameraintoyourcomputer.
1. StarttheBC-1BodyCamerasoftware.
2. Enteryourbadgenumberandsoftwarepasswordtologin.Ifyouare
logginginastheAdministrator,enteryourusernameintotheBadge
Number eld.
3. PlugtheBC-1BodyCameraintoyourcomputerusingthesupplied
USBcable.
4. OncethecomputerdetectsthattheBC-1BodyCamerahasbeen
connectedtoit,theBC-1BodyCamerawillbeepanditsLCDscreen
willturno.
5. AtthispointthesoftwareiscopyingthelesfromtheBC-1Body
Cameratoyourdesignatedstoragelocation.DO NOTdisconnectit
duringthisprocess.
Oncethelesappearinthemaininterfaceyoucanperformanyofthe
followingtasks:
Editing a File’s Info or “Tags”
You must have administrative privileges to edit le information.
1. ClickonceontheTag Iconofleyouwishtoedit.
2. Usetheformthatpopsuptoadd/edit/removeanyrelevant
informationtothemediaclip.
3. Clickthe“Save” buonwithinthepopupwindowtorecordyour
changes..
Deleting Files
It’snotnecessarytodeleteyourlesfromtheBC-1BodyCameraonce
thelesarebackeduptothecentrallerepository.WhentheBC-1Body
Camera’sinternalstorageislledtocapacityitisdesignedtoautomatically
overwritetheoldestles.
Thiseliminatestheneedtoworryaboutmaintaininganemptystorage
card.JustmakesureyourBC-1isregularlysyncedwiththeBC-1Body
CameraSoftwareandallofyourlesarepreserved.
However,forconvenience,wehaveincludedtheabilitytodelete
individuallesviatheadmininterface.
Backing Up Files
EverytimeyouconnectyourBC-1BodyCameratoyourdesignated
computeryourlatestlesareautomaticallycopiedtoyourlerepository.
JustremembertosyncyourBC-1BodyCamerasregularlytoyour
designatedrepositorycomputer.
Managing Files
Fromthemaininterfaceyoucanviewthemedia,tagtheleswithmore
information,printareportonaleandviewthele’saccesslog.
Viewing a File
1. Clickonceonthegreen“Play” iconintherowofleyouwishto
view.
2. Onceloaded,thelewilldisplayinanewwindow.
Software
To save time backing up your les and to reduce le redundancy,
only les that have not already been backed up are copied each
time you connect the BC-1 Body Camera to your computer.
Otros manuales para 10-8 Body Camera
1
Tabla de contenidos


