YUHAO 1010A Manual de usuario
Model No.: 1010A
Ceiling Fan
Installation Instructions
THANK YOU
We appreciate the trust and confidence you have placed in us through the purchase
of this ceiling fan.We strive to continually create quality products designed to
enhance your home.Thank you for choosing us!

.1.
Table of contents
Table of contents 1
2
4
4
Safety Precautions
Pre-Installation
Warranty
Installation kit
Blade balancing kit
3
3
Tools needed
5
6
7
8
8
10
11
12
Installation
Step 1 (Basic assembly of the fan)
Step 3 (Receiver and wiring installation)
Remote Control Operation
13
14
TroubleShooting
Balancing
9
Step 5 (Switch on and ceiling fan works)
Specification
Step 2 (Ceiling bracket installation and fan into the installed Bracket.)
Visit www.pmwfan.com
for further assistance.
Tuya Smart WiFi Remote Control
Third-Party Voice Servives
Step 4 (Install remaining parts)

.2.
Safety Precautions
1. For your safety, all electrical connections and disconnections should be performed by a
qualified electrician.
2. Any action performed for the electrical connection of the device must be carried out after
ensuring that the general power supply is disconnected,by removing the corresponding fuse or
disarming the protective switch in order to ensure total isolation of the power supply.
3. When deciding where to mount the fan, be sure that there is at least 30 inches(76 cm) of space
between the fan and any wall or other obstruction that the fan blades could collide with. The
greater this distance, the more effective the air flow produced.After the fan is mounted, be sure
that the blades are no less than 7ft(2.1 m) above the ground.
4 . The anchor point for the fan must be able to support a weight of at least 100 pounds(45 kg). If
mounting on a ceiling junctionbox, be sure that the fan is adequately supported to prevent
loosening or turning.
5. The fan’s electrical connection must be “grounded” (the fan’s ground cable connected to the
installation’s grounding network) in order to avoid any branching that may be dangerous to
people.
6. Do not connect the fan’s power supply to any dimmers,potentiometers, or light switches, as it
will cause the fan tomalfunction and/or will damage the motor. The fan must be directly
connected to a properly protected installation circuit(magnetothermal differential switch with the
adequate size for the fan’s consumption and technical specifications).Only use the fan’s control
to turn it on or stop it.
7. It is recommended to not use these types of fans along with gas installations simultaneously in
the same room.
8. The fan must be not be moving and must have come to a complete stop before changing its
direction of rotation.This will prevent damage to its motor and to the control unit, when
applicable.
9. Do not insert anything that could hit the fan’s blades into its pathway while it is moving, as this
could cause damage to people, can damage the blades, and can offset the balance of the unit,
causing vibrations and wobbling.
10. After installing the fan, ensure that all fastenings aresecure and tightened in order to avoid any
noise caused by loose elements.
11. Due to the fan’s movement, certain fastenings may become loose. Check all fastenings twice
per year at a minimum in order to ensure that they are sufficiently tight. If necessary, they must
be retightened.
12. The motor housing can be cleaned with a soft brush or a lint-free cloth to avoid scratching the
surface. Clean the blades with a lint-free cloth. Important: Turn off the main power supply before
starting any maintenance. Do not clean the fans with water or a damp cloth.
Note: The important warnings and instructions indicated in this manual are not
guaranteed to cover all possible conditions and situations that may occur. It
must be understood that common sense, precaution, and care are factors that
cannot be included in all products. These factors can and must only be provided
by the user who maintains and enjoys this fan.
The information contained in the following pages has been prepared to ensure your
maximum enjoyment of your fan
Please remove the fuse or turn off the circuit breaker to cut off the power before installing
the fan. Ensure all electrical connections are in compliance with local laws, regulations
and national eletrical codes. If you are not familiar with electrical installation and wiring,
please hire a qualified electrician or consult the wiring manual.
Visit www.pmwfan.com
for further assistance.

.3.
The manufacturer warrants the fan motor to be free from defects in workmanship and material present at
time of shipment from the factory for a period of lifetime after the date of purchase by the original purchas-
er.The manufacturers also warrants that all other fan parts, excluding any glass or acrylic blades, to be
free from defects in workmanship and material at the time of shipment from the factory for a period of one
year after the date of purchase by the original purchaser. We agree to correct such defects without charge
or at our option replace with a comparable or superior model if the product is returned. To obtain warranty
service, you must present a copy of the receipt as proof of purchase. All costs of removing and reinstalling
the product are your responsibility. Damage to any part such as by accident, misuse, improper installation
or by affixing any accessories, is not covered by this warranty. Because of varying climatic conditions this
warranty does not cover any changes in brass finish, including rusting, pitting, corroding, tarnishing or
peeling. Brass finishes of this type give the longest useful life when protected from varying weather
conditions. A certain amount of “wobble” is normal and should not be considered a defect. Servicing
performed by unauthorized persons shall render the warranty invalid. There is no other express warranty.
We hereby disclaim any and all warranties, including but not limited to those of merchantability and
fitness for a particular purpose to the extent permitted by law. The duration of any implied warranty which
cannot be disclaimed is limited to the time period as specified in the express warranty. Some states do
not allow limitation on how long an implied warranty lasts, so the above limitation may not apply to you.
The retailer shall not be liable for incidental, consequential, or special damages arising out of or in connec-
tion with product use or performance except as may otherwise be accorded by law. Some states do not
allow the exclusion of incidental or consequential damages, so the above exclusion or limitation may not
apply to you.
This warranty gives specific legal rights, and you may also have other rights which vary from state to
state.
This warranty supersedes all prior warranties. Shipping costs for any return of product as part of a claim
on the warranty must be paid by the customer.
Tools Needed
Warranty
Pre-Installation
Visit www.pmwfan.com
for further assistance.

.4.
Installation kit
Blade balancing kit
Pre-Installation
AA
AA
BB
BB
CC
CC DD
DD
Blade screw and washer
Wire nut
Part Description
6
10+1
2
4
Quantity
Screws
Tools
Needed
Self tapping screw
Visit www.pmwfan.com
for further assistance.

Note:The Illustrations in this manual are for explanation purposes only and may differ from the actual unit. It is subjected
to change without prior notice for further improvements.
.5.
Specification
Pre-Installation
B
E
F
G
H
I
A
C
D
Part
A
B
C
D
E
F
G
H
Quantity
1
1
1
1
1
1
1
3
Description
Down rod
Bracket
Canopy
Coupling cover
Body/motor
Light kit
Light cover
Blades
Part
I
J
J
K
K
Quantity
1
1
2
Description
Remote control
Receiver
Battery
AAA 1.5V
Visit www.pmwfan.com
for further assistance.

.6.
Visit www.pmwfan.com
for further assistance.
Step 1 (Basic assembly of the fan)
Installation
①
②Route all the wires from the motor the
down rod through. Fix the down rod to the
coupling with bolt,and then insert the
clevis pin.Last tighten the two screws on
coupling.
Decompose drown rod and remove the screws which are used to install the blades.
③Assemble the canopy,coupling cover,and
hanging ball through the down rod.Then
insert the fixing pin, push the hanging ball
up, and fix it with screws.
Coupling Clevis Pin
Bolt
Tighten the two screws
x 9
Remove the screws
.7.
Visit www.pmwfan.com
for further assistance.
Installation
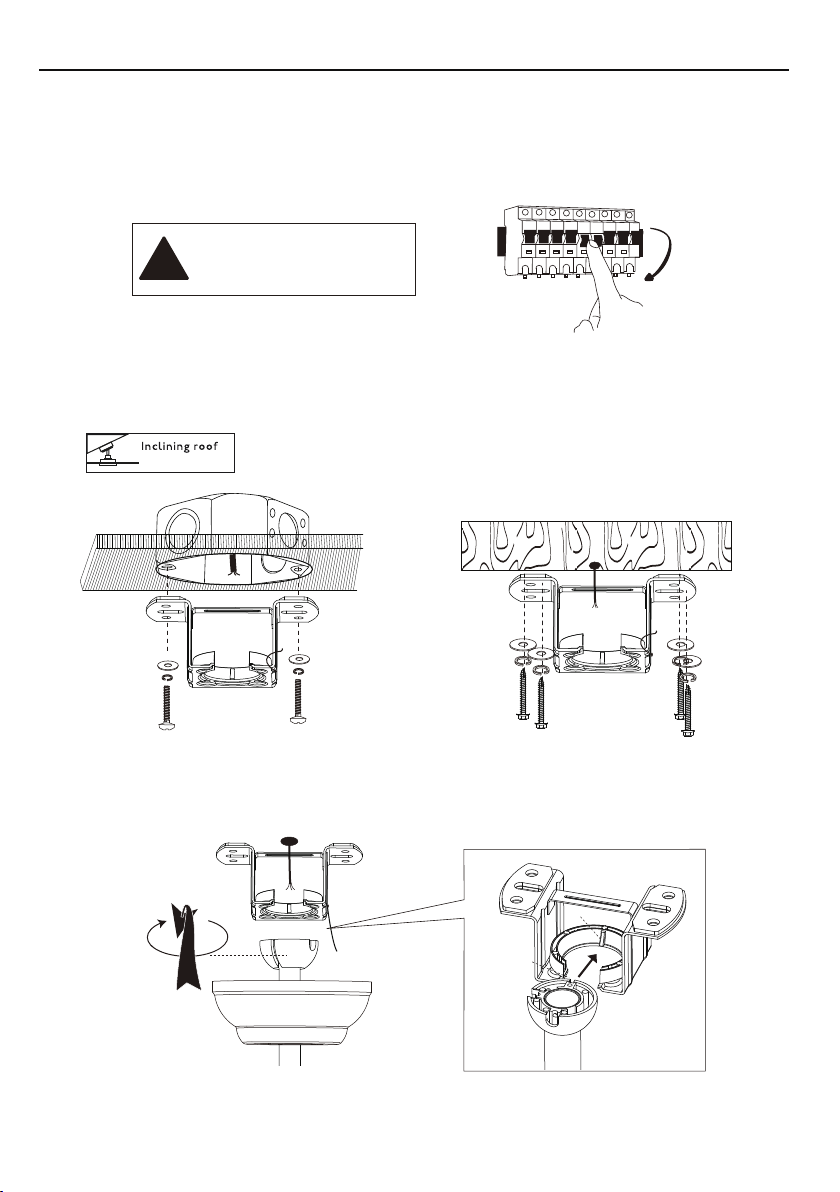
Step 2 (Ceiling bracket installation and fan into the installed Bracket.)
①Turn off the fan power supply at the circuit breaker box and the wall switch.
Solid wood ceiling
or
OFF
Failure to disconnect the power
supply prior to installation may
result in serious injury or death.
!
②
Octagon box
Can be installed on <10º sloped roof.
Choose the following installation methods according to the actual situation of the roof.
max 10°
③Snap the basically assembled fan into the installed Bracket.
Concave
Convex

.8.
Visit www.pmwfan.com
for further assistance.
Installation
Step 3 (Receiver and wiring installation)
①
②Put the receiver into the bracket and tidy up wires. Rotate the canopy counter-clockwise until
screw heads engage the key slots fully. Tighten the screws. Be careful not to damage or cut the
wiring.
House power
To Light To Motor Ground wire
AC IN L(
Black
)
AC IN N(
White
)
Make the wire connection in accordance to the wiring diagram provided.
Step 4 (Install remaining parts)
①Align the connected blade with the mounting hole, and then fix it with screws.

.9.
Visit www.pmwfan.com
for further assistance.
Installation
②
Step 5 (Switch on and ceiling fan works)
ON
Remove the 3pc pre-installed screws from motor assembly,connect terminal.Then fix
the light kit to the main body with screws.Last install light cover.
Remove the screws ×3
Tabla de contenidos
Otros manuales de Admirador de YUHAO

YUHAO
YUHAO 1109 Manual de usuario

YUHAO
YUHAO Retractable ceiling fan with lights Manual de usuario

YUHAO
YUHAO 1085-4 Manual de usuario

YUHAO
YUHAO 1163 Manual de usuario

YUHAO
YUHAO 1103 Manual de usuario

YUHAO
YUHAO 1086 Manual de usuario

YUHAO
YUHAO 1084-4 Manual de usuario

YUHAO
YUHAO 1073AL Manual de usuario

YUHAO
YUHAO 1073L Manual de usuario

YUHAO
YUHAO 1053A Manual de usuario


