YateBTS LabKit Manual de usuario


Congratulations for purchasing this LabKit!
Please follow the steps below to get started
In this quick guide you will find
A. Assembling your LabKit
B. Accessing your LabKit
C. LabKit GSM configuration
. Making your first call
E. LabKit LTE configuration
F. Starting your first data session
Note: The LTE functionalities presented in this document only applies for the LTE
LabKit. You can upgrade any time from GSM to LTE by contacting us at
© Copyright 2017 SS7ware, Inc. All rights reserved 1

What you get
. LabKit
2. LabKit power adapter
3. two antennas
4. two filters, one for use in the Americas (red) and one for the rest of the world (black)
5. two smartphones and chargers
6. ten pre-written SIM (two of them are already inserted in each of the two phones)
7. USB WiFi adapter
Important! Your LabKit is also pre-configured to provide access to the Hosted Core, a free
service that allows users to experiment with a fully-functional GSM/GPRS or LTE/IMS
network. The 0 SIM cards you receive are already associated to your Hosted Core
account. You will receive the Hosted Core credentials on the e-mail you used to place the
order.
Note: default PIN for every SIM we sent with our equipment is 0000
For the video guide regarding the LabKit setup, access this link:
https://youtu.be/XklRrzBoaVY
2 © Copyright 2017 SS7ware, Inc. All rights reserved
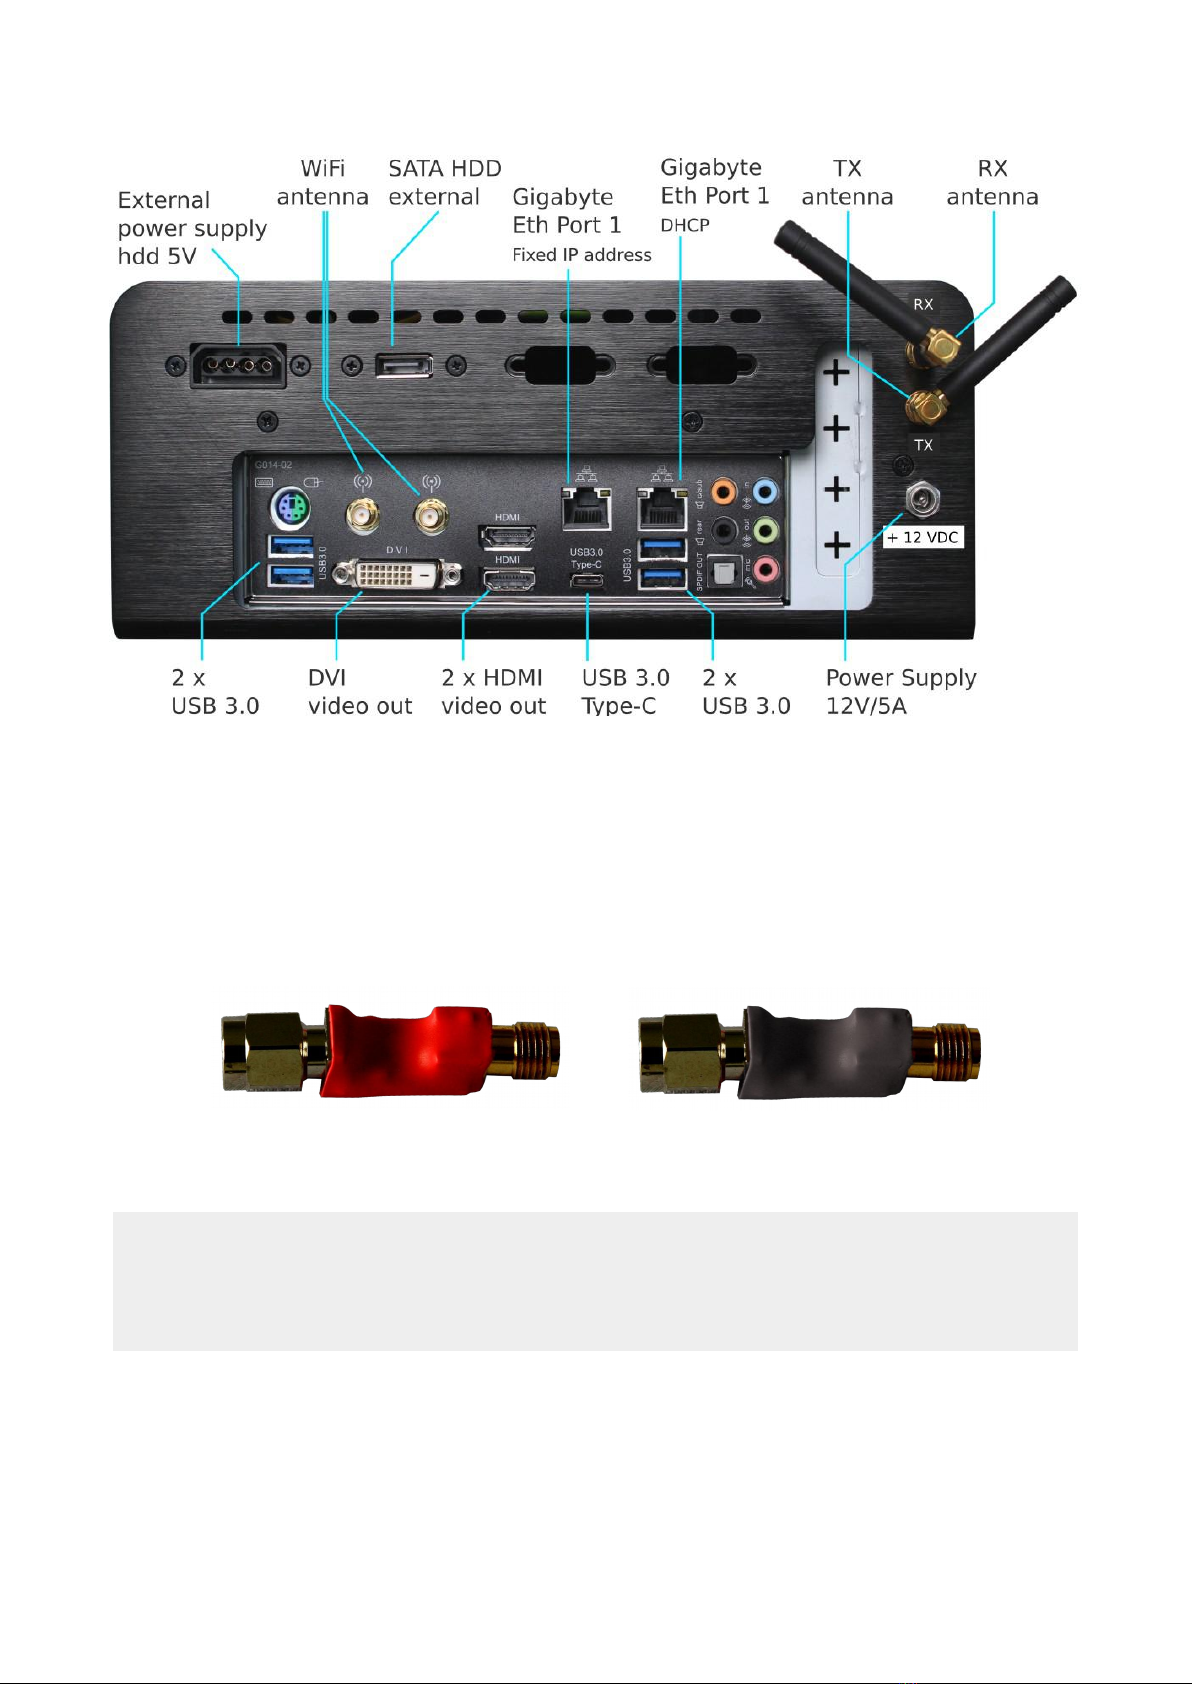
A. Assembling your LabKit
1. Connect one antenna to the TX socket.
2. Connect the filter to the RX socket. Then, connect the other antenna to the filter.Filters
Note: Use the 900 Filter if you are inside the Americas and the 850 Filter if you are in
the rest of the world. This is backwards from what mobile operators do. We advise this
to prevent interference between other commercial bands and your LabKit's.1 This also
prevents interference between what the LabKit transmits and what it receives.
1 By the Americas we are referring to the following regions: North America, South and Central America.
The typical bands for these regions are TE band 5 and GSM 850.
By the rest of the world we are referring to the following regions: Europe, Middle East, Asia, Africa and
Oceania. The typical bands for these regions are TE band 8 and EGSM 900.
© Copyright 2017 SS7ware, Inc. All rights reserved
850 Filter (black)
900 Filter (red)

Filter Color Use
LTE band 8, EGSM 900 Red In the Americas (ITU Region 2)
LTE band 5, GSM 850 Black In the rest of the world. (ITU Regions and 3)
Connect the first antenna
to the TX socket
Connect the filter
to the RX socket
Connect the second
antenna to the filter
Note: Screw the antennas securely.
Always angle the antennas at a 90° orientatio.
3. Connect the LabKit to the power supply with a cable via the + 2VDC socket.
Keep in mind that the adapter's label should also indicate the power output.
4. (Optional) Connect the USB WiFi adapter.
4 © Copyright 2017 SS7ware, Inc. All rights reserved
Adapter label

B. Accessing your LabKit
1. Locally
1.1. Accessing the operating system
1. Connect the LabKit to the monitor via the HDMI or
DVI video outputs; connect the keyboard and mouse to
any of the USB sockets or to the dedicated
mouse/keyboard PS2 port.
Note: Due to radio interference, we strongly recommend to
use DVI/HDMI connectors only for the initial setup.
2. As soon as you have powered the LabKit you will be asked for a password. The
password is the serial number found on the front of your LabKit.
Note: This grants you access to the Local Management Interface (LMI), the YateBTS and
LabKit online documentation, the Yate forum and the LabKit terminal console though the
icons located on the desktop.You can also find your LabKit's serial number by opening the
LXTerminal console on the taskbar of your desktop, on the first line: [yatebts@ybts-'serial
number'~]$.
To connect to the internet, click the icon in your task bar:
Once you have connected the LabKit to your local network/Internet, you will be able to find
our your assigned IP address by typing ifconfig in the LabKit terminal console.
You will need this information if you want to access the LabKit remotely.
1.2. Accessing the Local Management Interface (LMI)
1. Click the LMI icon on the desktop.
2. This allows you to access the LMI, via HTTP, on two different ports.
•http:// 27.0.0. :2080/lmi/main.php in Firefox
•http:// 27.0.0. / lmi in Firefox, on older YateBTS versions
2. Remotely
2.1. Accessing the operating system through a SSH port connection
1. Open a terminal console if you are a Linux user or download the Putty free software and
use it, if you are a Windows user.
You will use the 54321 SSH port to access the LabKit terminal console.
2. From Linux type in the following command:
ssh yatebts@network-ip-assigned-ip -p 5432
© Copyright 2017 SS7ware, Inc. All rights reserved 5

As Windows user, connect with putty.exe to network-assigned-ip through SSH protocol on
port 5432 .
3. You will be asked for credentials before entering the LMI interface. You must insert the
information in lowercase.
username: yatebts
password: 'the serial number on your LabKit'
2.2. Accessing the Local Management Interface (LMI)
Note: If you want access your LabKit LMI from
another computer in your network, use this
URL: http://network-assigned-ip:2080/lmi , with
2080 as an HTTP port for newer YateBTS
versions. You will be prompted to enter valid
credentials of a system account, as seen in
the image.
HCP through the Gigabyte Ethernet port 2
1. Connect the LabKit to your Wi-Fi router or switch with an Ethernet cable, in the Gigabyte
Eth port 2, as seen in the image showing LabKit's rear side.
2. To find your IP address assigned through DHCP, enter the Mageia Control Center, go to
Network & Internet, open the Network Center and select Wired (Ethernet) and click on
Configure.
3. Open your computer's browser and go to: http://network-assigned-ip:2080/lmi/main.php
to access the LMI.
HCP through the USB WiFi adapter
1. Connect the USB Wi-Fi adapter to your LabKit.
2. To find out the IP address you have been assigned, enter the Mageia Control Center, go
to Network & Internet, open the Network Center and look for the Wireless (Wi-Fi)
connection.
3. Click on your SSID and select the Configure option to find out your assigned IP address.
4. Open your computer's browser and go to: http://network-assigned-ip:2080/lmi/main.php
to access the LMI.
Through a fixed IP address
1. Connect the LabKit to your laptop or personal computer via the Gigabyte Eth port 1, as
seen in the image showing the LabKit's rear side.
2. Go to your computer's Network Configuration and manually set up your network to the
10.0.3.2 fixed IP address.
3. Open your browser and go to: http:// 0.0.3. :2080/lmi/main.php to access the LMI.
6 © Copyright 2017 SS7ware, Inc. All rights reserved

C. LabKit GSM configuration
If you are operating your LabKit in the Americas, skip the next step, as your
machine is already set up to function in these areas.
GSM NiPC mode
1. When you enter the Local Management Interface (LMI), you are first required to select
the appropriate working mode. Click the Modify button to choose GSM nipc.
2. Select the GSM nipc working mode and click the Save button.
© Copyright 2017 SS7ware, Inc. All rights reserved 7

3. Click the BTS Configuration tab. In the GSM section, enter the GSM radio interface tab
and select the GSM operating band in the Radio.Band field, depending on the region where
you operate the LabKit.
If you are in Europe, Middle East, Asia, Africa or Australia, change the operating
band to 850 MHz (the typical operating band for America), to avoid local interference.
(For more information go back to step A.2)
4. Select an ARFCN value corresponding to the operating band you have selected, in the
Radio.C0 field.
GSM roaming mode
1. Select GSM roaming working mode. Click the Modify button and click Save button.
LabKit will connect to Hosted Core which provides the complete functionality of a GSM
mobile network.
2. Check CORE settings -> BTS Configuration -> Core -> Roaming
Your GSM LabKit is already connected to Hosted Core through a direct OpenVPN line. IP
addresses with 00. 27.*.* are OpenVPN private addresses.
Be ware that your GSM LabKit OpenVPN IP address won't be 00. 27.0.5 as seen in these
examples, set your assigned IP address from BTS Configuration -> Core -> Roaming -> My
sip dropdown.
8 © Copyright 2017 SS7ware, Inc. All rights reserved

3. Manage HostedCore SIMs and subscribers.
Hosted Core Web interface log in credentials were sent in the email you've used on
purchase.
© Copyright 2017 SS7ware, Inc. All rights reserved 9
Otros manuales para LabKit
1
Tabla de contenidos
Otros manuales de Equipo de prueba de YateBTS

Manuales populares de Equipo de prueba de otras marcas

SMART
SMART KANAAD SBT XTREME 3G Series Manual de usuario

Agilent Technologies
Agilent Technologies BERT Serial Manual de usuario

Agilent Technologies
Agilent Technologies N3280A Manual de usuario

Vernier
Vernier Go Direct Voltage Manual de usuario

Lifeloc
Lifeloc R.A.D.A.R. Manual de usuario

Fluke
Fluke T5-600 Instrucciones de funcionamiento e instalación


