
XCEL Hunting Edition Manual de usuario

USER
MANUAL
XCELTM HD CAMERA
Remote control
(included)
v1.9
XCELCAM.COM

2
Package contents ................................................................ 3
Specications...................................................................... 4
Components ....................................................................... 4
Basic functions.................................................................... 5
Camera modes.................................................................... 6
Settings ............................................................................. 9
Remote control ................................................................. 11
Power .............................................................................. 12
Memory card .................................................................... 13
Transferring les ............................................................... 13
Maintenance of the camera ................................................. 14
Troubleshooting................................................................. 15
Error message .................................................................. 15
Available accessories.......................................................... 16
Notices ............................................................................ 17
Limited warranty ............................................................... 17
Repair service ................................................................... 17
Table of contents

3
XCELTM HD camera HUNTING Edition XCELTM HD camera SPORT Edition
Package contents
Camera with
slide adaptor
Camo waterproof
housing
Bow mount
Quick release stands
with safety ring (2)
Remote
control
Scope mount
Lithium-ion
battery
Head strap mount
Lens protector
Lens cleaning
cloth
Carrying case
HDMI and
USB cables
Camera with
slide adaptor
Remote
control
Clear waterproof
housing
Straight and
90° extender
360° Roll
bar mount
Curved adhesive
mount
Flat adhesive
mount
HDMI and
USB cables
Carrying case Lens cleaning
cloth
Lithium-ion
battery
Lens protector
Quick release stands
with safety ring (2)
Wrist strap Wrist strap
XCELTM
stickers (3)
XCELTM
stickers (3)
4
Specifications/ Components
SPECIFICATIONS
Photo Recording
Photo resolution 5, 3 & 1 MP
File format JPG
Time Lapse option Predened intervals from 0.5 to 60s
Video recording
Video resolution 1080p/30fps
720p/30fps
WVGA/60fps
File format .mp4, Codec H.264
Audio
Sound recording Stereo, Mpeg AAC codec
Microphone input 2.5mm input for external microphone
(optional)
Memory storage
Support •Internal memory: no
•External memory: microSD card,
up to 32Go, class 4 or higher
(not included)
Viewing
TV output Micro-HDMI
Computer output Micro-USB
Power source
Lithium-ion battery Rechargeable lithium-ion battery
Optical viewing eld
Ultra Wide & Wide
Dimensions
2.4” W x 1.7” H x 1.6” D
Weight
82g (camera only), 153g (camera and housing)
Wireless transmission
Start or stop the photos and videos recording up to 40ft with the remote
control.
Recommendations
Operating temperature (-20 °C to + 40 °C) (-4 °F to +104 °F)
Storage temperature (+15 °C to + 25 °C) (+59 °F to +77 °F)
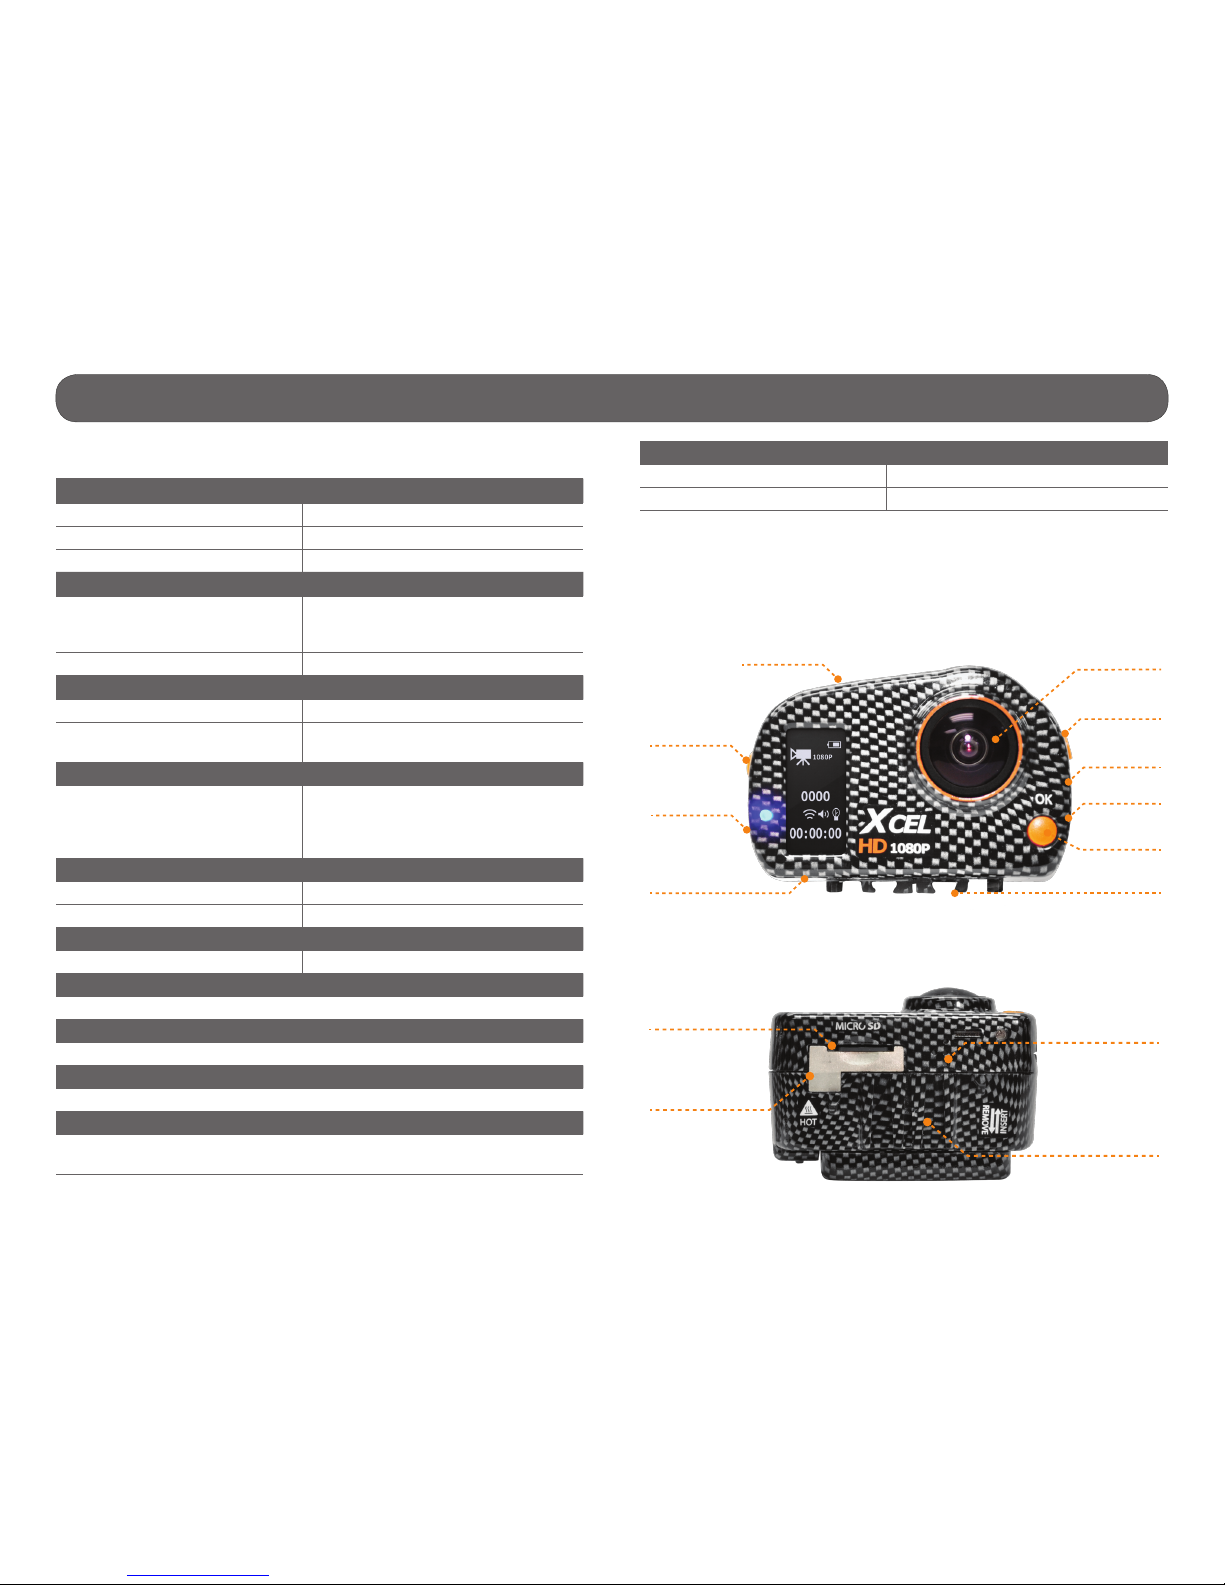
COMPONENTS
MODE
BUTTON
ON/OFF &
START/STOP
BUTTON
BACK
BUTTON
MICRO
HDMI PORT
WIDE ANGLE LENS
MICRO
USB PORT
MIC IN
SLIDE ADAPTOR
ANCHORAGE
MICROSD
SLOT
OK
BUTTON
MIC
MICROSD
SLOT
HEAT
SINK
MOUNT
SYSTEM
FRONT VIEW
BOTTOM VIEW

5
Basic functions
INSERTING THE MICROSD CARD
Insert a microSD memory card (up to 32 GB capacity)
in the card slot, gold contacts facing up. The card is
inserted correctly when a click is heard.
REMOVING THE MICROSD CARD
Lightly press the memory card into the camera once to pop it out of the slot
and remove it.
BATTERY INSTALLATION
Unlock the battery compartment cover by moving the lock
button to the right and remove the cover.
Insert the lithium-ion battery
(included) into the battery
compartment.
TURNING ON THE CAMERA
To turn on the camera, press and hold the button a few seconds
until the welcome screen appears.
To turn off the camera, press and hold the button a few seconds
until the shutdown screen appears.
BUTTON FUNCTION
1. : ON/OFF, START/STOP
2. M : Changes mode/Next
3. OK : Conrm entries
4. BACK : Exit the menu/Previous
USING THE CAMERA WITH THE WATERPROOF HOUSING
(XHD-OHT or XHD-OHC)
Insert the camera into the housing and close it tightly. The
housing can then be installed on any mount compatible
with XCELTM action cameras. It protects the camera and
allows to use for underwater use. The housing is water
proof up to 160ft. (picture: camera with XHD-OHT housing)
An access screw for the microphone is located at the
back of the housing. Remove the screw completely to
improve sound recording. Note that the housing is no longer
waterproof if the screw is loosened or removed, the water
will inltrate into the housing.
USING THE CAMERA WITHOUT THE WATERPROOF HOUSING
To use the camera without the housing, it is necessary
to use the slide adaptor. This allows you to attach the
camera on any mount compatible with XCELTM action
cameras. Install the slide adaptor by sliding it in the
anchorage system located under the camera.
To remove the slide adaptor from the camera, press
the ends and slide the adaptor toward the back of the
camera.
Note: The camera is compatible with microSD memory cards with
capacity up to 32GB, class 4 or higher (not included).
Note: The battery included with the camera is partially charged. It is
possible to use the camera as is, but for best results, recharge the
battery. (see Power section)
v1.0
Note: The slide adaptor has been designed to attach securely and snugly
to the anchorage system of the camera and resist to the activities with
impact.
SHUTTING
DOWN
1
2
4
3
6
Camera modes
DESCRIPTION OF ICONS
Turn on the device and switch from one mode to another by pressing the M
button. It is possible to see on the conguration screen 5 different modes.
VIDEO HD video recording
(WVGA, 720p or 1080p)
PHOTO
Taking photos
(1mp, 3mp or 5 mp and
1 to 6 consecutive photos)
TIME LAPSE
Taking photos at predened regular
intervals
(0.5, 2, 5, 10, 30 or 60 seconds)
VIEW
• Allows to see the number of recorded
les.
• Allows to view photos and videos
when the camera is connected to a
television using the HDMI cable.
SETTINGS Allows to set the advanced settings of
the camera.
See “Settings” section for more details.
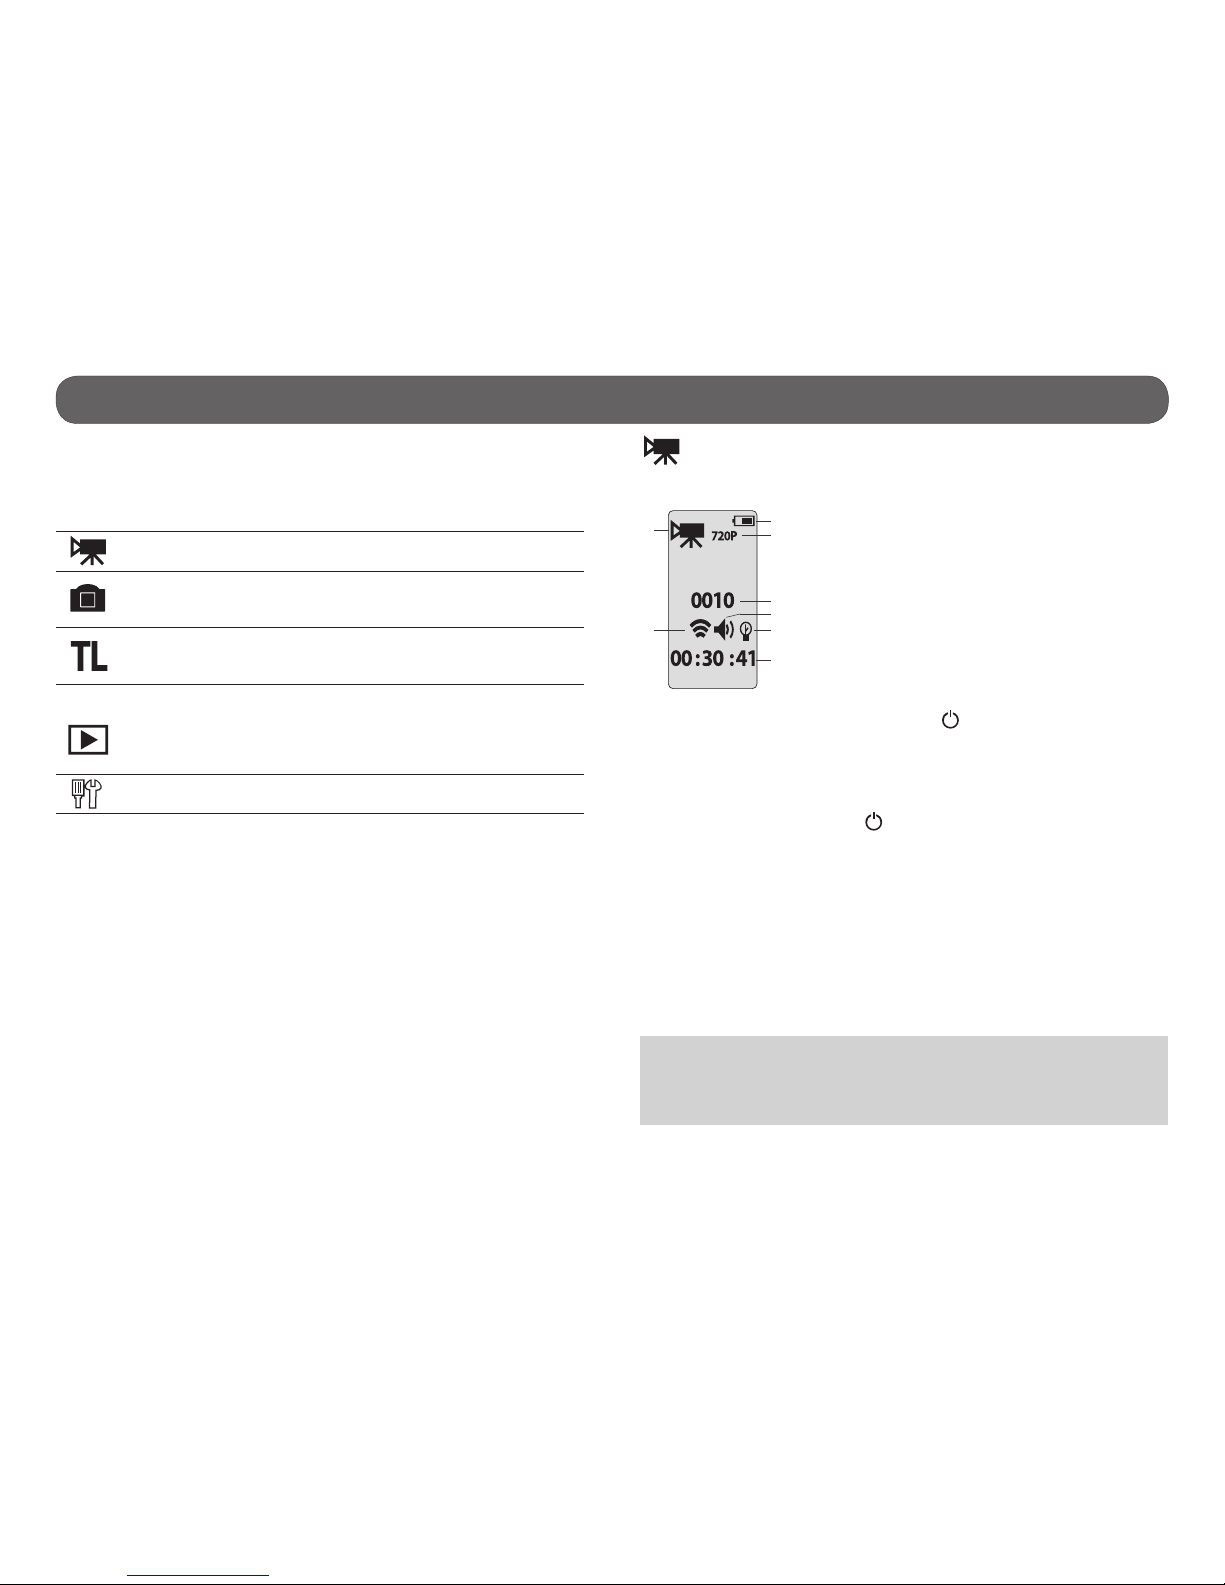
VIDEO MODE
• Allows to see the current conguration of the VIDEO mode.
1) Battery level
2) Icon of video mode
3) Video resolution
4) Number of recorded videos
5) Icon of the remote control (wireless)
6) Icon of the sound signal
7) Icon of the LED lights
8) Estimated remaining recording time
• To start recording a video, press the button. The camera emits a
sound signal (if the sound signal option is enabled), the recording time
is displayed on the screen and the LED lights ash while recording (see
“Operation of the LED lights and screen depending on selected options”
section for more details).
• To stop recording, press the button. The camera emits a sound signal
(if the sound signal option is enabled) and the remaining recording time
on the memory card will reappear on the screen.
When the microSD card is full, the camera automatically stops recording
and the current video will be saved. (see “Memory card” section)
When the battery is empty, the camera automatically stops recording and
the current video will be saved before the camera turns off.
It is possible to record a video with a maximum duration of approximately
45 minutes (3.66Go). When this maximum is reached, the camera stops
recording and automatically starts a new video. The rst video will be
identied XCEL0001 and the second XC010001.
Note: It is possible to take videos with the camera installed upside down.
The camera automatically displays the video in the right direction when
viewing on a computer or a TV. To do this, the camera must be installed
upside down before recording the video.
1
23
4
5
6
7
8

7
Camera modes
PHOTO MODE
• Allows to see the current conguration of the PHOTO mode.
1) Battery level
2) Icon of photo mode
3) Photo resolution
4) Icon of multi-shot option
5) Icon of the remote control (wireless)
6) Icon of the sound signal
7) Icon of the LED lights
8) Estimated number of pictures that can be taken
before the card is full
• To take a photo, press the button. The camera emit a sound signal
(if the sound signal option is enabled) and the LED lights ash to
indicate that a photo was taken (see “Operation of the LED lights and
screen depending on selected options” section for more details).
TIME LAPSE MODE
The TIME LAPSE mode allows to take photos at predened regular intervals.
• Allows you to see the current conguration of the TIME LAPSE mode.
1) Battery level
2) Icon of time lapse mode
3) Time interval between each photo
4) Icon of the remote control (wireless)
5) Icon of the sound signal
6) Icon of the LED lights
7) Estimated number of pictures that can be taken
before the card is full
• To start taking photos, press the button. The camera emit a sound
signal (if the sound signal option is enabled) and the LED lights ash to
indicate that photos are being taken (see “Operation of the LED lights
and screen depending on selected options” section for more details).
• To stop taking photos, press the button.
1
3
5
6
7
2
4
Note: This option allows to obtain photos of fast moving subjects.
5
3
1
6
7
8
2
5
4

8
Here is the information displayed on the television screen depending on the
mode selected (VIDEO, PHOTO or TIME LAPSE).
MODE INFORMATIONS
VIDEO Icon of the mode, video resolution, battery level and
remaining recording time.
PHOTO Icon of the mode, photo resolution, battery level and
number of pictures that can be taken before the card is full.
TIME LAPSE Icon of the mode, photo resolution, battery level and
number of pictures that can be taken before the card is full.
SETTINGS
• Allows to see the battery level and access the settings menu by pressing
the OK button.
1) Battery level
2) Icon of settings
Camera modes
VIEW MODE
• Allows to see the number of recorded les and view photos/videos when
the camera is connected to a television.
1) Battery level
2) Icon of VIEW mode
3) Number of recorded pictures
4) Total length of recorded video
VIEWING ON A TELEVISION
Allows to view photos and videos directly on a television.
1) Connect the HDMI cable (included) to the HDMI port of the TV and to
the camera.
2) Turn on the camera by pressing the button.
3) Navigate on the interface to VIEW mode by pressing the M button.
4) Select the VIEW mode by pressing the OK button. The photo or video
recorded will appear on the TV screen. To change the photos or videos,
use the OK and Back buttons. To view a video, press .
When the camera is connected to a televison, it is also possible to take
pictures and videos and access the settings menu. Navigate on the
interface to the desired mode by pressing the M button. See the respective
section of each mode for the use of the buttons.
PHOTO
3
1
4
2
2
1
HDMI

9
Date/ Time
Allows to set the date (Year / Month / Day) and time (hour / minute).
Use the OK button to conrm the entry and use the M and BACK button
to adjust the digits.
Note: When the camera is not powered for approximately 48 hours, it is
possible that the settings for the date and time could be reset. So
always verify the date and time before using the camera when this
occurs.
Remote control
Enable or disable the remote control (wireless).
Sound signal
Enable or disable the sound of the camera when using the buttons.
DEL lights
Enable or disable the LEDs lights. When the Remote control and LED lights
options are activated, the 4 LEDs ash slowly to indicate that the camera
is waiting for the signal from the remote control and ash rapidly during
record videos/photos (see “Operation of the LED lights and screen
depending on selected options” section for more details).
Erase
Allows to erase the last le or all les.
Settings
• Allows to set the advanced settings of the camera.
Navigating in the menu:
-The M button allows to move among the choices
-The OK button to select an option
-The BACK button to return to the previous menu
Video mode
Allows to record video in the following resolutions:
Resolution Field of view Screen
resolution Advantage
WVGA Wide 848 x 480 Greater lenght of recording
720p Ultra wide 1280 x 720 Largest eld of view
1080p Wide 1920 x 1080 The highest resolution
Photo mode (including the Multi-shot option)
1. Allows to take photos in the following resolutions:
1 mp, 3 mp or 5 mp
Changing this setting also affects photos taken in TIME LAPSE mode.
2. Allows to take 1 to 6 consecutive photos with every shot with a delay
of approximately 0,5 seconds between each photo.
TIME LAPSE mode
Allows taking photos at regular predened intervals:
0.5, 2, 5, 10, 30, 60 seconds.

10
Settings
OPERATION OF THE LED LIGHTS AND SCREEN DEPENDING ON SELECTED OPTIONS
REMOTE
CONTROL
OPTION
DEL
LIGHTS
OPTION
OPERATION OF THE LED LIGHTS AND SCREEN
BEFORE RECORDING VIDEOS/PHOTOS
OPERATION OF THE LED LIGHTS AND SCREEN
WHEN RECORDING VIDEOS/PHOTOS
ENABLED
Enabled
• The 4 LED lights ash every 2 seconds to indicate
that the camera is waiting for the signal from the
remote control (when the video, photo or time lapse
mode is shown on the screen).
•The screen turns off after 1 minute of inactivity
(ENERGY SAVING). To return to the screen, press the
M button.
Video/
Time lapse
• The 4 LED lights ash rapidly.
•The screen turns off after 5 seconds
(ENERGY SAVING).
Photo • The 4 LED lights ash rapidly.
Disabled
• The LED on the back ashes every 2 seconds to
indicate that the camera is waiting for the signal
from the remote control (when the video, photo or
time lapse mode is shown on the screen).
•The screen turns off after 1 minute of inactivity
(ENERGY SAVING). To return to the screen, press the
M button.
Video/
Time lapse
• The LED light on the back ashes
rapidly.
•The screen turns off after 5 seconds.
(ENERGY SAVING).
Photo
• The LED light on the back ash twice.
•The screen turns off after 10 seconds
(ENERGY SAVING).
DISABLED
Enabled •The camera turns off after 2 minutes of inactivity
(AUTO SHUTTING DOWN).
Video/
Time lapse
• The 4 LED lights ash rapidly.
•The screen turns off after 5 seconds
(ENERGY SAVING).
Photo • The 4 LED lights ash rapidly.
Disabled •The camera turns off after 2 minutes of inactivity
(AUTO SHUTTING DOWN).
Video/
Time lapse
• The LED light on the back ashes
rapidly.
•The screen turns off after 5 seconds
(ENERGY SAVING).
Photo • The LED light on the back ash twice.
ENERGY
SAVING
ENERGY
SAVING
ENERGY
SAVING
ENERGY
SAVING
ENERGY
SAVING
ENERGY
SAVING
ENERGY
SAVING
SHUTTING
DOWN
SHUTTING
DOWN
Este manual sirve para los siguientes modelos
1
Tabla de contenidos


