Wine cellr WC1958PLBC Manual de usuario

VERSION FRANÇAISE P.21
Instruction manual
Models:
WC34PLSZ5 (1 zone)
WC38SSTBC5 (2 zones wine/beverages)
WC1958PLBC (2 zones wine/beverages)
WC46PLSZ5 (1 zone)
WC46PLDZ5 (2 zones)
PLEASE READ THIS MANUAL CAREFULLY BEFORE INSTALLATION AND USE.

2

3
Table des matières
INFORMATION/SAFETY INSTRUCTIONS 4 to 5
Before using your device 4
Important safety instructions 4
Pre-installation tips 5
INSTALLATION 6 to 10
Measurements and dimensions 6
Installing the handle 8
Reversing the door 8
Bottle layout and storage 10
OPERATION 11 to 15
Wine cabinet operation 11
•Display panel (A) 12
•Before you start (B) 12
•Temperature setting (C) 13
•Locking and unlocking the panel (D) 13
•Light adjustment 13
•Changing the display to Celsius or Fahrenheit 13
•Ideal temperature for serving your wine 14
•Lock 14
•How to remove a telescopic shelf 15
MAINTENANCE 15 to 16
Cleaning the wine cabinet 15
Filter change 16
Power outage 16
Energy Saving Tips 16
TROUBLESHOOTING 17 to 18
YOUR WINE CELL’R WARRANTY 19 to 21
Limited Warranty 19
Terms & Exclusions 19
Contact us 21
Registration card 21
Model and serial number of the unit 21

4
INFORMATION/SAFETY INSTRUCTIONS
Before using your device
•Remove inner and outer packing material.
•Allow the appliance to stand upright for approximately 24 hours before plugging it
in to avoid complications in the cooling system.
•Use a soft cloth with warm water to clean the inside and outside.
Important safety instructions
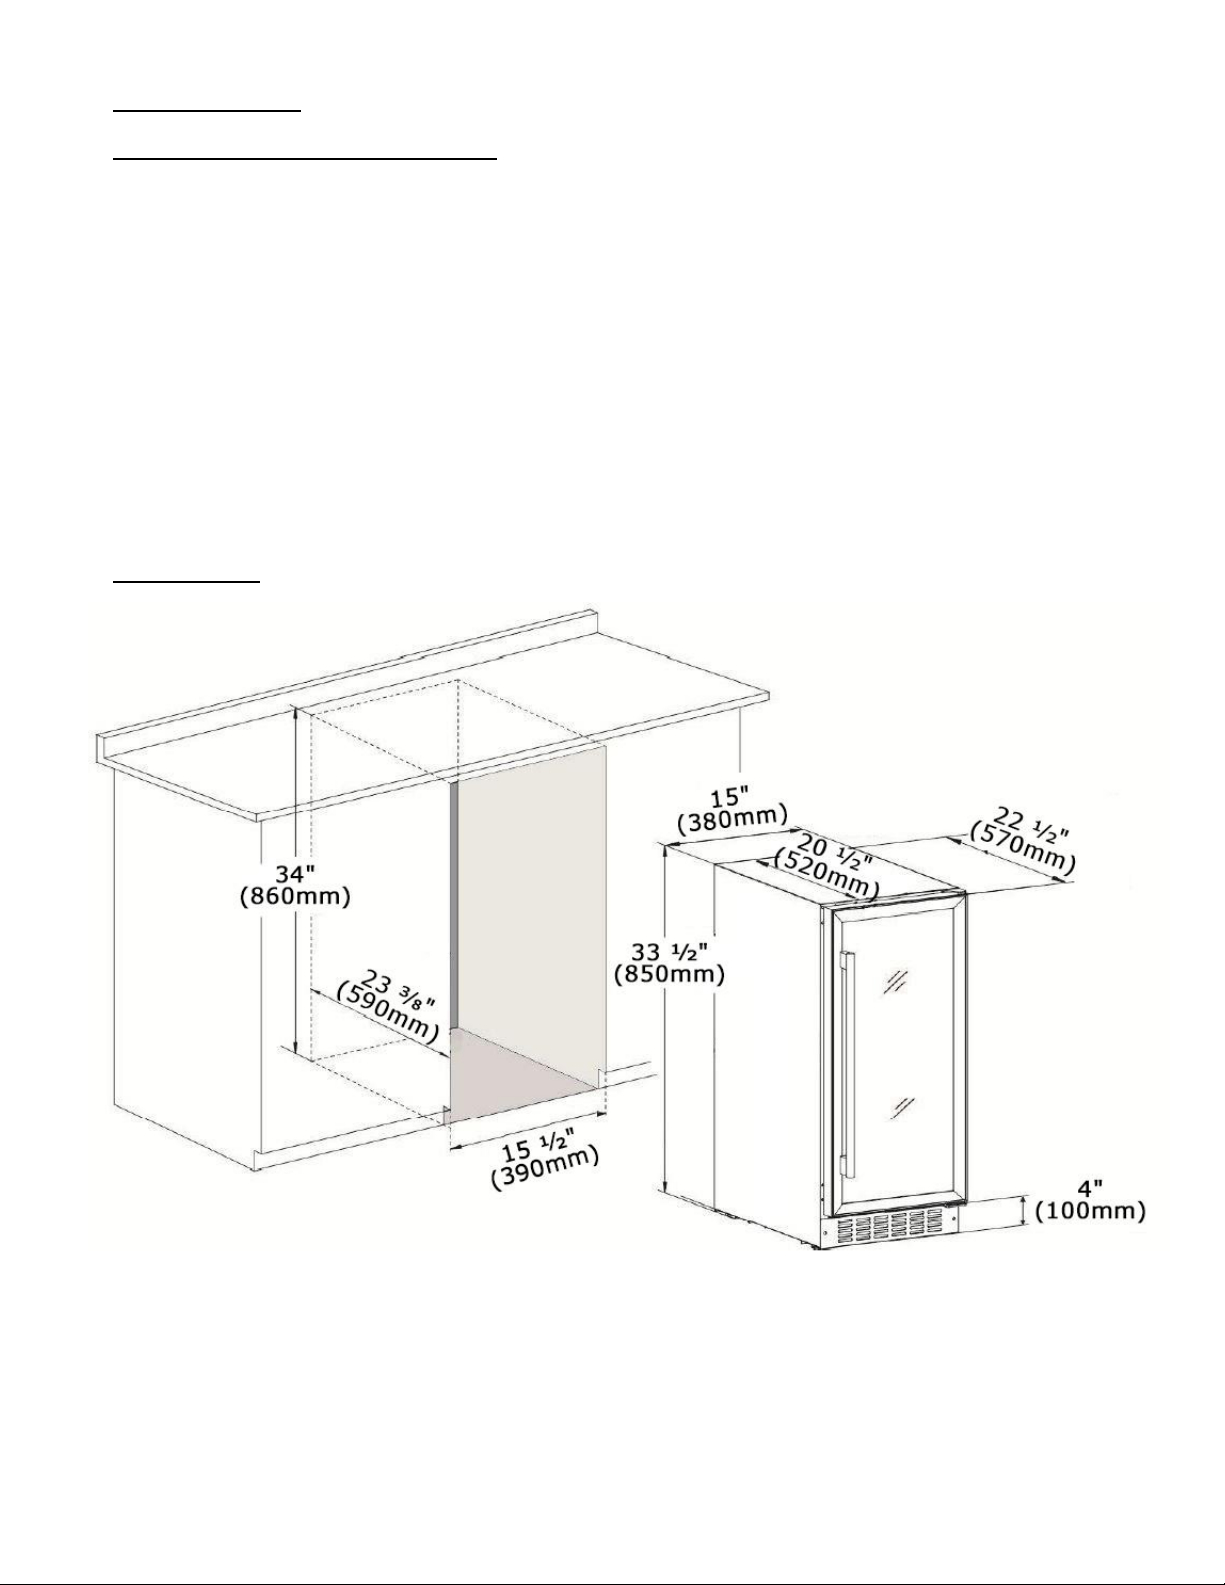
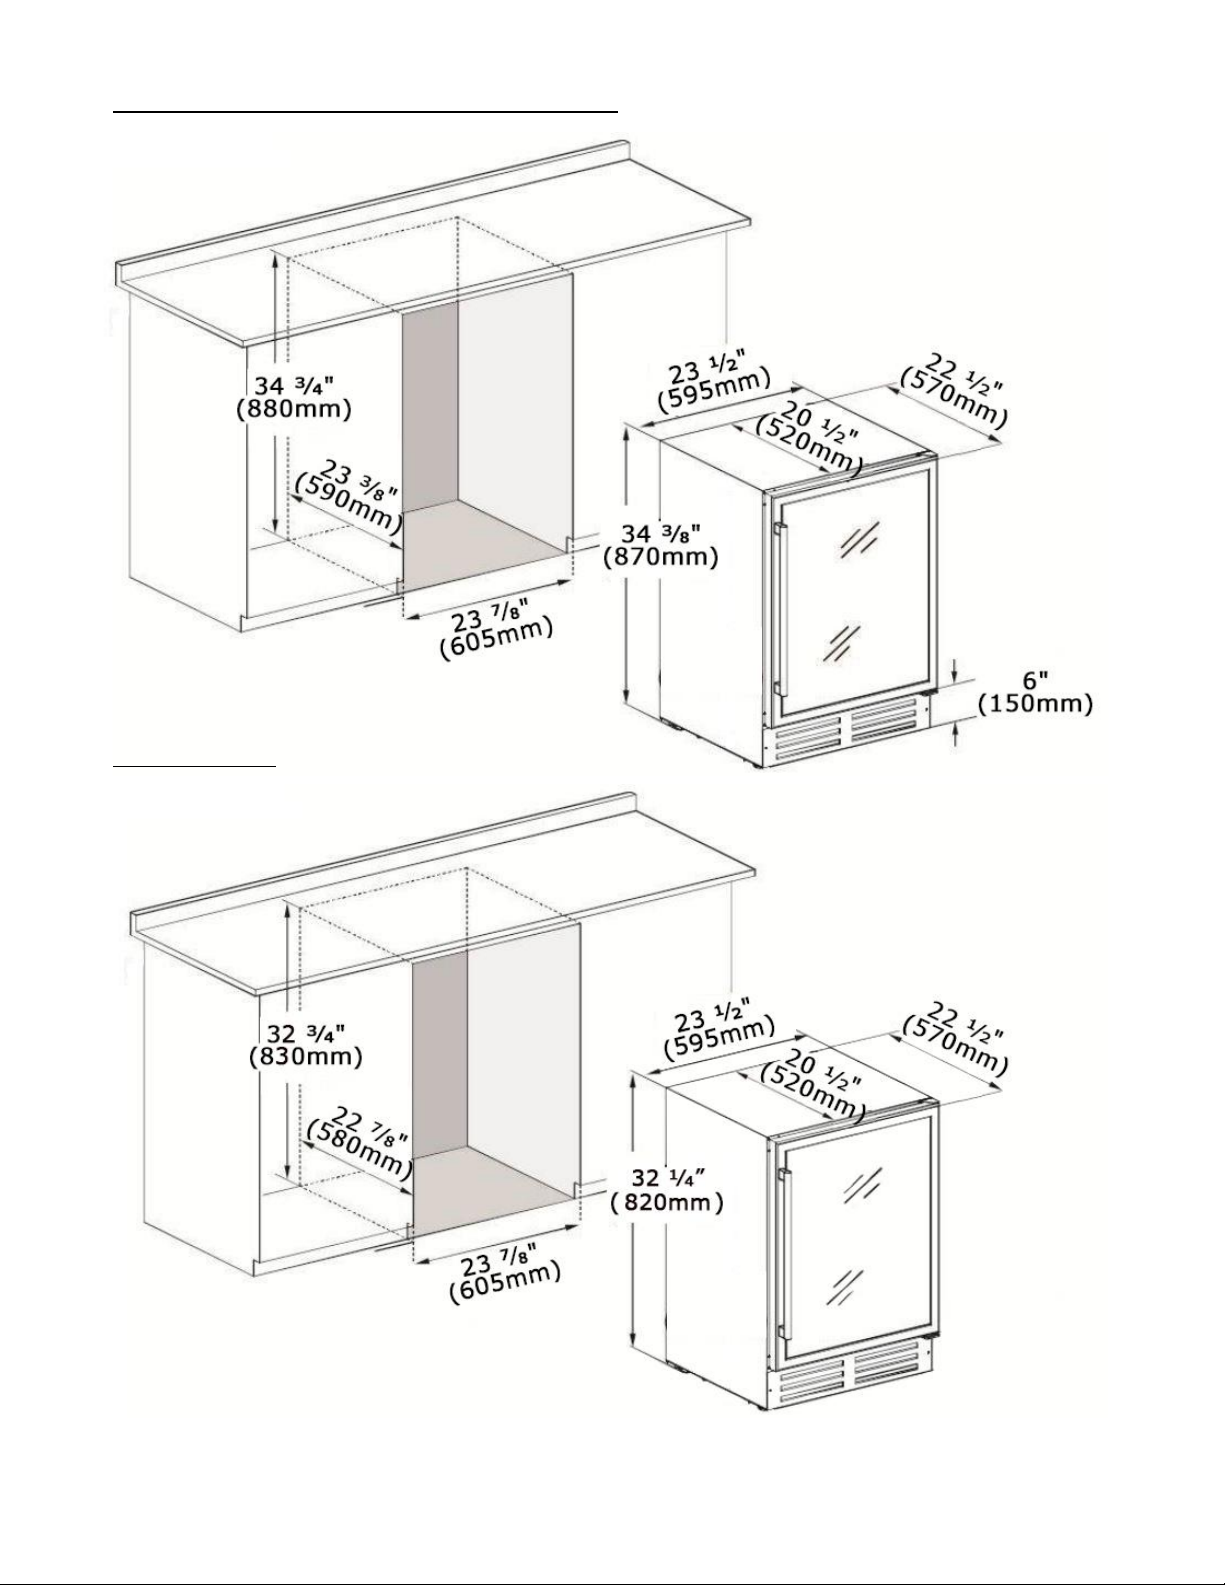
Before using the appliance, please position and install it properly according to the
specifications in the manual. To avoid the risk of fire, electric shock or injury when using
the unit, please read and follow the precautions suggested in this manual.
•Never clean any part of the unit with flammable liquids that may cause a fire or
explosion hazard.
•Do not store gas or other flammable products near the appliance.
•Do not plug or unplug the appliance when your hands are wet.
•Unplug the appliance or disconnect the power supply before making a service call,
servicing or cleaning the appliance. Failure to do so may result in electric shock or
death.
•Do not attempt to replace or repair any parts on the appliance unless specified in
the manual or refer servicing to a qualified technician.
•The front of the appliance must not be obstructed in any way to ensure adequate
ventilation.
•This appliance is designed and intended for use by persons who are familiar with the
operation of electrical appliances. All other persons (including children) must be
supervised or instructed in advance by a person responsible for their safety.
•Children must be supervised not to play with the appliance.
•Do not use solvent-based or abrasive cleaners inside the appliance, as these may
discolour the interior.
•Do not use this unit for any purpose other than recommended.
•The use of an extension cord is not recommended by the manufacturer and may be
dangerous.
•When disposing of the appliance, be sure to remove the door and leave the shelves
in place to prevent children from climbing inside. Make sure that the cooling and
heating circuit at the bottom rear of the unit is not damaged. The symbol on the
product or on its packaging indicates that this appliance is not a product to be
disposed of in the household waste, but rather should be taken to an appropriate
recycling facility for electrical appliances.

5
Pre-installation tips
This appliance is designed for flush-mounted or freestanding installation
•The appliance is intended to be used exclusively for the storage of wine.
•Place your wine cabinet on a flat floor strong enough to support it when fully loaded.
•It is important that the appliance is level to operate properly (check with a level
from left to right and front to back). You can adjust the feet of the appliance to level
it.
•Make sure that there are enough people to move and install the appliance to prevent
damage to the appliance or people. When moving the appliance, do not tilt it more
than 45 degrees.
•The appliance must be installed away from heat sources such as heating system,
radiator, oven. Direct sunlight can affect the acrylic coating and heat sources can
increase the energy use of the wine cabinet. Cold and extreme ambient
temperatures can also cause malfunctions of the appliance.
•Avoid placing the appliance in damp locations.
•Once in its location, wait 24 hours before plugging in the appliance.
•Make sure that the voltage/current indicated on the label matches your supply
voltage. Plug the appliance into a 3-pin socket, do not remove the grounding rod.
Do not use an adapter and do not use an extension cord.
•It is recommended to plug the wine cabinet into a power bar with surge protector.
•It is recommended to provide a separate circuit for your appliance.
•The fuse (or circuit breaker) size should be 15 A or greater.
•Any questions regarding the power supply and/or grounding should be directed to
an electrician or an authorized service center.

6
INSTALLATION
Measurements and dimensions
The cut-out dimensions shown below allow door clearance and access to the sliding shelves
when the wine cabinet is installed as a flush-mounted appliance.
Your wine cabinet has been manufactured with a zero-clearance door, so no additional
space is required to accommodate door swing when building your cabinets.
These cut-out dimensions indicate the minimum space required for your wine cabinet to
function as intended.
Note that the plug on the socket requires 38 mm of clearance at the rear when plugged in
and the handle is a maximum of 45 mm deep, depending on the model.
WC34PLSZ5

7
WC38SSTBC5 / WC46PLSZ5 / WC46PLDZ5
WC1958PLBC

8
Installing the handle
1. Move the door seal behind the handle with your finger. In some models, plastic caps
cover the screws; remove them to expose the screws.
2. Insert the screws into the pre-drilled holes in the handle.
3. Install the handle and tighten the screws.
4. Replace the seal and the door caps.
Reversing the door (WC34PLSZ5/WC46PLSZ5/WC46PLDZ5)
Before you start
Make sure the wine cabinet is level. Seal the shelves with tape to prevent movement during
the process. The door of this appliance can be installed to open on the left or right side. To
reverse the movement of your wine cabinet door and open it on the opposite side, please
follow the instructions and diagram below.
1. Open the door and unscrew the screws of the lower hinge.

9
2. Remove the door from the top hinge, remove the metal pin and remove it.
3. Use a small flat head screwdriver to lift and remove the plastic cap on the upper center
(locking hole) of the door and insert it into the lower center hole, rotate the door 180
degrees (counterclockwise) so that the top becomes the bottom.
4. Unscrew the upper and lower hinge.
5. Dislodge the plastic caps on the left side of the cabinet and change them to the right
side.
6. Install on the opposite side the left hinges included as accessories with the instruction
manual.

10
7. Screw the metal pin under the door, then install the door by retracting it into the upper
hinge and then into the lower hinge. Replace the screws of the support bar at the bottom
to secure the door.
Bottle layout and storage
Your wine cabinet has been designed to safely store a maximum number of
bottles. We recommend that you follow the tips below to optimize loading.
• Remove the tape from the shelves once the appliance is stable and ready for storage.
• Place the bottles evenly to avoid concentrating the weight in one place. Bottles should
not touch the back of the wine cabinet. Your wine cabinet has been designed to store large
bottles such as Pinot Noir and Champagne. These larger bottles reduce the number of
bottles you can place on a shelf. Make sure that not all bottles are grouped together at the
top or bottom of the wine cabinet for optimal cooling.
• Pull out only one telescopic shelf at a time. Never try to pull more than one telescopic
shelf at a time.
Este manual sirve para los siguientes modelos
4
Tabla de contenidos
Otros manuales de Electrodoméstico de cocina de Wine cellr


