Willtronics WT-1010 Manual de usuario

WILLTRONICS
D
etection system
WT1010
OWNER’S MANUAL

FCC Information
Note: This equipment has been tested and found to comply with the limit for a
Class B digital device,pursuant to part 15 of the FCC Rules. These limits are
designed to provide reasonable protection against harmful interference in a
residential Installation. This equipment generates, uses, and can radiate radio
frequency energy and, if not installed and used in accordance with the
instructions. may cause harmful interference to radio communications.
However, there is no guarantee that interference will not occur in a particular
installation. If this equipment does cause harmful interference to radio or
television reception, which can be determined by turning the equipment off and
on, the user is encourage to try to correct the interference by one or more of
the following measures:
-Reorient or relocate the receiving antenna.
-Increase the separation between the equipment and receiver.
-Connect the equipment into an outlet on a circuit different from that to
which the receiver is connected
-Consult the dealer or an experience radio/TV technician for help
Change or modification not expressly approved by the party responsible for
Compliance could voidthe user’s authority to operate the equipment

CONTENTS
Ⅰ. MODEL FEATURES AND CONTROLS
Ⅱ. ACCESSORIES INCLUDED WITH RADAR DETECTOR
Owner’s Manual
Power Cord
Mounting kit
Hook & Loop Fasteners
Spare Fuse
Ⅲ. MOUNTING INSTALLATION
Windshield Mounting
Dash Board Mounting
Power connection
Ⅳ. OPERATION GUIDE
Power on & Self-Test
Feature Engaged Confirmation
Mute Mode
City/City1 Modes
Dim/Dark Modes
VG-2 Mode
Tutorial Mode
Memory Retention
Ⅴ. RADAR/ LASER/ VG-2 ALERTS
Speed Radar Visual /Audio Alerts
Laser Visual /Audio Alerts
VG-2 Visual /Audio Alerts
Instant Visual/Audio Alerts
Safety Radar Visual/Audio Alerts
Ⅵ. TROUBLESHOOTING GUIDE
Factory setting
Ⅶ. SPEED MONITORING DEVICES
Radar speed gun
Laser speed gun
Radar Detector Detectors
Ⅷ. MAINTENANCE
Care and Maintenance
Fuse Replacement
Ⅸ. SPECIFICATIONS

Ⅰ. MODEL FEATURES AND CONTROLS
X, K, Ka Super Wideband Detection
All Laser Detection
360°Laser Detectability
Safety Radar System (SA, SWS) Detection
VG2 (Radar Detector Detector) Detection
VG2 Undetectability
Instant On /Pulsed Radar Alert
Smart ICON Display (Bar LED:8 Cell)
Memory Retention
Bar-graph Signal Strength meter
Visual & Audible Alarms
External Laser Jack (Option)
Power On/Off with Volume Control
Mute Mode
Dim/Dark Modes
City/City1 Modes
VG2 Mode
Tutorial Mode
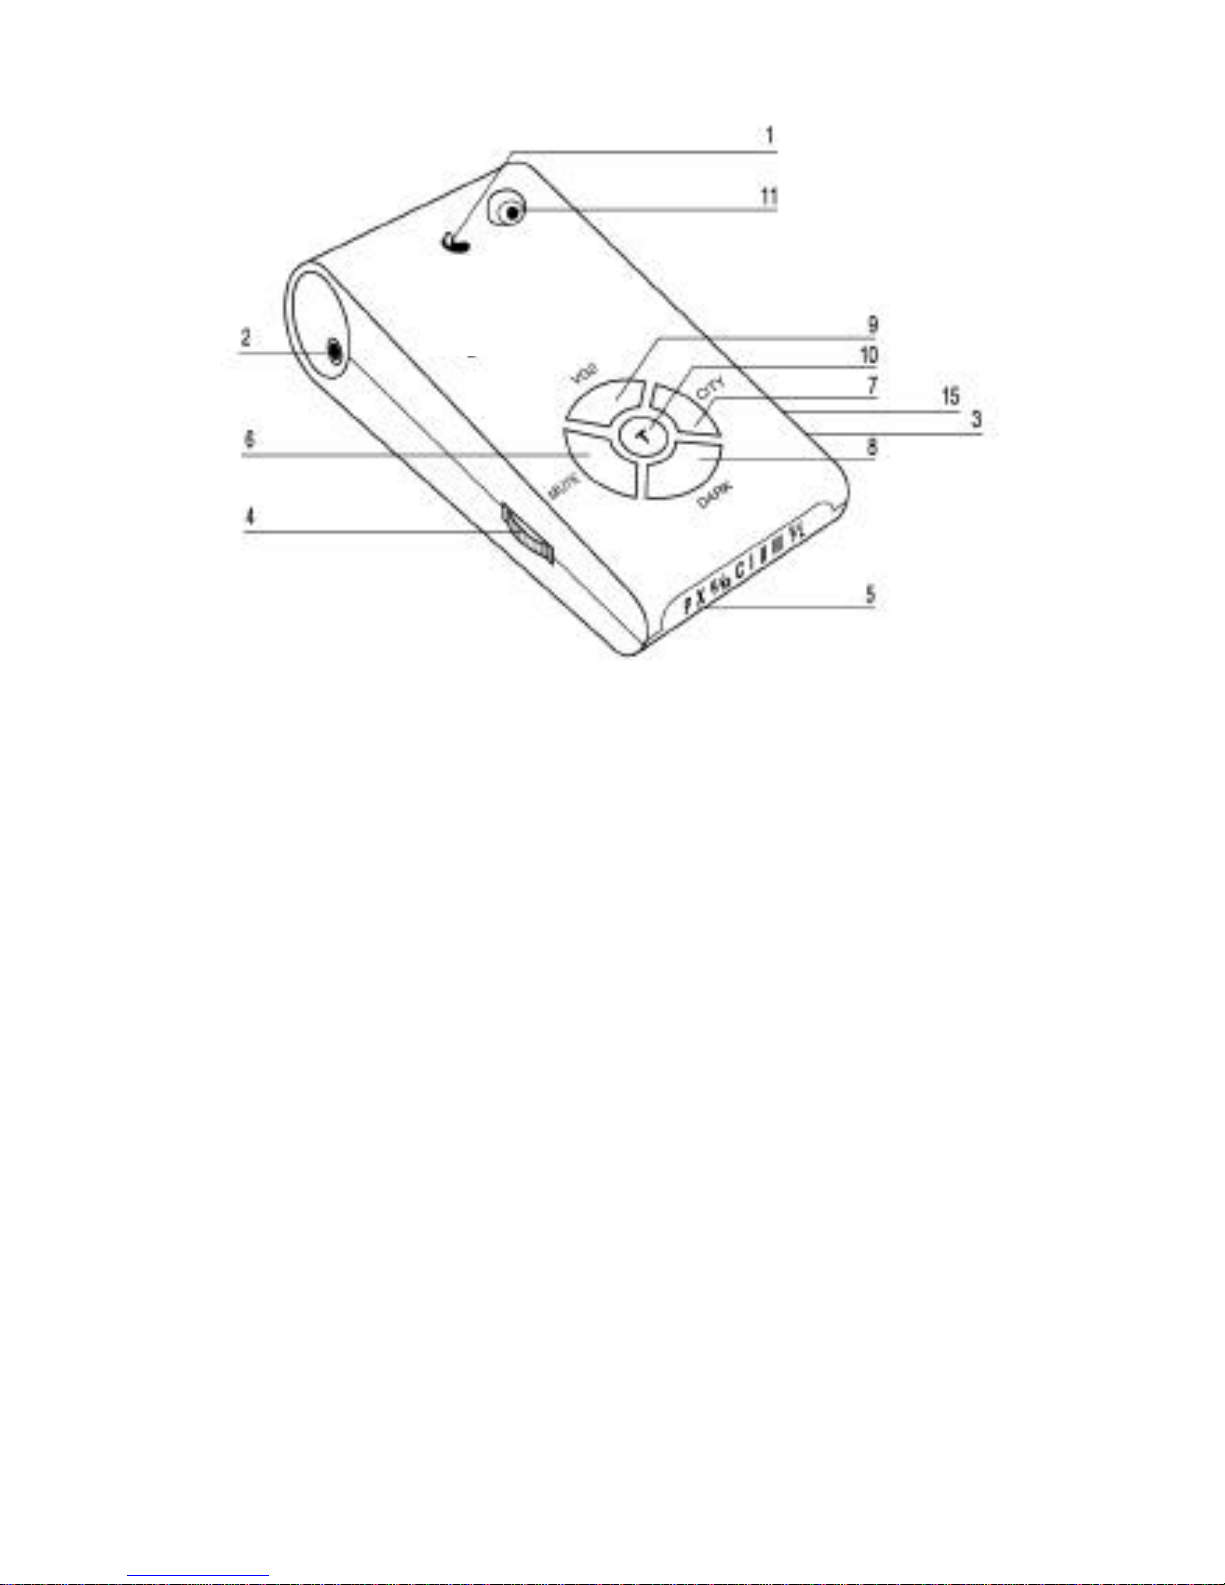
1. Bracket Lock/Release Button
Easy lock/release of the mounting
bracket.
2. Power Jack
Connection for the power cord.
3. Speaker
Provides distinct audio alarms for X, K, Ka band radar, laser
and the VG-2
4. Power/Volume Control
Turns unit on/off and adjusts audio level.
5. High Visibility ICON Display
Provides distinct visual confirmation of
signals strength, signal band identification and indicates engaged modes
of operation.

6. MUTE Button
Pressing MUTE during a radar/laser encounter silences
audio alerts.
7. CITY Button
Reduces the annoyance of false alerts typically
encountered in urban driving areas.
8. DARK Button
Reduces illumination of display to “dim”or “dark”
settings.
9. VG2 Button
Pressing VG2 to engage or disengage VG-2.
10. T Button
Tutorial mode engage button
11. Laser Lens (Rear)
An integrated optical waveguide provides superior
detection of laser signals transmitted from behind
12. Laser Lens (Front)
High gain optical lens array provides increased
sensitivity and field of view for leading edge laser detection.
13. Radar Antenna
Compact, high-efficiency antenna receives radar
signals.
14. Mounting Bracket Location
Slot holds mounting bracket firmly.
15. EXT
Port for external laser connection (Option Laser Module)

Ⅱ. ACCESSORIES INCLUDED WITH RADAR DETECTOR
1. Owner’s Manual 2. Power Cord
3. Mounting kit 4. Hook & Loop Fasteners
5. Spare Fuse 2A 250V

Ⅲ. MOUNTING INSTALLATION
Mount the unit as low as possible near the center of the windshield.
Do not mount your unit behind wipers, ornaments, mirrored sunscreens,
etc. These obstructions have metal surfaces which can affect radar and
laser signals and reduce critical warning time. (Regular tinted glass does
not affect reception.)
Some newer windshields have an lnstaclear™or Electriclear™type
coating, which affect radar signals.
Avoid placing unit in direct contact with windshield.
To reduce the possibility of theft, conceal your unit when not in use.
Windshield Mounting
Install the mounting kit at the windshield as it follows.
IMPORTANT: Some newer cars have a plastic safety coating on the inside
of the windshield. The windshield bracket may leave permanent marks on
this type of surface. We recommend that you do not leave the suction
cup bracket on the window in direct sunlight. If the detector is removed,
this may cause blistering of the dash in some vehicles.
Slide the detector onto the bracket and get it locked with switch.
If necessary, the unit may be leveled by bending the windshield bracket.
Push the bracket release switch and remove the detector before bending.

Dashboard Mounting
Make sure the mounting location you have chosen is relatively level and
is clean and dry. Clean with isopropyl alcohol if necessary to remove any
waxes or polishes.
Separate the fastener strips. Peel the paper backing off each strip and
adhere one piece to the dash and the other piece to the bottom of the
unit, taking care
not to cover the serial number.
Be careful not to place the fastener strip over the unit’s serial number. If
the fastener strip is removed, the serial number may be pulled off the unit.
Units without serial numbers are not covered under warranty.
Power Connection
Plug the small end of the power cord into the unit’s power jack.
Plug the large end into the vehicle’s cigarette lighter.

Ⅳ.OPERATION GUIDE
Power On And Self-Test
Each time your WT1010 detector is turned on, an automatic self-test
sequence confirms that the speaker and visual displays are functional and
displays the engaged features.
Turn Power/Volume control clockwise. Display reads:
Feature Engaged Confirmation
Each time a button is pressed one beep confirms feature“
on
”, two beeps
confirm feature “
off
”.
Tabla de contenidos


