Wen 4021 Manual de usuario

Model # 4021
8-INCH ELECTRIC
POLE SAW
bit.ly/wenvideo
Your new tool has been engineered and manufactured to WEN’s highest standards for dependability,
ease of operation, and operator safety. When properly cared for, this product will supply you years
of rugged, trouble-free performance. Pay close attention to the rules for safe operation, warnings,
and cautions. If you use your tool properly and for intended purpose, you will enjoy years of safe,
reliable service.
IMPORTANT:
NEED HELP? CONTACT US!
Have product questions? Need technical support?
Please feel free to contact us at:
800-232-1195
WENPRODUCTS.COM
(M-F 8AM-5PM CST)

TABLE OF CONTENTS
Technical Data 2
3
4
7
8
9
11
14
15
17
General Safety Rules
Specific Safety Rules For Circular Saw
Electrical Information
Know Your Circular Saw
Assembly and Adjustments
Operation
Exploded View and Parts List
Warranty
TECHNICAL DATA
Model Number:
Motor:
Saw Chain:
Speed (no load):
Max Reach:
Oil Tank Capacity:
Weight:
4021
120 V, 60 Hz, 6.5A
8 inch
6000 RPM
9 feet
2 ounces
8 pounds
2
Maintenance

3
GENERAL SAFETY RULES
Safety is a combination of common sense, staying alert and knowing how your item works. SAVE THESE SAFE-
TY INSTRUCTIONS.
WARNING: To avoid mistakes and serious injury, do not plug in your tool until the following steps
have been read and understood.
1. READ and become familiar with this entire instruction manual. LEARN the tool’s applications, limitations, and
possible hazards.
2. AVOID DANGEROUS CONDITIONS. Do not use power tools in wet or damp areas or expose them to rain.
Keep work areas well lit.
3. DO NOT use power tools in the presence of flammable liquids or gases.
4. ALWAYS keep your work area clean, uncluttered, and well lit. DO NOT work on floor surfaces that are slippery
with sawdust or wax.
5. KEEP BYSTANDERS AT A SAFE DISTANCE from the work area, especially when the tool is operating.
NEVER allow children or pets near the tool.
6. DO NOT FORCE THE TOOL to do a job for which it was not designed.
7. DRESS FOR SAFETY. Do not wear loose clothing, gloves, neckties, or jewelry (rings, watches, etc.) when op-
erating the tool. Inappropriate clothing and items can get caught in moving parts and draw you in. ALWAYS wear
non-slip footwear and tie back long hair.
8. WEAR A FACE MASK OR DUST MASK to fight the dust produced by sawing operations.
WARNING: Dust generated from certain materials can be hazardous to your health. Always oper-
ate the tool in a well-ventilated area and provide for proper dust removal. Use dust collection systems
whenever possible.
9. ALWAYS remove the power cord plug from the electrical outlet when making adjustments, changing parts,
cleaning, or working on the tool.
10. KEEP GUARDS IN PLACE AND IN WORKING ORDER.
11. AVOID ACCIDENTAL START-UPS. Make sure the power switch is in the OFF position before plugging in
the power cord.
12. REMOVE ADJUSTMENT TOOLS. Always make sure all adjustment tools are removed from the saw before
turning it on.
13. NEVER LEAVE A RUNNING TOOL UNATTENDED. Turn the power switch to OFF. Do not leave the
tool until it has come to a complete stop.
14. NEVER STAND ON A TOOL. Serious injury could result if the tool tips or is accidentally hit. DO NOT store
anything above or near the tool.

4
15. DO NOT OVERREACH. Keep proper footing and balance at all times. Wear oil-resistant rubber-soled foot-
wear. Keep the floor clear of oil, scrap, and other debris.
16. MAINTAIN TOOLS PROPERLY. ALWAYS keep tools clean and in good working order. Follow instruc-
tions for lubricating and changing accessories.
17. CHECK FOR DAMAGED PARTS. Check for alignment of moving parts, jamming, breakage, improper
mounting, or any other conditions that may affect the tool’s operation. Any part that is damaged should be properly
repaired or replaced before use.
18. DO NOT operate the tool if you are under the influence of drugs, alcohol, or medication that may affect your
ability to properly use the tool.
19. USE SAFETY GOGGLES AT ALL TIMES that comply with ANSI Z87.1. Normal safety glasses only have
impact resistant lenses and are not designed for safety. Wear a face or dust mask when working in a dusty environ-
ment. Use ear protection such as plugs or muffs during extended periods of operation.
GENERAL SAFETY RULES
WARNING: Do not let comfort or familiarity with product (gained from repeated use) replace strict
adherence to product safety rules. If you use this tool unsafe or incorrectly, you can suffer serious per-
sonal injury!
1. Use the pole saw for cutting wood only. Do not use this tool for cutting plastic, masonry, etc.
2. Keep the cable away from the cutting area. When working with the tool, make sure to keep the blade away from
any extension cords or wiring.
3. Keep all parts of your body clear of the chain while the saw is running. Before starting the saw, make sure the
chain is not touching any objects
4. Always hold the pole saw with your right hand at the rear handle and your left hand at the front handle. Holding
the chain saw differently (left hand on rear handle, right hand on front handle) may affect the balance of the saw
and will increase the risk of injury.
5. Wear eye and hearing protection. Other personal protection equipment for the head, hands, legs and feet is
recommended.
6. Do not operate the saw while sitting or standing in a tree. Make sure to have a safe stance at all time. Only use the
saw when standing on solid, safe and level ground.
7. When cutting a branch that is under tension, take into account that the branch may spring back.
8. Use particular caution when cutting brush and young trees. The thin material may get caught in the chain and hit
you or throw you off balance.
SPECIFIC RULES FOR POLE SAWS

5
SPECIFIC RULES FOR POLE SAWS
9. Carry the switched-off chain saw using the front handle with the chain pointing away from your body. Always put
on the protective cover when trasnporting or storing the chain saw. Carefully handling the saw greatly reduces the
risk of accidentally touching the sharp cutting chain.
10. Follow the instructions for lubrication, chain tension and changing accessories. An improperly tensioned or
lubricated chain may either break or considerably increase the risk of kickback.
11. Keep the handles dry, clean and free from gas, oil and grease. Slippery handles may lead to a loss of control.
12. Never attempt to use an incomplete or altered saw.
13. This machine is not intended for use by persons with an impaired physical, sensory or mental capacity or by
persons with insufficient pole saw knowledge or experience.
14. Remain alert; pay attention to what you are doing and proceed sensibly when working with an electric tool. Do
not use the machine if you are tired or under the influence of drugs, alcohol or medication.
15. Young persons under the age of 16 are not permitted to operate this device.
16. Inspect the saw thoroughly before use for damage. If any parts or pieces appear to be missing or damaged, do
not operate the saw.
17. Do not operate during adverse weather conditions, particularly during lightening and rain.
18. Always make sure the chain tension is correct.
19. Only use properly functioning chainsaws. Only work with a saw chain sharpened according to regulations.
20. Never saw with the upper edge or tip of the guide bar.
21. Always hold the saw firmly with two hands.
22. Sawing wood under tension necessitates an increased amount of caution. Wood that is suddenly released from
tension can react in a completely uncontrolled manner. This can result in severe to deadly injuries. Such work may
only be performed by trained specialists.

CHECK with a licensed electrician or service personnel if you do not completely understand the grounding instruc-
tions or whether the tool is properly grounded.
CAUTION: In all cases, make certain the outlet in question is properly grounded. If you are not sure, have a li-
censed electrician check the outlet.
WARNING: This tool is for indoor use only. Do not expose to rain or use in damp locations.
Guidelines for using extension cords
Make sure your extension cord is in good condition. When using an extension cord, be sure to use one heavy
enough to carry the current your product will draw. An undersized cord will cause a drop in line voltage resulting
in loss of power and overheating. The table below shows the correct size to be used according to cord length and
nameplate ampere rating. When in doubt, use a heavier cord. The smaller the gauge number, the heavier the cord.
Make sure your extension cord is properly wired and in good condition. Always replace a damaged extension cord
or have it repaired by a qualified person before using it.
Protect your extension cords from sharp objects, excessive heat and damp/wet areas.
Use a separate electrical circuit for your tools. This circuit must not be less than a #12 wire and should be protected
with a 15 A time-delayed fuse. Before connecting the motor to the power line, make sure the switch is in the OFF
position and the electric current is rated the same as the current stamped on the motor nameplate. Running at a
lower voltage will damage the motor.
AMPERAGE REQUIRED GAUGE FOR EXTENSION CORDS
25 ft. 50 ft. 100 ft. 150 ft.
6.5 A 16 gauge 16 gauge 16 gauge 14 gauge
ELECTRICAL INFORMATION
GROUNDING INSTRUCTIONS
IN THE EVENT OF A MALFUNCTION OR BREAKDOWN, grounding provides the path of least resistance
for an electric current and reduces the risk of electric shock. This tool is equipped with an electric cord that has an
equipment grounding conductor and a grounding plug. The plug MUST be plugged into a matching outlet that is
properly installed and grounded in accordance with ALL local codes and ordinances.
DO NOT MODIFY THE PLUG PROVIDED. If it will not fit the outlet, have the proper outlet installed by a
licensed electrician.
IMPROPER CONNECTION of the equipment grounding conductor can result in electric shock. The conduc-
tor with the green insulation (with or without yellow stripes) is the equipment grounding conductor. If repair or
replacement of the electric cord or plug is necessary, DO NOT connect the equipment grounding conductor to a
live terminal.
6

7
AMPERAGE REQUIRED GAUGE FOR EXTENSION CORDS
25 ft. 50 ft. 100 ft. 150 ft.
6.5 A 16 gauge 16 gauge 16 gauge 14 gauge
KNOW YOUR POLE SAW
1
2
3
45
6
7
8
9
10
11
12
1
2
3
4
5
6
7
8
9
10
11
12
13
14
Main Cable
Cable Strain Relief
Trigger Switch
Rear Handle
Handle Rotation Switch
Middle Handle Bar
Telescoping Pole
Telescope Release Lever
Motor Housing
Oil Tank Cover
Guide Bar
Saw Chain
Tension Adjustment Knob (Outside Knob)
Cover Release Knob (Inside Knob)
14
13

8
ASSEMBLY AND ADJUSTMENTS
WARNING: Always be sure that the tool is switched off and unplugged before adjusting, adding accesso-
ries, or checking a function on the tool.
ASSEMBLY OF GUIDE BAR AND SAW CHAIN
1. Loosen the cover release knob (Fig. A - 1) to release the chain
sprocket cover. Remove the chain sprocket cover.
2. Place the chain in the groove of the outside edge of the guide
bar as shown. NOTE: make sure the chain’s direction of rotation
is correct. The blades on each cutting link on the upper side of
the cutting bar must be facing towards the tip of the chainsaw.
3. Insert the guide bar and chain into the mount on the chainsaw
(Fig. B). In the process, guide the chain around the pinion and
hang the guide bar in the chain tensioning bolts.
4. Adjust the chain tension (see the following section - TEN-
SIONING THE CHAIN). Mount and hand-tighten the chain
sprocket cover with the retaining nut
TENSIONING THE CHAIN
1. Loosen the retaining nut of the chain sprocket cover by a few rotations.
2. Adjust the chain tension by rotating the Tension Adjustment Knob (the outermost knob on the cover release
knob). Clockwise rotation increases the chain tension; counter-clockwise rotation reduces the chain tension. The
saw chain is correctly tensioned if it can be raised approximately 2 mm from the center of the guide bar.
NOTE: The saw chain must be tensioned properly in order to ensure safe operation. The chain tension is opti-
mal if the saw chain can be lifted 2 mm from the center of the edge of the guide bar (not the tip). Since the saw
chain heats up during operation, its length can therefore fluctuate. Check the chain tension every 10 minutes of
operation and adjust as necessary, particularly for new saw chains. Slacken the saw chain after the work is com-
peted since it shortens when cooling down. In doing so, you can elongate the chain’s life and prevent damage.
SAW CHAIN LUBRICATION
Always unplug the unit from its power source before inspection and adjustment work. Wear protective gloves dur-
ing maintenance to prevent injury.
Never operate the chainsaw without saw chain oil. The use of the chainsaw without enough saw chain oil will dam-
age the unit.
Only use special saw chain oil. Other oils will run the risk of damaging the unit and voiding the warranty.
Take note of temperature conditions. Using the saw at various temperatures requires the use of differing oils. To
ensure a sufficient layer of lubricant at lower temperatures, use liquid oil (low viscosity).
Fig. A
1
Fig. B
9
ASSEMBLY AND ADJUSTMENTS
FILLING THE OIL TANK
1. Place the saw on a level surface. Clean the area around the oil tank cap and then open it.
2. Fill the oil tank (Fig. C - 1) with saw chain oil. In doing so, make sure that no dirt gets into the oil tank so that
the oil nozzle does not clog.
3. Close the oil tank cap.
2. Fasten the carabiner hook on the shaft bracket of
the shaft.
3. Always use the utility strap. Never carry the belt diagnolly across your shoulders and chest, but rather on one
shoulder so that you can move rapidly away from the tool in case of danger.
4. To release the strap, push both buttons and pull the lock apart.
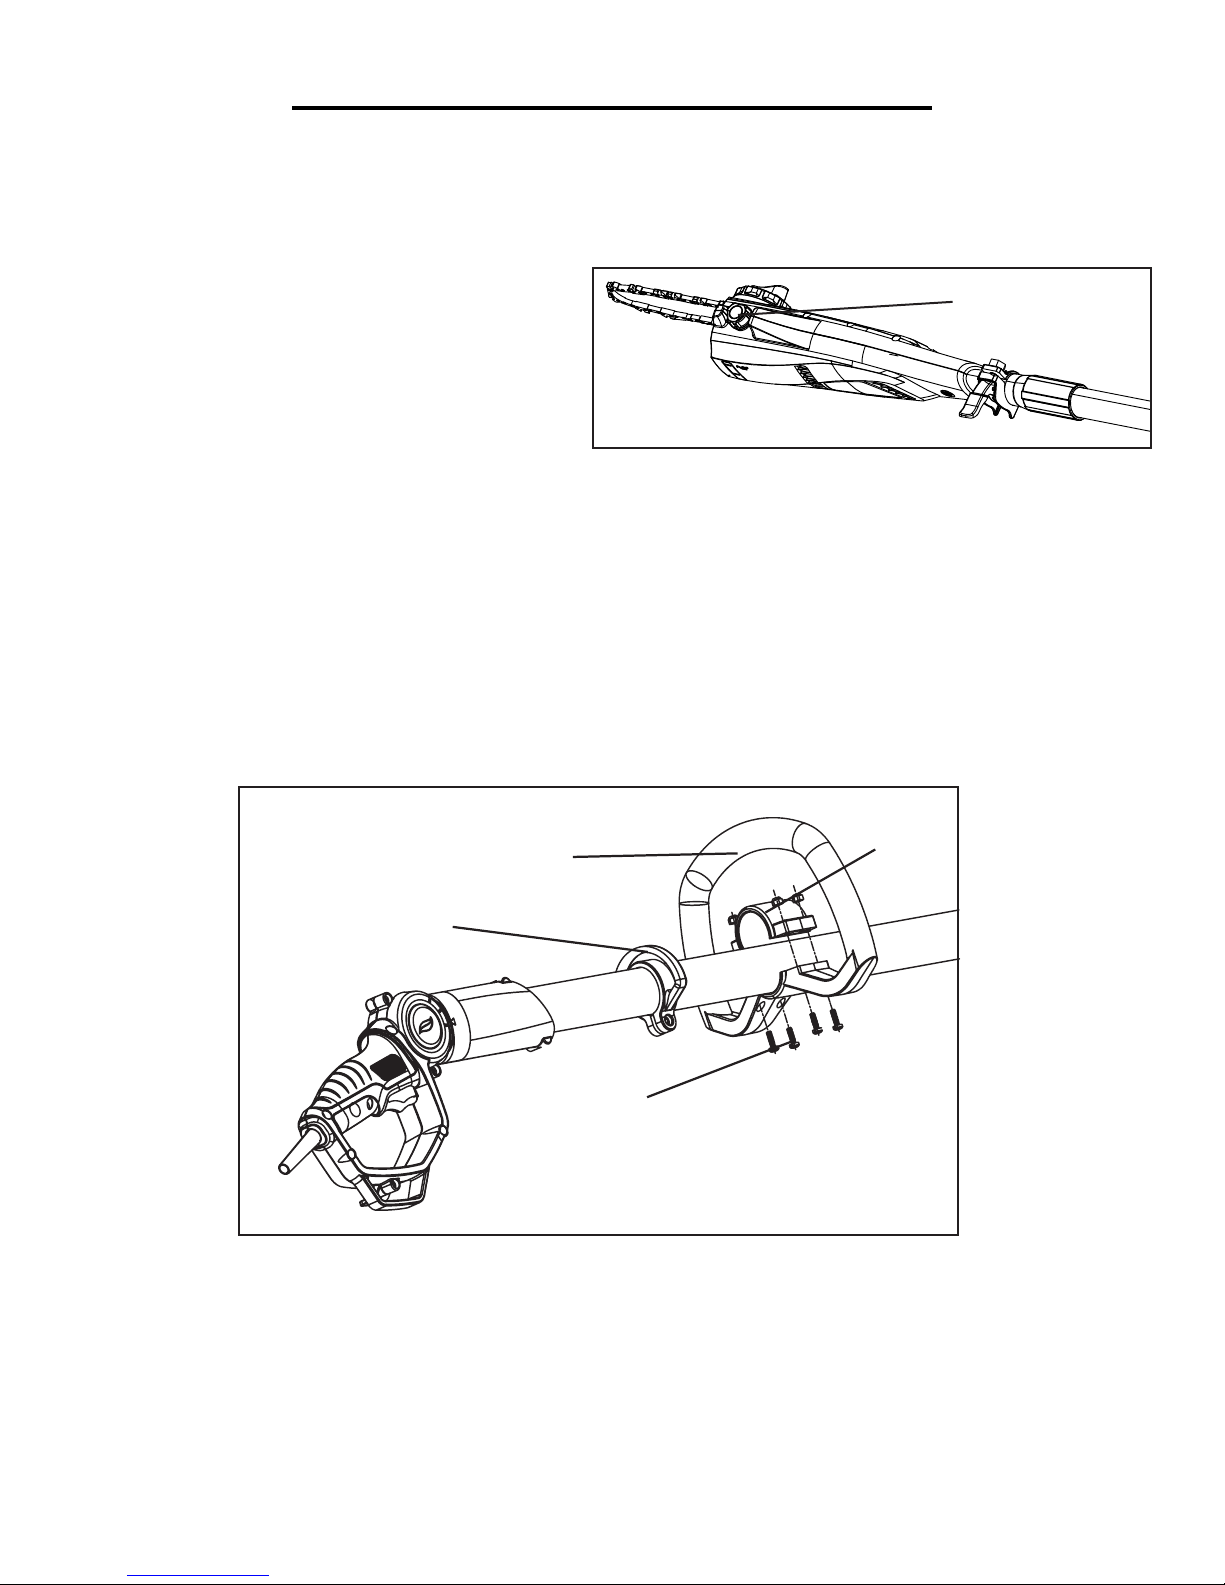
INSTALLATION OF THE MIDDLE HANDLE BAR
1. Line the middle handle bar (Fig. D - 1) up so it is facing the same direction as the shoulder belt ring (Fig. D - 2)
2. Install the handle cover (Fig. D - 3) using the four included screws and hex nuts (Fig. D - 4) to secure the
handle.
Fig. C
1
Fig. D
1
2
3
4

10
OPERATION
PREPRATION
Before each use, check the following items to ensure safe working conditions.
CHAINSAW: before beginning work, inspect the chainsaw for damage to the housing, the extension cable, the
saw chain and the guide bar. Never use an obviously damaged machine.
OIL TANK: check the fill level of the oil tank. Also check whether there is sufficient oil available while working.
Never operate the saw if there is no oil or the oil level has dropped below the minimum oil level mark in order
to prevent damage to the chainsaw. On average, an oil filling is sufficient for approximately 10 minutes of cutting
operation (depending the duration of pauses and the density of the workpiece).
SAW CHAIN: check the tension of the saw and the condition of the blades. The sharper the saw chain is, the
easier and more manageable operations will be. The same applies to chain tension. Check the tension every 10
minutes of operation to maximize safety. New saw chains in particular are subject to changes due to the heat cre-
ated by operation.
PROTECTIVE CLOTHING: make absolutely sure to wear the approrpiate close-fitting protective clothing such
as chainsaw-protective pants, gloves and safety shoes. Wear a safety helmet with integrated hearing protection and
a face guard to provide protection against falling and recoiling branches.
ADJUSTING THE TELESCOPING HANDLE
1. Unlock the telescope release lever so that the pole can freely extend outwards and inwards.
2. Extend it to the desired length and relock the telescope release lever to hold it in place.
ADJUSTING THE REAR HANDLE
The rear handle can be adjusted into three varying positions. Adjust it by pushing the handle rotation switch and
turning the handle to the desired position. The pole saw can only be used if the handle is in a fixed position.
CONNECTING TO THE MAIN SUPPLY
1. Connect the main cable to a suitable extension cord. Make sure the extension cord is designed to accommodate
the amperage (4.5A) of the pole saw.
2. Secure the extension cable against tractive forces and accidental unplugging by looping it through the cable
strain relief notch on the underside of the rear handle. Connect the extension cable to a nearby socket.
TURNING THE POLE SAW ON AND OFF
To turn ON, hold the pole saw firmly with both hands on each respective handle. Press and hold the safety switch
located on the lefthand side of the rear handle above the main power trigger. Press down the trigger to turn it ON.
The safety switch can now be released.
To turn OFF, release the ON/OFF trigger switch. Always unplug the pole saw from its power supply when fin-
ished.
Tabla de contenidos
Otros manuales de Sierra de pértiga de Wen


