weJupit WJ-D330 Pro Manual de usuario

USER MANUAL
[Warning] To prevent product damage caused by improper
operation, please read this manual carefully before using this
product. For more technical support, please contact merchant
Welcome to use the FullHD mini dash camera WJ-D330 Pro

DIRECTORY
目录
1. APPEARANCE OF THE INTERFACE
外观接口
INTERFAZ DE APARIENCIA
2. THE MANUAL
使用手册
MANUAL DE USUARIO
3. PRODUCT PARAMETERS
产品参数
PARÁMETROS DEL PRODUCTO
4. TROUBLE SHOOFING
异常处理
MANEJO DE EXCEPCIONES
5. INSTALLATION INSTRUCTIONS
安装指导
GUÍA DE INSTALACIÓN
01
09
16
02-03
10-11
17-19
04
12
20
05-06
13
21
07-08
14-15
22-23
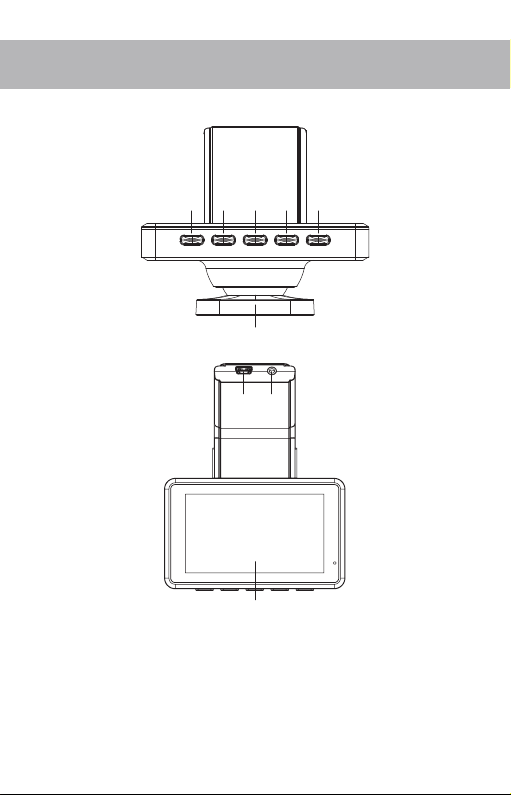
01
APPEARANCE OF THE
INTERFACE
① ② ③
⑥
⑨
⑦ ⑧
④ ⑤
①Setting ②Up ③On/Off ④Down ⑤OK
⑥Lens ⑦Power ⑧Rear Cam ⑨LCD

02
1.Dash Camera On/Off
Upon installation the product with provided standard power cables, the dash
camera will be turned on/off when the car is turned on/off.
2.TF Card Installation
TF card is used to store recorded video or image files. Please insert external
TF card before using.
Attentions:
The TF card is provided by a third party, which may wear out easily and lead
to data missing or abnormalities. It is recommended to format or replace TF
card regularly every month to ensure a normal operation.
3.Recording
After the TF card is inserted into the dash camera, it will automatically start
recording.
4.Browse the Recorded Files
Press "menu" to enter the menu interface, find the icon "file browsing", press
"ok" to enter the playback interface, and press "menu" to exit;
Video Playback Instructions
1) Select the target video file and press “ok” to play.
2) Press "menu" to exit.
5.Format TF card
Press "menu" to enter the menu interface, find the "format" icon, and select
"ok".
Important note: All data saved on the TF card will be deleted and cannot be
restored after formatting. Please backup the data before formatting.
6.Front and Rear Image Switching
The front and rear images of the dash camera are displayed by default as
picture-in-picture. Press "on/off" can switch the front and rear lenses.
7.Quick Lock Video Files
Press "ok" to save the current video as SOS locked file (SOS locked file will
not be overwritten during loop recording).
8. Parking Monitor
After the vehicle is turned off, if the vehicle vibrates due to a collision or
other forces, the dash camera will automatically start to record and lock the
video as SOS file.
THE MANUAL

03
9. Times Lapse
When the vehicle is turned off, the dash camera will automatically enter the
anti-theft mode and record videos with 1 frame per second (special ACC
cable is required).
10. WIFI
Turn on the WiFi function, connect the phone through APP. The APP can be
downloaded from the “Settings” menu.
More Settings Instructions
Press "menu" to enter the menu interface and select "Product Settings",
which can be used to configure many Settings.
1) Loop Recording: Off, 1 minute, 2 minutes, 3 minutes
2) Resolution: FHD, HD
3) Sound Record: On, Off
4) G-sensor: Off, High, Middle, Low
5) Language: English, Simplified Chinese, Traditional Chinese
6) LCD Save: Off, 1 minute, 3 minutes
7) Date and Time: Press "up/down" to adjust date and time, and press "ok" to
confirm.
8) Volume: press "up" to increase volume, "down" to decrease volume, and
press "ok" to confirm.
9) Sound: Off, On
10) Watermark format: date + model, date, close
11) Time zone: press "up/down" to adjust the time zone.
12) Frequency: 50Hz, 60Hz
13) System Reset: Confirm, Cancel
14) GPS location information: Check current GPS location information
15) GPS time setting: Confirm, Cancel
16) Speed: km/h, mph
17) Speeding alarm: set a speed limit, the alarm will sound when the driving
speed is above the limit.
18) E-dog: On, Off
19) Delete document: select a file and press "OK" to delete
20) APP download: Press "enter" to confirm and then scan QR code to
download the APP to your mobile. (If some functions of the dash camera are
different from the description on the manual, it may attribute to an upgrade of
the product. You should follow the instructions on the current version.)
MANUAL

04
PRODUCT PARAMETERS
Lens
Display
Video Format
Memory
Resolution
G-sensor
Audio
F/No.
Memory capacity
Photo
Core
Seamless recording
Loop recording
Languages
Battery
Charging
Temperature range
Lens quantity
Function
5 megapixel, 140-degree wide-angle lens
3.0 inch IPS LCD
MP4 format
Support Class10 TF card (4GB-64GB)
Front 1080P +Back 720P
3 Axis G-sensor
Support sound recording and playback
F2.0
1G
Support
Two cores
Continuous recording without interruption or missing seconds
When the card is full, new files will automatically overwrite old
files and be saved.
English, Simplified Chinese, Traditional Chinese
Super capacitor
5V
Operation temperature: -20 °C ~ 60 °C
Storage temperature: -30 °C ~ 80 °C
Dual lens
WIFI, Time lapse, Park monitor, Fixed speed, Dual recording,
Night vision enhanced, Collision sensing, Loop recording,
GPS positioning

TROUBLE-SHOOFING
If the product does not work properly on some functions, or you have
changed some settings, please restart the device or restore to the
factory settings.
Low battery alert/File cannot be saved/Automatic shutdown when car
starts
1. Remove the memory card and charge the dash camera for 4 hours.
2. Contact the seller to replace the built-in battery.
Memory card is full?
1. Format the memory card and try again.
2. Adjust the "G-sensor" of the device to "low level" and format the
memory card once per month.
3. Replace the memory card.
Memory card is not working?
1. Format the memory card
2. Use a new card
Pls insert SD card/ SD card cannot be recognized?
If the memory card is damaged/slow/incompatible, please use a
genuine high speed TF card
Cannot playback videos/file damaged?
1. The file name or folder name has been changed on the computer.
2. If the video file has been edited on a computer, or the videos were not
captured by the device, the device may not playback properly.
3. The memory card is damaged.
Black screen/blurred screen/splash screen?
1. Restart the device
2. Reset the system
3. Contact the merchant service for exchange or repair.
05

Breakdown?
1. Restart the device.
2. Remove the memory card to test again.
3. Reset the system.
4. Contact the merchant service for exchange or repair.
Dash camera cannot start
1. Check if the power cable is connected properly
2. Remove the memory card and try again.
3. Connect the device to a computer and test again.
4. Reset the system.
06
INSTALLATION INSTRUCTIONS
Attentions:
1. Before installation, please connect the power and check whether the
product works properly. Do not pull the wires too hard. Connect the wires
correctly, do not connect the wrong wires, connect to the wrong outlet, or
insert at the wrong direction.
2. If the product works properly before installation but does not work after, it
is probably because something went wrong during the installation. In this
case, please check whether there is a short circuit or the wiring is wrong.
3.Never destroy or modify the wires during installation. If the dash camera
or the wires are damaged during installation, you should replace the whole
set and install again.

07
POWER CABLE INSTALLATION
POWER CABLE INCLUDED IN THE PACKAGE
After installation, connect the standard power cable with the cigarette lighter.
Plug one end of the power cable into
the car cigarette lighter socket and
connect the other end with the dash camera.
Watch "How to install and wire weJupit Mirror Dash Cam Car
Backup Camera (DIY)" on youtube.com.
The standard wires are 3.5 m long. The wires are very thin and can
be hidden between headlining (1), weather strips (2), floor pans (3).
The front camera can be either attached to the front window or to
the rearview mirror (4).
WIRING INSTRUCTIONS

08
SCAN THE QR CODE TO DOWNLOAD THE APP
15:56 167K/s
DVR
REC
2020年01月22日 14:05:20
①
Android iOS
②
a:Video playback
Front/Back switch
Recording
Take Photo
b:Preview picture
c:Setting
d:Videos and pictures downloaded to your phone
abc d
15:56 167K/s
DVR
REC REC
2020年01月22日 14:05:20
a b c d
Tabla de contenidos
Idiomas:


