Warmup StickyMat 3D Manual de usuario

1
StickyMat 3D™
Installation Manual
Electric
Heating System
Technical Helpline
0345 345 2288

2
Experience MyHeating™
Download now for iOS and Android
Easy to use
Simple and secure
set up with 24/7
support
Unique to Warmup:
Natural Language Programming™
Programming that speaks your language
Please scan the QR code
for more information
The world’s best-selling floor heating brand™
Over 2 million installations in
more than 60 countries
EasySwitch™
Always on the best
tari, automatically
SmartGeo™
Smarter geo-fencing.
Reduce energy usage
by up to 25%

3
Contents
Quick Install Guides������������������������������������������������������������������4
Components Required for Installation������������������������������������� 8
Do’s & Don’ts ���������������������������������������������������������������������������� 9
Step 1 - Electrical Supply ������������������������������������������������������ 10
Step 2 - Substrate Considerations ���������������������������������������� 12
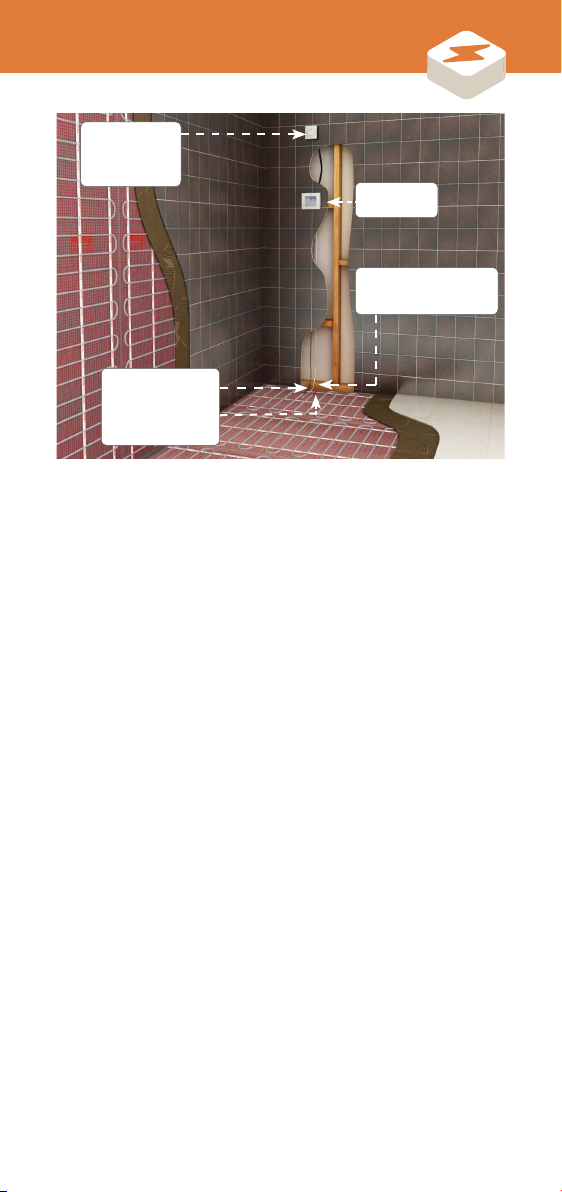
Step 3 - Layout Planning������������������������������������������������������� 14
Wall Applications
Step 4 - Install StickyMat 3D™������������������������������������������ 16
Step 5 - Select Wall Covering������������������������������������������� 19
Step 6 - Apply the Wall Covering�������������������������������������� 20
Floor Applications
Step 4 - Install StickyMat 3D �������������������������������������������� 22
Step 5 - Select Floor Covering������������������������������������������ 25
Step 6 - Lay the Floor Covering���������������������������������������� 26
Step 7 - Connect the Thermostat������������������������������������������ 28
Troubleshooting��������������������������������������������������������������������� 29
Performance Troubleshooting ����������������������������������������������� 31
How to test the heater & floor sensor������������������������������������� 33
Layout Plan ���������������������������������������������������������������������������� 34
Control Card��������������������������������������������������������������������������� 35
Warranty��������������������������������������������������������������������������������� 36
Technical Specifications �������������������������������������������������������� 38
WARNING
Your Warmup heating system has been designed so that installation
is quick and straight forward, but as with all electrical systems,
certain procedures must be strictly followed. Please ensure that you
have the correct heater(s) for the area you wish to heat. Warmup plc,
the manufacturer of the Warmup StickyMat 3D System, accepts no
liability, expressed or implied, for any loss or consequential damage
suered as a result of installations which in any way contravene the
instructions that follow.
It is important that before, during and aer installation that all
requirements are met and understood. If the instructions are
followed, you should have no problems. If you require help at any
stage, please contact our helpline.
You may also find a copy of this manual, wiring instructions and other
helpful information on our website:
www.warmup.co.uk

4
Wall Heating - Quick Install Guide
Quick Install Guide - The full installation instructions in this
manual must be followed�
•We recommend installing
Warmup insulation boards for
optimum performance.
•Test the resistance of the
heater ensuring it is within the
range set out in the Reference
Resistance Band tables.
•Cut, turn and aix the mat
to the substrate using self-
adhesive mesh or double
sided tape.
•Make electrical provision for
the heater (30 mA RCD, 35 mm
deep electrical back boxes,
trunking).
•Mark on the boards where any
penetrating fixtures are likely
to be such as, mirrors, shower
screens, towel rails etc.
•The cable should be installed
40 mm in from the edge of the
heated area or penetrations
through the substrate.
1
3
5
4
2
6

5
Wall Heating - Quick Install Guide
•Test the resistance of the
heater aer installation and
check against the previous
value to ensure no damage
has occurred.
•Test the resistance of the
heating cable aer tiling and
check against previous values
to ensure no damage has
occurred.
•Connect your Warmup
thermostat.
DO NOT install the thermostat
on the same wall as the
heater.
•Channel a groove in the
boards for the coldtail &
termination joints, enabling
them to fit flush with the top
of the heater. DO NOT tape
over these joints!
•Install the sensor probe
centrally between two runs of
the heater.
•Lay the adhesive and tiles over
the system. Use flexible grout
when grouting.
•If a plaster finish is required,
apply a minimum cover of
10 mm.
• The heater, including its joints,
must be wholly within the
adhesive/plaster and not
exposed.
7
9
8
10
11

6
Floor Heating - Quick Install Guide
Quick Install Guide - The full installation instructions in this
manual must be followed�
•Ensure the subfloor is smooth,
dry and free from dust.
•Mark on the subfloor where
fixed objects, kitchen units etc.
are likely to be.
•The cable should be installed
40 mm in from the edge of the
heated area or penetrations
through the floor.
•Make electrical provision for
the heater (30 mA RCD, 35mm
deep electrical back boxes,
trunking).
•We recommend installing
Warmup insulation boards for
optimum performance.
•Test the resistance of the
heater ensuring it is within the
range set out in the Reference
Resistance Band.
1
3
5
4
2
6

7
Floor Heating - Quick Install Guide
•Channel a groove in the
subfloor for the coldtail &
termination joints, enabling
them to fit flush with the top of
the heater. DO NOT tape over
these joints!
•Install the floor sensor
centrally between two runs of
the heater.
•Lay tiles or levelling compound
over the system.
•The heater, including its
joints, must be wholly within
the adhesive or levelling
compound and not exposed.
•Use flexible grout when
grouting.
•Connect your Warmup
thermostat.
•Cut, turn and aix the mat
to the subfloor using self-
adhesive mesh or double
sided tape
•Any loose heating cable
removed from the mesh must
be installed at no less than
50 mm intervals and tab taped
in place.
•Test the resistance of the
heating cable aer installation
and check against the
previous value to ensure no
damage has occurred.
•Test the resistance of the
heating cable aer tiling and
check against previous values
to ensure no damage has
occurred.
7
9
11
8
10
12

8
Components Required
for Installation
Components available from Warmup
Warmup Insulation BoardsWarmup StickMat 3D™ System
Warmup Thermostat & Sensor
Probe
Additional components needed as part of your Warmup heating
installation:
30 mA Residual Current Device (RCD), required as part of all
installations.
Digital Multi-meter required for testing the resistance of the
heater and sensor probe.
Electrical tape to secure the sensor probe.
Electrical housing, back boxes and junction boxes.
Electrical trunking/conduit for housing the power leads.
Flexible tile adhesive and flexible grout.
Staple gun.

9
Do’s & Don’ts
Ensure that the control card at the back of the manual is
completed and fixed at the consumer unit along with any
plans and electrical test records as per the current edition of
BS7671�
Ensure the termination and coldtail joints are within a full bed
of adhesive/plaster directly beneath the heated floor or wall
finish�
Ensure the heat output of the floor or wall meets your
requirements�
Install the sensor probe centrally between two parallel runs of
heating cable and away from other heat sources such as hot
water pipes, lighting fixtures etc�
Use adhesives and grouts suitable for use with heating�
Ensure all furniture installed over underfloor heating has feet,
creating a minimum 50 mm ventilated space beneath it to
allow heat flow into the room�
Ensure that during the course of the installation no damage is
caused to the heater by falling or sharp objects�
Cut or shorten the heating element at any time�
Leave surplus heater rolled up under units or fixtures, use the
correct size heater�
Connect two heaters in series, only connect heaters in
parallel�
Attempt a DIY repair if you damage the heater, contact
Warmup for assistance�
Tape over manufactured joints or the sensor probe tip�
Install items above the heating system which have a
combined resistance of more than 1�5 tog in floor applications
or 1 tog in wall applications, as this may cause overheating�
Bend the heating cable under 25mm radius�
Install the thermostat on the same wall as the heating mat in
wall heating applications�
Install penetrating fixtures into the heated wall such as
shower screens, towel rails, mirrors etc�
DO
DON’T

10
Step 1 -
Electrical Supply
Install the RCD
Install a dedicated 30 mA RCD or use an existing RCD. No more than
7.5 kW of heating should be connected to each 30 milliamp RCD. For
larger loads, use multiple RCD’s.
NOTE: It is possible to run the heater(s) from an existing circuit
protected by a 30 mA RCD. It should be calculated whether or not the
circuit can handle the additional load.
NOTE: A junction box is required if more than two heaters are being
connected to a single Warmup thermostat.
NOTE: When conducting an insulation resistance test on the supply
to the thermostat the thermostat and heaters must be isolated or
disconnected.
Warmup
Thermostat
13 amp fused
spur or RCD spur
supplying power to
the thermostat
Floor Sensor 300 mm into
heated area. Floor sensor
connected to thermostat
Coldtail & Termination
Joint recessed into
the subfloor. Coldtail
connected to the
thermostat
Tabla de contenidos
Otros manuales de Sistema de calefacción de Warmup


