wallas 3008 Manual de usuario

Advanced Control Panel 3008

- 2 -
Control Panel - Control Panel 3008 Installation 1 ...................................................................................
Control Panel - Control Panel 3008 basic features 2 .............................................................................
Control Panel - Software update 10 ..............................................................................................................
Control Panel - Wallas Remote application and Control Panel connection 11 ...........................
Control Panel - Error Codes 17 .........................................................................................................................

- 1 -
Control Panel 3008 Installation
Control Panel 3008 cable connection can be assembled in surface mount or through hole.
Surface, cable visible Hole, cable hidden inside the wall
Install the assembly plate and mark places for the
screws. Pre-drill 3*1 mm holes for screws. Install the
wall plate.
Cut the cable opening in bottom of the panel.
Slide the panel in place top-down.
Remove the display protection tape.
Install the assemply plate.
Drill 12 mm hole for the cable. Draw and check hole
place before drilling, it should not be visible when panel
is on its place.
Slide the panel in place top-down.
Remove the display protection tape.
Cable connection
Please note that cable connector release pin is as in
the picture, when connecting cable into panel. (Silent
click sound can be heard when cable is connected.)
Cable release
Press connector release clip (shown in the picture)
before pulling the cable off.

- 2 -
Control Panel 3008 basic features
Advanced Control Panel
Before using the Control Panel ensure it is assembled correctly with the assembly plate (see assembly instructions from
sales package) and connected with the Wallas unit. This manual refers to Control panel SW 1.2.75. and heater SW
1.6.64
Starting the heater for the first time
Prior to starting the heater, choose the operation mode; Manual Mode, Thermo Control Mode, or Ventilation Mode.
Use the arrow buttons to choose the mode and press the Select Button.

- 3 -
Starting the heater for the first time
If Thermo Control Mode is chosen, use
Arrow buttons to choose the desired
mode. Press the Select Button. Press
and hold the Select Button down again
for 3 seconds to start the heater (safety
feature).
Use Arrow Buttons to set the desired
temperature and press the Select
Button. Main display will appear.
Note: Wallas unit's starting procedure takes approx. 12 minutes.

- 4 -
Digital Panel Legend:
1 Main Menu Bar
2 Target Temperature / Power Level / Blower Speed
3 Room Temperature
4 Heater Status
5 Start/Stop Icon
6 Air Boost Icon
7 Info Bar: Power On/Off, Combustion, Info, Lock, Heater power %
Operation modes (Main Menu Bar)
Manual control mode
- heater power is manually
controlled with 6 power
levels (1-6)
Thermo control mode
- set a target temperature
(C°/F°)
- heater controls the power
level automatically
Ventilation mode
- set the desired blower
speed (speed levels 1-6)
- blows fresh air without
heating
Settings
- get familiar with the control
panel's functionality
- read more under Settings
- 5 -
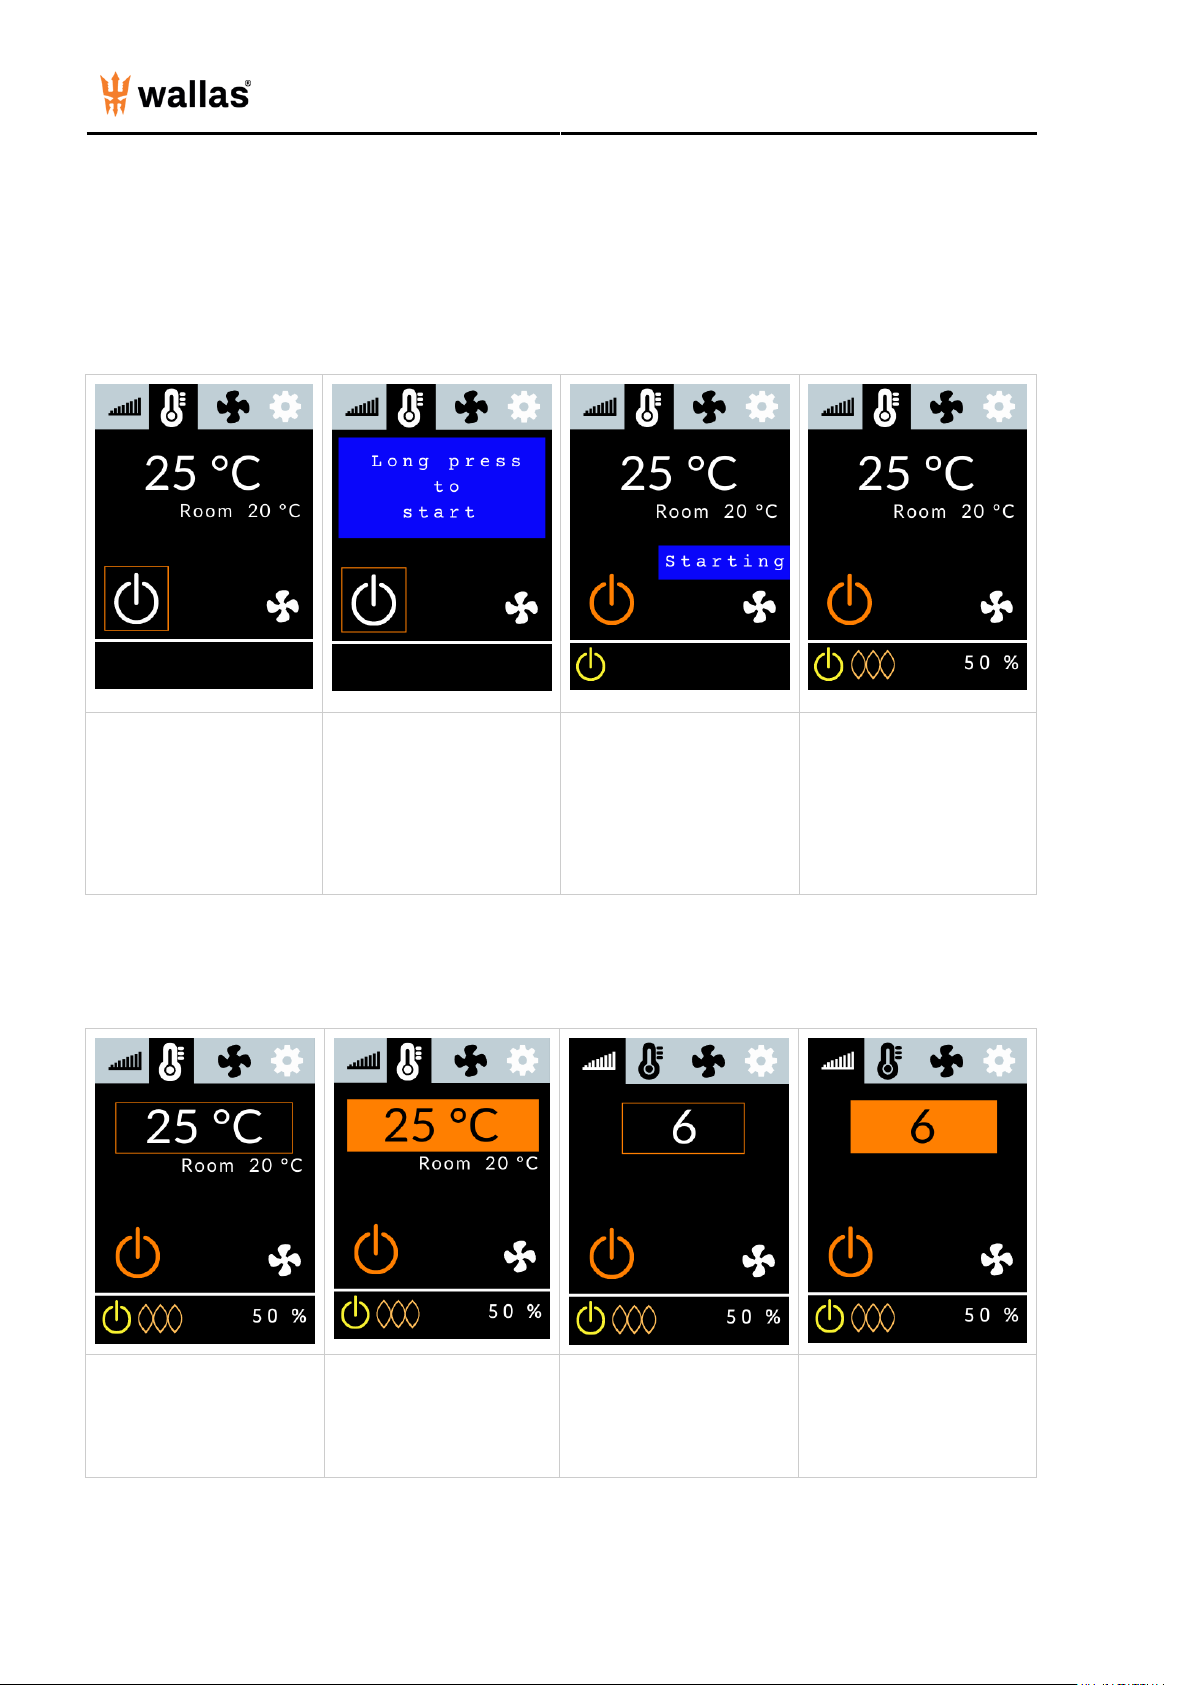
Ignition
To start, use the Arrow
Buttons (left or right) to
move the orange selection
square to the Start/Stop
Icon and press the Select
Button.
Confirm the selection by
holding the Select Button
down for 3 seconds (safety
feature).
Starting will appear on the
screen.
The light orange combustion
light will light up when the
burner flame has been
ignited and the combustion
has stabilized (in about 5
min). Heater will be fully
operational about 10
minutes later.
Temperature/Power setting
In Thermo Control Mode,
move the selection square
to the Target Temperature
and press the Select
Button.
Press Arrow Buttons (left
or right) to set the desired
target temperature.
In Manual Mode, move the
selection square to the
Power Level and press
the Select Button.
Use Arrow Buttons to set
the desired power level
(1-6). Confirm by pressing
the Select Button.

- 6 -
Air Boost
Air Boost maximizes the air volume for quick defrosting and drying, but does not change the set temperature, power
level of fuel rate. Air Boost can be activated either in Manual or Thermo Control Mode, while the system is heating.
Use Arrow Buttons to
move the
selector to the Air
Boost icon
and press the Select
Button.
The orange Air Boost On
icon will appear.
To go back to normal air
volume, choose the Air
Boost icon again and press
the Select Button.
The Air Boost icon will
change to white.
Ventilation mode
Ventilation Mode blows fresh air without heating at 6 blower speeds. Choose Ventilation Mode prior to starting the
device.
Use the Arrow Buttons to
move the selection square to
the Main Menu Bar and
press the Select Button to
activate it. Use Arrow
Buttons to choose
Ventilation Mode and press
the Select Button.
Move the selection square to
the Start/Stop Icon and
press the Select
Button once. Press the
Select Button down again
for 2 seconds to confirm and
start the heater. Yellow
Power On
light will appear in the Info
Bar.
Choose the blower speed
(1-6) by moving the
selection square to
the Blower Speed and
press Select Button to
activate the field.
Press Arrow Buttons to the
desired power and press the
Select Button to choose.
To deactivate ventilation,
turn the heater off. Re-start
in the desired mode.

- 7 -
Pause Mode (in Thermo Control Mode only)
Pause Mode automatically turns the heater off if the temperature remains +2 C° (3,6 F°) above the set level for 1/2 hour
due to local ambient conditions. Pause Mode can be delayed temporarily by slightly increasing the target temperature.
Power can be turned on by increasing the target temperature in the Pause Mode.
If the heater is in Pause Mode,
Paused
will appear on the screen.
Heater will re-start heating again
automatically, if the cabin temperature
falls 2 degrees C (3,6 F°) below the set
target temperature.
Shut down
Option 1 Quick shut down: Press
and hold the Select Button down for
more than 4 seconds.
Stopping
will
appear and the Power Icon light will
change to white indicating the unit is
off.
Option 2 Alternatively use
the Arrow Buttons to move
the selection square to the
Start/Stop Icon and press
the Select Button.
Press and hold the Select
Button down for more than
2 seconds.
Stopping will appear and the
Power Icon light will change
to white indicating the unit is
off.
- 8 -
Note: The system mode that was used last upon shutdown will be the same mode when the heater is turned on again.
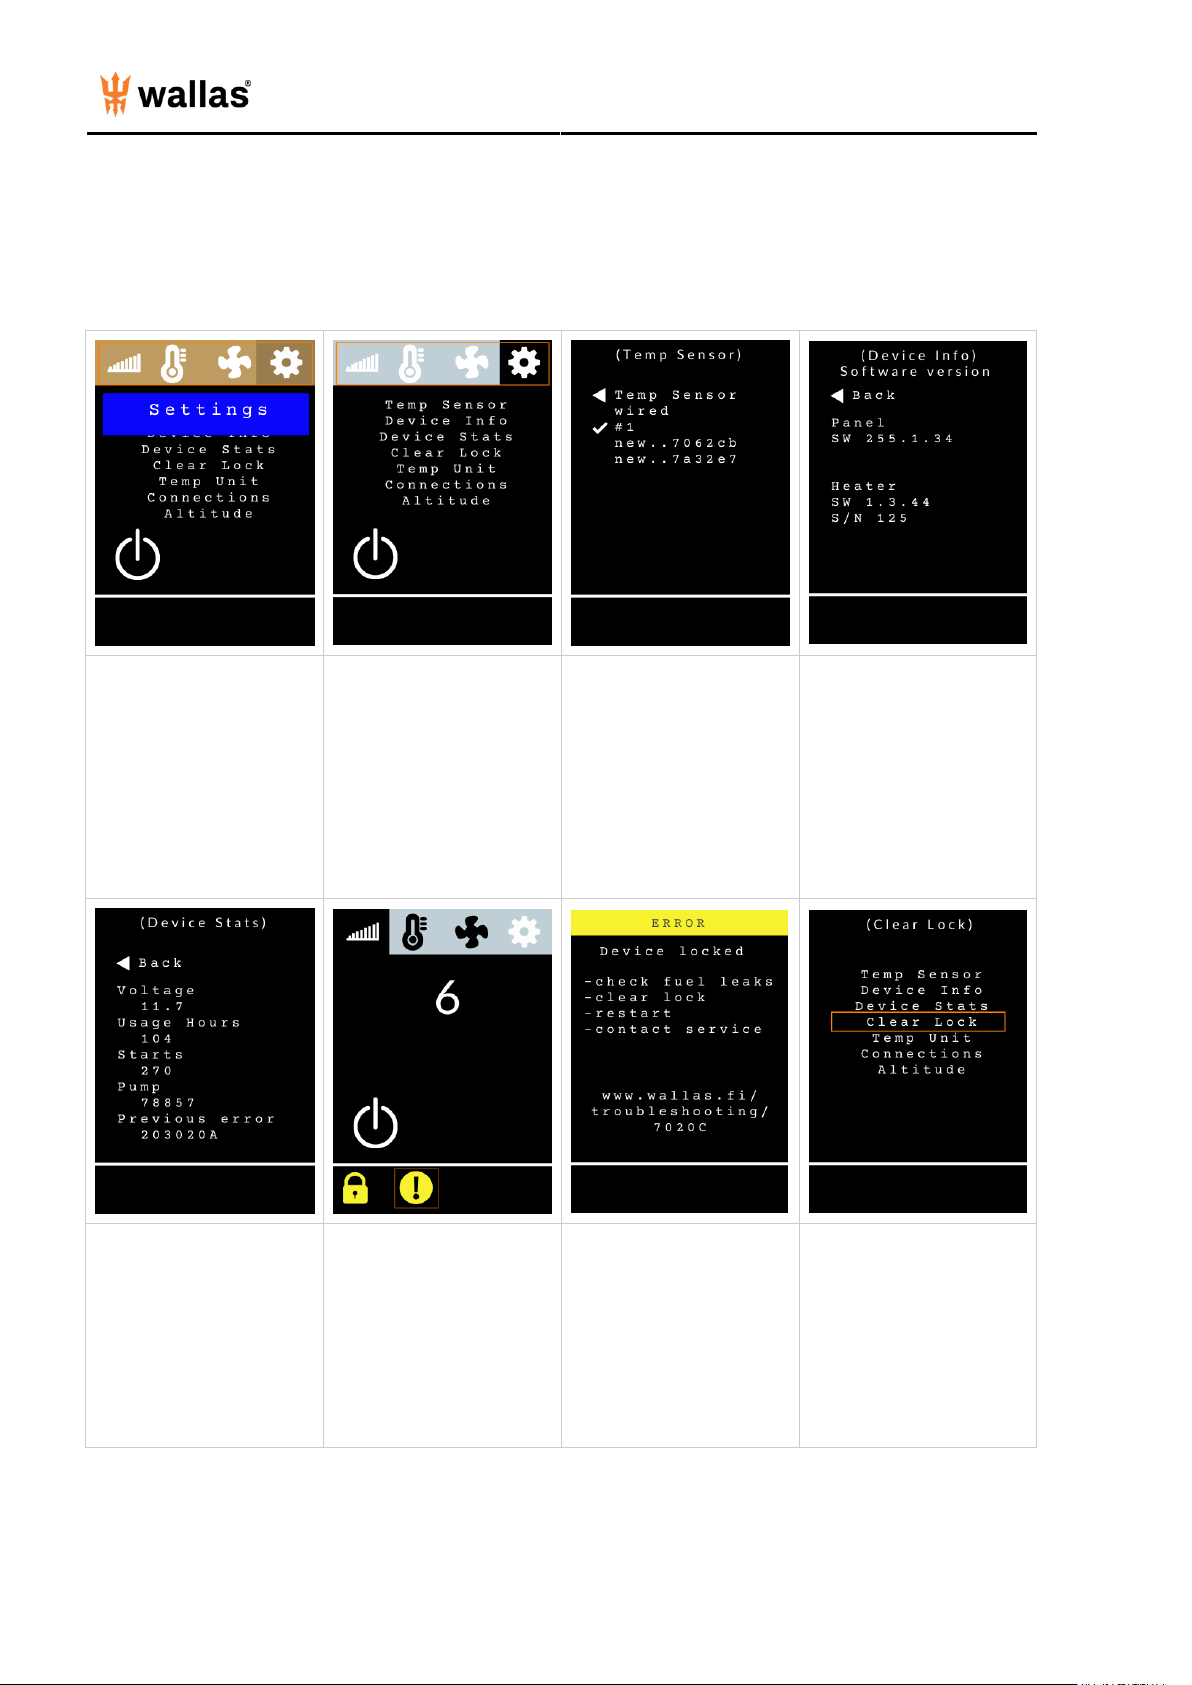
Settings:
Move the selection square to
the Main Menu Bar and
press the Select Button.
Use the Arrow Buttons to
choose Settings. Press the
Select Button.
Use the Arrow Buttons to
move the selection square
down and press the Select
Button to choose.
Temp Sensor
- Choose the desired sensor
to measure the indoor
temperature with.
- Wired is the hardwired
sensor in the heater unit
- Wireless sensors are listed
by sensor numbers
- When a wireless sensor is
selected, it gets a running
number ID
Device Info
- Control panel and heater
software versions (needed
for customer service/tech
help)
- Heater unit serial number
(needed for customer
service/tech help)
Device Stats
- Check there is enough
voltage to start the unit
(must have at least 10 V)
- Check usage hours (units
must be serviced every 2000
hours/3 years)
If a Lock Icon is displayed,
the heater has locked itself
for safety. The heater will
also lock after 3
unsuccessful starts. Move
the selection square to the
Exclamation Point Icon
and press the Select
Button. An error Page will
appear.
If the heater has locked
itself, there may have been a
failure that should be
investigated and resolved
prior to futher use. The error
page will display a check list
and a website for further
information.
If you need help, reach out
to a professional.
To remove the lock, move
the selection square to the
Main Menu Bar and press
the Select Button, choose
Settings, and press the
Select Button. Choose
Clear Lock from the
Settings Menu and press the
Select Button.
Otros manuales para 3008
4
Tabla de contenidos
Otros manuales de Panel de control de wallas


