Voyager Radius Pro Manual de usuario

BIKE4050RP
User’s Manual
Radius Pro Electric Bike

CONTENTS
SAFETY PRECAUTIONS
MAINTENANCE
INTRODUCTION
PACKAGE CONTENTS
SPECIFICATIONS
A QUICK LOOK
ASSEMBLY VIDEO GUIDE
ASSEMBLY
CHARGING THE BATTERY
POWERING ON/DISPLAY SCREEN
BIKE FEATURES
BEFORE YOU RIDE
RIDING YOUR BIKE
CARE & MAINTENANCE
NOTES
FCC STATEMENT
WARRANTY
2
3
4
4
4
5
6
7-8
9
10
11
12
13
14
15-16
17
18
_________________________________
_______________________________________
_______________________________________
__________________________________
______________________________________
_______________________________________
_______________________________
___________________________________________
______________________________
______________________
________________________________________
_____________________________________
____________________________________
_______________________________
_______________________________________________
______________________________________
__________________________________________
1

When using your Voyager Radius Electric Bike, basic safety precautions should
always be followed, including the following:
BEFORE RIDING
1. READ ALL INSTRUCTIONS BEFORE USING YOUR BIKE.
2. All riders should be at least 14 years old. Rider weight should not exceed 300 lbs.
3. To reduce the risk of injury, close supervision is necessary when the product is used
near children.
4. Do not ride bike in extreme temperatures.
5. The bike is not to be used by children, the elderly or the infirm.
6. Never immerse the bike in water.
7. Do not leave the bike in high temperatures with direct exposure to sunlight.
8. Always wear a safety helmet, elbow pads and knee pads to avoid injury.
9. Wear suitable footwear when riding and keep shoelaces tied. Never go barefoot
on the bike.
10. Never use the bike with more than one rider.
11. When charging the battery, only use the supplied charging cable included with
your bike.
12. Do not disassemble bike parts.
13. Do not ride your bike if you notice any defects or irregularities. Contact the
manufacturer or a certified technician immediately for support.
WHILE RIDING
1. When riding your bike, follow local traffic laws.
2. Do not ride your bike while under the influence of alcohol or medication which
can cause impairment.
3. Do not attempt to do any tricks while riding your bike.
4. Do not ride your bike over rough terrain, icy roads, or uneven surfaces. Further-
more, do not ride your bike while it is raining or on wet road conditions.
5. Ride carefully. Avoid applying the breaks abruptly. Take caution while turning
and always keep your balance.
6. Practice riding in spacious areas at low speeds until you become more
experienced and comfortable with higher speeds.
7. Do not use your bike at night or in areas of low visibility.
8. Always power off your bike when it is not in use.
9. Never allow more than one person on the bike at a time.
10. Do not ride near stairs, narrow passageways, bodies of water, or any gas, fire or
flammable materials.
11. Keep your hands on the handlebar while riding, do not carry any items.
12. Avoid distractions! Never answer phone calls or attempt to send text messages
while riding.
13. Consider using additional reflectors or similar portable lighting to maximize
visibility.
NOTE: The color and design of your bike may vary from the ones displayed in this
user’s manual.
SAFETY PRECAUTIONS
2

BRAKES
Squeeze the brake levers. Make sure the brake levers are not too loose, and that
you can apply full braking force on the levers without having them touch the
handlebar. If you detect any problems with your brakes, contact a qualified repair
person.
INSTRUCTIONS PERTAINING TO THE RISK OF FIRE OR ELECTRIC SHOCK
1. Do not put fingers or hands into the product.
2. Do not use this product if the flexible power cord or output cable is frayed, has
broken insulation, or any other signs of damage.
3. This equipment is not intended to be used at ambient temperatures less than
-20°C (-4°F) or above ambient temperatures of 45°C (113°F);
4. The battery is intended to be charged when the ambient temperature is between
0°C (32°F) and 45°C (113°F). Never charge the battery when ambient temperatures
are outside this range.
5. Do not attempt to modify your bike in ways unintended by the manufacturer. If
your bike is not working properly, do not attempt to fix it yourself. Contact the
manufacturer or a qualified technician for service.
6. When charging your bike, only use the charger that came with your bike.
SAVE THESE INSTRUCTIONS
RECOMMENDED TEMPERATURES FOR USE
1. Charging temperature range: 0°C-45°C
2. Operating temperature range: -20°C-45°C
3. Storage temperature range: -20°C-45°C
CONTROL CABLES
Check the outer casing for kinks, stretched coils and damage. Check cables for
kinks, rust, broken strands or frayed ends as well as stretched coils and damage.
Replace any damaged cables before riding.
BEARING ADJUSTMENTS
Make sure that the hub bearings are lubricated, run freely and display no excess
movement, grinding or rattling. Have a qualified bicycle mechanic perform
adjustments if you have any doubts.
WHEEL ADJUSTMENTS
Spin each wheel. Make sure there is clearance between the wheel and the break,
and that the wheels do not wobble from side to side. If you detect issues, take your
bike to a qualified bicycle repair expert.
LUBRICATION
Regularly add a few drops of grease (use grease specifically designed for bicycle
chains) on the bike’s chain as well as the brake calipers. Wipe any excess oil. Use a
lithium based grease on the brake cables for best results.
REFLECTORS
Before riding make sure all reflectors are securely attached to your bike. Never
remove the reflectors, as they are integral for keeping you safe as you ride.
3
MAINTENANCE

Thank you for purchasing your new Voyager Radius Electric Bike and welcome to
the Voyager family. We hope that you’ll do plenty of exploring on your new bike.
Please enjoy your new bike responsibly and be sure to read the entire instruction
manual before your first use. Have a blast, be safe and Get Moving!
PACKAGE CONTENTS
-Voyager Radius Electric Bike
-Bike Seat
-Charger
-Tightening Tool*
-User’s Manual with Warranty Information
*Use the tightening tool to keep the fenders securely in place. Check to make sure
all parts are securely attached and in good condition before riding.
INTRODUCTION
HARDWARE
Motor Power: 450W Rated/500W Max
Charging Time: ~5 hours
Battery Specifications: 48V/7.5AH Lithium-Ion
Display Type: Digital LCD Display
PERFORMANCE
Max Speed: ~24-25 MPH
Max Load: 300lbs.
Max Climbing Ability: ~30
°
Max Range: Up to 18 Miles
GENERAL
Solid Tire Size: 16 In. Pneumatic
Weight: 42 lbs.
Brakes: Rear Mechanical Disc Brake
Suspension: Cushioned
Folded Size (L/W/H): 28/13.3/ 27.3 inches
Unfolded Size (L/W/H): 53.5/15/42.5 inches
NOTE: Specifications may vary depending on the size of the rider, weather
conditions and road conditions. For peak performance, make sure that your bike
is properly maintained.
SPECIFICATIONS
4
5
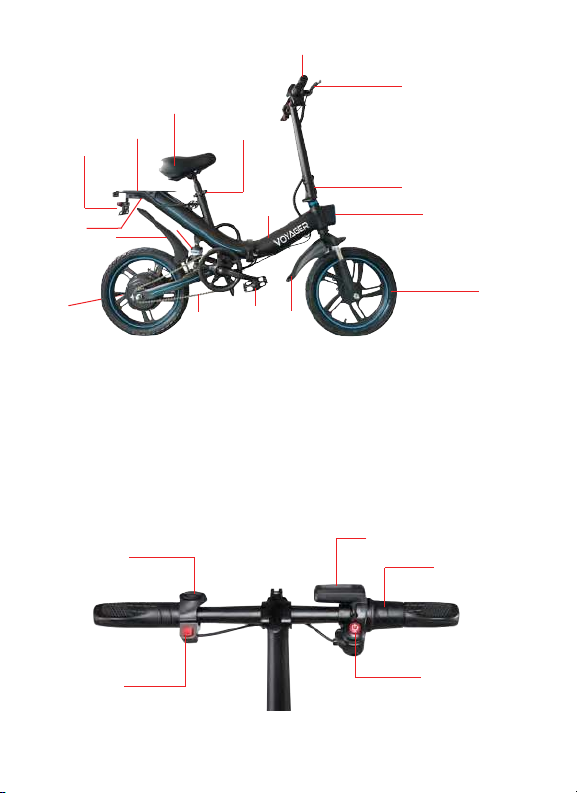
Front Tire
Headlight
Stem Quick Release
Handlebar
Seat Clamp
Seat
1.
2.
3.
4.
5.
6.
7.
8.
9.
10.
11.
12.
Stand
Reflector
Charging Port
Rear Fender
Shock Absorber
Chain
13.
14.
15.
16.
17.
Foot Pedal
Front Fender
Kick Stand
Frame
Handbrake
1
2
3
17
4
6
8
7
910
5
11
12 13 14
16
A QUICK LOOK
Horn
Light Switch
Display Screen
Power Button
Twist Throttle
15

ASSEMBLY GUIDE VIDEO
6
For more information on assembling and using your bike, scan the QR code
below for additional video tutorial content.

Unfold the Radius Pro E-Bike and lock
the latch in the center of the bike
frame. Make sure the connecting wires
are recessed into the pass-through
holes to ensure that the wires don’t get
pinched when locking the Frame in the
unfolded position.
Insert the handlebar stem into the recessed hole above the front wheel and lift
the handlebar up into the upright position before pressing down on the latch,
locking the handlebar in place.
Line up the handlebar and front wheel so that the front wheel is aligned with the
back wheel and the handlebar is perpendicular to the front wheel. Then unlatch
the handlebar and fold the handlebar down to reveal the locking bolt. Tighten
the locking bolt securely using the larger Allen key tool provided.
Next, lift the handle into the upright position and lock it in place by pressing down
on the lever until it snaps closed.
ASSEMBLY
7
2. CONNECTING THE HANDLEBARS
1. UNFOLDING THE BIKE

Loosen the seat angle bolt using the provided wrench tool and adjust the seat
to a comfortable upright position. Then tighten the seat angle bolt, locking
the seat position securely.
When the seat clamp is loosened, you can attach the seat to the body of the
bike, or remove it. You can also adjust the height of the seat for a more
comfortable ride.
Once the seat is attached to the bike at the height of your choosing, close
and tighten the seat clamp so that the seat stays securely in place.
NOTE: You can twist the pin on the seat clamp to tighten or loosen the clamp
tension to ensure the seat height is locked securely in place.
8
3. ATTACHING THE SEAT
4. ASSEMBLY COMPLETE
Seat
Clamp
Seat
Angle
Bolt
ASSEMBLY (continued)

Before riding your bike, be sure to charge the battery. To do so, follow the steps
below:
1. Remove the rubber gasket covering
the charging port, and then connect the
charger.
2. Plug your charger into a suitable power
outlet.
3. The LED light on the charger turns RED
while the battery is charging, and turns
GREEN when charging is complete.
NOTES:
--Please charge the battery for at least 5-8 hours before first using.
--To maximize the lifespan of the battery, unplug the charger once the battery is
fully charged.
--The charging port has a rubber cover. Make sure that the port is covered
after charging is complete in order to protect the port from dirt and debris.
--Make sure to charge the battery at least once per month.
--Do not power on the bike while charging the battery.
--Only use the supplied charger. Do not use the charger if it becomes
damaged. Contact the manufacturer for further support.
Charging Port
CHARGING THE BATTERY
9
Tabla de contenidos


