Voxx Electronics SB10MD1 Manual de usuario

Owner's Manual
Universal Seatback
In-Vehicle Entertainment System


Congratulations on your purchase of this In-Vehicle Entertainment System! The system has been designed to provide passengers
with unlimited content options delivering smiles for many miles. Please read the directions that follow to familiarize yourself with
the product to ensure that you obtain the best results from your equipment.
The system has been designed so that it can be directly controlled through the monitors touch screen interface or remotely
controlled directly by the user(s) using the VoxxLink APP. If the users are too young to control the system monitors themselves,
adults in the vehicle can remotely control the system monitors using the VoxxLink APP. It is recommended that pyhsical source
media such as DVDs, USB thumb drives, and SD cards are not changed while the vehicle is in motion. Enjoy your entertainment
system but remember that the safety of all passengers remains the number one priority.
• Do not use any solvents or cleaning materials when cleaning the video monitors.
• Do not use any abrasive cleaners, they may scratch the screen.
• Use only a lightly dampened lint free cloth to wipe the screen if it is dirty.
• Before putting on headphones always adjust the volume setting to the lowest position.
• Do not put pressure on the screen.
• Caution children to avoid touching or scratching the screen, as it may become dirty or damaged.
Patented, refer to www.voxxintl.com/company/patents
Congratulations
Safety Precaution
Warnings
© 2019 Voxx Electronics. All rights reserved.
This manual, or any portion thereof, may not be reproduced without the express written permission of Voxx Electronics.
Design and specications subject to change without notice. The images shown in the examples may dier from actual operation.
Software subject to change without notice for performance and function improvements.

TABLE OF CONTENTS
System Features ................................................................................................................................................................................................................... 5
Accessories ............................................................................................................................................................................................................................ 6
Description of parts (SB10MD1) ..................................................................................................................................................................................... 7
Description of parts (SB10M1)......................................................................................................................................................................................... 8
Getting Started ..................................................................................................................................................................................................................... 9
Home Main Menu ............................................................................................................................................................................................................. 10
APPs ........................................................................................................................................................................................................................................ 11
SmartStream Android .......................................................................................................................................................................................................12
SmartStream iOS ............................................................................................................................................................................................................... 13
HDMI Port Information......................................................................................................................................................................................................14
USB & SD Card Playback....................................................................................................................................................................................................15
WIFI Dual Screen..................................................................................................................................................................................................................16
Dual Screen............................................................................................................................................................................................................................18
Wi-Fi Setup.............................................................................................................................................................................................................................19
VOXX LINK..............................................................................................................................................................................................................................21
WFMM .....................................................................................................................................................................................................................................23
IR Headphone Transmitter ...............................................................................................................................................................................................24
Language .............................................................................................................................................................................................................................. 25
About Device & Check for Update ............................................................................................................................................................................... 26
Time Zone & Reset ............................................................................................................................................................................................................. 28
Volume & Brightness Control......................................................................................................................................................................................... 29
DVD Playback (SB10MD1) ................................................................................................................................................................................................30
Media Type and File Type Compatibility.....................................................................................................................................................................31
Troubleshooting ..................................................................................................................................................................................................................32
General Specications.......................................................................................................................................................................................................34
Compliance Information.................................................................................................................................................................................................. 35

5
SB10MD1 FEATURES
• Android Operating System
• Quad-core Processor
• RAM (8GB)
• Internal Memory (8GB)
• 10.1" TFT LCD Display (1024x600)
• Capacitive Multi-Touch Panel
• User Downloadable Apps
(PlayStore,Chrome,NetixPre-loaded*)
• MicroSD Card (Supports up to 64GB)
• USB 2.0 Input (Supports up to 64GB)
• SmartStream Screen Mirroring (Android Devices)
• Integrated DVD Player
• Dual Screen (Share Content Between Monitors)
• Wi-Fi Dual Screen (Share Content Between Monitors)
• 100 Channel Wireless FM Modulator
• Dual Channel IR Headphone Transmitter
• Wi-Fi 802.11 a/b/n/g Dual Band (Hotspot Required)
• VOXX LINK Remote Control (APP for Android and iOS)
SB10M1 FEATURES
• Android Operating System
• Quad-core Processor
• RAM (8GB)
• Internal Memory (8GB)
• 10.1" TFT LCD Display (1024x600)
• Capacitive Multi-Touch Panel
• User Downloadable Apps
(PlayStore,Chrome,NetixPre-loaded*)
• MicroSD Card (Supports up to 64GB)
• USB 2.0 Input (Supports up to 64GB)
• SmartStream Screen Mirroring (Android Devices)
• HDMI Input
• Dual Screen (Share Content Between Monitors)
• Wi-Fi Dual Screen (Share Content Between Monitors)
• 100 Channel Wireless FM Modulator
• Dual Channel IR Headphone Transmitter
• Wi-Fi 802.11 a/b/n/g Dual Band (Hotspot Required)
• VOXX LINK Remote Control (APP for Android and iOS)
* All trademarks and their respective logos cited herein are the property of their respective owners.

6
ACCESSORIES
Wireless Headphones
Each monitor includes a built-in dual channel infrared transmitter for use with the included wireless headphones. The wireless headphones
must be used within a direct line of sight from the screen. Infrared transmission, like visible light, travels only in a straight line.
How to Use the Wireless Headphones
When wearing the headphones, make sure to observe the “Left” and “Right” labels. The headphones must be oriented correctly in order to
receive the audio signal. Press the power button located on the side of the headphone. To switch between channel “A” (Driver’s side) and
channel “B” (Passenger side), slide the selector switch to the "A" or "B" position. Volume can be adjusted by rotating the wheel on the outside
of the channel select button. The headphones are designed to automatically turn off after approximately 3 minutes of no activity to help prevent
battery drain. If the headphones are not going to be used for an extended amount of time it is recommended to remove the batteries to prevent
damage of the headphones due to battery corrosion.
Wired Headphone Input
The System will allow you to use your personal headphones (not included) to listen to audio content. There are 3.5mm stereo headphone
output jacks located on the side of each monitor which can be used with most standard stereo headphones. The volume control of personal
headphones can be adjusted by selecting the volume icon and adjusting up/down.

7
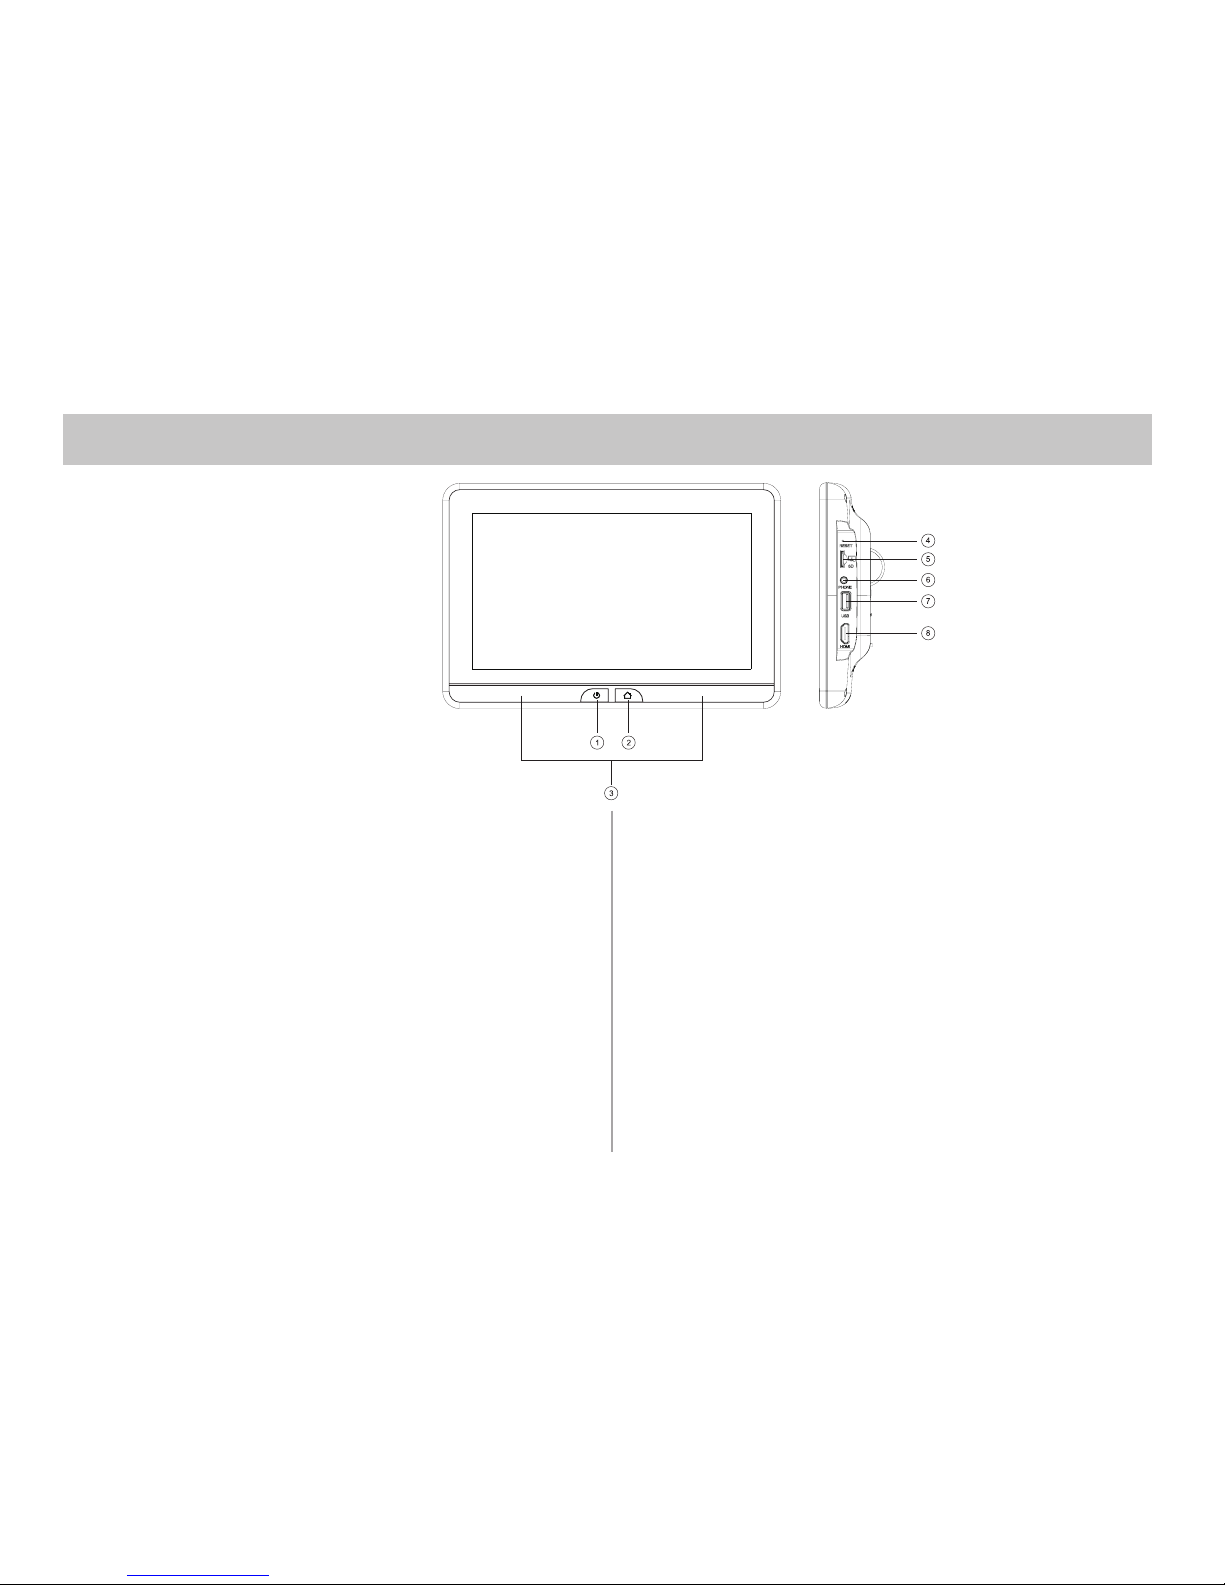
DESCRIPTION OF PARTS SB10MD1
1. DVD Disc Eject Button
This button is used for ejecting a disc from the built-in DVD player.
2. Power Button
This button is used to turn the system ON/OFF.
3. Home Button
This button is used to display the Home Menu Screen.
4. IR Transmitter
Used to broadcast the audio signal to the wireless headphones.
5. USB Port
This input supports media playback from a USB thumb drive (up to
64GB). This port will also support USB charging (1amp) to provide
power to a device that requires external USB power.
6. Wired Headphone Jack
For use with wired headphones equipped with a 3.5mm cable.
7. Micro SD Card Slot
This input supports media playback from micro SD cards (up to
64GB).
8. Reset
This button provides a system-level power reset. It does not aect
the user settings.
9. DVD Disc Insertion Slot
Insert a disc with label side facing towards the user.
8
DESCRIPTION OF PARTS SB10M1
1. Power Button
This button is used to turn the system ON/OFF.
2. Home Button
This button is used to display the Home Menu Screen.
3. IR Transmitter
Used to broadcast the audio signal to the wireless headphones.
4. Reset
This button provides a system-level power reset. It does not aect
the user settings.
5. Micro SD Card Slot
This input supports media playback from micro SD cards (up to
64GB).
6. Wired Headphone Jack
For use with wired headphones equipped with a 3.5mm cable.
7. USB Port
This input supports media playback from a USB thumb drive (up to
64GB). This port will also support USB charging (1amp) to provide
power to a device that requires external USB power.
8. HDMI Input
This input is used to connect a HDMI compatible device.

9
GETTING STARTED
1. To start the system, the vehicle ignition key switch must be in ACC or engine ON position.
2. The Power Button and Home Buttons will ash RED and BLUE while the system is booting up. Once the boot up process is completed, the Power
Button and Home Buttons will turn RED, and stay in the Standby position. It will take approximately 12 seconds to 15 seconds to complete the system
boot up process.
3. Once the Power and Home buttons are solid RED, press the Power Button to turn the system ON and the logo image will appear on the screen. After
the logo image displays, the Home Main Menu will appear on the screen.
Power Button
Home Button

10
HOME MAIN MENU
SB10MD1 SB10M1
SCREENOFF
DVD SmartStream USB SD
DUAL SCREENWIFI DUAL SCREEN APPS SETUP
SCREENOFF
HDMI SmartStream USB SD
DUAL SCREENWIFI DUAL SCREEN APPS SETUP
Otros manuales para SB10MD1
1
Este manual sirve para los siguientes modelos
1
Tabla de contenidos
Otros manuales de Receptor de coche de Voxx Electronics


