Vivitar DPF-30 Manual de usuario

DPF-30
Digital Photo Frame
Owner’s Manual
© 2009 Vivitar, Inc. All rights reserved.
All other trademarks are the property of their respective companies.

2
Table of Contents
Package Contents ……………………………..…………………………………… 3
Computer System Requirements for Windows………………………………………. 4
A Quick Look at Your Device ……………………………………….. 5
Preparing Your Device for Use ……………………………………….. 6
Starting Your Digital Photo Frame ………………………………………... 7
Exploring the Settings Options ……………………………................. 8
Loading Photos from Your Computer ………………………………………... 15
Using Photo Viewer Software …………………………………… 17
Digital Photo Frame Maintenance ..………………………………………… 19
Appendix A: Technical Specifications ………………………………………… 20

3
Introduction:
Thank you for purchasing the Digital Photo Frame. Please read this manual carefully FIRST in
order to get the most out of your device.
Package Contents:
•Photo Frame
•USB cable
•User’s Manual with Warranty Information

4
Computer System Requirements for Windows
Your Digital Photo Frame can be used with computers running Windows XP and Windows Vista.
In order to load photos from your PC to your Digital Photo Frame you will need the following
minimum system configuration:
Windows XP Users
-Pentium 4 Processor or higher (recommended), 1.6 GHZ, .Windows XP Service Pack 2
-512MB RAM
-150MB Free Hard Disk Drive Space
-CD/DVD ROM Drive
-Available USB Port
-Direct X 9 Capable Graphics Card
-1024x768 Screen Resolution
Windows Vista Users
-One Gigabyte (GHz) processor
-512MB RAM
-150MB Free Hard Disk Drive Space
-CD/DVD ROM Drive
-Available USB Port
-Direct X 9 Capable Graphics Card
-1024x768 Screen Resolution
5
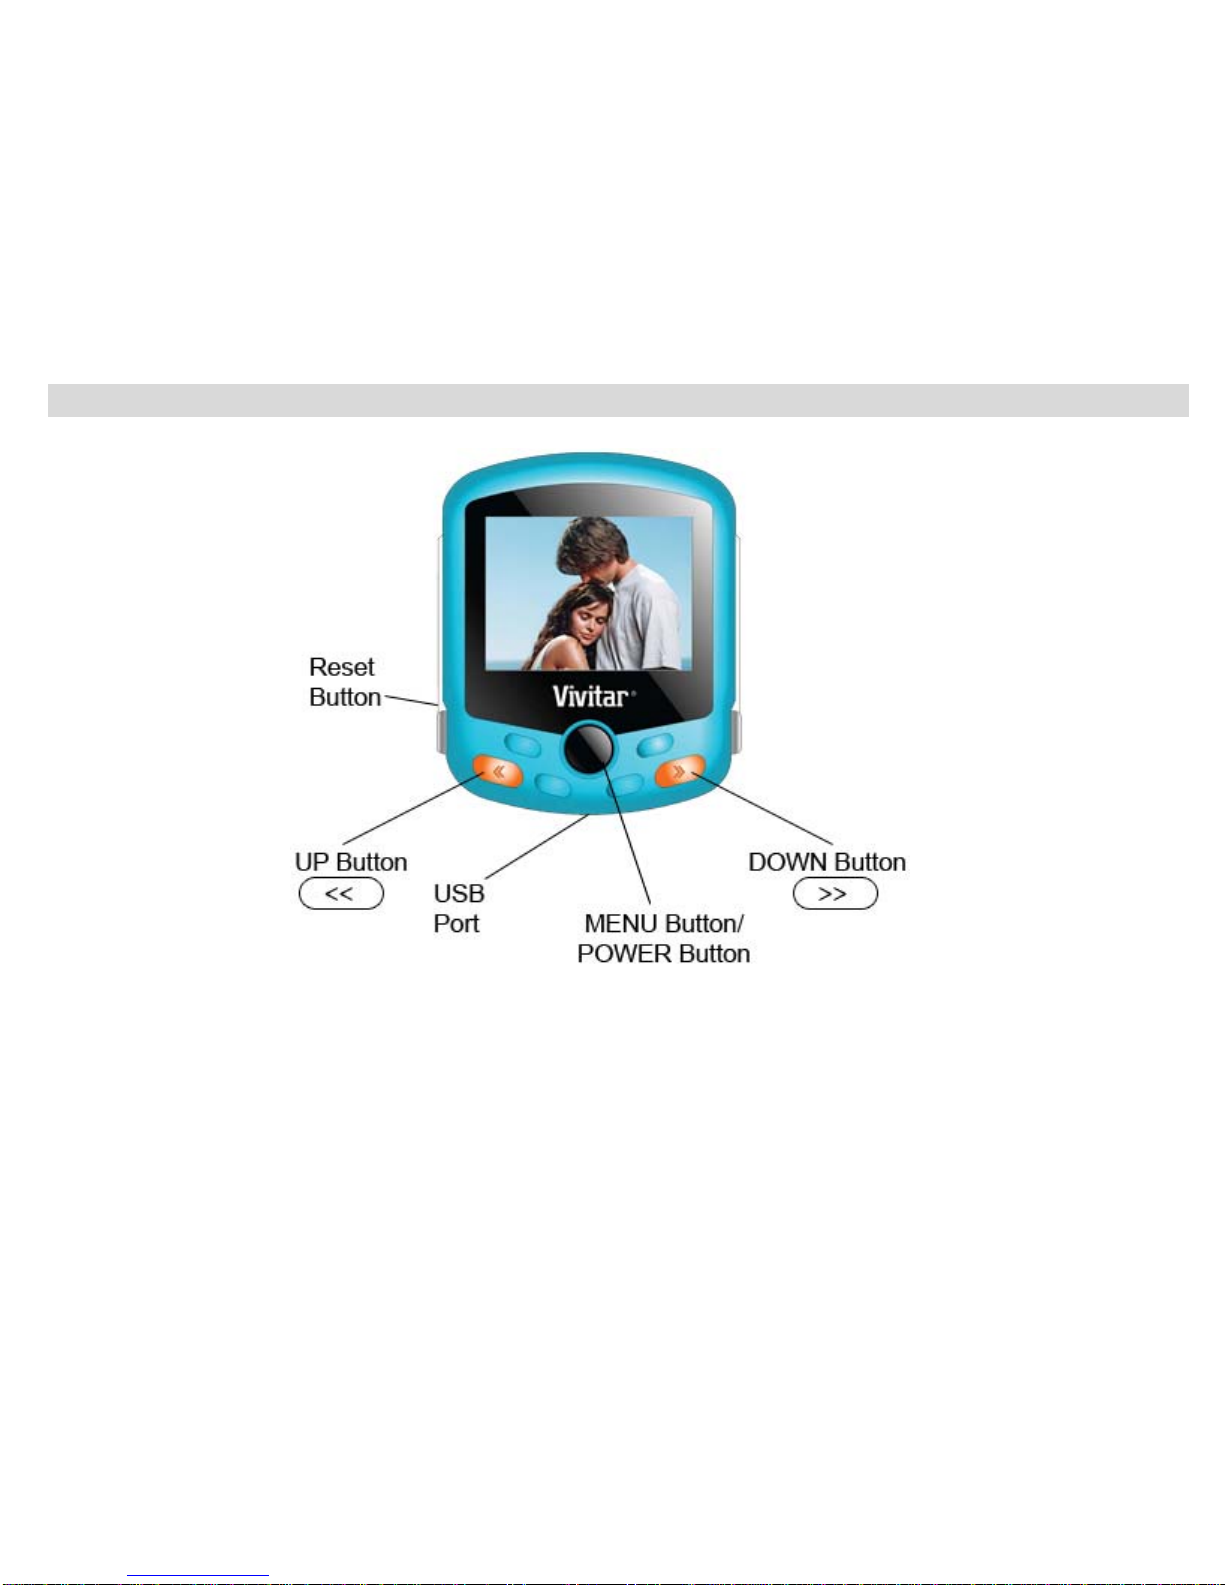
A Quick Look at Your Device

6
Button Functions
Up Button:Pushing the UP Button allows you to scroll UP or backwards.
Down Button: Pushing the DOWN Button allows you to scroll DOWN or forward
Menu Button/ Power Button: By quickly pushing this button you will enter the selected setting. By
pressing the button down for 3 or 4 seconds you can power on or power off your device.
Reset Button: Press the reset button in order to reset your device. This can be used if your device
is not powering off properly.
USB Port: Connect the included USB cable to this port in order to connect your device to your
computer so it can be charged, or so that you can load new photos.
Preparing Your Device for Use
To charge the battery of your Digital Photo Frame
Your device has a built in lithium battery. A red battery icon will flicker on the LCD screen
when your Digital Photo Frame battery is running low. After 10 seconds, your Photo Frame will
automatically turn off. You can recharge your lithium battery by connecting your photo frame to the
computer with the included USB cable.

7
Starting Your Digital Photo Frame
Powering on Your Photo Frame:
Press and hold the Menu Button/Power Button for about 3 seconds to power on your Digital
Photo Frame.
Note:
Please make sure that your Photo Frame has sufficient battery power in order to operate properly.
Powering Off Your Photo Frame
When your Photo Frame is turned on, press and hold the Menu Button/Power Button for about 3
seconds. On your LCD screen the message “Power Off” will appear, and your Digital Photo
Frame will power off.
Viewing Different Photos On Your Photo Frame
If multiple photos are loaded on your Photo Frame, you can press the or button to
scroll through the different photos on your LCD screen.

8
Exploring the Settings Options
To change or adjust any of the settings options for your Photo Frame, first power on your Photo
Frame, and then press the Menu button. On your LCD screen, you will see the heading “Main
Menu”, followed by a list of settings that can be adjusted on your Photo Frame. Use the or
button to scroll through the list of settings options. When the setting you wish to adjust is
highlighted, press the Menu button to make adjustments. Your Photo Frame features the
following settings which can be adjusted:
MAIN MENU
Usb Connect
Clock
Slide Show
Auto Shut Down
Backlight
Delete
Off
Exit

9
1. USB CONNECT
A. Press the Menu button to enter the settings menu.
B. Once in the settings menu, press or repeatedly until USB CONNECT is
highlighted.
C. Press the Menu button to enter this setting.
D. Navigate or to select between YES and NO.
E. Press Menu to confirm.
USB CONNECT SETTINGS
Yes: When YES is selected, you can load pictures from your computer onto your Digital Photo
Frame once your device is connected to your computer using the included USB cable.
NO : When NO is selected, you will be unable to load photos onto your Digital Photo Frame, as
your computer will not look for the device when it is plugged in.
NOTE: The USB CONNECT option must be set to YES in order to load photos from your
computer.
2. CLOCK
A. Press the Menu button to enter the settings menu.
B. Once in the settings menu, press or repeatedly until CLOCK is highlighted.

10
C. Press the Menu button to enter this setting.
D. Press or to select the DISPLAY CLOCK, ANALOG CLOCK, SET CLOCK or
ALARM CLOCK.
E. Press the Menu to confirm.
DISPLAY CLOCK
By choosing the DISPLAY CLOCK option, your frame will display the date, time and day
of the week
ANALOG CLOCK
The ANALOG CLOCK allows the time to be displayed as an analog clock image on the
screen.
SET CLOCK
The SET CLOCK allows you to adjust the Display Clock so that it displays accurate time
and date information. To do so, press or to choose the correct date or time
setting, and press the Menu to confirm these settings.
ALARM CLOCK
ON: When ON is selected, the alarm can be set by pressing or to enter the
time that you’d like your alarm to go on and then the Menu button to confirm.
Tabla de contenidos


