Vitek VT-3498 Manual de usuario

STEREO MINI SYSTEM WITH DVD/VCD/CD PLAYER
MODEL VT-3498
3
33
65
98
www.vitek-aus.com
MANUAL INSTRUCTION
3498.QXD 30.06.2005 23:39 Page 1

3498.QXD 30.06.2005 23:39 Page 2

OPERATING INSTRUCTIONS
Music Center with DVD/VCD/CD Player
CAUTION
RISK OF ELECTRIC SHOCK
DO NOT OPEN!
This lighting-flash arrow symbol in a
triangle is to alert users to the pres-
ence of non-insulated high voltage
within the product’s enclosure that
may be of sufficient magnitude to
constitute a risk of electric shock.
The exclamation point symbol in a
triangle is to alert users to the pres-
ence of important operating and
maintenance instructions in the liter-
ature accompanying the unit.
CAUTION:
DVD/VIDEO CD/CD PLAYER IS A LASER 1
CLASS PRODUCT. THIS DVD/VIDEO CD/CD
USES A LASER BEAM, EXPOSION TO WHICH
CAN CAUSE A DANGEROUS RADIATION
HAZARD. WHEN OPERATING YOUR
DVD/VIDEO CD/CD PLAYER, FOLLOW THESE
INSTRUCTIONS
AFTER CONNECTING YOUR DVD/VIDEO
CD/CD PLAYER TO THE AC LINE, DO NOT
PLACE YOUR FACE CLOSE TO THE DISC
TRAY, OR TO OTHER OPENINGS OF THE
DEVICE, TO AVOID RISK OF SIGHT DAMAGE.
IMPROPER USE OF CONTROLS, ADJUST-
MENTS OR PERFORMANCE OF PROCE-
DURES OTHER THAN THOSE SPECIFIED IN
THE GIVEN MANUAL MAY RESULT IN HAZ-
ARDOUS RADIATION EXPOSURE.
DO NOT REMOVE THE COVERS OR TRY TO
REPAIR UNIT YOURSELF. REFER TO QUALI-
FIED PERSONNEL ONLY.
WARNING!
TO PREVENT FIRE OR ELECTRIC SHOCK
HAZARD, DO NOT EXPOSE THE UNIT TO
MOISTURE OR WATER.
TO PREVENT RISK OF FIRE, ELECTRIC
SHOCK OR NOISE, USE ONLY RECOM-
MENDED AUXILIARY EQUIPMENT.
THIS SYSTEM IS DESIGNED FOR CONTINU-
OUS USE!
CAUTION: TO AVOID ELECTRIC SHOCK HAZ-
ARD, DO NOT REMOVE THE COVER (OR
REAR PANEL). THERE ARE NO USER-SER-
VICEABLE PARTS INSIDE THE UNIT. REFER
TO QUALIFIED PERSONNEL ONLY.
CAUTION: LASER RADIATION HAZARD WHEN
OPENING THE DEVICE. DO NOT LOOK AT
LASER BEAM.
WARNING: (VENTILLATION SYSTEM)!
MAKE SURE THAT VENTILLATION SYSTEM IS
NOT BLOCKED.
Dear customer,
We take this opportunity to thank you for pur-
chasing our DVD/VCD/CD player.
Please carefully read this operation manual
and become familiar with all the safety
instructions before operating the device.
SPECIFICATIONS
HIGH QUALITY AUDIO AND VIDEO
• Digital analogous converter 192 kHz/24 bit
This player provides a high quality reproduc-
tion of 192 kHz/24-bit linear PCM signals,
corresponding to the highest technical speci-
fications in DVD standards. To ensure 192
kHz sampling/24-bit sound, the shaping
noise of this multi-level sigma type of D/A
converter is kept flat up to 44 kHz, thus pre-
venting important audio signals from being
affected. As for the lower limit, high quality of
sound is ensured in all operation modes.
• 10-bit Digital/analog video converter
This 10-bit digital-analog converter provides
excellent video quality.
SUPPORTED TV SYSTEMS
This device can play PAL and NTSC discs.
DIGITAL TUNER
This radio system is easily operated and pro-
ENGLISH
3
3498.QXD 30.06.2005 23:39 Page 3

vides a clean stereo sound, the tuned fre-
quency is shown on the display.
Press the DISPLAY button on the remote con-
trol to display on the TV set the player and
disc information. The player operation and
settings are performed from the remote con-
trol device, using information of the TV dis-
play.
MULTIPLE LANGUAGE SUPPORT
Sound tracks can be played in up to 8 lan-
guages (the exact number of languages is
determined by the DVD recording software).
SUBTITLES
Up to 32 subtitle languages, the exact num-
ber is determined by the disc recording soft-
ware.
MULTIPLE ANGLES
This function allows you to choose the view-
ing angles of scenes which were shot from a
number of different angles (only for DVD
video recorded with multiple angles).
PARENTAL LOCK FUNCTION
This function can prevent playback of DVD
discs that may be unsuitable for children.
• SUITABLE DISC FORMATS
This device can play discs of the following
formats:
SAFETY PRECAUTIONS
Power Cord Protection
To avoid faults in operation and to prevent
electric shock, fire and personal injury, please
follow the following recommendations:
• Hold the power cord plug firmly when con-
necting or disconnecting it from the AC
power socket.
• Do not connect the power cord with wet hands.
• Do not route the power cord near heat
sources.
• Do not put heavy items onto the power cord.
• Do not repair the cord yourself or make any
alterations.
• Keep the plug clean.
• If the player was dropped or in any way dam-
aged, set it to standby mode and disconnect
from the power supply.
• If the player produces any smoke, smell or
noise, set it to standby mode and disconnect
from the power supply.
Location
Do not install the unit in places exposed to:
• direct sunlight or heat sources, in closed cars;
• high temperature (over 35°C) or high humidity
(over 90%);
• vibration and dynamic impacts on the inclined
surface, to avoid serious damage of the inter-
nal components.
When not in use
When the player is not in use, set it to standby
mode.
When the player is not to be used for a long
period of time, disconnect it from the AC
power socket.
Do not insert fingers or other objects inside
the casing.
• Internal parts of the system can be danger-
ous, and the device can be seriously dam-
aged. Do not disassemble the unit.
• Do not put any foreign objects on the disc
tray.
The device should be placed away from
sources of humidity and magnetic objects.
• Do not place the unit near flower vases,
baths, sinks and so on. If liquid gets inside
the unit, it can case serious damage to the
device.
• Do not place the unit near such magnetic
objects as speakers.
Installation
• Install the player on the horizontal surface
and do not put heavy objects on it.
• Do not install the unit on speakers or other
equipment which may heat up.
ENGLISH
4
3498.QXD 30.06.2005 23:39 Page 4

Condensation
Condensation on the device optics can form
in the following circumstances:
• directly after turning on an electric heater;
• left in a room with high humidity or steam;
• when the player is brought from a cold into a
warm room.
If moisture appears inside the enclosure, the
device operation may become faulty. In such
case disconnect the device from the power
supply and wait an hour for the moisture to
evaporate.
Background noise when viewing TV
programs
When viewing TV programs with the player
turned on (depending on the TV settings),
background noise may occur. This should not
be considered as a player or TV set malfunc-
tion. Set the player to Standby mode when
viewing TV programs.
CAUTION:
• To avoid electric shock hazard, this unit must
not be exposed to water.
• Minimum distances should be provided
around the apparatus for sufficient ventila-
tion.
• Ventilation should not be impeded by cover-
ing the ventilation openings with items, such
as newspapers, table-cloths, curtains, etc.
• No naked flame sources, such as lighted
candles, should be placed on the apparatus.
• Before disposing of the appliance, remove
the batteries and place them in the appropri-
ate battery collection container.
CONTROL SYSTEM
Front Panel
1. POWER button – press it to turn on/off the
unit. The remote control device only works if
this button is activated.
2. SEARCH/TUNE UP button – activates fast
forward playback at X2, X4, X8, X16, X32
speed, in the radio mode – search of the
next radio frequency.
3. SEARCH/TUNE DOWN button – activates
fast reverse playback at X2, X4, X8, X16, X32
speed, in the radio mode – search of the
previous radio frequency.
4. BAND/AM/FM & REPEAT 1/ALL button –
toggles between AM and FM bands in the
radio mode. In the audio playback mode,
repeats one/all folders or tracks.
5. AUDIO button – selects audio recording.
6. DISPLAY button - shows information on the
display during playback. Pressing Display
button shows elapsing and remaining time of
the playback.
7. PHONES jack – to connect one pair of head-
phones.
8. Cassette Record button – recording of audio
signal from another sound source, like radio,
DVD, etc. To start recording, the Play and
Record buttons on the cassette deck must
be pressed simultaneously.
9. Cassette Play button – press to play the
tape.
10. Cassette Fast Rewind button – press to fast
rewind the tape.
11. Cassette Fast Forward button – press to fast
forward the tape and find a desired track on
the tape.
12. Stop/Eject button – press once to stop play-
back or recording, press twice to open the
cassette door.
13. Pause button – to temporarily stop playback.
14. Microphone jack – to connect microphone
15. Microphone Volume Control – adjusts micro-
phone volume (karaoke).
16. Cassette Deck
17. SUBTITLE button – press to show available
subtitle languages.
18. DVD STOP button – press it to stop DVD
playback.
19. PAL/NTSC button – press to toggle between
PAL, NTSC and/or MULTI , depending on
your TV system.
20. VOLUME knob – turn clockwise to increase
the volume, turn in opposite direction – to
decrease the volume.
21. STANDBY indicator – if the unit is turned off
using the remote control, the indicator lights
up (Standby mode), when you turn on the
unit, using the remote control, the indicator
goes down.
22. LED display – shows DVD playback info.
ENGLISH
5
3498.QXD 30.06.2005 23:39 Page 5

23. DVD PLAY/PAUSE button – press to start or
temporarily stop playback.
24. DVD SKIP NEXT button – to move to the next
scene (DVD) or record (CD).
25. DVD SKIP PREVIOUS button – to move to
the previous scene (DVD) or record (CD).
26. FUNCTION button – press to select another
playback source – DVD, Radio, Tape.
27. Remote Control Sensor – accepts signals
from the remote control device.
28. DVD door- press in this area to open the
DVD door.
REMOTE CONTROL UNIT
1. POWER – to turn on the system when it is in
standby mode or to turn off the system (if
Power button on the main unit is pressed).
2. DISPLAY – when pressed in the playback
mode, the elapsed and remaining playback
time is shown on screen.
3. ZOOM – increase image size.
4. REPEAT A-B – repeated playback of a sec-
tion between two marks (A-B).
5. REPEAT 1/ALL&BAND button – in radio
mode, press it to toggle between AM and FM
ranges. In disc playback mode, press it to
repeat one/all scenes, catalogs or tracks.
6. DVD PLAY/PAUSE button – press to start or
temporarily stop playback.
7. NAVIGATION button- navigation to the left.
8. ENTER button – confirms the choice.
9. RANDOM – when pressed, the devices plays
in random order all scenes or films ( DVD),
or all tracks (for VCD).
10. STEP button – press this button to activate
frame-be-frame playback mode.
11. F.BWD button – press it to activate fast
reverse playback at X2, X4, X8, X16, X32
speed, in the radio mode – search for the
previous radio frequency.
12. F.FWD button – press it to activate fast for-
ward playback at X2, X4, X8, X16, X32
speed, in the radio mode – search of the
next radio frequency.
13. SUBTITLE button – when pressed, available
subtitle languages are shown on screen.
14. ANGLE – press it to show the angle number
on screen, you can change angles by
repeated pressings on this button.
15. PROGRAM – to program in memory the
playback order of scenes and films ( DVD) or
tracks ( CD)
16. MENU - to select VCD playback control, if
PBC function is turned on. When RETURN
button is pressed, the player starts playback
from the VCD root folder. To return to the
DVD root folder.
17. FUNCTION button – press to select another
sound source – DVD, Radio, Tape.
18. P/N – press to select TV system – MULTI,
NTSC or PAL.
19. DIGEST – review of the disc contents.
20. TV-SYSTEM button –press it to toggle TV
signal between YUV and CVBS.
21. Number buttons - to select tracks.
22. CLEAR button – to clear the on screen infor-
mation.
23. “+10” – with each pressing adds 10 to the
audio track or DVD scene number.
24. STOP button - press it to stop disc playback.
25. NAVIGATION button- navigation up.
26. NAVIGATION button- navigation to the right.
27. NAVIGATION button- navigation down.
28. SEARCH – press it in playback mode and
then press the desired track number, its
playback will be started.
29. SLOW – when pressed in playback mode,
the playback speed is reduced.
30. P.SCAN (Progressive Scan) – progressive
scan video mode. Check if your TV set can
support this mode. In case it does not, press
this button again to return to the initial video
mode.
31. NEXT button – to select the next scene or
track.
32. PREV button – to select the previous scene
or track.
33. VOLUME + button – to increase the volume.
34. AUDIO button – to select an audio track
35. VOLUME - button – to decrease the volume.
36. TITLE button – press to play DVD captions.
37. MUTE button – to turn off the main unit’s
audio output
38. SETUP button – to call up the initial setup menu
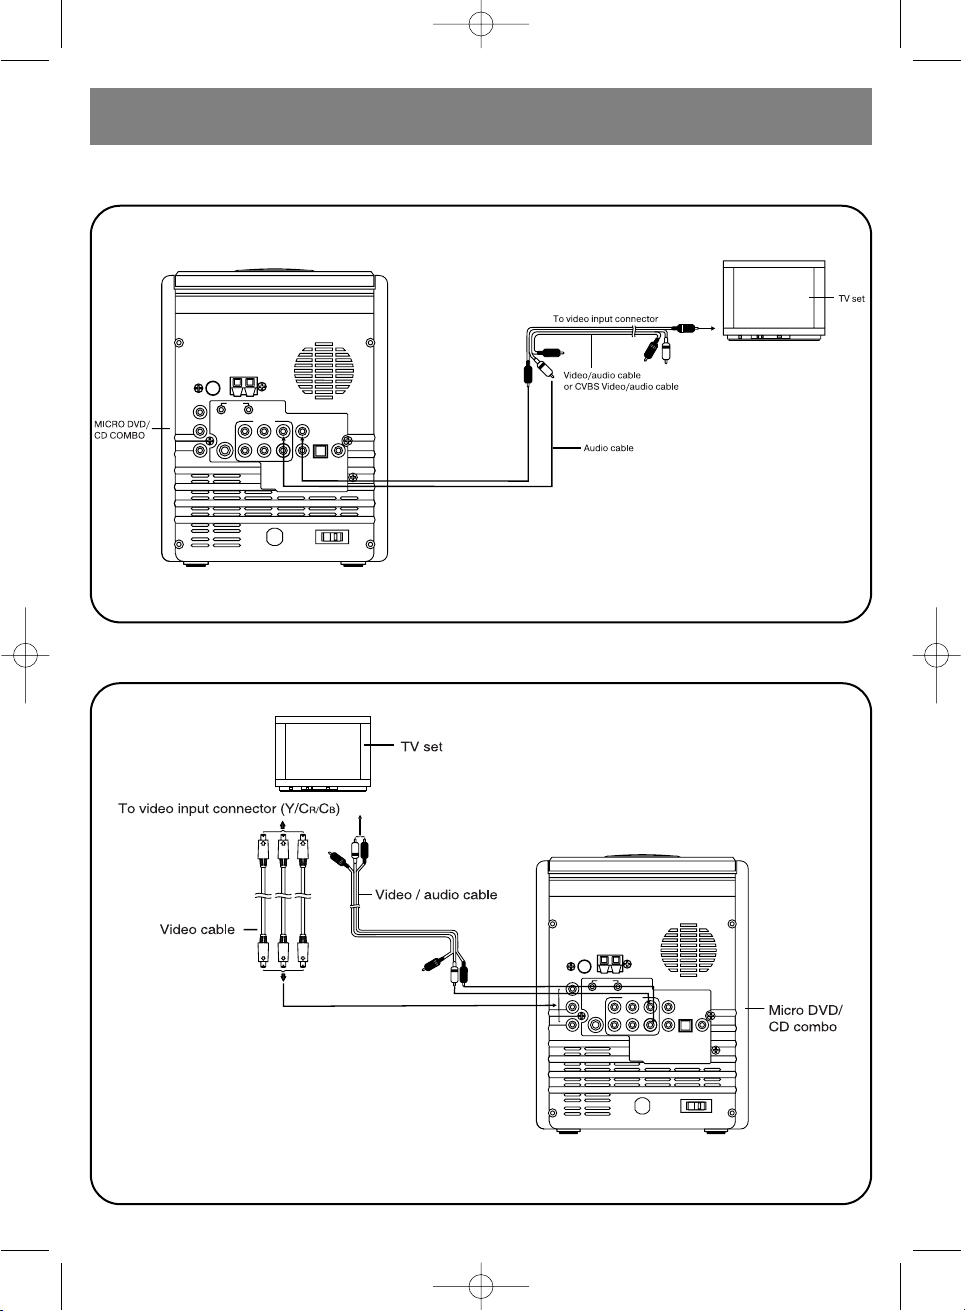
MAIN CONNECTIONS
• We recommend that you connect this device
to a multi system TV set.
ENGLISH
6
3498.QXD 30.06.2005 23:39 Page 6

• Make sure that the player and other equip-
ment is in standby mode or turned off, then
disconnect all power cords from the AC
outlet.
• Check up that the ventilation openings are
not blocked and sufficient air circulation is
provided.
• Before connecting the equipment, please
carefully read all available manuals.
• Make sure that audio and video cords are
connected correctly (by colors).
Note:
• In DVD playback mode, the volume may be
lower than when receiving TV programs.
Adjust the volume level, if needed.
• If DVD/VCD/CD player is connected to the TV
via a video cassette recorder, playback quali-
ty of some DVD discs can be reduced. In
such case, connect the DVD player separate-
ly from the VCR.
ENGLISH
7
CONNECTION TO STEREO TV
3498.QXD 30.06.2005 23:39 Page 7

ENGLISH
8
Connection to Mono TV
Connection to TV or monitor via “yuv” type connector
3498.QXD 30.06.2005 23:39 Page 8

YPbPr/YCbCr connecting cable transfers color signals (brightness, contrast of red and blue col-
ors) to obtain a quality reproduction of colors.
Characteristics of component video inputs can be different for different TV sets or monitors. See
the TV operation manual.
Connection to audio equipment
ENGLISH
9
3498.QXD 30.06.2005 23:39 Page 9

ENGLISH
10
Connection to 5.1 CH amplifier
3498.QXD 30.06.2005 23:39 Page 10
Tabla de contenidos
Idiomas:
Otros manuales de Sistema estéreo de Vitek

Vitek
Vitek VT-3497 Manual de usuario

Vitek
Vitek VT-3488 Manual de usuario

Vitek
Vitek VT-3486 Manual de usuario

Vitek
Vitek VT3470 GY Manual de usuario

Vitek
Vitek VT-3490 Manual de usuario

Vitek
Vitek VT-3481 Manual de usuario

Vitek
Vitek VT-3496 Manual de usuario

Vitek
Vitek VT-3494 Manual de usuario

Vitek
Vitek VT-3494 Manual de usuario


