Viking VHMD Guía de referencia rápida

1
Viking Professional Hand Mixer
Use and Care Instructions
Professional Hand Mixer
VHMM5 VHMD9
®
vikingrange.com

Congratulations! You have just purchased a Viking Professional Hand
Mixer. The professional grade hand mixer offers a heavy duty look and
feel, but may be used for whipping the lightest meringues. This unit
offers a variety of functions from mixing cookie dough to your favorite
cake recipe.
2

3
Table of Contents
4 Important Safeguards
5 Using your Viking Hand Mixer
6 Hand Mixer Diagram
7 Getting Started
7 Before Using the First Time
7 Assembling and Disassembling Attachments
8 Operating
9 Speed Control Guide
10 Using the Manual Wind Cord Storage
10 Cleaning and Service
10 Troubleshooting
11 Recipes
21 Warranty

4
When using electrical appliances, consideration should always be given to basic
safety precautions including the following:
• Read all instructions.
• To protect against the risk of electrical shock, do not place cord, plugs, or
motor housing in water or any other liquid.
• This appliance should not be used by children and care should be taken when
operated near children.
• Unplug from outlet before cleaning, removing parts, and also when not in use.
• Do not operate the hand mixer with a damaged cord or plug or after the
hand mixer malfunctions, or has been damaged in any manner. Please call
1-800-216-5775 to speak with the Viking Culinary Warranty & Service Center.
• The use of an accessory not evaluated for use with this hand mixer may
cause re, electric shock, or possible injury.
• Avoid contacting moving parts. Keep hands, hair, clothing, as well as
spatulas and other utensils away from all attachments during operation to
reduce the risk of injury to persons and/or damage to the hand mixer.
• Flashing of the digital control means ready to operate, do not touch beaters.
• Do not use outdoors.
• Do not let cord hang over edge of table or counter, or touch hot surfaces.
• This hand mixer is for household use only. Not intended or warranted for
commercial use.
• Do not use hand mixer for other than its intended use.
• Do not remove beaters while operating.
• The beaters are for use in this hand mixer only. Do not use in other
appliances.
• Do not clean hand mixer with cleansers, steel wool pads, or other abrasive
materials.
SAVE THESE INSTRUCTIONS
IMPORTANT SAFEGUARDS

IMPORTANT SAFEGUARDS
Using Your Viking
Hand Mixer
5

6
Powercord
Rear Cord Storage
Beater Insert
Manual or Digital
Control
Eject Button
Main Body or Motor Housing
Ergonomic Handle
Wire Beater Flat Beater

7
Getting Started
Please use these setup instructions before attempting to use this hand mixer.
Failure to follow the instructions may result in injury or a void in the warranty.
Before Using the First Time
Before using the product for the first time, remove all attachments from•
their packaging
Wash all attachments in the dishwasher or with warm soapy water and dry•
with a clean dry towel
Assembling and Disassembling the
Hand Mixer Attachments
Make sure the unit is unplugged before installing or removing any attachments.•
Insert the pair of wire beaters by aligning the shaft of the beater with the•
proper slot on the underside of the hand mixer. The pair of wire beaters
includes one with a collar and one without. Insert the wire beater with collar in
the slot labeled . The pair of at beaters (both with collars) may be inserted
in either slot on the underside of the hand mixer.
Remove the attachments by pressing the eject button on top of the hand
•
mixer. You may gently remove the attachments from the motor housing.
Insert
Collar
Beater
Eject
Button

8
1Insert the proper beater
attachments into the motor
housing.
Plug the electrical cord into the appropriate electrical wall outlet
and place the beaters into the mixture for mixing.
2
3
Operating the Viking Professional
Hand Mixer
4
Turn power on:
For Digital Model: Pressing the up arrow
until desired speed is reached
For Manual Model: Slide the switch
forward until the desired speed is reached.
When mixing is complete turn unit off by:
For Digital Model: Press the down arrow until
you reach the lowest speed and switch to off.
For Manual Model: Slide the switch
downward to off.
5Make sure unit is off and unplugged from power source before
removing attachments.
Note: the hand mixer should never be immersed into mixtures
which exceed the height of the beaters. Do not submerge the
motor housing into any type of liquid or mixture.
Digital Manual
Digital Manual
9
• When mixing move to the slowest speed to remove any
unwanted food on the beaters.
• Use wire beaters for whipping thin mixtures such as
meringue and the at beaters for heavier mixtures such
as cookie dough.
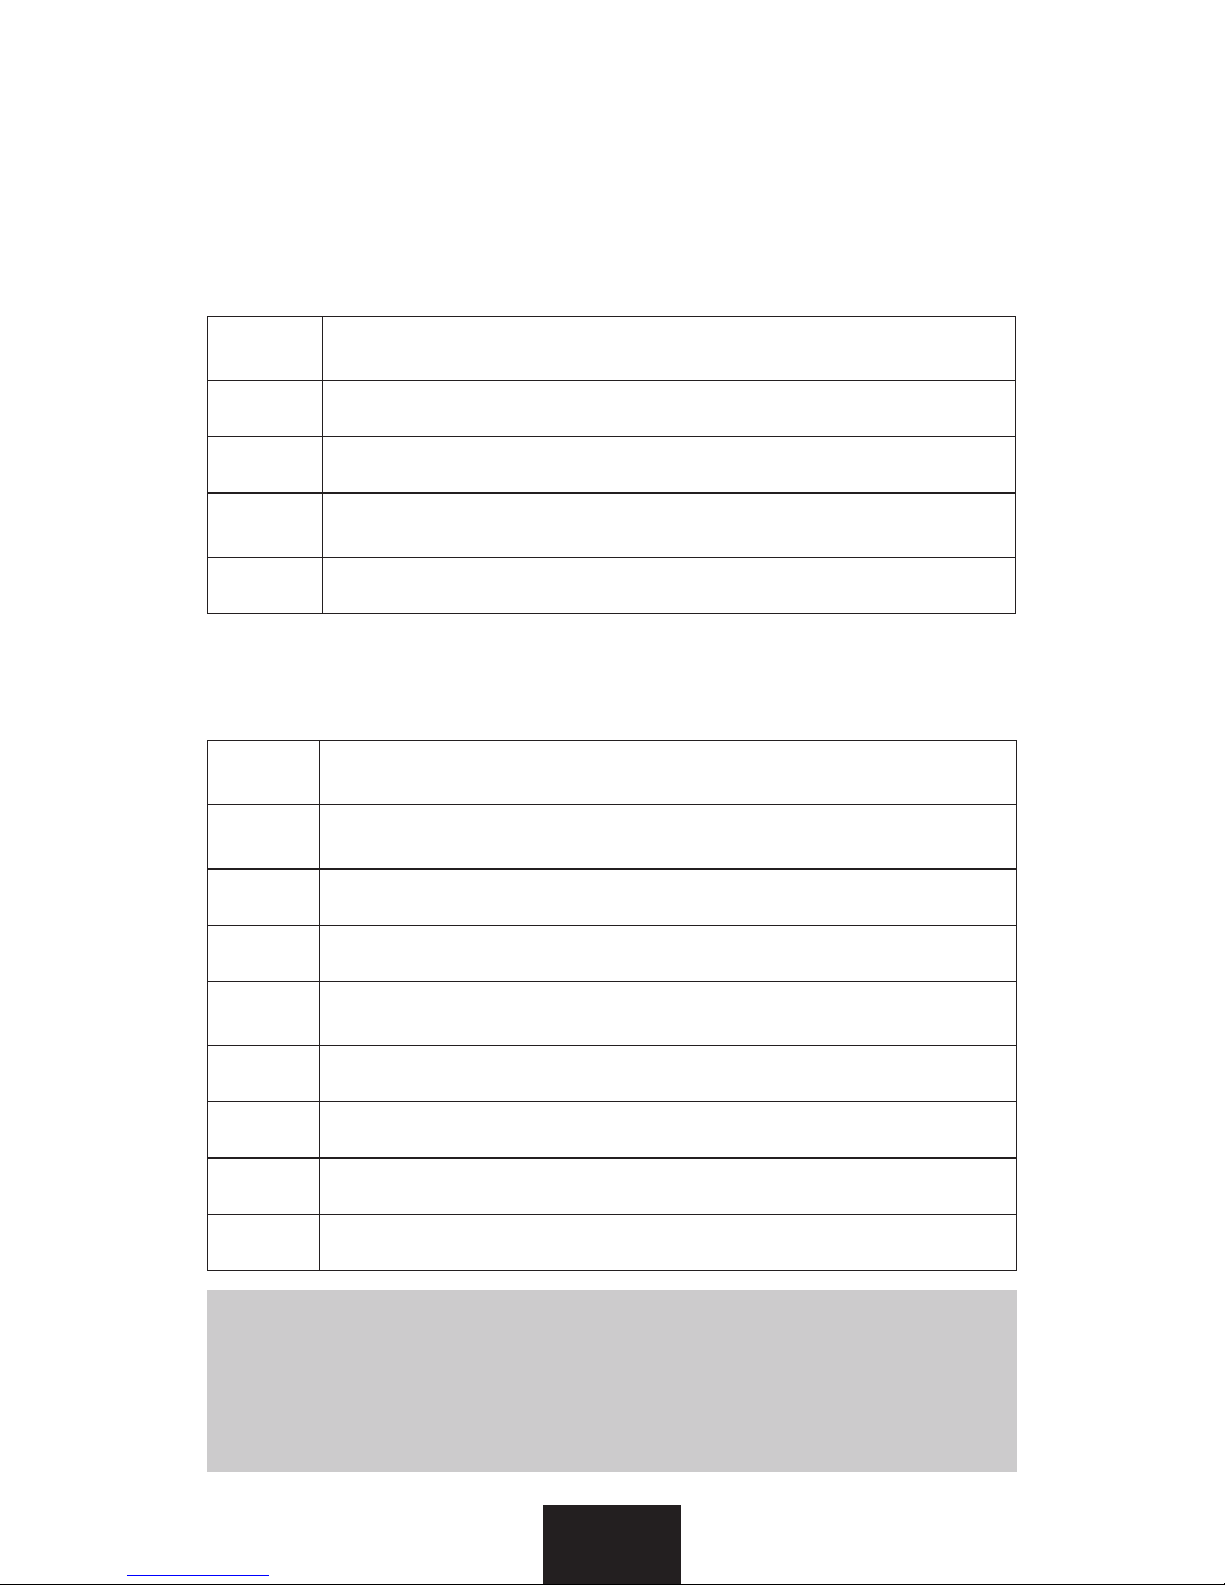
Speed Control Guide
Below are suggested settings and may be adjusted for personal preference
Speed Control Guide for Manual 5 Speed Hand Mixer
Speed 1 Stirring and blending mixtures. Use this speed to fold ingredients into
the mixture such as coconut, chocolate chips, nuts, and cheese
Speed 2 Mixing dry ingredients into wet mixtures
Speed 3 Mixing batters such as cakes and pancakes
Speed 4 Heavier mixtures such as mashed potatoes, cookie dough, cream
butter and sugar for icings
Speed 5 Whipping mixtures such as egg whites and whipped cream
Speed Control Guide for Digital 9 Speed Hand Mixer
Speed 1 Stirring and blending mixtures. Use this speed to fold ingredients
into the mixture such as coconut, chocolate chips, nuts and cheese
Speed 2 Incorporating dry ingredients into wet ingredients. Flour into
liquids
Speed 3 Mix cake and pancake batter
Speed 4 Heavy mixtures such as cookie dough, mashed potatoes
Speed 5 Mix muffins and breads - combine heavy ingredients such as cream
cheese
Speed 6 Blend butter and sugar and icings
Speed 7 Whipping cream
Speed 8 Whipping egg whites
Speed 9 Whipping meringue mixtures
Useful
Tips:

10
Using the Manual
Wind Cord Storage
• The cord storage may be used by
simply winding the end of the motor
housing counterclockwise until the
plug is ush with the end of the motor
housing.
• To remove the cord simply pull on
the plug end until you reach the desired
length.
Cleaning and Service
• Always turn the unit off and unplug before cleaning.
• Do not put motor housing in the dishwasher.
• The beater attachments may be washed in your household dishwasher or with
warm soapy water by hand.
• Never immerse or run water over the motor housing. Always wipe with a clean
damp cloth.
Troubleshooting
• Make sure the unit is plugged into the
proper electrical outlet.
• The unit is not blending properly. Are the
attachments installed correctly? Remove
attachments and reattach
• If any other issues may arise please call
1.800.216.5775 to speak to a service
representative. The service representative will
be glad to assist you with any issue. Please
do not return the product to the place where
it was purchased.
Este manual sirve para los siguientes modelos
3
Tabla de contenidos


