Vanco 280563 Manual de usuario

HDMI® Audio &
Video Scaler
Vanco Part Number:
280563
Technical Support
www.vanco1.com • [email protected] • 800-626-6445

www.vanco1.com 800-626-6445
2
1. Do not expose this unit to water, moisture,
or excessive humidity.
2. Do not install or place this unit in a built-in
cabinet, or other conned space without
adequate ventilation.
3. To prevent risk of electrical shock or re
hazard, due to overheating, do not obstruct
unit’s ventilation openings.
4. Do not install near any source of heat,
including other units that may produce heat.
5. Do not place unit near ames.
6. Only clean unit with a dry cloth.
7. Unplug unit during lightening storms, or
when not used for an extended period
of time. A surge protector is strongly
recommended.
8. Protect the power cord from being walked
on or pinched, particularly at the plugs.
9. Use unit only with accessories specied by
the manufacturer.
10. Refer all servicing to qualied personnel.
WARNING
DEAR CUSTOMER
Thank you for purchasing this product.
For optimum performance and safety, please
read these instructions carefully before
connecting, operating or adjusting this product.
Please keep this manual for future reference.
CAUTION
HDMI is a very complex technology requiring continuous authentication of the signal and the same
video resolution and audio settings on all electronic equipment in the system. When there are multiple
sources and displays, the video resolution and audio setting on all connected units must be adjusted
to correspond with that of the display having the lowest video and audio capability.
This product is 100% inspected and tested in the United States
to verify HDMI performance parameters.

www.vanco1.com 800-626-6445 3
FEATURES
This HDMI & Audio Scaler and Converter offers an easy and instant approach for
converting digital HDMI to digital video (DVI-D) with either digital audio (S/PDIF) or analog
stereo audio. With this module, HDMI based devices such as Blu-ray Disc players, PS3,
DVD players, camcorders, or set-top boxes can readily connect to your PC LCD and PC
speakers. This device also enables users to connect full digital video and audio to DVI
enabled monitor and S/PDIF equipped audio receiver and amplier, and make the highest
compatibility to your home theater devices.
HDMI & Audio Scaler and Converter
Part # 280563
• HDMI Resolution Scaler with Audio Embedding/
De-embedding and Video Calibration
• Embeds an analog or digital audio signal onto
the HDMI Ouput to combine Video and Audio
sources onto a single display
• Allows for up to 50 different resolutions from
an HDMI source to be scaled to 720P or
1080P
• De-embeds an analog or digital audio signal
from the HDMI Input to connect to an external
audio receiver or amplier
• HDMI 1.3a compliant and DVI 1.0 compliant
• IR remote control, Remote control via mini-USB
• OSD control interface
• Maximum pixel rate : 165MHz
• Deinterlacer supported
• Supports noise reduction and video
enhancement features
• Video enhancement support and calibration
• Over / Under scanning adjustable
• Video H/V mirror supported
• Active video area adjustment supported
• USB rmware upgradable for expanding
compatibility
• Wall-mount housing design for easy installation

www.vanco1.com 800-626-6445
4
PACKAGE CONTENTS
Before attempting to use this unit, please check the packaging and make sure the following items are
contained in the shipping carton:
• Part # 280563 HDMI & Audio Scaler and Converter
• 5V/2A power supply unit
• Installation software CD
• Product Manual
SPECIFICATIONS
Iole of usage.............................................................. HDMI to HDMI Converter
HDMI compliance....................................................... HDMI 1.3a
Input Video Frequency bandwidth................................. 225 MHz
Output Video Frequency bandwidth .............................. 165MHz
Audio support............................................................ Stereo PCM (48KHz)
ESD protection .......................................................... [1] Human body model — ±19kV [air-gap discharge]
& ±12kV [contact discharge]
[2] Core chipset — ±2kV
PCB stack-up ............................................................ 4-layer board [impedance control — differential 100;
single 50]
Firmware update........................................................ Feasible via USB Port
CEC Channel ............................................................. N/A
Input ........................................................................ 1x HDMI + 1x3.5mm(Stereo) + 1xRCA(S/PDIF)
Output...................................................................... 1x HDMI + 1x3.5mm(Stereo) + 1xRCA(S/PDIF)
HDMI connector ........................................................ Type A [19-pin female]
BNC connector .......................................................... 1.5G 75Ω inter-locked socket
USB connector .......................................................... Mini B

www.vanco1.com 800-626-6445 5
PANEL DISCRIPTIONS
1. STEREO AUDIO OUT: connect to analog stereo audio component
2. S/PDIF AUDIO OUT: connect to digital S/PDIF audio component
3. DIP SWITCH: For rmware update:
ON (switch pointing up) rmware update mode
OFF (switch pointing down) normal mode
4. LED INDICATOR: (green]: signal indicator LED [red]: power indicator LED.
5. IR SENSOR: IR sensor for receiving the IR commands from IR remote
6. PUSH BUTTON: [LEFT]: Down Button, [MID]: Up Botton, [RIGHT]: Menu/Enter Button
7. +5V DC: Interlocking power jack for 5V DC power supply unit
8. Mini USB: for F/W update
9. HDMI OUT: connect to a HDMI display or HDMI input
10. S/PDIF AUDIO IN: connect from a digital S/PDIF audio source
11. STEREO AUDIO IN: connect from an analog stereo audio source
12. HDMI IN: Connect to a HDMI source
1234
5
6
7
8
9
10 11 12
www.vanco1.com 800-626-6445
6
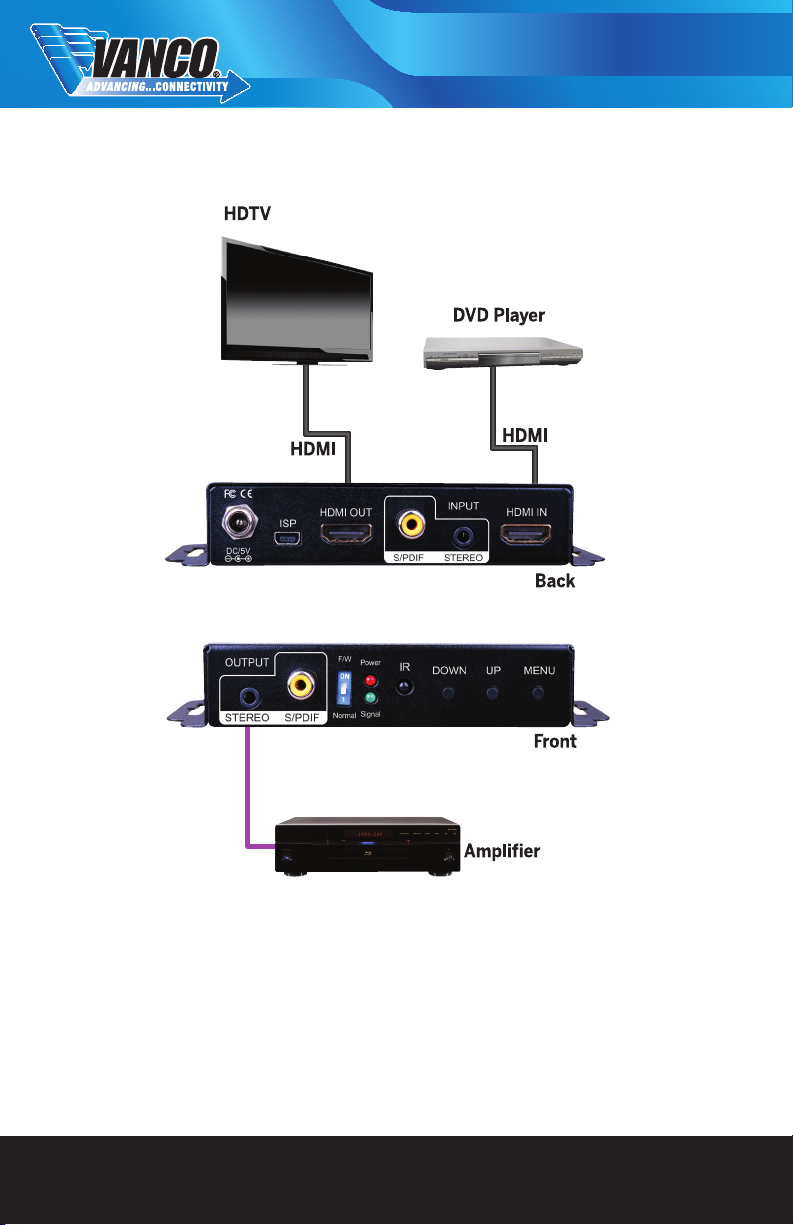
CONNECT AND OPERATE
1. Connect a source such as a Blu-Ray player, game console, Cable/Satellite receiver, etc. to the HDMI input.
2. Connect either a SPDIF digital coaxial audio cable or 3.5mm analog stereo cable from the source device to
the SPDIF or Stereo Input ports on the unit. (OPTIONAL)
3. Connect a display such as an HDTV or Projector to the HDMI output.
4. Connect either a SPDIF digital coaxial audio cable or 3.5mm analog stereo cable from the device to the
SPDIF or Stereo Input ports on an A/V receiver or distributed audio system as seen above.. (OPTIONAL)
5. Insert the 5v power supply provided with the unit and power on the connected devices.
6. Using the manual buttons, IR remote, or software modify audio/video settings

www.vanco1.com 800-626-6445 7
OSD MENU
1.Output Setup Out Res.
Output Mode RGB, YCbCr444, YCbCr422
Default Pattern Disable, White, Cross, Hatch,
Color, Gray, Windows, H-Ramp,
W-HRamp, W-VRamp, Diagonal
Audio Source Stereo, SPDIF
2.Image Contrast 0~255 of Contrast Level
Brightness 0~255 of Brightness Level
Saturation 0~255 of Saturation Level
Hue 0~255 of Hue Level
B/W Extension Off, On
Color Tone Off, Skin, Green
Edge Enhance Typ, Mid, Max, Off
Sharpness 0~127 of Sharpness Level
3.Adjustment Under/Over Scan -50%~50% of Scan Level
Aspect Ratio 16:9, 4:3
H-Mirror Off, On
V-Mirror Off, On
H-Shift -100~100 of H-Shift Level
V-Shift -50~50 of V-Shift Level
4. System Input Res. Info
Firmware Version
CONTROL
Method A: Push-in Button

www.vanco1.com
CONTROL CONTINUED
Method B: IR Remote Control
Button Function
FREEZE Freeze video
ASPECT RATIO Aspect ratio change
BLANK Blank video
EXIT Exit OSD
ENTER Enter key
UP Up key
LEFT Left key
RIGHT Right key
DOWN Down key
MENU Menu on
INPUT INFO Source resolution information
1080p60 Select 1080p60 output
resolution
1080i60 Select 1080i60 output
resolution
720p60 Select 720p60 output resolution
480p60 Select 480p60 output resolution
Method C: IR Remote Control through Mini-USB port

www.vanco1.com 800-626-6445 9
1 COM Port Selection
2 COM Port Detection Button
3 Output Setup Button
4 Image Button
5 Adjustment Button
6 System Button
7 Input / Output Resolution Info
8 Refresh Input / Output
Resolution Info Button
9 Output Quick Selection Button
1. COM Port Selection - Please select the application
2. COM PORTCOM Port Detection Button
Click this button to detect the COM PORT
3. Output Setup Button
4. Image Button

www.vanco1.com 800-626-6445
10
5. Adjustment Button
6. System Button
1. In-Sync Info: To view the current input resolution
2. Factory Reset Button
3. Firmware Update Button
Tabla de contenidos
Otros manuales de Convertidor de medios de Vanco

Vanco
Vanco 280708 Instrucciones de instalación

Vanco
Vanco EVSP14VW Manual de usuario

Vanco
Vanco EVOLUTION EVSP8K22 Manual de usuario

Vanco
Vanco HDSP4K12 Instrucciones de instalación

Vanco
Vanco HD4KSC Manual de usuario

Vanco
Vanco HDVC1 Manual de usuario

Vanco
Vanco Evolution EV4K1014 Manual de usuario

Vanco
Vanco 12x3 Multi-Function Switch/Scaler Instrucciones de instalación

Vanco
Vanco RS232-IP Manual de usuario


