Unitron iCube Manual de usuario

Complete guide to iCube
Wireless programming
2
Table of contents Overview
iCube enables the wireless transfer of fitting data from your
computer directly to your client’s hearing instruments.
For further information, please visit the Unitron website:
www.unitron.com
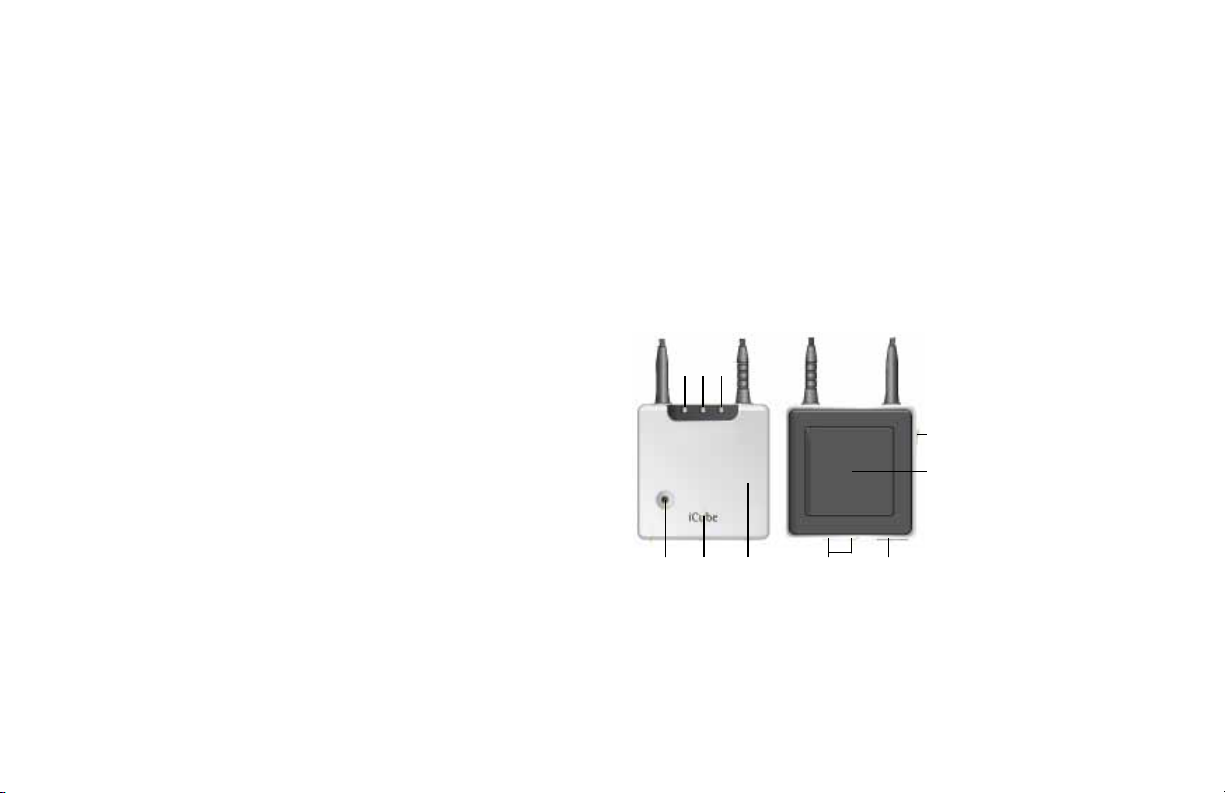
Use the diagram below to identify the components of the
iCube programmer:
Legend
1 Right side fitting indicator
2 Battery indicator
3 Bluetooth / left side
fitting indicator
4 Not supported
5 ON/OFF button
6 Bluetooth® pairing button
7 Reset button (covered)
8 Detachable cover
9 Audio & FM connection
(not supported)
10 USB charging and
programming connection
iCube accessories
• USB cable, 3 m (10 ft.)
• iCube charger
• USB Bluetooth adaptor
Contents may vary depending on country.
front back
1
6
2
7
3
8 9 10
4
5
Overview ......................................................................................................2
First time setup ........................................................................................... 3
Connecting iCube to your computer ........................................................... 3
iCube system configuration options ............................................................5
Battery status .............................................................................................. 6
Operating time ............................................................................................ 6
Using iCube with a client ............................................................................. 6
Quick reference page ...................................................................................7
Indicator lights ............................................................................................ 8
Using iCube without a client ...................................................................... 11
Detecting and programming hearing instruments .................................... 11
Reset button .............................................................................................. 11
Important information ............................................................................... 11
Troubleshooting guide ...............................................................................13
Notices ....................................................................................................... 14
® Bluetooth is a registered trademark of Bluetooth SIG Inc.

3
First time setup
Charging the iCube prior to setup
Connect the iCube charger by plugging the power supply
into a power outlet and the mini USB plug into the iCube as
shown below. Alternatively you can charge your iCube with
the USB cable using the USB port on your computer system.
Your iCube battery can be charged hundreds of times. If the
operating time of your iCube reduces substantially, please
contact your local Unitron representative.
Prior to the first use, ensure that the iCube battery is fully
charged.
Note: When charging your iCube for the first time, leave it to
charge for at least three hours (even if the battery indicator
starts flashing earlier).
Turning iCube on/off
To turn ON your iCube, press and hold the ON/OFF button for
about a second until you see the battery indicator turn ON.
Once your iCube is fully operational, the battery indicator will
flash slowly.
To turn OFF your iCube, press and hold the ON/OFF button
for about two seconds until you see the battery indicator turn
ON. Release the ON/OFF button. Once you release the ON/
OFF button, the battery indicator will go dark and your iCube
is OFF.
Connecting iCube to your computer
iCube allows you to wirelessly program hearing instruments
via a Bluetooth connection.
Alternatively it can be used with a wired USB connection for
places where Bluetooth connections are not allowed.
In either case, before you can start using your iCube, it needs
to be connected with your computer.
Connecting via Bluetooth
Connecting your iCube via Bluetooth is done in three steps:

4
1. Prepare the Bluetooth connection on your computer
To use iCube wirelessly via Bluetooth, make sure that you
have the Bluetooth function enabled. For specific instructions
please refer to the documentation of the computer and
operating system you are using.
If you are using NoahLink and you have already installed the
corresponding external Bluetooth adaptor, you can use that
same adaptor for iCube. If your computer is neither equipped
with Bluetooth built in nor with a NoahLink compatible
Bluetooth adaptor, use the Bluetooth adaptor accessory.
Refer to the “quick start guide” document available with the
adaptor’s Software CD and follow the instructions.
Note: iCube works within a Bluetooth operating range of up to
10 meters (33 ft.) of the fitting computer.
2. Start the connection wizard for iCube
With Bluetooth functionality turned ON, you can now initiate
the setup process. In the fitting software, either select iCube
as the programming device and click on Detect or:
• In TrueFit, select Options > iCube Configuration
• In U:fit, select Options > iCube
and then click on Add iCube to start the iCube pairing wizard.
3. Pairing iCube with your computer
After you select Add iCube, the pairing
wizard will guide you through the process
of pairing iCube with your computer. Pairing
is necessary to control which Bluetooth
devices are permitted to communicate with
each other. It needs to be completed only
once, before first use. It’s completed in 3
easy steps:
1. Turn on your iCube. To initiate the pairing process on
iCube, set the device into pairing mode by pressing and
holding the Bluetooth pairing button for 2 seconds until
the Bluetooth indicator is blue and flashing fast. iCube
is now in pairing mode for two minutes or until pairing is
completed.
2. Follow the on-screen instructions to complete pairing and
finish the connection process for iCube. Upon successful
pairing the serial number of the detected iCube will be
listed in the dialog box.
3. To end the process, click on close.

5
Removing a Bluetooth pairing
If you wish to delete the Bluetooth pairing
from your iCube, press and hold the
Bluetooth pairing button for about 10
seconds until the Bluetooth indicator is lit
solid blue.
Connecting via USB cable
1. To connect your iCube via USB cable instead of
Bluetooth open the iCube Configuration window:
• In TrueFit, select Options > iCube Configuration
• In U:fit, select Options > iCube
2. Connect your iCube via the USB cable to your
computer.
Note: When connecting iCube for the first time via USB, your
computer will start searching for the associated driver
software. Depending on the operating system, you may be
presented with an installation wizard: Found New Hardware
Wizard. If so, let your computer automatically install the
necessary driver software. The driver software has already
been installed during the fitting software installation and
should be identified by the wizard. It is not necessary to insert
the installation CD.
3. To allow the fitting software to use the connected
iCube:
• In TrueFit, select Check in the iCube connected via USB
box
• In U:fit, select Detect in the USB connected iCube dialog
box
Upon successful detection the serial number of the
connected iCube is displayed.
iCube system configuration options
Start the iCube pairing wizard:
• In TrueFit, select Options > iCube Configuration
• In U:fit, select Options > iCube
To remove a listed iCube, click Remove iCube.
In cases where multiple iCubes are paired with a computer,
you can choose the default iCube by selecting the iCube with
the desired serial number. The asterisk indicates which iCube
is currently being used as the default.

6
Battery status
While turned ON, your iCube indicates the battery status on
the battery indicator LED as follows:
• Yellow, slow flash – Battery level is high.
• Yellow, fast flash – Battery level is low.
Once the fast flashing starts, your iCube will still operate for
about an hour, but you should recharge the battery as soon
as possible.
The current battery status is also displayed in the software:
• In TrueFit, in the expanded Connections tab of the Quick
View Pane
• In U:fit, in the iCube Configuration dialog
For safety reasons, recharge the battery only with chargers
supplied by Unitron.
During the charging process, the battery indicator is lit solid.
Once the battery is fully charged, the battery indicator will
start flashing slowly. Normally, charging an empty battery
takes about 90 minutes. It is safe to leave the charger
connected overnight – the battery cannot be overcharged.
Operating time
Fully charged, your iCube will operate for up to four hours in
normal use.
Battery consumption and the operating time of the iCube
greatly depend on the usage of the device. Heavy use will
reduce the operating time of your iCube between battery
recharges.
Using iCube with a client
Batteries need to be inserted into the hearing aids and the
hearing aids need to be turned on prior to detection.
Before using iCube to fit a client with
hearing aids, make sure the battery is
sufficiently charged. Unplug the charging
cable from the iCube and turn it ON.
Wearing iCube
Open the neckloop by unplugging the
jack, and place iCube around your
client’s neck as shown. (Re)connecting
the neckloop will activate the built-in
antenna and enable iCube to operate
correctly.

7
Quick reference page
The following insert can be removed from this
booklet for use as a quick reference guide.

8
Indicator lights
Battery indicator
Yellow - Slow flash
Battery full
Yellow - Fast flash
Battery empty
Yellow - Lit solid
Battery charging
Fitting status indicator
Red - Right fitting status indicator flashing fast
Programming the right hearing instrument
Blue - Left fitting status indicator flashing fast
Programming the left hearing instrument

9
Software indicator
iCube can be upgraded whenever new functionalities are available.
Follow the instructions provided together with the new software version.
Indicators
Red/yellow/blue - All three indicators flash fast
iCube is being upgraded
Red/yellow/blue - All three indicators lit solid
This may indicate a software problem. Refer to Troubleshooting section.

Otros manuales para iCube
1
Tabla de contenidos
Otros manuales de Placa madre de Unitron

Manuales populares de Placa madre de otras marcas


Telit Wireless Solutions
Telit Wireless Solutions SL869-3DR Manual de usuario

Gigabyte
Gigabyte GA-9IVDT Manual de usuario

Texas Instruments
Texas Instruments ADS8372EVM Manual de usuario

Commell
Commell MS-C73 Manual de usuario

IBT Technologies
IBT Technologies MB860 Manual de usuario

Nvidia
Nvidia TEGRA DG-04927-001_V01 Manual de usuario


