
UNIARCH NVR-108E2-P8-3TB Manual de usuario
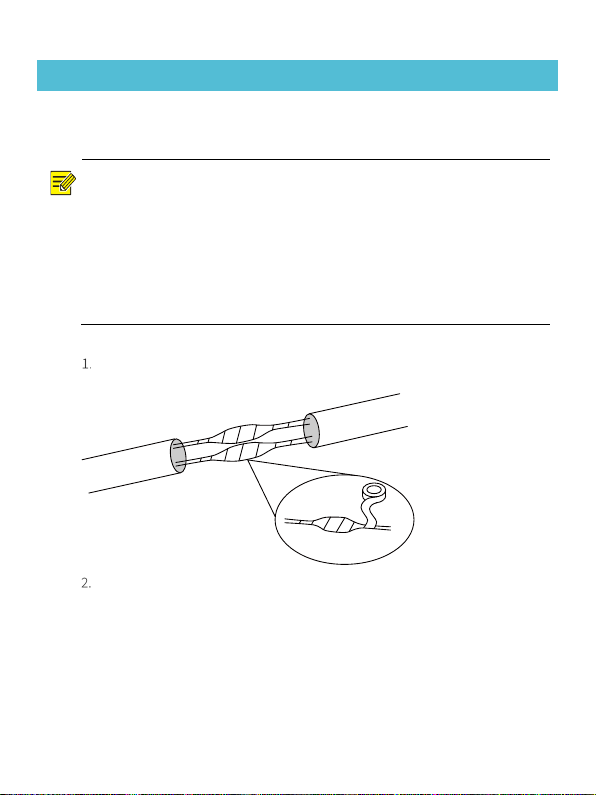
Waterproof Requirements
Please waterproof cables in accordance with the following instructions. User shall
assume all responsibility for device damage caused by water due to improper
waterproof measures.
NOTE!
Before you start,
connect all the needed cables and cut off the copper wires for
the cables that you don't use.
Please use self-adhesive waterproof tape (supplied with some
products) to
protect the cables.
Use waterproof components to protect the network cable.
Waterproof the
power cable separately if you don’t use it. The video cable does not need
waterproof treatment.
Use insulation tape (not included in the package) to insulate the connection part
of each cable.
Waterproof the cables with self-adhesive waterproof tape.
(1) Fully stretch the waterproof tape at both ends.
(2) Wrap the connection part and the cable ends tightly with waterproof tape.
Make sure the tape is fully stretched during the process.
(3) Tighten the tape at both ends to prevent water leakage.
Connection part
Insulation tape
2
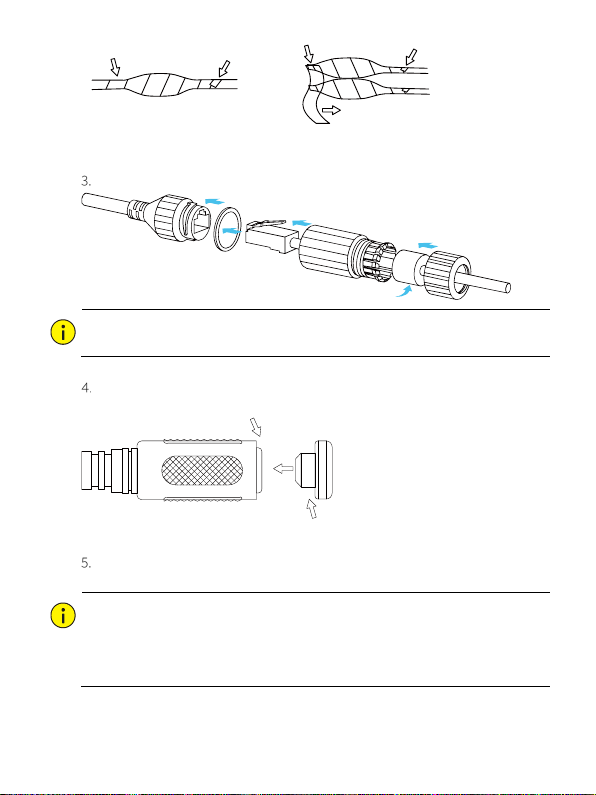
Install the supplied waterproof components to the network cable in sequence.
CAUTION!
You need to mount the rubber ring onto the network cable interface first
.
If your camera has a DC cable and you will not use it, insert the plug into the
interface.
(Optional) After the waterproof treatment is completed, put the cables into a
waterproof junction box (purchased separately).
CAUTION!
The cable connector must not be exposed and must be kept away from water.
Restore and fasten the device after dismounting.
Place the power adapter in a power distribution box.
TightenTighten
Wrapthe unused cables
together into a bundle
Wrapthe used cables separately Waterproof tape
TightenTighten
DC interface
Plug
3
1
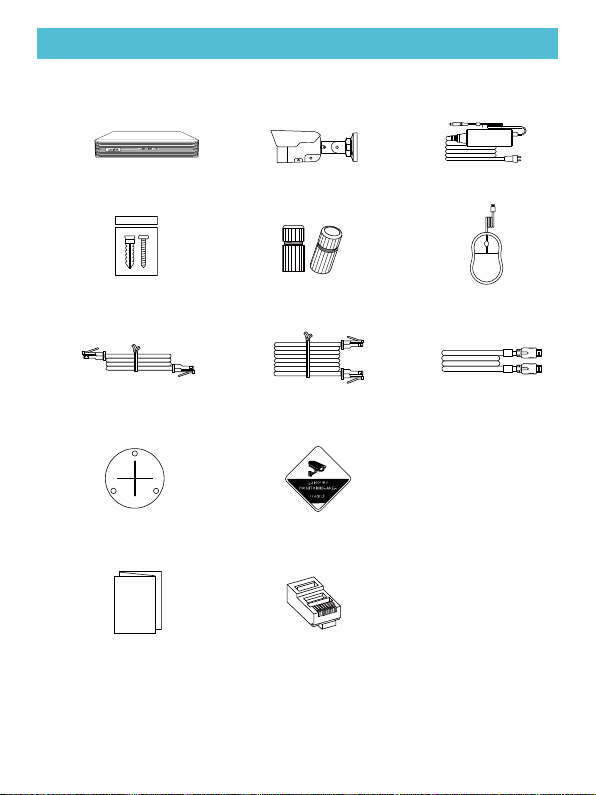
Packing list
The package contents may vary with device model.
Camera × 4 or 8
Drill template
× 5 or 9
Screw components × 5 or
9
Waterproof components × 4 or 8
User manual ×
1
Network cable (1m) × 1
Network cable (18m) × 4 or 8
Mouse × 1
HDMI
cable (2m) × 1
NVR power adapter ×
1
NVR × 1
W
arning sticker
× 4 or 8
RJ45 connector
× 4 or 8
4
2
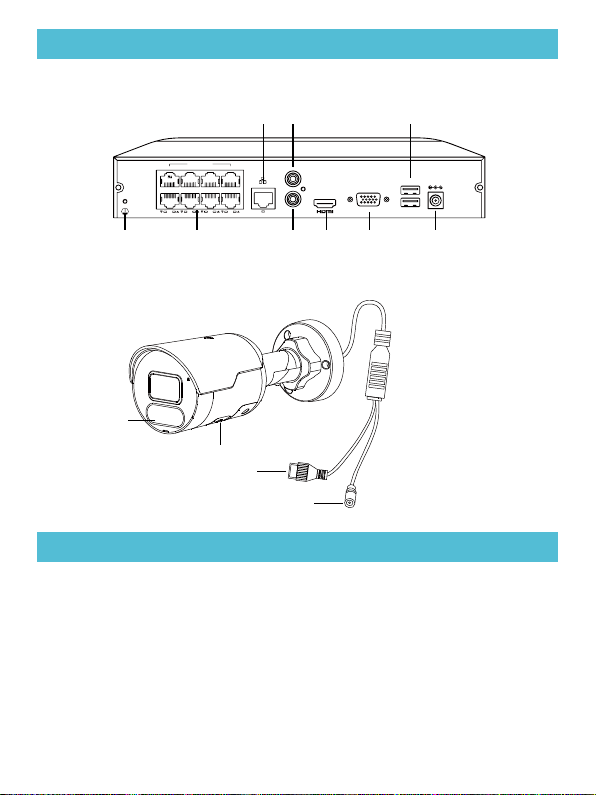
Ports and Interfaces
2.1 NVR
2.2 IP Camera
3
Install the Device
The illustrations are for reference only. The actual device may vary.
3.1 (Optional) Replace Hard Disk
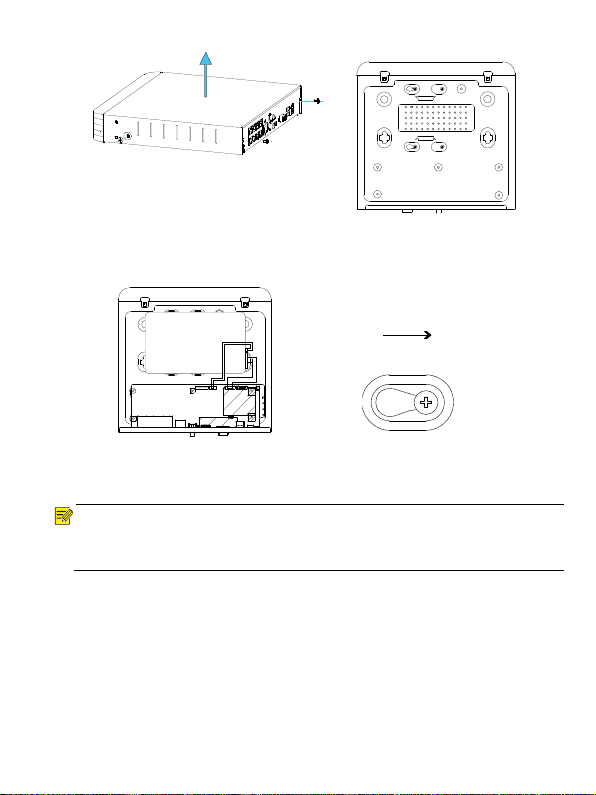
The hard disk is pre-installed. To replace the hard disk, please follow the steps.
1. Loosen the screws on the panel
and remove the upper cover.
2. Loosen the four screws at the
bottom plate, disconnect the
power and data cables, and then
remove the disk.
1 3 5 7
2 4 6 8
PoE PORTS
HAXN
AUDIO OUT
AUDIO IN
4K
VGA
USB3.0
USB2.0
PoE port Audio in VGA Power input
USBLAN Audio out
HDMI
Grounding terminal
LED light
Micro SD card slot
Network interface
Power interface
5
6
The screw positions are for reference only.
3. Put the new hard disk in place and
then connect the power and data
cables.
4. Attach two screws to the disk
(position 1 and 2) and tighten
halfway. Slide the disk into place
from A to B, tighten the two
screws.
5. Fasten other two screws at position
3 and 4 to secure the hard disk.
6. Put the cover back in place and
tighten all the screws.
NOTE!
Videos are also provided for reference. Please visit https://www.uniarch.cn/web/
video.html and search How to replace HDD for NVR.
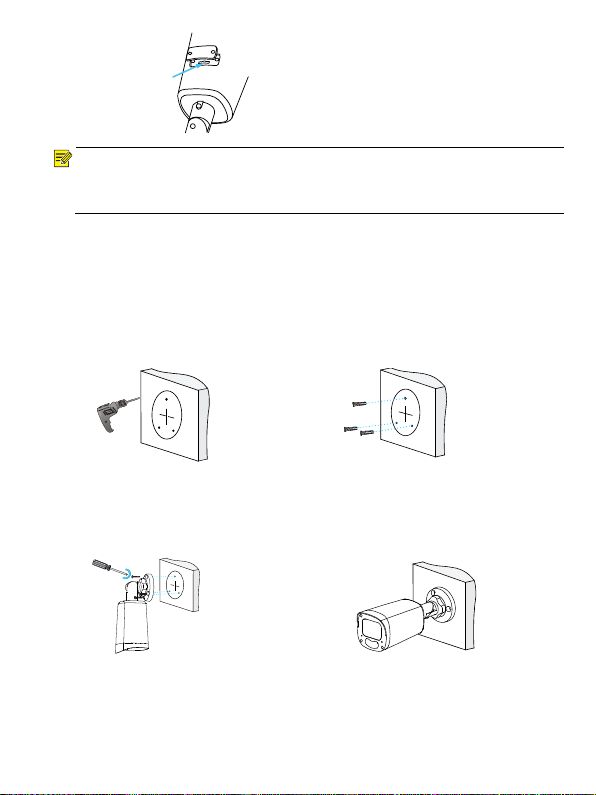
3.2 (Optional) Insert Micro SD Card
Some cameras support Micro SD card. You need to insert a Micro SD card by openning
the bottom cover if you want to use the edge storage function. Do not hot plug the
Micro SD card, otherwise the camera or the SD card may be damaged.
HDDSCREW
HDDSCREW
13
24
SATA
AB
NOTE!
For details about recommended SD card specifications, please visit
https://www.uniarch.cn/web/faq.html and search Uniarch compatible SDcard list.
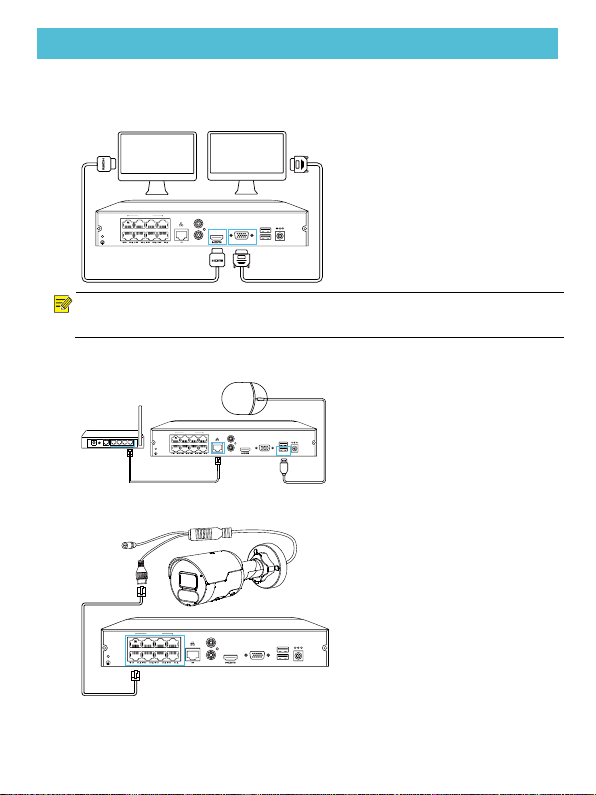
3.3 Install the Camera
Take wall mount as an example. Make sure the wall is strong enough to hold the
camera. Please prepare hardware accessories in advance.
1. Paste a drill template on the wall
and drill 30mm-depth guide holes
using a φ6-6.5mm drill bit.
2. Knock the plastic rivets into the
guide holes and ensure that they
are tightened up.
3. Unscrew the locknut to loosen the
universal joint, and then mount the
camera onto the wall.
4. Tighten the locknut, and adjust
the monitoring direction.
Micro SD card slot
7
4
Connect the System
The following part shows an example. The actual device may vary.
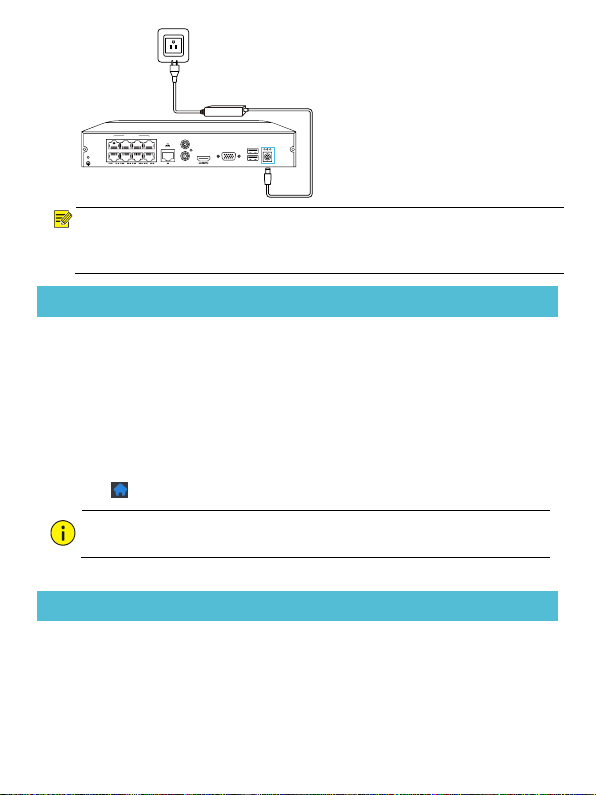
1. Connect the NVR to a monitor with a HDMI or VGA cable.
NOTE!
T
he VGA cable is not shipped with device.
2. Connect a router to the NVR’s LAN port with a network cable. Plug a mouse into
the USB port on the NVR.
3. Connect the camera to the NVR’s PoE port with a network cable.
4. Connect the NVR to power.
1 3 5 7
2 4 6 8
PoE PORTS
HAXN
AUDIO OUT
AUDIO IN
4K
VGA
USB3.0
USB2.0
1 3 5 7
2 4 6 8
PoEPO RTS
HAXN
AUDIO OUT
AUDIO IN
4K
VGA
USB3.0
USB2.0
1 3 5 7
2 4 6 8
PoE PORTS
HAXN
AUDIO OUT
AUDIO IN
4K
VGA
USB3.0
USB2.0
8
NOTE!
For more information, visit https://www.uniarch.cn/web/video.html and search
How to install Uniarch PoE Security System.
5
System Startup
Make sure the cables are connected correctly and the NVR is grounded properly. Use
a power supply that meets requirements.
5.1 Startup
Connect the NVR to power to start up.
5.2 Shutdown
Click >
Shutdown
on the screen toolbar in live view page.
CAUTION!
Do not disconnect power when the NVR is operating or shutting down.
6
NVR Web Access
You can use a Web browser to access the NVR’s Web interface from a PC.
1. Open your Web browser, enter the NVR’s IP address in the address bar, and then
press Enter. The default address is 192.168.1.30.
2. Enter the default username and password (admin/123456), then click Login.
1 3 5 7
2 4 6 8
PoE PORTS
HAXN
AUDIO OUT
AUDIO IN
4K
VGA
USB3.0
USB2.0
9
NOTE!
For security, you are strongly recommended to set a strong password of at least nine
characters including all three elements: digits, letters and special characters.
For more information, please visit https://www.uniarch.cn/web/video.html and
search PoE security system instruction.
7
Uniarch App
Download the Uniarch app and follow the instructions to access the NVR.
Download Uniarch on the App Store (iOS) or on Google Play (Android).
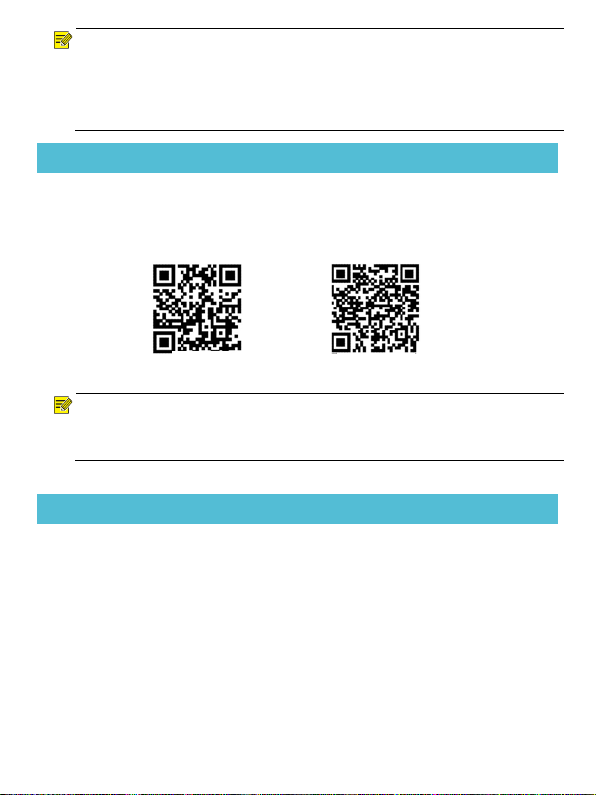
Scan QR code to download the app.
NOTE!
For more information, please visit https://www.uniarch.cn/web/video.html and
search Uniarch APP instruction.
8
Contact Us
If you have any problems when using the product, please do not hesitate to contact
us or visit Uniarch website.
Email: [email protected]
Skype: [email protected]
Uniarch website: https://www.uniarch.cn
FAQ: https://www.uniarch.cn/web/faq.html
iOS
Android
10

Disclaimer and Safety Warnings
Copyright Statement
No part of this manual may be copied, reproduced, translated or distributed in any form or by
any means without prior consent in writing from our company (referred to as us hereafter).
The product described in this manual may contain proprietary software owned by our company
and its possible licensors. Unless permitted, no one is allowed to copy, distribute, modify,
abstract, decompile, disassemble, decrypt, reverse engineer, rent, transfer, or sublicense the
software in any form or by any means.
Export Compliance Statement
Our company complies with applicable export control laws and regulations worldwide, including
that of the People's Republic of China and the United States, and abides by relevant regulations
relating to the export, re-export and transfer of hardware, software and technology. Regarding
the product described in this manual, our company asks you to fully understand and strictly
abide by the applicable export laws and regulations worldwide.
Privacy Protection Reminder
Our company complies with appropriate privacy protection laws and is committed to protecting
user privacy. You may want to read our full privacy policy at our website and get to know the ways
we process your personal information. Please be aware, using the product described in this
manual may involve the collection of personal information such as face, fingerprint, license plate
number, email, phone number, GPS. Please abide by your local laws and regulations while using
the product.
About This Manual
This manual is intended for multiple product models, and the photos, illustrations,
descriptions, etc, in this manual may be different from the actual appearances, functions,
features, etc, of the product.
This manual is intended for multiple software versions, and the illustrations and descriptions
in this manual may be different from the actual GUI and functions of the software.
Despite our best efforts, technical or typographical errors may exist in this manual. Our
company cannot be held responsible for any such errors and reserves the right to change the
manual without prior notice.
Users are fully responsible for the damages and losses that arise due to improper operation.
Our company reserves the right to change any information in this manual without any prior
notice or indication. Due to such reasons as product version upgrade or regulatory
requirement of relevant regions, this manual will be periodically updated.
Disclaimer of Liability
To the extent allowed by applicable law, in no event will our company be liable for any special,
incidental, indirect, consequential damages, nor for any loss of profits, data, and documents.
11
Este manual sirve para los siguientes modelos
1
Tabla de contenidos


