Tucker R CLASS Series Instrucciones de montaje

V20.02.20
ASSEMBLY, INSTALLATION
AND OPERATING INSTRUCTIONS
BUILT-IN BARBECUE
FOR R CLASS SERIES
MODELS:
1R, 2R, 3R, 4R, 5R, 6R.
1RS, 2RS, 3RS, 4RS, 5RS.
1RSS, 2RSS, 3RSS, 4RSS, 5RSS.
RSS, V6, V8, V1O, V12, V8+1, V10+1.
IMPORTANT – PLEASE READ ALL INSTRUCTIONS
BEFORE YOU ASSEMBLE, INSTALL OR
OPERATE THIS APPLIANCE.

1
IMPORTANT SAFETY INSTRUCTIONS
BARBECUE ASSEMBLY INSTRUCTIONS
INSTALLATION INSTRUCTIONS & WARNINGS
SPECIFICATIONS
DIMENSIONS
GAS INSTALLATION AND
LEAK TEST PROCEDURE
OPERATING INSTRUCTIONS
COOKING HINTS
TROUBLESHOOTING
SERVICE & MAINTENANCE
WARRANTY
2
3
5
7
8
10
12
14
15
16
17
CONTENTS

2
IMPORTANT SAFETY
INSTRUCTIONS
• Tucker R Class Barbecues are approved for
outdoor use only.
• Remove all plastic protection lm from stainless
steel components before assembly.
• Clean your barbecue regularly; check the
grease tray for excess grease build up, as
damage by grease or fat re is not covered by
warranty.
• Always turn off gas supply when you nish
barbecuing.
• A canvas cover for this barbecue will extend its
life and ensure trouble free operation.
• For installation of this barbecue onto a cabinet
trolley refer to relevant instructions.
• For installation of the this barbecue into an
insulation jacket refer to the instructions.
• Attend an operating barbecue at all times.
• Do not use indoors or in any enclosed area.
• Do not spray aerosols in the vicinity of this
appliance while it is in operation.
• Do not place articles on or against this
appliance.
WARNING FOR
YOUR SAFETY
If you smell gas:
1. Shut off gas supply to appliance.
2. Extinguish any open ame.
3. Open lid or hood.
4. If odor continues, immediately call your gas
supplier or your Fire Department.
• Failure to follow these instructions may cause
serious bodily injury or damage to property.
• Read all instructions carefully before assembly
and usage of barbecue.
• This barbecue must not be used indoors.
• Keep this manual for future reference.
• Do not store spare gas bottles, petrol, ammable
vapours or liquids in the vicinity of this barbecue.
• Do not use or store ammable liquids in or near
this appliance.
• Always leak test /check hose connections after
lling cylinders.
• Check cylinder condition for rust and that the date
stamp is current as every gas cylinder in Australia
must be pressure tested every ten years.
• Never disconnect the barbecue whilst it is running.
• Do not modify this appliance.
• Do not allow children to operate the barbecue.
• If a grease/fat re should arise, turn off the gas
supply immediately until extinguished.
• Always open the lid or hood before lighting.
HAZARDOUS FIRE OR EXPLOSION MAY RESULT
IF INSTRUCTIONS ARE IGNORED.
It is the consumer’s responsibility to see that the
barbecue is properly assembled, installed and taken
care of. Failure to follow instructions in this manual
could result in injury and /or property damage.

3
BARBECUE ASSEMBLY
INSTRUCTIONS
• Remove the pallet and any plastic lm protecting
or covering any parts of the Barbecue before
assembly.
• Cut away any packaging or cable ties that may
be holding components in place.
• Check you have all the correct components as
listed below.
10mm spanner
Phillips head screwdriver
TOOLS REQUIRED FOR ASSEMBLY
*Check that you have the correct gas type Barbecue i.e. L.P.GAS (red
sticker) NAT GAS (black sticker). The Gas Type Label is located on the right
hand side of the Barbecue Body.
BARBECUE PARTS
1x R Class Barbecue Body
1x Barbecue Fascia
1x
Grease Tray
x1 Control Valve
adjustment
Screwdriver
1x Grill 1x Plate
1x
Hose & Regulator
Flare Guard
Check Table Below
RSS V6 V8 V8+1 V10 V10+1 V12
A0122334
FLARE GUARDS QUANTITY FOR EACH BARBECUE MODEL

4
3. Place the Grill Flare Guards into the Barbecue,
they are designed to sit directly above the
burners below the open cooking grills.
There is a tag on each corner of the are
guard which locates them into the holes in the
barbecue front and rear panels.
1. The R Class BBQ can be installed into either an
Insulation Jacket or optional Cabinetry Trolley.
Please read relevant assembly installation
instructions before use.
2. Roasting hoods or at lids are also optional for the
R Class BBQ please read separate roasting hood
or at lid instructions prior to BBQ assembly and
installation.
BARBECUE ASSEMBLY
The Flare Guards are NOT required under the
cooking Hot Plate as they will inhibit the ame
from the burners heating the hot plate.
The R Class BBQ should look like this once you have
placed it into the assembled insulation jacket, for
built-in purpose. Place the stainless steel cooking grill above the are
guards and the stainless steel hot plate beside the
cooking grill.
Once you have assembled the barbecue
wipe it over to remove greasy ngerprints with
stainless steel polish and a soft cloth.
There is an optional angle support kit available
for the R Class if you wish to suspend it between
benchtops.

5
INSTALLATION INSTRUCTIONS
& WARNINGS
INSTALLATION INSTRUCTIONS INSTALLATION WARNINGS
READ THE IMPORTANT INFORMATION
ON THE FRONT OF THE BARBECUE
This barbecue is designed and approved for outdoor
use only.
Be mindful of the location of installation of the
barbecue.
When deciding on a location to install your
BBQ, we recommend that you install it with the
prevailing wind blowing into the front of the BBQ.
Strong winds blowing into the back or across the
back of the Roasting Hood can cause overheating
of the BBQ. The Roasting Hood is designed so that
Hot air is released through a vent in the back of the
Hood. When the Roasting Hood is shut strong winds
can prevent the hot air escaping out of this vent and
may even in some cases push the hot air down and
out the front of the BBQ which can cause damage
to the ignition system and control valves.
The intended use of this barbecue is to be installed
into cabinetry or brickwork. It may be placed onto a
bench or cut into an opening in a bench.
Be sensible about the location of your barbecue.
The barbecue must be located on a solid and level
surface that can safely support the BBQ.
Do not locate the barbecue near combustible
materials or surfaces, either above or around the
barbecue such as over hanging trees, bushes or
ammable liquids and the like.
Do not obstruct any of the air ventilation openings on
the front of the barbecue.
Do not use this appliance indoors or on marine craft.
This appliance shall only be used in an above
ground, open-air situation with natural ventilation,
without stagnant areas where gas leakage and
products of combustion are rapidly dispersed by
wind and natural convection.
Any enclosure in which the appliance is used shall
comply with one of the following:
• An enclosure with walls on all sided, but at least
one permanent opening at ground level and no
overhead cover. (gure 1)
• Within a partial enclosure that includes an
overhead enclosure and no more than two walls.
(gure 2)
• Within a partial enclosure that includes an
overhead cover and more than two walls, the
following shall apply. (gure 3,4 ,5)
• At least 25% of the total wall area is completely
open.
• At least 30% of the remaining wall area is open
and unrestricted.
• In the case of balconies, at least 20% of the total
of the side, back and front wall areas shall be
and remain open and unrestricted.
For alternative types of installations, contact your
nearest dealer.

6
DIAGRAMMATICAL REPRESENTATIONS
OF OUTDOOR AREAS
FIGURE F1 – OUTDOOR AREA – EXAMPLE 1
FIGURE 4 OUTDOOR AREA –EXAMPLE 4
FIGURE F2 – OUTDOOR AREA – EXAMPLE 2
FIGURE F5 – OUTDOOR AREA – EXAMPLE 5
FIGURE F3 – OUTDOOR AREA – EXAMPLE 3
The following gures are diagrammatical
representations of outdoor areas. The areas used in
the gures below are examples – the same principles
apply to any other shaped area.
Both ends open
Open side at least 25%
of total wall area
30% or more in total
of the remaining wall
area is open and
unrestricted.
OPEN AT SIDE AT LEAST 25% OF TOTAL WALL AREA. 30% OR
MORE IN TOTAL OF THE REMAINING WALL AREA IS OPEN
AND UNRESTRICTED.
OPEN SIDE AT LEAST 25% OF TOTAL WALL AREA. 30% OR
MORE IN TOTAL OF THE REMAINING WALL AREA IS OPEN
AND UNRESTRICTED.
Open side at least 25%
of total wall area
30% or more in total
of the remaining wall
area is open and
unrestricted.
7
BARBECUE GAS CONSUMPTION TUCKER R CLASS BARBECUES ARE MADE AND
APPROVED TO AUSTRALIAN STANDARDS
A.G.A. APPROVAL NO. AGA 8351-G
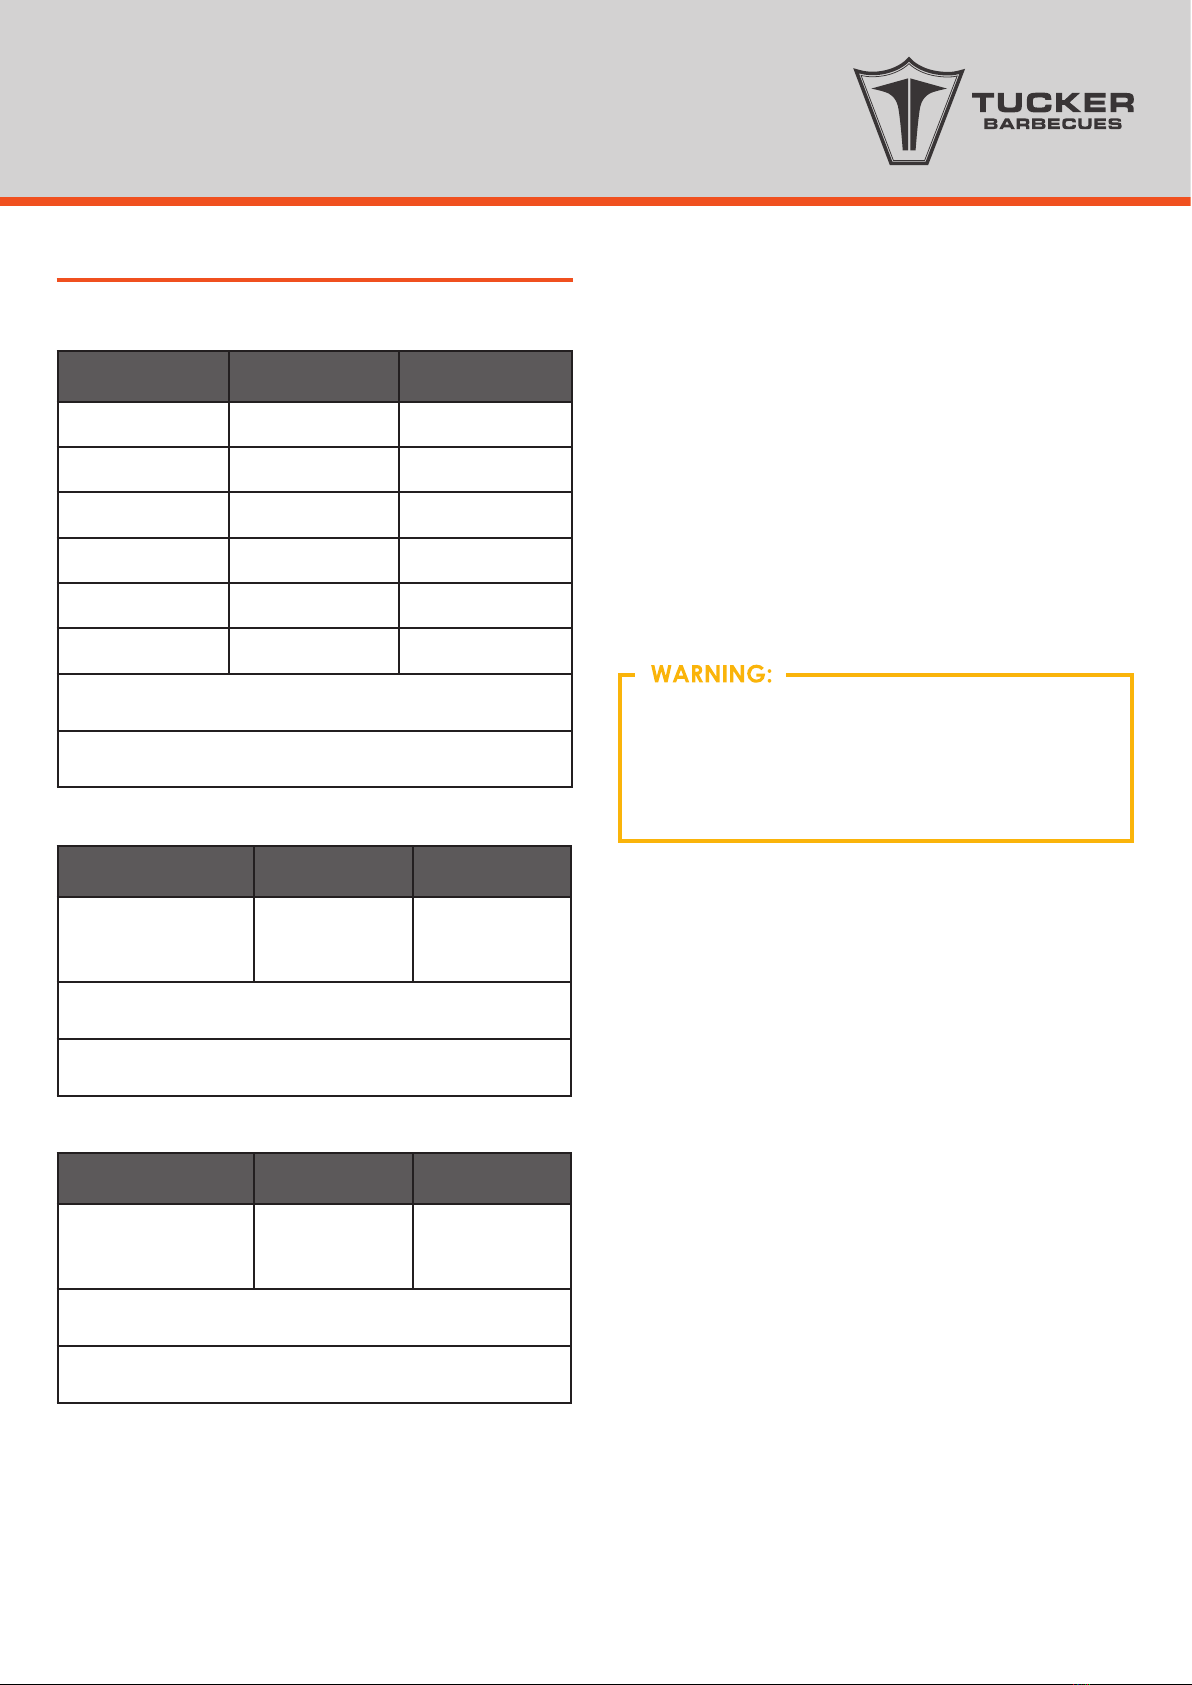
SPECIFICATIONS
(In Mega Joules Per Hour)
No. of Burners. Natural Gas LPG:
1 Burner 15mj 17mj
2 Burner 30mj 34mj
3 Burner 45mj 51mj
4 Burner 60mj 68mj
5 Burner 75mj 85mj
6 Burner 90mj 102mj
Natural Gas injector size 1.8mm Pressure 1KPA
Propane Gas injector size 1.1 mm Pressure 2.75 KPA
WOK TYPE Natural Gas LPG:
Integrated S Wok 12.5mj 15mj
Natural Gas injector size 1.8mm Pressure 1KPA
Propane Gas injector size 1.1 mm Pressure 2.75 KPA
WOK TYPE Natural Gas LPG:
Integrated SS Wok 17mj 18mj
Natural Gas injector size 1.9mm Pressure 1KPA
Propane Gas injector size 1.1 mm Pressure 2.75 KPA
For LP Gas connections, an approved 2.75 KPA
regulator and hose assembly connection to the
appliance is tted by the manufacturer.
The appliance inlet is 3/8 S.A.E. male and is located
on the bottom right hand side of the barbecue at
the front.
For use with Natural Gas a 13mm ID Hose must be
used.
The minimum capacity propane cylinder for this
barbecue is 4 KG.
Warning in freezing conditions the pressure
of Propane gas can be reduced in the
Cylinder Tank causing a lack of gas
pressure, this may affect the way the
barbecue operates.

8
R CLASS BBQ DIMENSIONS
(Measurements in mm)
DIMENSIONS
Model V6 (3R) V8 (4R) V10 (5R) V12 (6R) V8+1 (4RSS) V10+1 (5RSS)
A695 855 1015 1435 1275 1435
B760 920 1080 1500 1340 1500
B
A
565mm
285mm
280mm
560mm
840mm
600mm80mm
The manifold is factory tted at the front on the base on the right-hand side. Manifold diameter is 20mm
square tube. The back is ush with the back of the BBQ when open. The at lid is 35mm high shut
and 580mm high when open.

9
CLEARANCES TO COMBUSTIBLES ARE AS
FOLLOWS
Minimum Top Clearance Allow 800mm
Minimum Side Clearance Zero
Minimum Rear Clearance Zero
C D E
345mm 455mm 145mm
C D E
465mm 650mm 280mm
V6 (3R) V8 (4R) V10 (5R) V12 (6R) V8+1 (4RSS) V10+1 (5RSS)
F765mm 925mm 1085mm 1505mm 1345mm 1505mm
F
680mm
280mm
D
C
E
The wall surfaces above the BBQ cooking
surface at the rear and on either side of the BBQ
must be made from non-combustible material,
if the walls are combustible then the BBQ must
have a clearance of 100mm at the rear and
100mm clearance on either side of
the BBQ.
R CLASS BBQ
RSS WOK (In BBQ Body)RSB WOK
Otros manuales para R CLASS Series
1
Este manual sirve para los siguientes modelos
23
Tabla de contenidos
Otros manuales de Parrilla de Tucker


