Triumph 45-6090W Manual de usuario

1
For Customer Service Call 1-888-996-2729
© 2016 Escalade Sports
1-888-996-2729
FAX: 1-866-873-3535
gameroom@escaladesports.com
We strive to ensure that our products are of the highest quality
and free of manufacturing defects or missing parts. However, if
you have any problems with your new product,
DO NOT RETURN IT TO THE STORE,
please contact us toll free @:
Or write to:
Escalade Sports
Customer Service Department
P.O. Box 889
Evansville IN 47706
When contacting Escalade Sports please provide your model number, date code (if
applicable), and part number if requesting a replacement part. These numbers are
located on the product, packaging, and in this owners manual.
Your Model Number:
Please have your model number when inquiring about parts.
Date Code:
All Rights Reserved
Purchase Date:
PLEASE RETAIN THIS INSTRUCTION MANUAL FOR FUTURE REFERENCE
45-6090W
2-45-6090W- -GR

IMPORTANT! READ EACH STEP
IN THIS MANUAL BEFORE YOU
BEGIN THE ASSEMBLY.
TWO (2) ADULTS ARE REQUIRED TO ASSEMBLE
THIS PLAYMAKER DOUBLE SHOOTOUT
READ AND FOLLOW ALL ASSEMBLY, OPERATION, AND
SAFETY INSTRUCTIONS CAREFULLY. AT LEAST TWO
ADULTS ARE NEEDED TO PUT THIS BASKETBALL
SHOOTOUT TOGETHER.
2 For Customer Service Call 1-888-996-2729
© 2016 Escalade Sports
All Rights Reserved
Tools Needed (not provided):
Make sure you understand the following tips before you begin to assemble your
basketball shootout.
1.This game (with Mechanical Scoring Arm) can be played outdoors in dry weather
- but must be stored indoors.
2.Tighten hardware as instructed.
3.Do not over tighten hardware,as you could crush the tubing.
4.Some drawings or images in this manual may not look exactly like your product.
5.To prevent damage to the electronics or to your wall, do not place this unit any closer
than six inches from the wall.
!
WARNING:
1) Do not mix old and new batteries.
2) Do not mix alkaline, standard (carbon zinc), or rechargeable (ni-cad, ni-mh, etc.) batteries.
3) Do not dispose of batteries in fire, batteries may explode or leak.
T1-Allen Wrench (provided) Phillips Screwdriver Plyers
FEATURING “EZ FRAME ASSEMBLY AND QUICK ATTACH RIMS”.
THESE DESIGNS ARE CUSTOMER FRIENDLY AND WILL GREAT REDUCE ASSEMBLY TIME.

H1 - M6 x 35mm
Allen Head Bolt
(1 pc)
H4 - M6
Flat Washer
(11 pcs)
H5 - M6
Wing Nut
(11 pcs)
H6 - Plastic Bushing
(2 pcs)
H2 - M6 x 60mm
Allen Head Bolt
(2 pcs)
H3 - M6 x 25mm
Allen Head Bolt
(8 pcs)
3 For Customer Service Call 1-888-996-2729
© 2016 Escalade Sports
All Rights Reserved
HARDWARE IDENTIFIER
(To Scale)
H7 - Wing Bolt
(1 pc)
H8 - M6
Lock Washer
(8 pcs)
T1 - Allen Wrench
(1 pc)
(Not to Scale)

4For Customer Service Call 1-888-996-2729
© 2016 Escalade Sports
All RIghts Reserved.
PARTS IDENTIFIER (Not to Scale)
P1 - Left Lower
Tube Assembly
(1 pc)
P2 - Right Lower
Tube Assembly
(1 pc)
P3 - Left Middle
Tube Assembly
(1 pc)
P4 - Right Middle
Tube Assembly
(1 pc)
P5 - Front
Tube Assembly
(1 pc)
P6 - Upper
Tube (2 pcs)
P7 - Backboard
with Tubes Assembly
and Quick Attach Rim
Brackets (1 pc)
P8 - Ramp
Chute (1 pc)

5For Customer Service Call 1-888-996-2729
© 2016 Escalade Sports
All RIghts Reserved.
PARTS IDENTIFIER (Not to Scale)
P9 - Electronic
Scorer (1 pc)
P10 - Electronic
Scorer Face Plate
(1 pc)
P11 - Mechanical
Scoring Arm
(2 pcs)
P12 - Rim (2 pcs)
P13 - Rim Net
(2 pcs)
P14 - Control Box
(1 pc)
ACCESORY IDENTIFIER (Not to Scale)
A1 - Air Pump
with Needle
(1 pc)
A2 - Basketball (4 pcs)
P15 - Locking Pin
(2 pcs)
P16 - Scoring
Control Box
Wire (1 pc)

6For Customer Service Call 1-888-996-2729
© 2016 Escalade Sports
All RIghts Reserved.
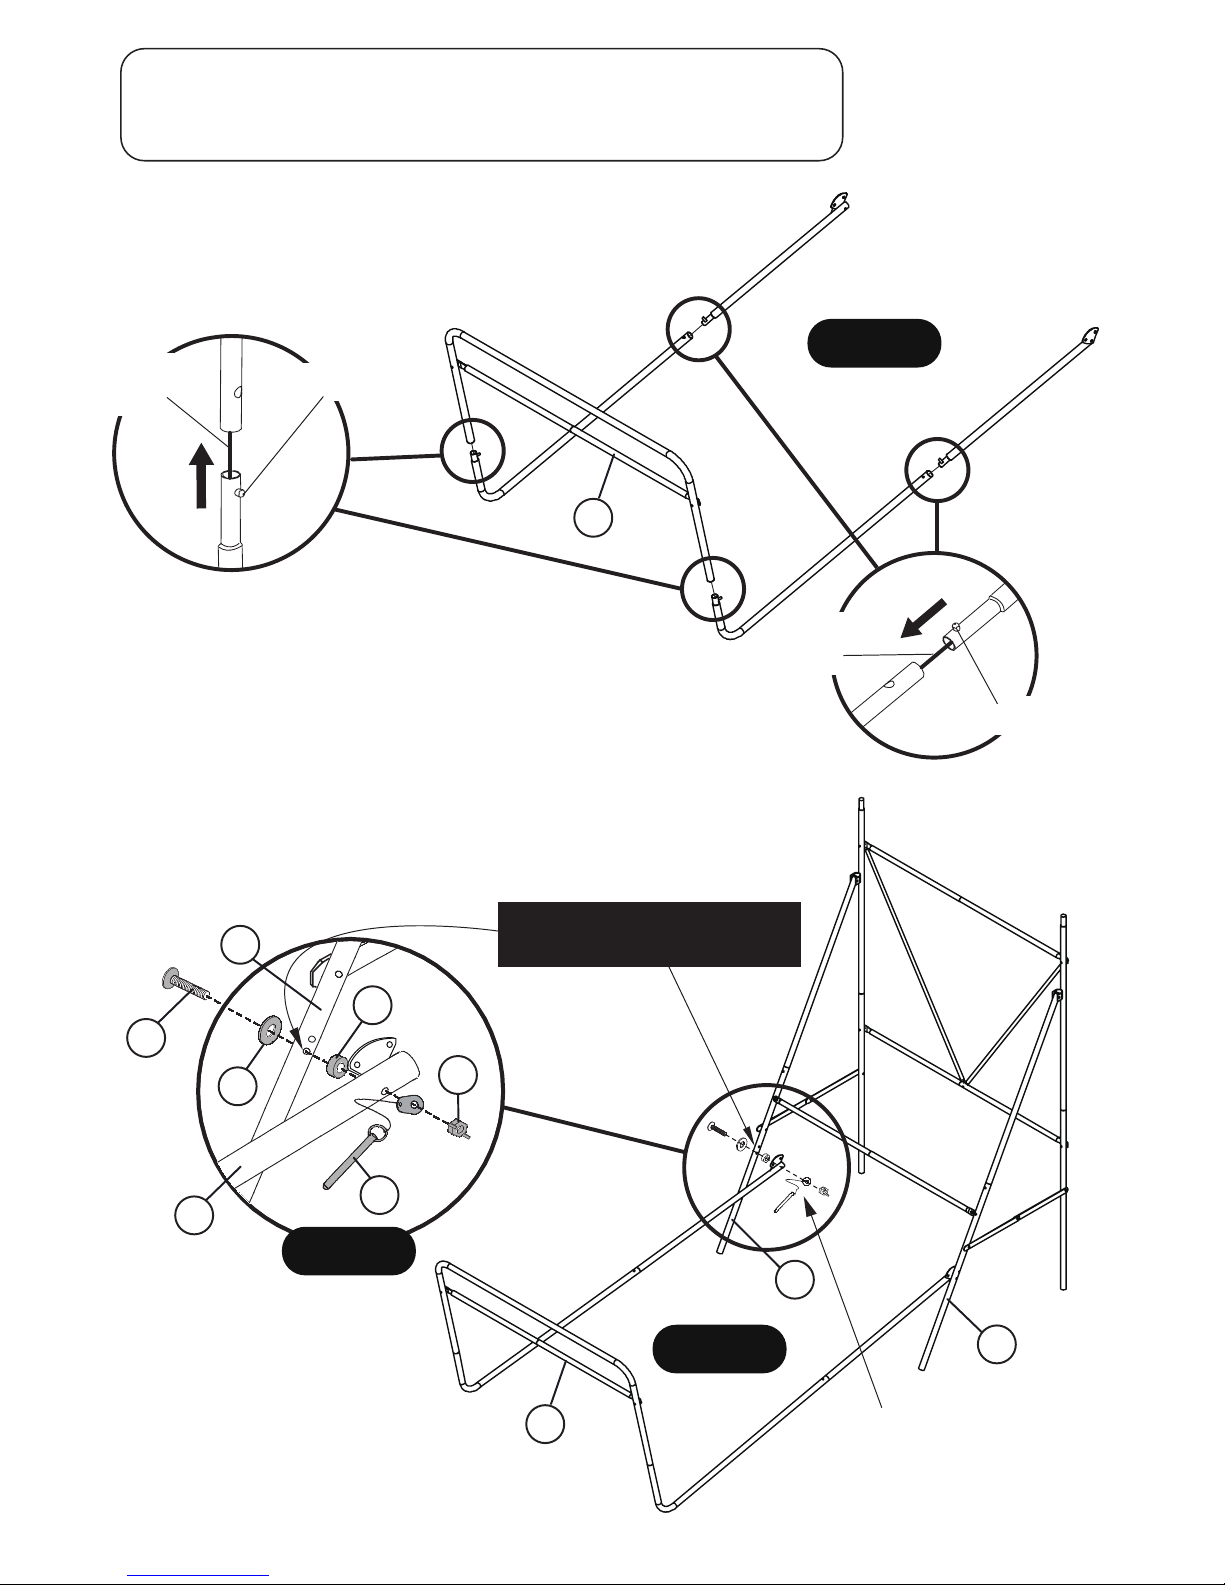
STEP 1
PARTS REQUIRED:
1 pc - P1 Left Lower Tubes Assembly
1 pc - P2 Right Lower Tubes Assembly
Connect P2 - Right Lower Tubes Assembly to
P1 - Left Lower Tubes Assembly using Spring
Lock as shown in FIGURE 1.
NOTE: STEP 1, 2 and 3 requires
a second adult to help “hold”
the assemblies as being
assembled.
Remove all the parts from the box and verify that you have all of the listed parts as shown on the Parts List.
NOTE: STEP 1, 2 AND 3 requires a second adult to help “hold” the assemblies as being assembled
NOTE: When unfolding assemblies, be careful not to bend any parts.
Spring Lock
Spring Lock
face backside
STEP 2
PARTS REQUIRED:
1 pc - P3 Left Middle Tubes Assembly
1 pc - P4 Right Middle Tubes Assembly
Connect P4 - Right Middle Tubes Assembly to
P3 - Left Middle Tubes Assembly using Spring
Lock as shown in FIGURE 2.
NOTE: The only assembly in this step is
connecting this spring lock.
FIGURE 1
P2
P1
Spring Lock
face backside
Spring Lock
Spring Lock
face backside
P4
P3
FIGURE 2
WARNING / PINCH HAZARD!
Keep hands and fingers away from
hinge until STEP 3 is complete and
the hinge is in a controlled position.

7For Customer Service Call 1-888-996-2729
© 2016 Escalade Sports
All RIghts Reserved.
STEP 3
PARTS REQUIRED:
1 pc - H1 M6 x 35 mm Allen Head Bolt
1 pc - H4 Flat Washer
1 pc - H5 Wing Nut
Connect Middle Tubes Assembly from STEP 2 to
Lower Tubes Assembly from STEP 1 using Spring
Locks. Next, using H1 Bolt, H4 Washer and H5 Wing
Nut, connect frame braces as shown in FIGURE 3
and DETAIL A.
FIGURE 3
Spring Lock
Spring Lock
H5
H4
H1
DETAIL A
H4
H5
H1
ASSEMBLY FRAME
FROM STEP 2
ASSEMBLY FRAME
FROM STEP 1
NOTE: Lastly, these six points can now
be tightened using a phillips screwdriver
or allen wrench (T1) provided and plyers.
8For Customer Service Call 1-888-996-2729
© 2016 Escalade Sports
All RIghts Reserved.
STEP 4
PARTS REQUIRED:
2 pcs - H2 M6 x 60 mm Allen Head Bolt 2 pcs - H6 Plastic Bushing
2 pcs - H4 Flat Washer 1 pc - P5 Front Tube Assembly
2 pcs - H5 Wing Nut 2 pcs - P15 Locking Pin
Connect P5 Front Tube Assembly using Spring Lock
as shown in FIGURE 4.
NOTE: Bungee Cord is an assembly aide and stays in place.
FIGURE 4
Spring Lock
Bungee
Cord
Spring Lock
Bungee
Cord
STEP 5
Connect P5 Front Tube Assembly to P1 - Left Lower Tube Assembly
and P2 - Right Lower Tube Assembly using H2 Bolts, H4 Washers,
H6 Bushing and H5 Wing Nuts as shown in FIGURE 5 and DETAIL B.
Note: This is a pivot point. “Snug” tighten H5 Wing Nuts only.
Make sure this assembly pivots freely.
P5
P5
P2
P1
P5
P1
H2
H4 H5
P15
H6
FIGURE 5
DETAIL B
NOTE: Use “bottom” hole
for this assembly.
NOTE: Push H2 Bolts
around the inner bungee
cord.

FIGURE 7
P9 P7
9For Customer Service Call 1-888-996-2729
© 2016 Escalade Sports
All RIghts Reserved.
STEP 6
PARTS REQUIRED:
8 pcs - H3 M6 x 25 mm Allen Head Bolt 1 pc - P7 Backboard
8 pcs - H4 Flat Washer 2 pcs - P11 Mechanical Scoring Arm
8 pcs - H5 Wing Nut 2 pcs - P12 Rim
8 pcs - H8 Lock Washer 1 pc - T1 Allen Wrench
Slide P12 Rims onto Rim Support Plates that already attached to the
front of the P7 Backboard. Use T1-Allen Wrench or Phillips
Screwdriver and Plyers (not provided) to
tighten P12 Rims.
Attach P11 Mechanical Scoring Arms to
P7 Backboard using H3 Bolts, H4 Washers,
H8 Lock Washers and H5 Wing Nuts as
shown in FIGURE 6.
Use T1-Allen Wrench or Phillips Screwdriver
and Plyers (not provided) to tighten H3 Bolts.
P11
P7
H5
FIGURE 6
H4
PARTS REQUIRED:
1 pc - P9 Electronic Scorer
1 pc - P10 Electronic Scorer Face Plate
2 pcs - P13 Rim Net
STEP 7
Attach P9 Electronic Scorer and P10 Electronic
Scorer Face Plate to P7 Backboard as shown
in FIGURE 7.
NOTE: Place P10 Electronic Scorer Face Plate
into P7 Backboard first, then carefully “press”
P9 Electronic Scorer onto the four tabs on P10.
You should hear the four tabs “snap”
into place.
Loop the P13 Rim Net through the ram horns
on the P12 Rims as shown in FIGURE 7.
P13
P10
NOTE:
P11 Mechanical Scoring Arm
sensor plug must pass through
P7 Backboard before attaching
the scoring arm.
H3
P12
NOTE:
Slide P12 Rims onto Rim
Brackets C1 pre-installed
on P7 Backboard.
Next, tighten C1 Brackets
to secure the P12 Rims
well using T1 Allen Wrench
(provided) or Phillips
Screwdriver and Plyers
(not provided).
C1
H8

10 For Customer Service Call 1-888-996-2729
© 2016 Escalade Sports
All RIghts Reserved.
STEP 8
PARTS REQUIRED:
2 pcs - P6 Upper Tube
Attach Backboard assembly from STEP 7 to Frame assembly from STEP 5 using Spring Lock as shown
in FIGURE 8.
Attach P6 Upper Tubes to P7 Backboard assembly using Spring Lock as shown in FIGURE 8.
FIGURE 8
TIME
VISITOR
HOME
Spring Lock
Spring Lock
Tabla de contenidos
Otros manuales de Accesorios de Triumph


