ToupTek SCAM4K Series Guía de referencia

The SCAM4K Series Camera Help Manual

I
Contents
The SCAM4K Series Camera Help Manual................................................................................................................. 1
Contents...................................................................................................................................................................... I
1SCAM4K Series Camera Application .................................................................................................................. 1
2SCAM4K Series Camera Datasheet and Functions(2)....................................................................................... 1
3Dimension of SCAM4K Series Camera............................................................................................................... 3
4SCAM4K Series Camera Packing Information .................................................................................................... 3
5Software and App .............................................................................................................................................. 4
6SCAM4K Series Camera Configurations............................................................................................................. 5
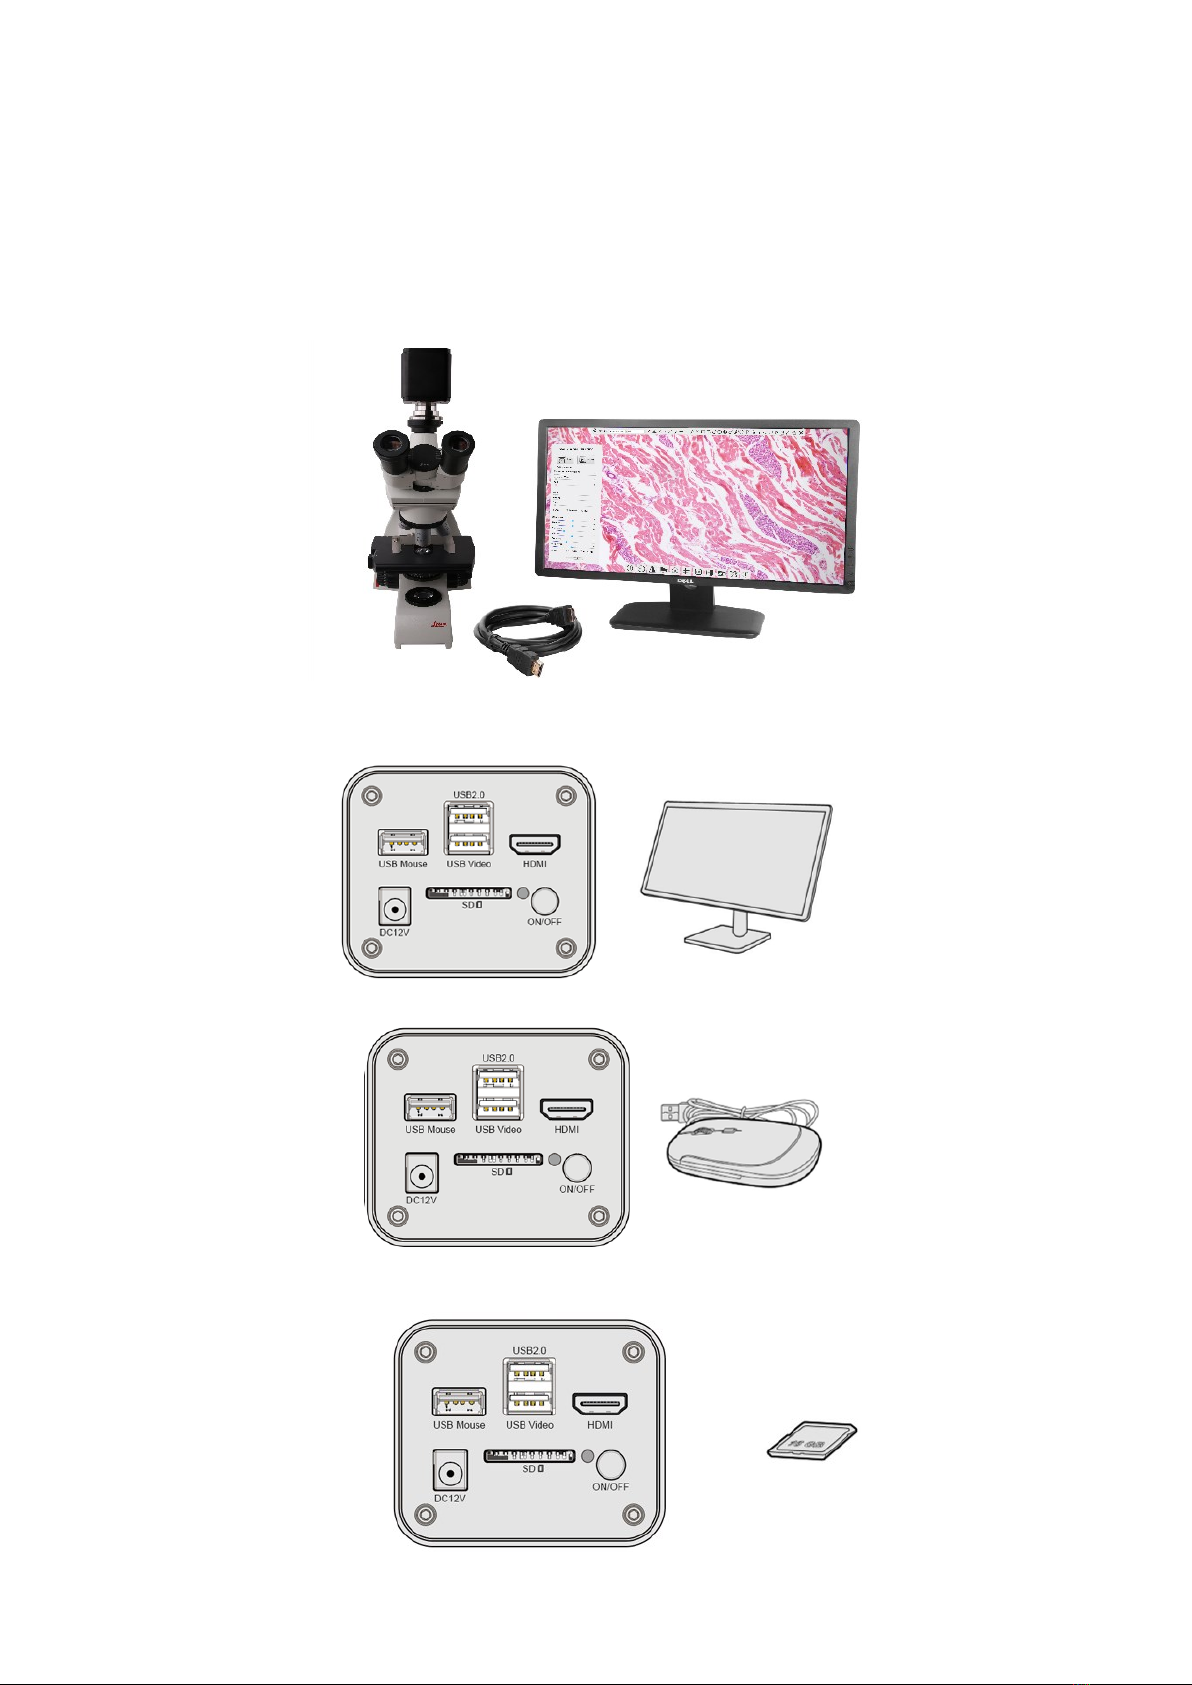
6.1 Camera working standalone with built-in XCamView software............................................................. 5
6.2 Connecting camera to computers with USB3.0 Port ............................................................................. 6
6.3 Camera working in WiFi mode (AP mode)............................................................................................. 7
6.4 Connecting multi-cameras to the router through the WiFi STA mode for the network application ..... 8
7Brief Introduction of SCAM4K UI and Its Functions......................................................................................... 11
7.1 XCamView UI........................................................................................................................................ 11
7.2 The camera control panel on the left side of the video window......................................................... 11
7.3 The Measurement Toolbar on top of the video window..................................................................... 11
7.4 Icons and functions of the Synthesis Camera Control Toolbar at the bottom of the video window... 13
7.4.1 Setting>Network>General ....................................................................................................... 13
7.4.2 Setting>Network>WiFi............................................................................................................. 13
7.4.3 Setting>Measurement ............................................................................................................. 14
7.4.4 Setting>Magnification.............................................................................................................. 14
7.4.5 Settings>Image Format............................................................................................................ 14
7.4.6 Setting>Video........................................................................................................................... 15
7.4.7 Setting>Storage........................................................................................................................ 15
7.4.8 Setting>Files............................................................................................................................. 15
7.4.9 Setting>Time............................................................................................................................ 16
7.4.10 Setting>Language..................................................................................................................... 16
7.4.11 Setting>ISP ............................................................................................................................... 17
7.4.12 Setting>Miscellaneous............................................................................................................. 17
8Sample Photos Captured with SCAM4K Series Camera................................................................................... 18
9Contacting Customer Service........................................................................................................................... 19

The SCAM4K Series Camera Help Manual
1/ 21
1 SCAM4K Series Camera Application
Figure 1-1 The SCAM4K Series Camera
The SCAM4K series camera is intended for acquisition of digital images from stereo microscopes, biological
microscopes, or online interactive teaching. The basic characteristic is listed as below:
⚫Sony Exmor/STARVIS back-illuminated CMOS sensor
⚫4K HDMI/ WiFi/ USB3.0 multiple video outputs
⚫4K/1080P auto switching according to monitor resolution
⚫SD card/USB flash drive for captured image and video storage, support local preview and playback
⚫Embedded XCamView for the control of the camera and image processing
⚫Excellent ISP with local tone mapping and 3D denoising
⚫ToupView/ToupLite software for PC
⚫iOS/Android applications for smart phones or tablets
2 SCAM4K Series Camera Datasheet and Functions(2)
Order Code
Sensor & Size(mm)
Pixel(μm)
G Sensitivity/Dark Signal
FPS/Resolution
Binning
Exposure(ms)
SCAM4K8MPA
Sony IMX678(C)
1/1.8"(7.68x4.32)
2.0x2.0
1364mv with 1/30s
0.15mv with 1/30s
30@3840*2160(HDMI)
30@1920*1080(WiFi)
30@3840*2160(USB3.0)
1x1
0.045~1000
SCAM4K8MPB
Sony IMX585(C)
1/1.2"(11.14x6.26)
2.9x2.9
1028mv with 1/30s
0.13mv with 1/30s
30@3840*2160(HDMI)
30@1920*1080(WiFi)
30@3840*2160(USB3.0)
1x1
0.014~1000
Figure 2-1 Available Ports on the Back Panel of the Camera Body
Interface or Button
Function Description
USB Mouse
Connect USB mouse for easy operation with embedded XCamView software
USB2.0
Connect USB flash drive to save pictures and videos
Connect 5G WiFi module to transfer video wirelessly in real time
USB Video
Connect PC or other host device to realize video image transmission

The SCAM4K Series Camera Help Manual
2/ 21
HDMI
Comply with HDMI1.4 standard. 4K/1080P format video output and supporting automatic switch between 4K and
1080P format according to the connected monitors
SD
Comply with SDIO3.0 standard and SD card could be inserted for video and images saving
ON/OFF
Power switch
LED
LED status indicator
DC12V
Power adapter connection (12V/1A)
Video Output Interface
Function Description
HDMI Interface
Comply with HDMI1.4 standard
30fps@4K or 30fps@1080P
WiFi Interface
Connecting 5G WiFi adapter (USB2.0 slot) in AP/STA mode
1080P H264 format video, 8M (3840*2160) image
USB Video Interface
Connecting USB3.0 Video port of PC for video transfer
H264/NV12/MJPEG format video
Other Function
Function Description
Video Saving
Video format:8M(3840*2160) H264/H265 encoded MP4 file
Video saving frame rate:30fps
Image Capture
8M (3840*2160) JPEG/TIFF image in SD card or USB flash drive
Measurement Saving
Measurement information saved in different layer with image content
Measurement information is saved together with image content in burn in mode
ISP
Exposure(Automatic / Manual Exposure) / Gain, White Balance(Manual / Automatic / ROI Mode),
Sharpening, 3D Denoise, Saturation Adjustment, Contrast Adjustment, Brightness Adjustment, Gamma
Adjustment, Color to Gray, 50HZ/60HZ Anti-flicker Function
Image Operation
Zoom In/Zoom Out(Up to 10X), Mirror/Flip, Freeze, Cross Line, Compare(Comparison between real time video
and images in SD card or USB flash drive ), Embedded Files Browser, Video Playback, Measurement Function
Embedded RTC(Optional)
To support accurate time on board
Restore Factory Settings
Restore camera parameters to its factory status
Multiple Language
Support
English / Simplified Chinese / Traditional Chinese / Korean / Thailand / French / German / Japanese / Italian /
Russian
Software Environment under WiFi/USB Video Output
White Balance
Auto White Balance
Color Technique
Ultra-Fine Color Engine
Capture/Control SDK
Windows/Linux/macOS/Android Multiple Platform SDK(Native C/C++, C#/VB.NET, Python, Java, DirectShow,
Twain, etc)
Recording System
Still Picture or Movie
Operating System
Microsoft® Windows® XP / Vista / 7 / 8 / 8.1 /10(32 & 64 bit)
OSx(Mac OS X)
Linux
PC Requirements
CPU: Equal to Intel Core2 2.8GHz or Higher
Memory: 4GB or More
Display:19” or Larger
CD-ROM
Operating Environment
Operating Temperature (in
Centidegree)
-10~ 50
Storage Temperature (in
Centidegree)
-20~ 60
Operating Humidity
30~80%RH
Storage Humidity
10~60%RH
Power Supply
DC 12V/1A Adapter

The SCAM4K Series Camera Help Manual
3/ 21
3 Dimension of SCAM4K Series Camera
Figure 3-1 Dimension of SCAM4K Series Camera
4 SCAM4K Series Camera Packing Information
Figure 4-1 SCAM4K Series Camera Packing Information
Standard Packing List
A
Gift box : L:25.5cm W:17.0cm H:9.0cm (1pcs, 1.57Kg/ box)
B
SCAM4K Camera(One of the two different shapes)
C
Power Adapter: Input: AC 100~240V 50Hz/60Hz, Output: DC 12V 1A
American standard: Model: POWER-U-12V1A(MSA-C1000IC12.0-12W-US): UL/CE/FCC
European standard: Model: POWER-E-12V1A(MSA-C10001C12.0-12W-DE): UL/CE/FCC
EMI standard: FCC Part 15 Subpart B
EMS standard: EN61000-4-2,3,4,5,6
D
USB Mouse
E
HDMI Cable
F
USB3.0 A male to A male gold-plated connectors cable /2.0m
G
CD (Driver & utilities software, Ø12cm)
Optional Accessory
H
SD Card(16G or above; Speed: class 10)

The SCAM4K Series Camera Help Manual
4/ 21
I
Adjustable lens adapter
C-Mount to Dia.23.2mm Eyepiece Tube
(Please choose 1 of them for your microscope)
108001/AMA037
108002/AMA050
108003/AMA075
J
Fixed lens adapter
C-Mount to Dia.23.2mm Eyepiece Tube
(Please choose 1 of them for your microscope)
108005/FMA037
108006/FMA050
108007/FMA075
Note: For K and L optional items, please specify your camera type(C-mount, microscope camera or telescope camera), ToupTek engineer will
help you to determine the right microscope or telescope camera adapter for your application;
K
108015(Dia.23.2mm to 30.0mm Ring)/Adapter rings for 30mm eyepiece tube
L
108016(Dia.23.2mm to 30.5mm Ring)/ Adapter rings for 30.5mm eyepiece tube
M
Calibration kit
106011/TS-M1(X=0.01mm/100Div.);
106012/TS-M2(X,Y=0.01mm/100Div.);
106013/TS-M7(X=0.01mm/100Div., 0.10mm/100Div.)
N
USB flash drive
O
USB WiFi adapter
5 Software and App
The software or the APP can be downloaded from the following link:
Windows: http://www.touptek.com/download/showdownload.php?lang=en&id=33
Linux & macOS: http://www.touptek.com/download/showdownload.php?lang=en&id=28
iOS: https://itunes.apple.com/us/app/toupview/id911644970
Android: https://play.google.com/store/apps/details?id=com.touptek.tpview

The SCAM4K Series Camera Help Manual
5/ 21
6 SCAM4K Series Camera Configurations
You can use the SCAM4K series camera in 4 different ways. Each application requires different hardware
environment.
6.1 Camera working standalone with built-in XCamView software
For this application, apart from the microscope, you only need an HDMI monitor, the supplied USB mouse,
and the camera embedded XCamView software. A computer or a network connection is not required to operate
the camera in this application. The steps to start the camera are listed as below:
Figure 6-1 SCAM4K Series Camera with the HDMI Monitor
Connect the camera to a HDMI monitor using the HDMI cable;
Insert the supplied USB mouse to the camera’s USB port;
Insert the supplied SD card/USB flash drive (USB2.0 slot) into the SCAM4K series camera SD card slot/USB2.0
slot;

The SCAM4K Series Camera Help Manual
6/ 21
Connect the camera to the power adapter and turn it on;
Turn on the monitor and view the video in the XCamView software. Move the mouse to the left, top or bottom
of the XCamView UI, different control panel or toolbar will pop up and users could operate with the mouse at ease.
Figure 6-2 XCamView And SCAM4K Series Camera in HDMI Mode
6.2 Connecting camera to computers with USB3.0 Port
For Windows user (Windows XP (32bit), Windows 7/8/10/11 (32/64 bit) ), please use ToupView.
For macOS and Linux user (macOS 10.10 or above or Linux distributions with kernel 2.6.27 or higher), please
use ToupLite. The steps to start the camera are listed below:
Start the camera according to Sec. 6.1. After the camera is running, connect camera to computer with USB
cable. Please use “USB Video” slot, NOT “USB Mouse” slot as shown below.
Install ToupView/ToupLite on your PC or install ToupView App on the mobile device; Run the software
ToupView/ToupLite, clicking the camera name in the camera list group to start the live video as shown in Figure
6-3.

The SCAM4K Series Camera Help Manual
7/ 21
Figure 6-3 ToupView and SCAM4K Series Camera in USB Mode
6.3 Camera working in WiFi mode (AP mode)
Please make sure your PC is WiFi enabled.
For Windows user (Windows XP (32bit), Windows 7/8/10/10/11 (32/64 bit) ), please use ToupView.
For macOS and Linux user (macOS 10.10 or above or Linux distributions with kernel 2.6.27 or higher), please
use ToupLite. When connecting the camera with a mobile device, the free ToupView App is required. Just make
sure that the mobile device uses iOS 11 or higher/Android 5.1 or higher operating systems.
The steps to start the camera are listed below:
Start the camera according to Sec. 6.1. After the camera is running, move the mouse to the bottom of the GUI
and clicking the button on the Synthesis Camera Control Toolbar at the bottom of the video window, a small
window called Settings will pop up as shown below. Click Network>WiFi property page and choose the AP in the
Wi-Fi Mode edit box(The factory default configuration is AP mode ).
Plug the USB WiFi adapter into the camera’s USB2 .0 port;

The SCAM4K Series Camera Help Manual
8/ 21
Install ToupView/ToupLite on your PC or install ToupView App on the mobile device, Connect the PC or mobile
device to the camera’s WiFi AP point; The network name (SSID) and the WiFi password (The default one is
12345678) can be found on the camera’s Setting>Network>WiFi page in AP mode.
Start ToupView/ToupLite software or ToupView App and check the configuration. Normally, the active
SCAM4K series cameras will be automatically recognized. The live image of each camera is shown in Figure 6-4. For
the display, the Camera List tool window is used in ToupView/ToupLite software, and the Camera Thumbnail is
used in ToupView App.
Figure 6-4 ToupView and SCAM4K Series Camera in WiFi AP Mode
6.4 Connecting multi-cameras to the router through the WiFi STA mode for the network
application
In WiFi STA mode, the camera connects to the router by WiFi STA mode. If a router with WiFi capability is used,
Este manual sirve para los siguientes modelos
2
Tabla de contenidos
Otros manuales de Microscopio de ToupTek
Manuales populares de Microscopio de otras marcas

VWR
VWR VisiScope 384 Series Manual de usuario

Nikon
Nikon ECLIPSE E200 POL Manual de usuario

Leica
Leica DI C800 Manual

ThermoFisher Scientific
ThermoFisher Scientific Continuµm Manual de usuario

ThermoFisher Scientific
ThermoFisher Scientific Continuµm Manual de usuario

Olympus
Olympus SZ61 Manual de usuario


