Tiger Electronics VCamNow Manual de usuario

Digital Video
Camera
USER GUIDE
Thank you for purchasing the VCAMNOW Digital Video Camera.
Be sure to read and follow all instructions carefully before using this
product.
Make your own movies anytime, anywhere! Film your friends and
make them the stars of the show, or take pictures and share them with
your friends and family.
CONTENTS:
• VCAMNOW Digital Video
Camera
• Software Installation CD
• USB Cable
• AV Cable
• 2 Blank PVDs [Personal Video
Discs]
• PVD Adaptor
Requires 2 x 1.5V “AA” or R6 size batteries (not included).
Alkaline batteries recommended.
™
76348

TO INSERT BATTERIES
Open cover. Insert 2 x 1.5V
“AA” or R6 size batteries (not
included). Alkaline batteries
recommended. Close cover.
CAUTION: TO AVOID
BATTERY LEAKAGE
1. Be sure to insert the batteries correctly and
always follow the toy and battery manufacturers’
instructions;
2. Do not mix old batteries and new batteries or
alkaline, standard (carbon-zinc) or rechargeable
(nickel-cadmium) batteries;
3. Always remove weak or dead batteries from the
product.
IMPORTANT: BATTERY INFORMATION
Please retain this information for future reference.
Batteries should be replaced by an adult.

CAUTION:
1. Always follow the instructions carefully. Use only
batteries specified and be sure to insert item
correctly by matching the + and – polarity markings.
2. Do not mix old batteries and new batteries or
standard (carbon-zinc) with alkaline batteries.
3. Remove exhausted or dead batteries from the
product.
4. Remove batteries if product is not to be played with
for a long time.
5. Do not short circuit the supply terminals.
6. Should this product cause, or be affected by, local
electrical interference, move it away from other
electrical equipment. Reset (switching off and back
on again or removing and re-inserting batteries) if
necessary.
7. RECHARGEABLE BATTERIES: Do not mix these with
any other types of batteries. Always remove from
the product before recharging. Recharge batteries
under adult supervision. DO NOT RECHARGE OTHER
TYPES OF BATTERIES.

GETTING STARTED
Getting to Know Your Digital Video Camera.........................1
Control Panel ......................................................................... 2
Power On/Off .........................................................................3
Low Battery Power Indicator ................................................3
MOVIES
How to Record a Movie ........................................................4
How to Playback a Movie.....................................................5
PICTURES
How to Take a Picture ........................................................... 7
How to Review a Picture.......................................................8
Taking a Picture in Dim Light................................................9
COMPUTER CONNECTION
How to Install the Software on your Computer .................10
How to Connect Your Digital Video Camera
to Your Computer.................................................................10
How to Use your Digital Video Camera
as a Web Cam....................................................................... 11
How to Use your Digital video Camera as a
Mass Storage Device............................................................ 11
TV CONNECTION
How to Connect Your Digital Video Camera to Your TV ....12
TABLE OF CONTENTS

MAIN FUNCTIONS
Movie Screen........................................................................13
Picture Screen.......................................................................13
Self-Timer..............................................................................13
LCD/Viewnder On/Off .........................................................15
Volume ..................................................................................15
Delete One ............................................................................16
Delete All...............................................................................17
MEMORY
Memory Full..........................................................................18
Memory Card Installation
(Memory Card not included)...............................................18
Memory Storage...................................................................19
Memory Card Lock...............................................................19
ADVANCED FUNCTIONS
Setup Menu.......................................................................…20
Beep On/Off..........................................................................21
Auto Off ................................................................................21
Erasing your Memory Card .................................................21
NTSC/PAL ............................................................................. 22
50Hz/60Hz............................................................................ 22
Mounting to a Tripod .......................................................... 22

GETTING STARTED
Microphone
GETTING TO KNOW YOUR DIGITAL VIDEO CAMERA
MMC/SD
Card Slot
(MMC/SD Card
not included.)
Speaker
Set Zoom (T-W)
Power
Lens
Self-Timer LED
Status LED
LCD/View nder
Control Panel
AV Video
Out Port
USB
Port
Battery Door
1
Tripod Mount
(Tripod not included.)
1
USB Cable
Software Installation CD
AV Cable
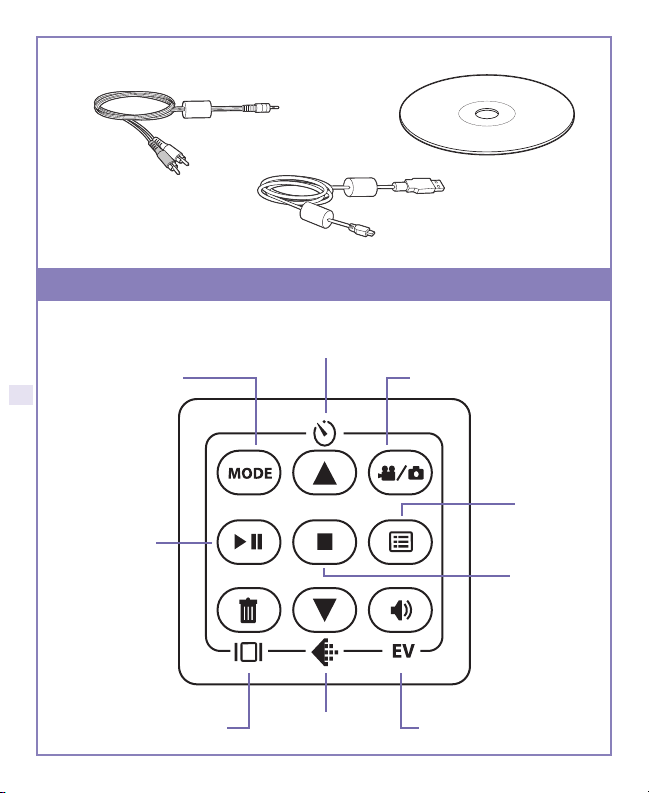
Volume/Exposure Value
CONTROL PANEL
Back/Self-Timer
Mode Movie/Camera Mode
Play/Pause
Stop
Menu
Delete/LCD On/Off Next/Quality
2

If your batteries are running low, you
will see a battery icon appear
on the top center of the LCD/
Viewfinder.
POWER ON AND OFF
LOW BATTERY POWER INDICATOR
Slide the Power button to turn your Digital Video
Camera ON.
It will automatically spring back
into place.
Slide the Power button again to
turn your Digital Video Camera
OFF.
It will automatically spring back
into place.
If your batteries are about to run out,
you will see a blinking battery icon
appear on the top center of the LCD/
Viewfinder. At this point you’ll have
10 seconds before your Digital Video
Camera will automatically turn off.
3

1. Press the button until you see the movie icon appear on the
LCD/Viewfinder.
HOW TO RECORD A MOVIE
NOTE: If you have an MMC/SD Card inserted (not included), your movie will
be automatically stored to the MMC/SD Card, not the internal memory. If you
want to record to the internal memory only, remove the MMC/SD Card.
MOVIES
4. Press Set to stop recording.
3. Press Set to start recording.
2. Press the Zoom button, T or W, to adjust the frame of your movie.
zoom in or zoom out
Set
T W
4

1. Press the “Mode” button to enter playback mode.
HOW TO PLAYBACK A MOVIE
2. Press the W on the Zoom button to view multiple images of the
movies on the camera.
3. Press the T on the Zoom button to view a single image.
5
Tabla de contenidos
Manuales populares de Videocámara de otras marcas


Panasonic
Panasonic AG-HMC152EN Manual de usuario

Insignia
Insignia NS-DCC5HB09 - Camcorder - 720p Manual de usuario

MYDLINK
MYDLINK DCS-6100LH Manual de usuario

Sony
Sony video Hi8 Handycam CCD-TR555 Manual de usuario

SECURECOM
SECURECOM V-5014B Manual de usuario

Panasonic
Panasonic HDC-SD100 Manual de usuario


