THOMSON LENS 100 Manual de usuario

www.mythomson.com
V1
EN Motorised Full HD indoor camera
512501
LENS 100
•REC
MicroSD
(Not included)
1080p
2.4GHz

EN 2
MOTORISED FULL HD INDOOR CAMERA
CONTENTS
A. SAFETY INSTRUCTIONS 5
1. OPERATING PRECAUTIONS 5
2. MAINTENANCE AND CLEANING 5
3. RECYCLING 5
B. PRODUCT DESCRIPTION 6
1. KIT CONTENTS 6
2. CAMERA START-UP 6
C. INSTALLATION 7
1. INSTALLING THE CAMERA 7
2. CAMERA START-UP 7
3. INSERTING A MICRO SD CARD (NOT INCLUDED) 8
D. CONFIGURATION 9
E. OPERATION 10
1. ACCESS TO THE LIVE IMAGE 10
2. VIEWING VIDEOS TAKEN BY THE CAMERA 11
F. ALLOCATING ACCESS TO ANOTHER PERSON 12
G.USE WITH ONVIF COMPATIBLE DEVICES 13

3ENEN
3
H. USE WITH AMAZON ALEXA 13
1. AVAILABLE ACTIONS 13
2. CONFIGURATION 13
I.USE WITH GOOGLE HOME 15
1. AVAILABLE ACTIONS 15
2. CONFIGURATION 15
J. RESETTING 18
K. FAQ 18
L. TECHNICAL AND LEGAL INFORMATION 20
1. TECHNICAL CHARACTERISTICS 20
2. WARRANTY 20
3. ASSISTANCE AND ADVICE 20
4. PRODUCT RETURNS - AFTER SALES SERVICE 20
5. DECLARATION OF CONFORMITY 20


5EN
MOTORISED FULL HD INDOOR CAMERA
A - SAFETY INSTRUCTIONS
1 - OPERATING PRECAUTIONS
• The cameras must not be installed where the
lens lter may be vulnerable to scratching and
dirt.
• Do not allow children to operate the product.
• When drilling, take care not to damage pipes
or electric cables under the surface.
• Do not expose the lens to direct sunlight or any
reected light source.
• Do not install near acidic chemicals, ammonia
or sources of toxic gases.
• The camera uses high precision motors, do not
manually handle the camera.
• The installation and use of the camera must
comply with local laws.
2 - MAINTENANCE AND CLEANING
• Disconnect the adaptor from the mains before
carrying out any maintenance.
• Never use abrasive or corrosive substances to
clean the products.
• Use a soft, slightly damp cloth.
• Never use an aerosol to spray the product as
this may damage the internal workings.
3 - RECYCLING
This logo denotes that devices which
are no longer in use must not be
disposed of as household waste.
They are likely to contain hazardous
substances that are dangerous to both
health and the environment. Return
the equipment to your local distributor or use the
collection service provided by your local council.
Pour en savoir plus :
www.quefairedemesdechets.fr

6
MOTORISED FULL HD INDOOR CAMERA
EN
B - PRODUCT DESCRIPTION
1 - KIT CONTENTS
2 - CAMERA
1x 1
4x 3 5x 3 6x 1
2x 1 3x 1
1Camera
2230V A/C 50 Hz mains adaptor / 5V D/C 2A USB
3USB cable for powering the camera
1Lens
2Infrared light for night vision (hidden behind the
opaque part of the globe)
3Speakers
4“Reset” button for resetting the camera
4Plugs for ceiling mounting
5Screws for ceiling mounting
6Base for ceiling mounting
5Microphone
6Mains adaptor power supply included in the kit
7MicroSD card slot (optional, not included)
8RJ45 cable for wired connection to the network
Micro SD
5V
RESET
1
3 4 5 6 7 8
2

7EN
MOTORISED FULL HD INDOOR CAMERA
C - INSTALLATION
1 - INSTALLING THE CAMERA
Connection tests are recommended before tting
the camera in its nal location.
The camera can be attached to the ceiling or
placed on a at surface.
Mount the camera using suitable screws and wall
plugs for the type of surface (the screws and plugs
supplied are suitable for solid walls).
RESET
RESET
2 - CAMERA START-UP
Note:
The screenshots displayed have been taken from
the Android version of the Link-Home app. The
iPhone version works in exactly the same way.
Download the Link Home app on the Appstore
or on Google Play, then launch the application.
Create an account by clicking on “Nouvelle
inscription utilisateur” (New user registration)
then on “inscrivez-vous à l’aide de votre adresse
électronique” (sign up using your email address).
Then follow the instructions on the screen and
carefully choose a login password.
When creating an account, a verication code will
be sent to the email address you enter. Check your
spam folder if you don’t receive the email in your
inbox:
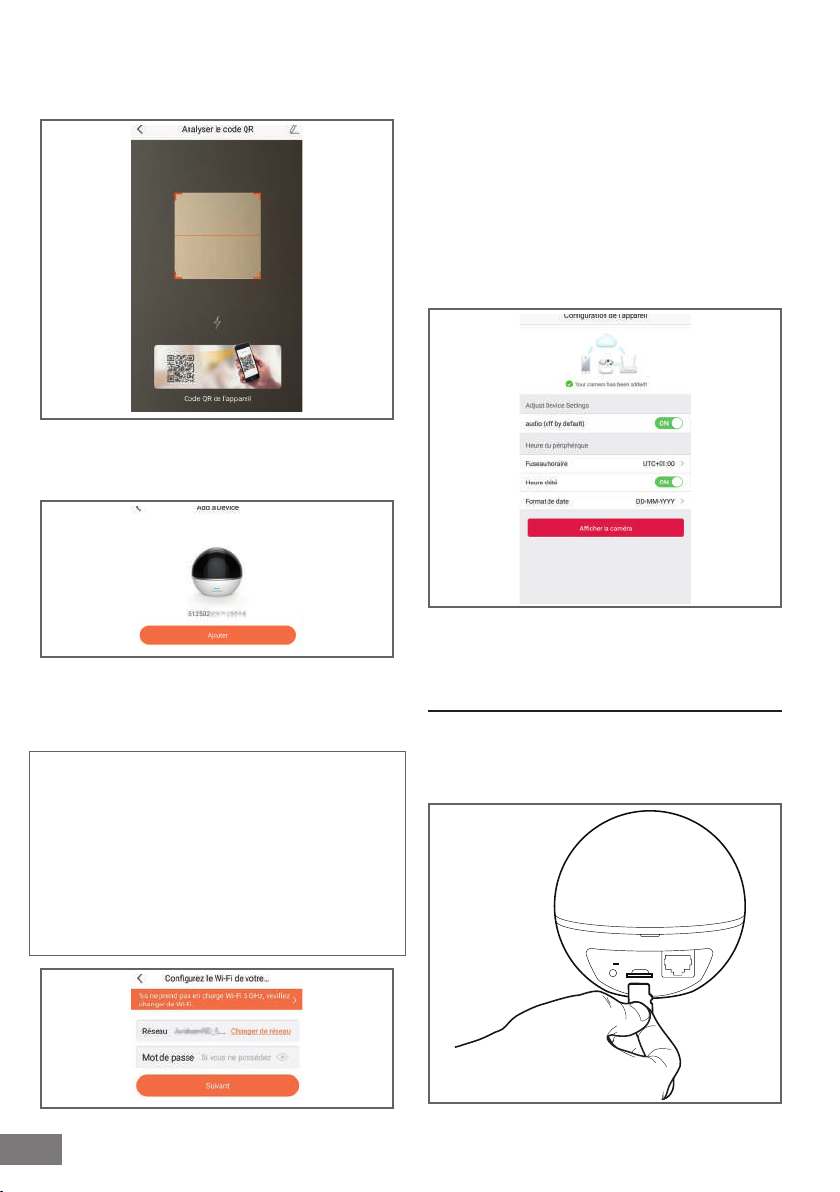
Once you have created and conrmed your
account, login and click on the “+” icon to pair your
connection base. The app will ask you to scan the
QR code under the base.
At this stage of the installation, your camera should
be switched on, awaiting conguration (switch the
power off and on again if necessary).
8
MOTORISED FULL HD INDOOR CAMERA
After having scanned the QRCode, the app. checks
whether the camera is switched on. If this is not the
case, it prompts you to switch it on.
Click on “Se connecter à un réseau”” (Connect to
a network) and enter the network key to which
the smartphone is connected to ensure that the
information is sent to the camera.
IMPORTANT:
The camera is not compatible with 5 GHz WiFi
networks. If necessary, please check the Wi-Fi
parameters of your box with your internet service
provider.
The camera start-up process can only be initiated
once the camera has been switched on and it
switches off after a few minutes for safety reasons.
Switch off the power and switch it back on again
if necessary.
Next, place your smartphone as close to the camera
as possible until it has been completely congured.
The information captured will be sent to the camera
at this stage.
Once the camera has been connected to Internet
and picked up by the smartphone, the conguration
page with the date and time embedded in the
image displays.
Adjust this as required and then click on “Afcher la
caméra” (Display camera).
3 - INSERTING A MICRO SD CARD (NOT
INCLUDED)
Your camera has a micro SD card slot, which gives
it an internal storage memory. The maximum size
is 128 GB. The slot is located at the back of the
camera.
Micro SD
5V
EN
C - INSTALLATION
9EN
MOTORISED FULL HD INDOOR CAMERA
IMPORTANT NOTE:
After successful pairing of your camera, it is linked
to your account and, for security reasons, cannot
be linked to another account without your consent.
If you change your account and want to swop over
your camera, you must remove the camera from
the previous account before you can assign it to
the new one.
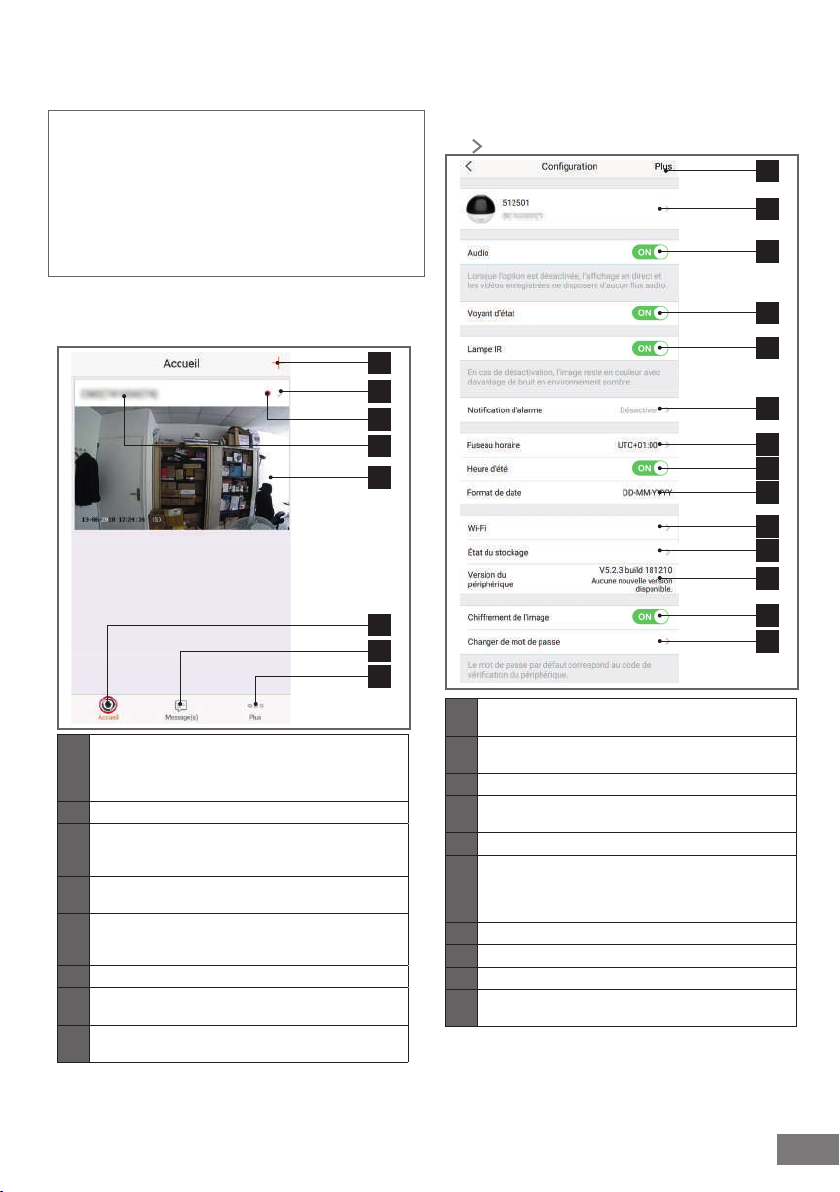
After successful pairing of your camera, the app
displays the main screen:
1
2
5
3
6
7
8
4
1
Adding a camera to the list of cameras already
known to the application (provided that the
cameras are not already specied in another
account)
2Access to the camera conguration page
3
The red dot indicates the presence of events that
have not yet been viewed in the “Message/s”
section (at the bottom of the screen)
4Personalised name of the camera (this can be
changed on the camera conguration page)
5
Thumbnail of the camera image. This automatically
updates with each new arrival on the main screen,
and may be forced by swiping downwards.
6Homepage: main screen
7Message(s): the latest events captured by the
camera are listed here
8Additionally: conguration of the account and the
app itself
Access the camera settings page by clicking on
the icon to access all of the functions available:
1
3
4
5
6
7
8
10
9
11
12
13
14
2
1Access to removal of the camera (allows for
“transfer” to another account)
2Personalised name of the camera: click here to
rename your camera
3Enables/disables the camera’s microphone
4Activation / deactivation of the indicators on the
camera face
5Deactivation of the camera infrared lighting
6
Activation of alerts through movement detection
(push notications), adjustment of movement
detection sensitivity, programming of time slots per
day or times not to be disturbed by notications
7Camera time zone
8Activation of daylight saving time
9Date format: day/month/year or month/day/year
10 Wi-Fi network to which the camera is connected.
Click to change the network if necessary
D - CONFIGURATION

10
MOTORISED FULL HD INDOOR CAMERA
EN
D - CONFIGURATION
E - OPERATION
11
If a MicroSD card (not included) has been inserted
into the camera, access to its features and
formatting
12 Firmware version of the camera
13 Activation/deactivation of the password to access
the camera’s image.
14 Changing of access password
1 - ACCESS TO LIVE IMAGES
The main screen shows a thumbnail of your camera
image that is refreshed at regular intervals. To
display the video directly from the camera, click on
the thumbnail:
4
321
5
6
7
8
14
11
13
10
12
9
15
1Current date and time (also embedded in the
video recordings)
2Allocation of camera access to another user
(another account)
3Conguration of the camera
4Live video
5Launch/stop live video
6Simultaneous display of up to 4 cameras
7Vertical image inversion
8Digital zoom onto the image (2x, 4x or 8x)
9
Selection of image quality. Take note: high quality
requires a better connection in terms of the camera
and smartphone.
Scroll to the right to access this option
10
Start/stop of video recording (recording onto
smartphone memory)
Scroll to the right to access this option
11 Immediate photo taking (recording onto
smartphone memory)
12
Private mode: When you are at the premises and
do not want to be monitored, pressing this key
switches the camera's lens, cuts the image, and
mutes the microphone and the speaker.
13 Smartphone microphone activation to speak
through the camera’s speaker
14
Display of camera motor
control:
360° photo: after
activating the camera,
a panoramic photo of
its eld of vision can
be taken by clicking
here. Once the photo
has been taken, you
can double click on
the image to point the
camera in the clicked on
direction.
Display of the directional
cross
Automatic monitoring:
activation / deactivation
of movement detection
by the camera motors
15
If a micro SD card is in the camera and video
recordings have taken place on the camera, they
can be viewed here.
Este manual sirve para los siguientes modelos
1
Tabla de contenidos
Otros manuales de Accesorios para cámaras de THOMSON

THOMSON
THOMSON LDK 4019 LDK 4019 Manual de usuario

THOMSON
THOMSON LDK 4020 Manual de usuario

THOMSON
THOMSON grass valley LDK 5305 Manual de usuario

THOMSON
THOMSON 512501 Manual de usuario

THOMSON
THOMSON 510055 Manual de usuario

THOMSON
THOMSON LDK 100 Manual de usuario

THOMSON
THOMSON LDK 5301 Manual de usuario

THOMSON
THOMSON LDK 200 Manual de usuario

THOMSON
THOMSON LDK 5302/60 Manual de usuario

THOMSON
THOMSON LDK 5411 Manual de usuario


