TEXAM FULL UNDERSHELF Manual de usuario
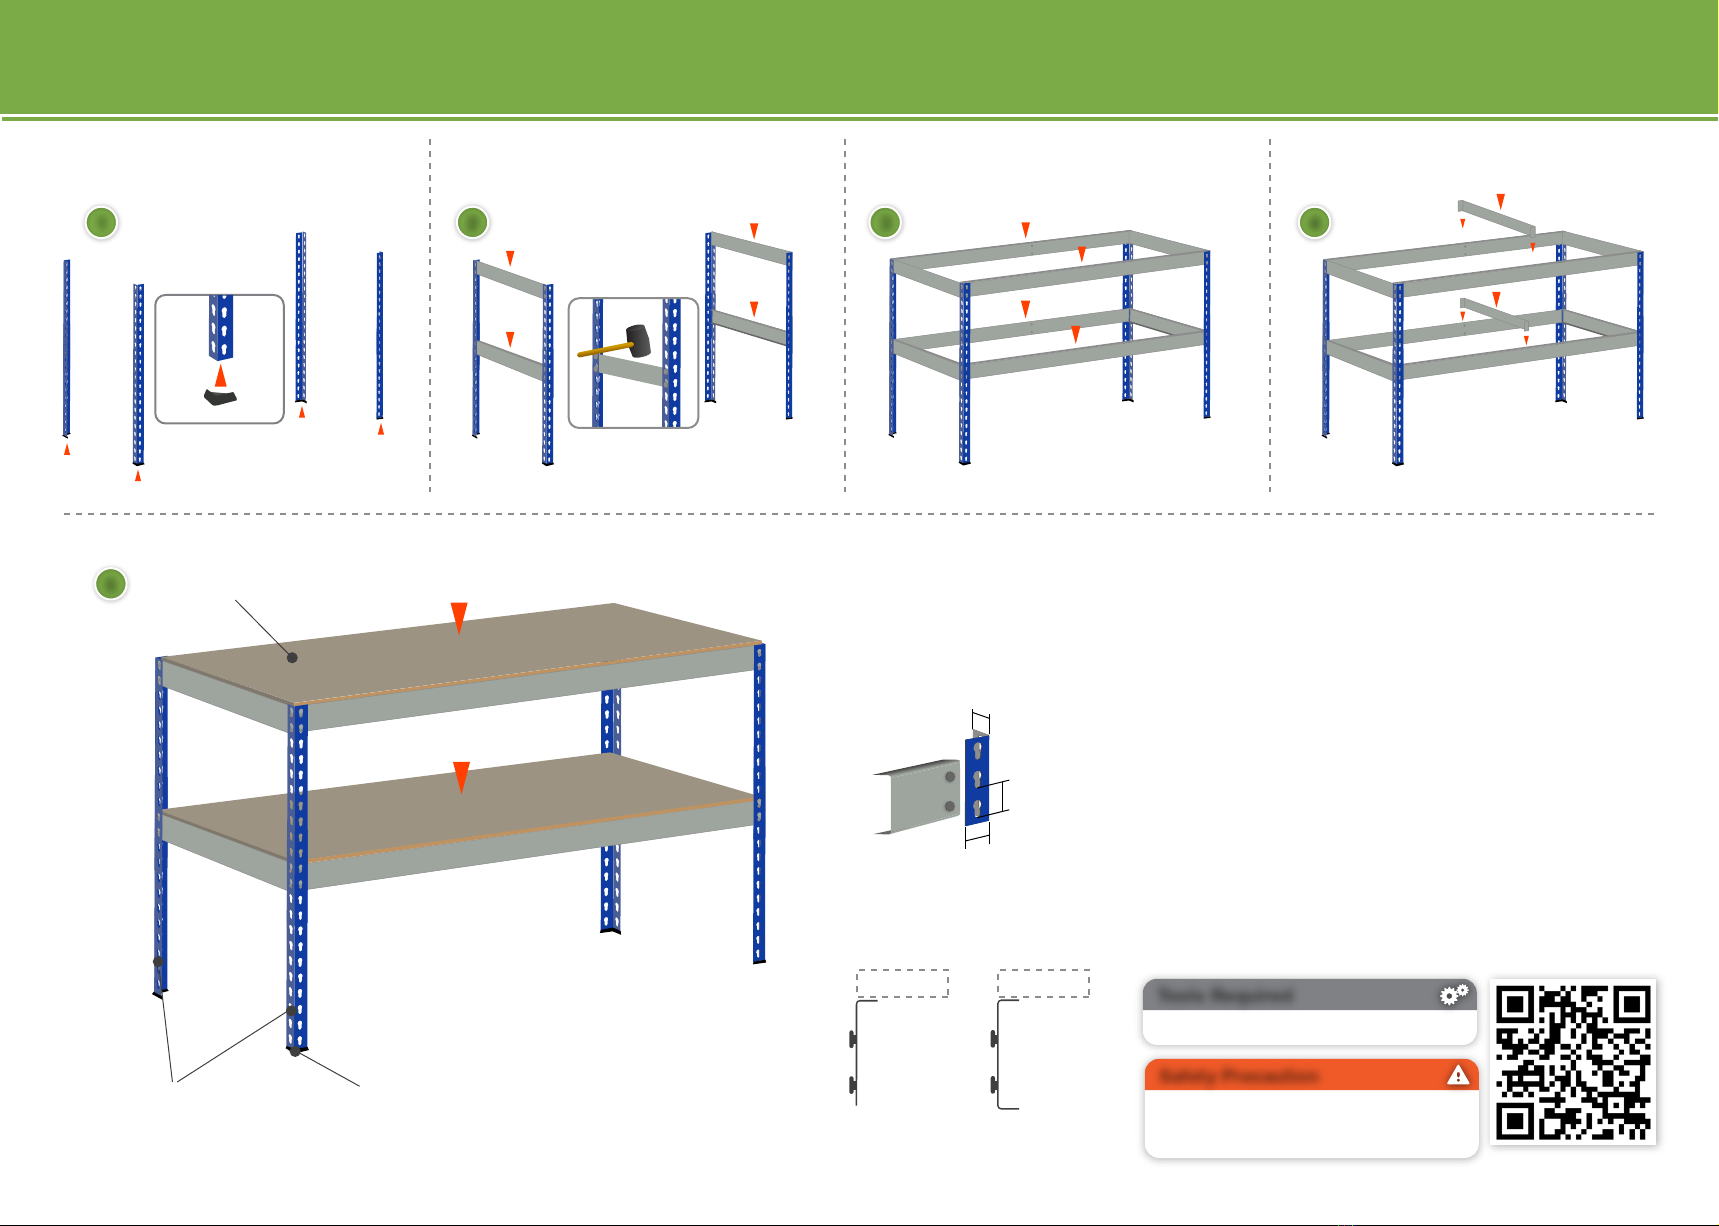
Rubber Mallet
Tools Required
Two competent people wearing safety gloves,
safety shoes and protective eyeware
are recommended to undertake the assembly.
Safety Precaution
scan for more info
915mm
uprights
plastic feet
18mm thick work top
1. Attach plastic feet to all 4 uprights,
the narrow part of each slot pointing downwards.
2. Tap the side beams in at the required positions for the worktop and
lower shelf level. The side beams for the worktop should be positioned
in the top two holes of the 915 uprights. - Repeat to get two matching
end frames.
3. The face beams for the worktop should be positioned in the top two
holes of the 915mm upright, matching the side beam height. Locate
the face beams for the undershelf at the same level as the lower side
beams.
4. Now insert the front to back deck support in the main work station
level and the undershelf.
(2440mm wide workbench comes with 2 deck supports per level)
5. Now you can add the 18mm thick shelf to the worktop and
undershelf level.
38mm
38mm
38mm
1 2 3 4
5
chipboard chipboard
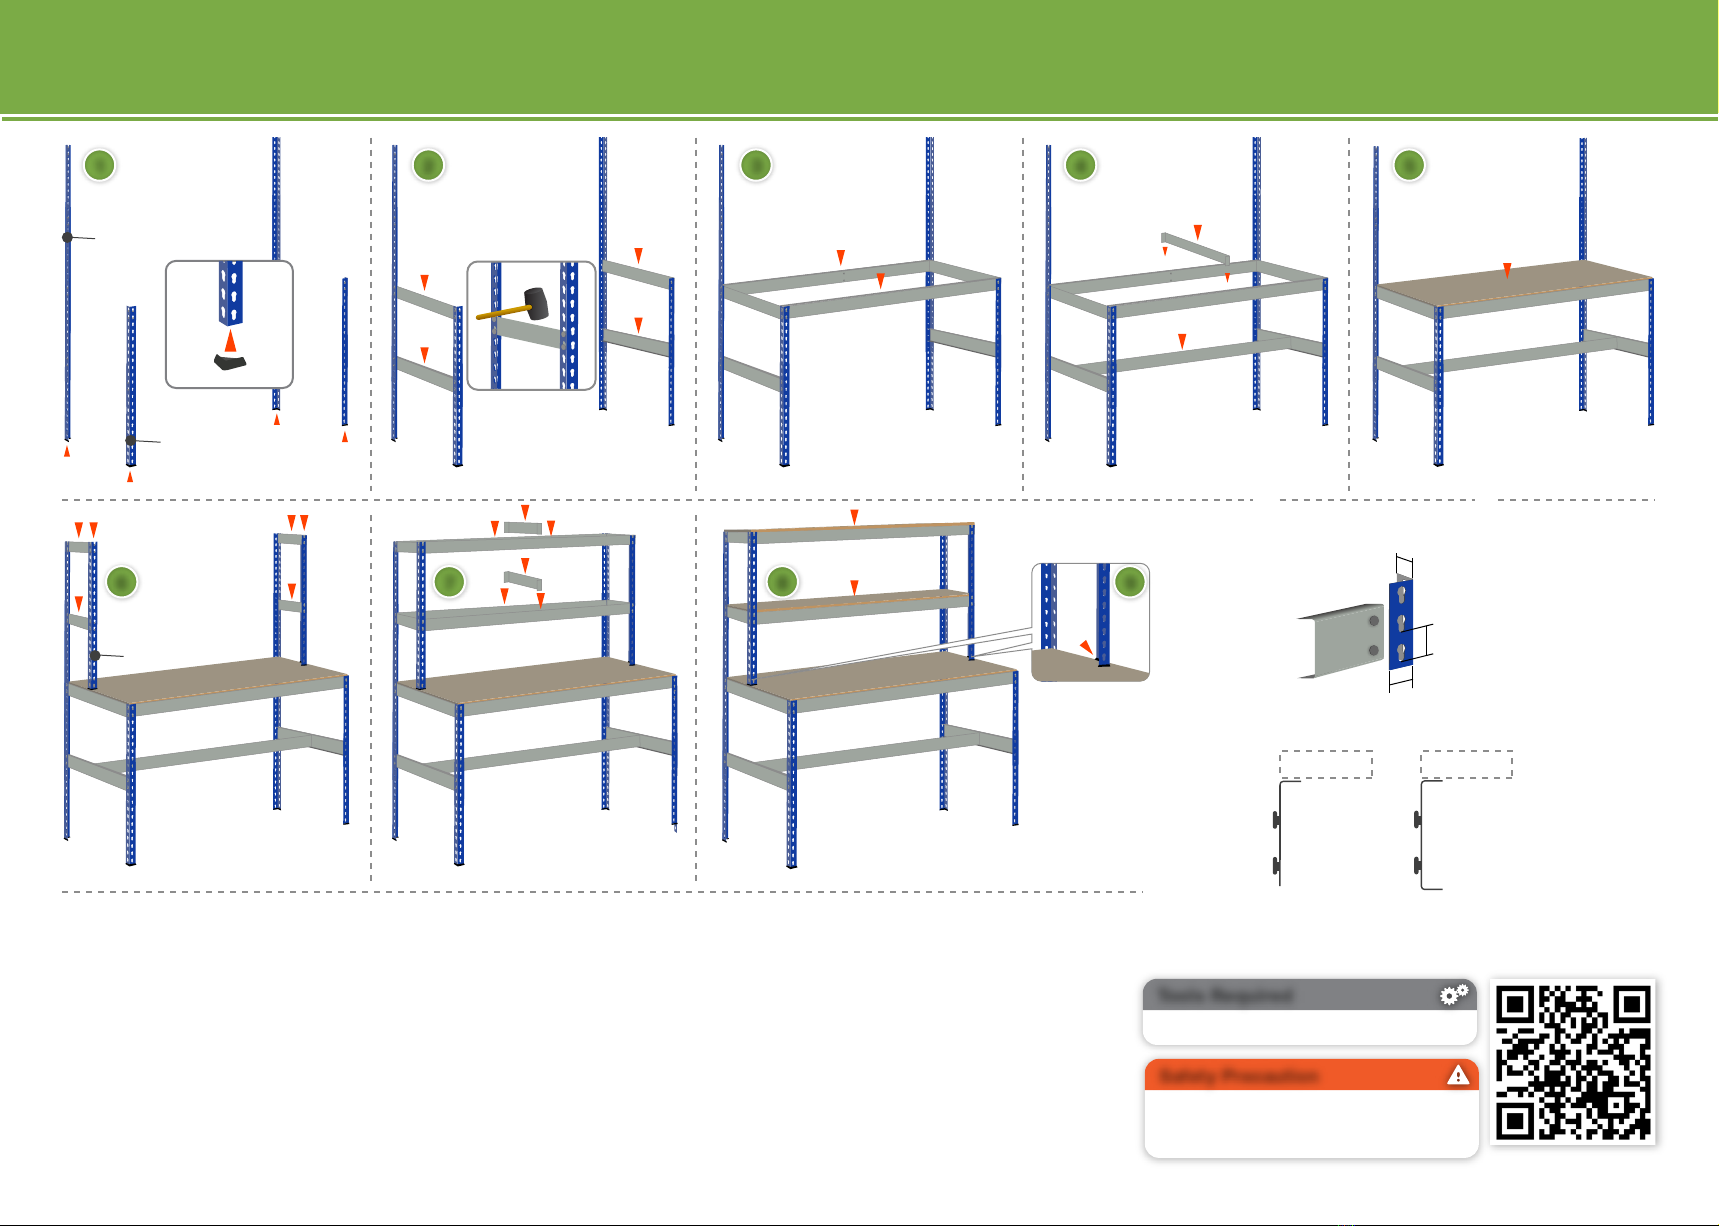
RIVET WORKBENCH - FULL UNDERSHELF Assembly Instructions

Rubber Mallet
Tools Required
Two competent people wearing safety gloves,
safety shoes and protective eyeware
are recommended to undertake the assembly.
Safety Precaution
scan for more info
915mm
uprights
plastic feet
18mm thick work top
1. Attach plastic feet to all 4 uprights,
the narrow part of each slot pointing downwards.
2. Tap the side beams in at the required positions for the worktop and
lower shelf level. The side beams for the worktop should be positioned
in the top two holes of the 915 uprights. - Repeat to get two matching
end frames.
3. The face beams for the worktop should be positioned in the top two
holes of the 915mm upright, matching the side beam height. Locate
the face beam for the undershelf at the same level of the lower side
beams.
4. Now insert the front to back deck support in the main work station
level and the undershelf (2440mm wide workbench comes with 2 deck
supports per level) and fit the left to right deck support which forms the
T bar.
5. Now add the 18mm undershelf to the lower level ensuring the block
of wood is fitted to the front (see image A).
Finally add the 18mm thick shelf to the work top level.
1 2 3 4
5image A
915/1220/1830/2440mm
centre deck support
Undershelf Side View
chipboard
back beam central support
block
RIVET WORKBENCH - HALF UNDERSHELF Assembly Instructions

Rubber Mallet
Tools Required
Two competent people wearing safety gloves,
safety shoes and protective eyeware
are recommended to undertake the assembly.
Safety Precaution
scan for more info
915mm
uprights
915/1220/1830/2440mm
centre deck supports
plastic feet
18mm thick work top
1. Attach plastic feet to all 4 uprights,
the narrow part of each slot pointing downwards.
2. Tap the side beams in at the required positions for the worktop and
lower shelf level. The side beams for the worktop should be positioned
in the top two holes of the 915 uprights. - Repeat to get two matching
end frames.
3. The face beams for the worktop should be positioned in the top two
holes of the 915mm upright, matching the side beam height.
4. Now insert the front to back deck support in the main worktop level
(2440mm wide workbench comes with 2 deck supports per level)
and fit the left to right deck support which forms the T bar.
5. Now you can add the 18mm thick shelf to the worktop level.
38mm
38mm
38mm
1 2 3 4
5
chipboard chipboard
RIVET WORKBENCH - T BAR Assembly Instructions

Rubber Mallet, Phillips Screwdriver
Tools Required
Two competent people wearing safety gloves,
safety shoes and protective eyeware
are recommended to undertake the assembly.
Safety Precaution
scan for more info
1 2 3 4 5
6 7 8
1. Attach plastic feet to all 6 uprights,
the narrow part of each slot pointing downwards.
2. With another person holding the uprights, place the 1830mm upright to the
back and the 915mm to the front. Now tap the side beams in at the required
positions for the worktop (top 2 holes) and lower shelf level.
3. The face beams for the work top should be positioned in the top two holes
of the 915mm upright. Locate the face beams for the undershelf at the same
level as the lower side beams.
4. Now insert the front to back deck support in the main work station level and
the undershelf.
(2440mm wide workstation comes with 2 deck supports per level)
5. Now you can add the 18mm thick shelf to the work top and undershelf level.
6. Now position the 903mm uprights on top of the work top ready to tap in the side
beams, position side beams as necessary.
7. Repeat for the face beams and then add the front to back deck support to both
levels.
(2440mm wide workstation comes with 2 deck supports per level)
8. Add the 18mm thick chipboard panels to each shelf level.
9. Finally screw the plastic feet of the 903mm uprights down to the worktop with the
3.5 x 17mm chrome screws provided.
38mm
38mm
38mm
903mm
upright
915mm
upright
1830mm
upright
9
chipboard chipboard
RIVET WORKSTATION - FULL UNDERSHELF Assembly Instructions

Rubber Mallet, Phillips Screwdriver
Tools Required
Two competent people wearing safety gloves,
safety shoes and protective eyeware
are recommended to undertake the assembly.
Safety Precaution
scan for more info
1 2 3 4 5
6 7 8
1. Attach plastic feet to all 6 uprights,
the narrow part of each slot pointing downwards.
2. With another person holding the uprights, place the 1830mm upright to the
back and the 915mm to the front. Now tap the side beams in at the required
positions for the worktop (top 2 holes) and lower shelf level.
3. The face beams for the work top should be positioned in the top two holes
of the 915mm upright. Locate the back beam for the undershelf at the same
level as the lower side beams.
4. Now insert the front to back deck support in the main work station level
(2440mm wide workstation comes with 2 deck supports per level)and fit the left
to right deck support which forms the T bar (image A)
5. Now add the 18mm undershelf to the lower level ensuring the block of wood is
fitted to the front (see image A).
Finally add the 18mm thick shelf to the work top level.
6. Now position the 903mm uprights on top of the work top ready to tap in the side
beams, position side beams as necessary.
7. Repeat for the face beams and then add the front to back deck support to both
levels.
(2440mm wide workstation comes with 2 deck supports per level)
8. Add the 18mm thick chipboard panels to each shelf level.
9. Finally screw the plastic feet of the 903mm uprights down to the worktop with the
3.5 x 17mm chrome screws provided.
image A
903mm
upright
915mm
upright
915/1220/1830/2440mm
centre deck support
1830mm
upright
Undershelf Side View
chipboard
back beam central support
block
9
RIVET WORKSTATION - HALF UNDERSHELF Assembly Instructions
Rubber Mallet, Phillips Screwdriver
Tools Required
Two competent people wearing safety gloves,
safety shoes and protective eyeware
are recommended to undertake the assembly.
Safety Precaution
scan for more info
1 2 3 4 5
6 7 8
1. Attach plastic feet to all 6 uprights,
the narrow part of each slot pointing downwards.
2. With another person holding the uprights, place the 1830mm upright to the
back and the 915mm to the front. Now tap the side beams in at the required
positions for the worktop (top 2 holes) and lower T bar level.
3. The face beams for the work top should be positioned in the top two holes
of the 915mm upright.
4. Now insert the front to back deck support in the main work station level
(2440mm wide workstation comes with 2 deck supports per level)
and fit the left to right deck support which forms the T bar.
5. Add the 18mm thick shelf to the work top level.
6. Now position the 903mm uprights on top of the work top ready to tap in the side
beams, position side beams as necessary.
7. Repeat for the face beams and then add the front to back deck support to both
levels.
(2440mm wide workstation comes with 2 deck supports per level)
8. Add the 18mm thick chipboard panels to each shelf level.
9. Finally screw the plastic feet of the 903mm uprights down to the worktop with the
3.5 x 17mm chrome screws provided.
903mm
upright
915mm
upright
1830mm
upright
9
38mm
38mm
38mm
chipboard chipboard
RIVET WORKSTATION - T BAR Assembly Instructions
Este manual sirve para los siguientes modelos
2


