Tesla Smart Camera Outdoor Manual de usuario

1
USER MANUAL
TESLA SMART CAMERA
OUTDOOR
EN
CZ
SK
PL
HU
SL
HR
DE

2
WHAT‘S IN THE BOX
Please consult this checklist for all parts.
• Smart Camera Outdoor
• Power adapter
• Screw package
• User manual
• Screwdriver
Power DC12±10%
Status light Red light solids on: the camera or network is abnormal
Blinking red light: awaiting WiFi connection (faster blinking)
Blue light solids on: camera running correctly
Blinking blue light: currently connecting
Microphone Captures sound for your video
SD card slot Supports local SD Card storage (Max.128G)
Reset Press and hold for 5 seconds to reset the camera
(if you have modified settings, they will return to factory defaults)
Reset
Speaker
Microphone
SD card slot
Status light

3
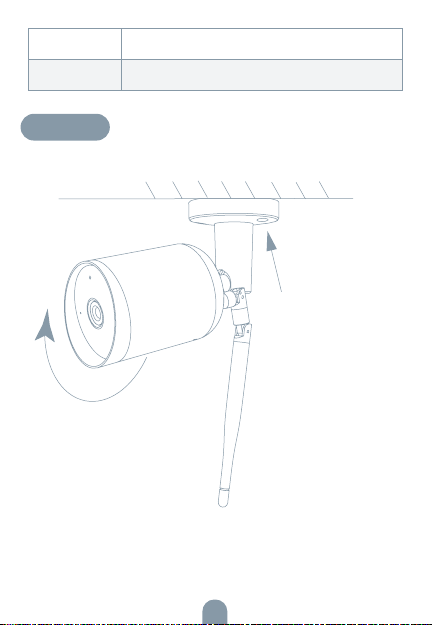
INSTALL
After ajusting your
camera angle, please
lock this screw
1. Fix the Camera to the wall with screws
2. Ajust camera angle to a correct view
(as shown in the picture)

4
CONNECT
Download
Tesla Smart is available for both iOS and
Android OS. Search the name ‚Tesla Smart‘
in App Store or Android Market, or scan the
QR-Code to download the App.
SET UP ROUTER
The router supports the 2.4GHz WiFi (doesn‘t support the 5GHz), and
is connected to the WiFi network.Please set the parameters of the
router before connecting the WiFi network, and record the SSID and
password of your WiFi. Please keep network available
REGISTRATION PROCESS
Step 1 Open the Tesla Smart App, click „Register“, read the „Privacy
Policy“ and click „Agree“ .
Step 2 Input a legal and valid Mobile number or Email address and
click „Continue“. Input Verification Code, then log in the app.
QR CODE CONFIGURATION
1. Open the Tesla Smart App, click „Create family“, and you can custo-
mize the Family name and related settings.
2. Continue to click „Security & Sensor“ >> „Smart Camera“, and then
choose“ Add Device“ or „+“, ready to add camera.
3. In „Add Device“ this interface,continue to click „next step“, and then
you should input your WiFi‘s passwords. Note:
1) Camera only supports 2.4GHz WiFi network. 2) The number of bits
in the ssid and passwords of the router should not exceed 24 digits.
4. In this interface, you should scan the QR code in your phone with
the camera, when the camera comes out „dong dong dong“. And
you can complete the configuration about 30s.
5. When connecting, you should make sure your router, mobile,and

5
camera are as close as possible. When camera added successffully,
click „ „ you could also DIY the camera‘s name.
SETTINGS
In „Smart Camera“ interface,click „ „,you can set the camera
common functions.
FAQ
Q: The device cannot be previewed properly?
A: Check whether the network is normal, you can place the camera
close to the router, and if not, it is recommended to reset the device
and add it again.
Q: Why is it still in the list of devices after reseting?
A: The reset device only resets the network configuration of the
camera, but cannot change the configuration on the App, remove the
camera, and must be deleted by the App.
Q: How to cut the camera network to another router?
A: First remove and reset the device on the App and then configure the
device again by the App.
Q: Why doesn‘t the device identify the SD card?
A: It is recommended to plug in SD card after power cut. Confirm
whether the SD card is normally available and the format is FAT32.
And the TF card can’t be identified when the internet environment is
not good.
Q: Why I can’t get the notifications with my cell phone App?
A: Please confirm that the App has been running on the phone, and the
relevant reminder function has been opened;Message notification and
authority confirmation in the mobile phone system have been opened.

6
Video flip
Flip your video stream up or down for maximum flexibility.
Motion detection
Built-in motion sensors detect movement, and the camera will send you
push notifications and app alerts.
Record
Record every moment using high capacity SD card storage.
Day & Night
Never miss a moment, even in complete darkness, with powerful
night-vision technology.
Product name Tesla Smart Camera Outdoor
Resolution 1920 x 1080
Power supply DC5V, 1A
Sensor 1/2.9‘‘ 2MPx, CMOS
IR Distance Up To 10 m
Lens 3.0mm , F2.0
Dimensions 57 x 62 x 100 mm
Storage MicroSD Card, Cloud
App Tesla Smart for Android and iOS
Connectivity Wi-Fi 2,4 GHz IEEE 802.11b/g/n
Model Bullet 4S
TECHNICAL SPECIFICATION
FUNCTIONS

7
EU DECLARATION OF CONFORMITY
Hereby, Witty Trade s.r.o. declares that the radio equipment type
Bullet 4S is in compliance with EU directives. The full text of the EU
declaration of conformity is available at the following internet address:
teslasmart.com/declaration
Connectivity: Wi-Fi 2,4 GHz IEEE 802.11b/g/n
Frequency band: 2.400 - 2.4835 GHz
Max. radio-frequency power (EIRP): < 20 dBm
Manufacturer
Tesla Global Limited
108 Lok Shan Road, Tokwawan,
Kowloon
Hong Kong, 85200
www.teslasmart.com
INFORMATION ABOUT DISPOSAL
AND RECYCLING
This product is marked with the symbol for separate collection. The
product must be disposed of in accordance with the regulations for
disposal of electrical and electronic equipment (Directive 2012/19/EU
on waste electrical and electronic equipment). Disposal together
with regular municipal waste is prohibited. Dispose of all electrical and
electronic products in accordance with all local and European regu-
lations at the designated collection points which hold the appropriate
authorisation and certification in line with the local and legislative
regulations. Correct disposal and recycling help to minimise impacts
on the environment and human health. Further information regarding
disposal can be obtained from the vendor, authorised service centre or
local authorities.

BENUTZERHANDBUCH
TESLA SMART CAMERA
OUTDOOR
EN
CZ
SK
PL
HU
SL
HR
DE

9
Sehen Sie die folgende Checkliste ein und überprüfen
Sie, ob Sie alle Komponenten erhalten haben.
• Smart Camera Outdoor
• Versorgungsadapter
• Schrauben
• Bedienungsanleitung
• Schraubenzieher
WAS IST IN DER SCHACHTEL ZU FINDEN
Versorgungsport DC 5 V ± 10 %
Zustandskontro-
lllampe
Durch das Drücken der Taste für die Dauer von
3 Sekunden wird die Kamera eingeschaltet/ausgeschaltet
Rotes Licht leuchtet: Kamera wird eingeschaltet oder funktio-
niert nicht richtig
Rotes Licht blinkt: Warten auf den Wi-Fi-Anschluss (langsames
Blinken)
Anschluss ans Wi-Fi-Netz (schnelles Blinken)
Blaues Licht blinkt: Anschließen
Blaues Licht leuchtet: Kamera funktioniert richtig
Mikrophon Erfasst Sounds für Ihr Video
Reset-Taste
Lautsprecher
Mikrofon
Slot für die
SD-Karte
Zustandsdiode
10
INSTALL
Nach Ihrem
Kamerawinkel
einzustellen,
sichern Sie
diese Schraube.
1. efestigen der Kamera an der Wand mit den Schrauben
2. Stellen Sie den Kamerawinkel auf die richtige Ansicht ein
(wie in der Abbildung gezeigt).
Slot für die
SD-Karte
Unterstützung der mikro SD-Speicherkarte (max. 128 G)
Reset-Taste Durch das Drücken und Halten der Taste für die Dauer von
5 Sekunden wird die Kamera zurückgesetzt
Otros manuales para Smart Camera Outdoor
2
Tabla de contenidos
Idiomas:


