Tesla MS100 Manual de usuario

1
USER MANUAL
TESLA MULTI
STERILIZER MS100
EN
CZ
SK
PL
HU
SL
DE
TESLA MULTI

2
DESCRIPTION
CONTROL PANEL
Sterilizer rack
Flip Cover
Sterilizer Cover
Multi Sterilizer
LED Temp/Time Display
Time/Temp decrease
button
LED Temp
Display
Power Button
Time/Temp increase
button
Mode Knob
Control Panel
CONTROL PANEL
LED Temp/Time Display
Time/Temp decrease
button
LED Temp
Display
Power Button
Time/Temp increase
button
Mode Knob

3
WARNING
IMPORTANT SAFEGUARDS
Read the ENTIRE instruction manual to become familiar with the
features of the product before operating. Failure to operate the
product correctly can result in damage to the product, personal
property and cause serious injury. Failure to operate this Product
in a safe and responsible manner could result in injury or damage
to the product or other property. This product is not intended
for use by children. Do not attempt disassembly or use with
incompatible components. This manual contains instruc tions
for safety, operation and maintenance. It is essential to read and
follow all the instructions and warnings in the manual, prior to
setup or use, in order to operate correctly and avoid damage or
serious injury.
This product is for household use only. When using electrical
appliances, basic safety precautions should always be followed,
including the following:
1. Read all instructions.
2. Do not touch hot surfaces. Use handles or knobs.
3. To protect against electrical shock, do not immerse cord or
plugs in water or other liquid.
4. Close supervision is necessary when any appliance is used by
or near children.
5. Unplug from outlet when not in use and before cleaning.
Allow to cool before putting on or taking off parts.
6. Do not operate any appliance with a damaged cord or plug
or after the appliance malfunctions or has been damaged in
any manner. Return appliance to the nearest authorized service
facility for examination, repair; or adjustment
7. Do not use outdoors.
8. Do not let cord hang over the edge of the table or counter;
do not let it touch hot surfaces.
9. Do not place on or near a hot gas or electric burner in a
heated oven.
10. Extreme caution must be used when moving an appliance
containing hot liquids.

4
11. To operate, plug cord into wall outlet To disconnect turn any
control to „off,“ then remove plug from wall outlet.
12. Do not use an appliance for other than intended use.
13. A short power-supply cord is provided to reduce the risk
resulting from becoming entangled in or tripping over a longer
cord.
14. Longer extension cords may be used if care is exercised in
their use.
15. If a longer extension cord is used, the marked electrical
rating of the extension cord should be at least as great as
the electrical rating of the appliance, and the cord should be
arranged so that it will not drape over the countertop or tabletop
where it can be pulled on by children or tripped over unintenti-
onally. The extension cord should be a ground ing-type 3-wire
cord.
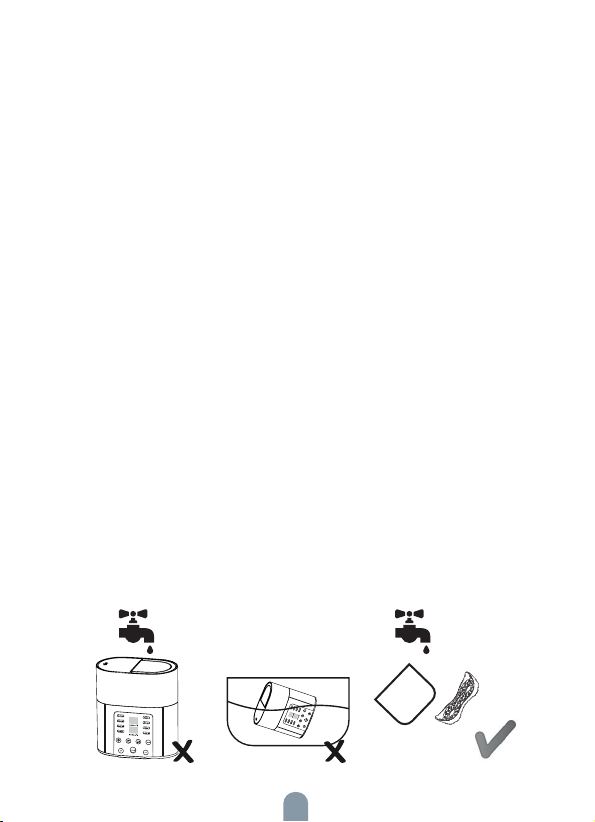
16. Never immerse the warmer or power cord in water.
17. When in use, the warmer contains hot water. Be careful to
avoid spilling or splashing any water on yourself when removing
contents from the warmer.
18. Before serving, be sure food is at a safe temperature.
19. Before serving, unplug cord from wall outlet and dish. Do not
leave the cord within child’s reach.
Thank you for buying our product. It has been designed and
developed to provide moms, dads and other caregivers an
easy, reliable way to warm baby bottles and baby food jars. The
unit accommodates up to two baby bottles of standard size. As
parents, we know that sometimes feeding a young baby can be a
time of increased stress, especially if the baby is upset or fussing.
Preparing a bottle often has to be done while holding and com-
forting the baby.
Please read through the ENTIRE INSTRUCTION BOOK, inclu-
ding the IMPORTANT SAFEGUARDS before using the product.
SAVE THESE INSTRUCTIONS

5
Warm Milk
The function can choose “glass bottle“ plastic bottle“ and “sili-
cone bottle“ according to the material of the bottle. The default
temperature of the three functions is 45°C, and the adjustable
temperature is 37°C to 55°C. Automatically keep warm for 24
hours.
Heat Food Function
The default temperature of this function is 75°C, and the adj-
ustable temperature is 45°C to 90°C. Automatically keep warm
for 24 hours.
Defrost
The default temperature of this function is 55°C and the adj-
ustable temperature is 30°C to 90°C. Automatically keep warm
for 24 hours.
Boil Eggs
This function is to first heat to 100°C, and then shut down after
working according to the pre-set time (1-30 minutes).
Sterilize
This function is to first heat to 100°C, maintain 100° for 5 minutes
and then automatically shut down.
Formula Milk
The default temperature of this function is 45° and the adjustable
temperature is 37°C to 75°C. Automatically keep warm for 24
hours.
Yogurt Function
Yogurt Function:The default temperature of this function is
40°C, and the adjustable temperature is 40°C to 45°C. Automa-
tically keep warm for 8 hours.
FUNCTION INSTRUCTION

6
Adjust Temp Function
When the milk warmer is already working, you can press „Adjust
temp“ and when the screen flashes, you can adjust the preset
temperature again.
Preset Time Function
Press Preset Time, then press the + or - button to set the hour
values. Set time range: within 24 hours.
1. Beep sounds after program is completed.
2. Press „Preset time“ button after selecting program. Press „+“
or „-“ button to set the hour values. The time is set after the value
stops blinking.
3. Please be aware, when the „Sterilize“ or „Boil eggs“ functions
are selected, the „Preset temp °C“ defaults to 100 °C. The
heating duration is displayed in minutes when the temperature
reaches 100 °C
4. When the reservoir water evaporates, the machine automa-
tically shuts off. Please allow it to cool down, fill with water and
switch on again.
5. Cool down for 30 minutes after each use to extend the service
life of the milk warmer.
CAUTION
1. The speed of the warmer in heating milk or baby food will be
affected by many factors, including bottle quality, volume, or
the initial temperature and environmental temperature (room
temperature) of the milk or baby food.
2. Always check the content temperature of the bottle or the
small jar before feeding your baby.
3. We recommend using distilled water to prolong the device
lifecycle. If using tap water, it is recommended to decalcify from
time to time.
TIPS

7
HOW TO USE THE BOTTLE WARMER
1. Place the product on a stable surface. 2. Insert the bottle into the sterilizer.
3. Pour in pure water. Make sure the
bottles are full enough that they do
not float.
4. Cover the device with the lid. Turn
on the power, select a function.
5. Adjust the temperature and time if
needed. After 5s, it will automatically
enter the working state.
6. Please test the temperature before
feeding. You may put a few drops of
milk on the back of your hand to test
the temperature.
HOW TO USE THE BOTTLE WARMER
1. Place the product on a stable surface.
5. Adjust the temperature and time if
needed. After 5s, it will automatically
4. Cover the device with the lid. Turn
on the power, select a function.

8
HOW TO USE THE STEAMING EGG RACK TO
HEAT FOOD
1. Place the product on a stable
surface.
3. Put eggs or food bottle on the
steaming rack.
5. Cover the device with the lid. Turn
on the power, select a function.
2. Put the steaming rack in the body
as the picture show.
4. Pour in pure water. Make sure the
eggs or bottles do not float.
6. Adjust the temperature and time if
needed. After 5s, it will automatically
enter the working state.
1. Place the product on a stable
2. Put the steaming rack in the body
as the picture show.
6. Adjust the temperature and time if
needed. After 5s, it will automatically
5. Cover the device with the lid. Turn
on the power, select a function.

9
HOW TO USE MILK BOTTLE STERILIZE RACK
1. Place the product on a stable
surface.
3. Place the bottles upside down on
the steaming rack
5. Cover the device with the lid. Turn
on the power, select a function.
2. Put the steaming rack in the body
as the picture show.
4. Pour in pure water. Make sure
the water level does not exceed the
bottom of the sterilizing rack.
6. Adjust the temperature and time if
needed. After 5s, it will automatically
enter the working state.
1. Place the product on a stable
surface.
2. Put the steaming rack in the body
as the picture show.
6. Adjust the temperature and time if
5. Cover the device with the lid. Turn
1. Place the product on a stable
2. Put the steaming rack in the body
as the picture show.
1. Place the product on a stable
2. Put the steaming rack in the body
as the picture show.

10
CLEANING AND MAINTENANCE
1. Please make sure to turn off the power before cleaning.
2. Do not wash the product in water to avoid water damage.
3. Transparent cover, bottle sterilize rack and other small parts
can be washed in water with a soft sponge and detergent. Do
not use a wire scrubber to clean in order to avoid damage to the
surface.
4. When the product isn‘t going to be used in a long time, please
clean it and store it in the package box. Put it in a dry and ventila-
ted place to avoid being affected by moisture.
5. After use, let the product cool down before cleaning.
6. Do not use oils, gasoline, detergent, hard brush or steel wire
to clean, so as not to damage the surface of the product
WARNING!
1. Do not clean the sterilizer directly under the tap.
2. Do not immerse the sterilizer in the water.
CLEANING TIPS
Limescale is a natural calcium precipitate formed when heating
water. It will affect the service life of the product and should be
removed in time.
Mix vinegar and water in a ratio of 1:2 into the sterilizer up to the
MAX level marked inside. Select “Boil eggs“ program and let
it run. After that replace the vinegar/water mixture with clean
water and the product is ready to use.
Constant temperature or heating for a long time can cause the
milk to spoil. It is recommended that constant temperature or
heating should not exceed 2 hours.
Tabla de contenidos
Idiomas:
Manuales populares de Equipo de laboratorio de otras marcas

Agilent Technologies
Agilent Technologies 5800 ICP-OES Manual de usuario

Endress+Hauser
Endress+Hauser Cleanfit CPA875 Manual de usuario

NI
NI PXI-5422 Manual

Collomix
Collomix Aqix Manual de usuario

SPEX SamplePrep
SPEX SamplePrep 6875 Freezer/Mill Series Manual de usuario

Ocean Insight
Ocean Insight FLAME-NIR+ Manual de usuario


