TELELYNX QM-960 Manual de usuario

MODEL QM-960

Contents
1SAFETY INSTRUCTION ·································································································1
2Overview ······················································································································ 2
2.1 Function and Application ···································································································································2
2.2 Size (1U Rack)····················································································································································2
3Main Feature ················································································································· 3
4Technical Specification ····································································································· 3
4.1 ASI Interface·······················································································································································4
4.2 RF Port·······························································································································································4
4.2.1 RF Output ············································································································· 4
4.2.2 RF Test Output········································································································ 4
4.3 Signal Encoding··················································································································································4
4.4 Network Interface ···············································································································································4
4.5 Radiation and Safety Requirements····················································································································5
5System Composition and Operating Principle········································································· 6
5.1 System Composition············································································································································6
5.2 Operating Principle············································································································································7
6Installation Guide ··········································································································· 7
6.1 Installation Preparation ·····································································································································7
6.2 Installation Procedure········································································································································7
6.3 Environment Requirement ··································································································································8
6.4 Grounding Requirement······································································································································9
6.4.1 Rack Grounding ······································································································ 9
6.4.2 Equipment Grounding ······························································································· 9
6.5 Cable Connection···············································································································································9
6.5.1 Power Cable Connection ···························································································· 9
6.5.2 Signal Line Connection·····························································································10
7Front Panel Operation Guide ····························································································11

7.1 Keyboard ··························································································································································11
7.2 Menu·································································································································································11
7.2.1 Lock Status Display·································································································11
7.2.2 Press “EXIT” to Enter Menu·······················································································11
7.2.3 Input Info·············································································································12
7.2.4 System Setting ·······································································································12
7.2.5 RF Setting ············································································································14
7.2.6 Network Setting ·····································································································15
7.2.7 Save Config ··········································································································16
7.2.8 Load Config··········································································································16
7.2.9 Version················································································································17
7.2.10 Language ·············································································································17
7.2.11 Error Info·············································································································17
7.3 Error Info and Shooting····································································································································17
7.3.1 Indicator Status ······································································································17
7.3.2 Error Shooting ·······································································································18
8NMS Operation Guide·····································································································18
8.1 NMS Login························································································································································18
8.2 Add Frequency··················································································································································20
8.3 Add Device························································································································································20
8.4 Edit Device ·······················································································································································21
8.5 Check and Set Config ·······································································································································24
8.5.1 Modulator ············································································································24
8.6 Public Function of NMS ···································································································································24

Introduction
Thanks for choosing our products.
This Manual introduces product performance, installation and operation in details.
Please read this manual before starting to use the product no matter it’s the first time for you to
use or you have known similar ones before.
Inspection
Make sure package is in perfect condition and all accessories are there as packing list or below
shows:
DVB-S2 Modulator 1 set
Power line 1 piece
ASI Cable 1 piece
If you find items are not same as above, please kindly inform us immediately.
Read the User Manual
Please read it carefully and do as it asks.

1
1SAFETY INSTRUCTION
•Read manual carefully before use
•Do not open the case and touch internal components for safety and warranty
•Pull out power plug in case of long time standby. Do not use faulty power plug or power
supply to avoid fire or electric shock
•Do not touch power supply with wet hands
•Handle with care when pulling out power plug, no touch with the wire
•No flammable or liquid allowed into device
•Do not install device in hot area or strong sunshine or dusty place
•Shock-proof is a must
•Room with good ventilation is required
•Keep original packing material for future possible transportation
2
2Overview
2.1Function and Application
DVB-S2 modulator supports 2×ASI input and outputs DVB-S2 RF signal by QPSK/8PSK
modulation. It uses advanced frame structure, channel coding modulation technology. Compared
with DVB-S modulator, it increase 50% of the transmission capacity under same condition and it
has stronger reception capacity under same spectral efficiency. This modulator complies with
DVB-S2 EN302 307 and DVB-S (EN300 421) standard. It suits 1U rack and can be configured
by front panel LCD and NMS (network management software). Its high-integrated and
cost-effective design makes it widely used in varieties of digital wireless and satellite
broadcasting distribution systems.
2.2Size (1U Rack)
Length: 482mm
Width: 280mm
Height: 44mm
Net Weight: 4.5 KG

3
3Main Feature
⚫Comply with DVB-S2(EN302 307) and DVB-S (EN300 421) standard
⚫2×ASI input, supports hot backup
⚫Support input and output signal real time monitoring
⚫LCD/Keyboard control by front panel and network management by Ethernet
4Technical Specification
Input
ASI
ASI (DVB standard, BNC interface)
Package Format
188/204bytes
Output
Modulation Mode
QPSK/8PSK
Frequency Range
950-2150MHz
Symbol Rate
17.2-40Mbaud/s
Error-Correcting Codes
FEC: 1/2 3/5 2/3 3/4 4/5 5/6 8/9 9/10
Input Rate
1.0-108Mbps
Channel Data Rate
1-56Mbps
MER
>38dB
BER
0
LevelAttenuation Range
0-20dB(0.5dB step)
Impedance
75Ω
Control
Ethernet Port
10/100M RJ45
General
Features
Size
482mm×280mm×44mm
Temperature Range
0~45°C (Operation); -20~80°C (Storage)
Power
100-240VAC, 50Hz, 25W

4
4.1ASI Interface
Input Interface: 2×ASI, DVB standard
Connector: BNC
Impedance: 75
TS package format: 188/204bytes (automatic identification)
4.2RF Port
4.2.1 RF Output
Connector: F-head (male)
Impedance: 75Ω
Output Frequency: 950MHz~2150MH
Output level: 80dBuV~110dBuV (adjustable)
SNR (Out of Band): ≥50dB
4.2.2 RF Test Output
Connector: BNC
Impedance: 75Ω
Output Level: 60dBuV~90dBuV (adjustable)
4.3Signal Encoding
Modulation Mode: QPSK/8PSK
Channel Coding: DVB Standard, RF Coding
MER: ≥38dB
SNR (Out of Band): ≥50dB
4.4Network Interface
Ethernet Port: IEEE802.3 Ethernet, RJ45

5
Software Protocol: UDP
4.5 Radiation and Safety Requirements
Conforms to GB13837-92 & GB8898-88

6
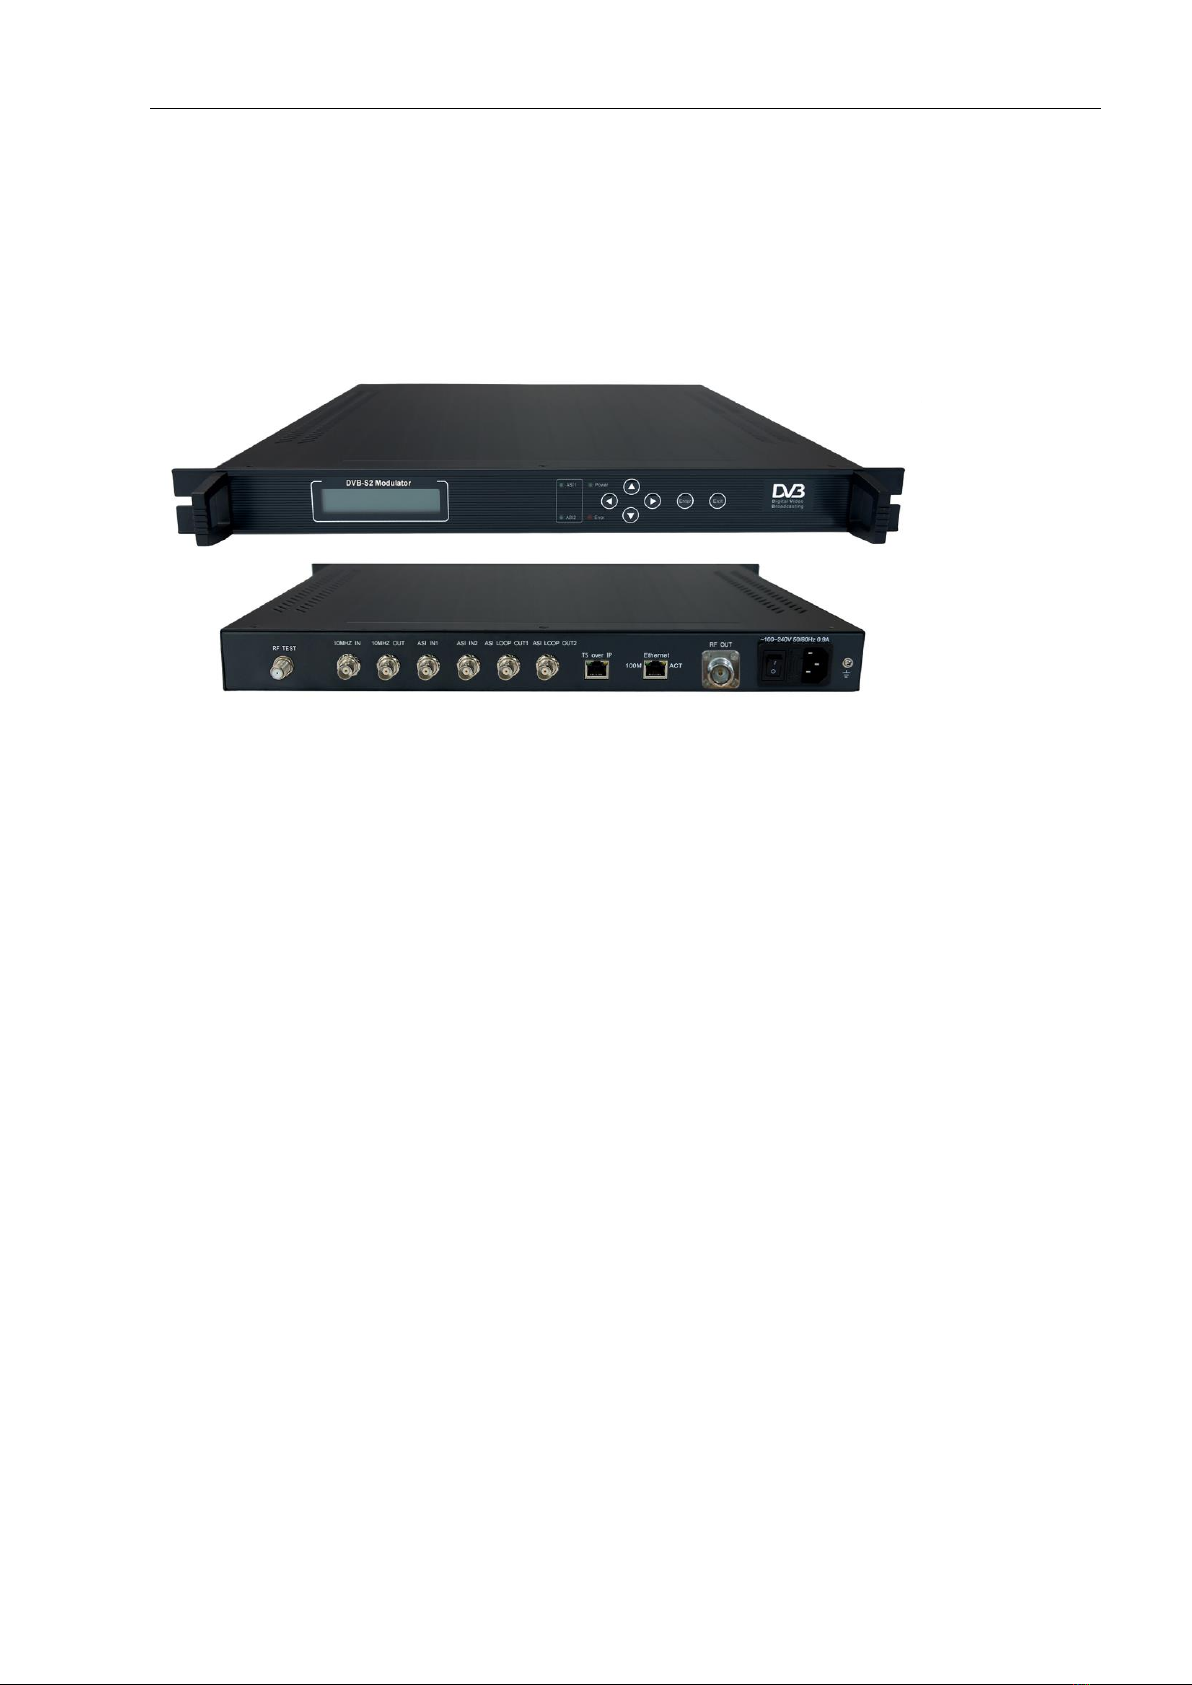
5System Composition and Operating Principle
5.1System Composition
Structure Diagram (1U Rack)
Front Panel
Rear Panel
1
LCD Display
2
ASI Indicator
3
Indicator
4
Keyboard
5
Enter
6
Exit
Tabla de contenidos


