Swann SWWHD-INTSOL Manual de usuario

1
EN
Solar Panel
Placa Solar
Panneau Solaire
Pannello Solare
Solarmodul
EN Instruction Manual ES Manual de instrucciones FR Manuel d’instructions
IT Manuale Operativo DE Benutzerhandbuch
English
2
EN
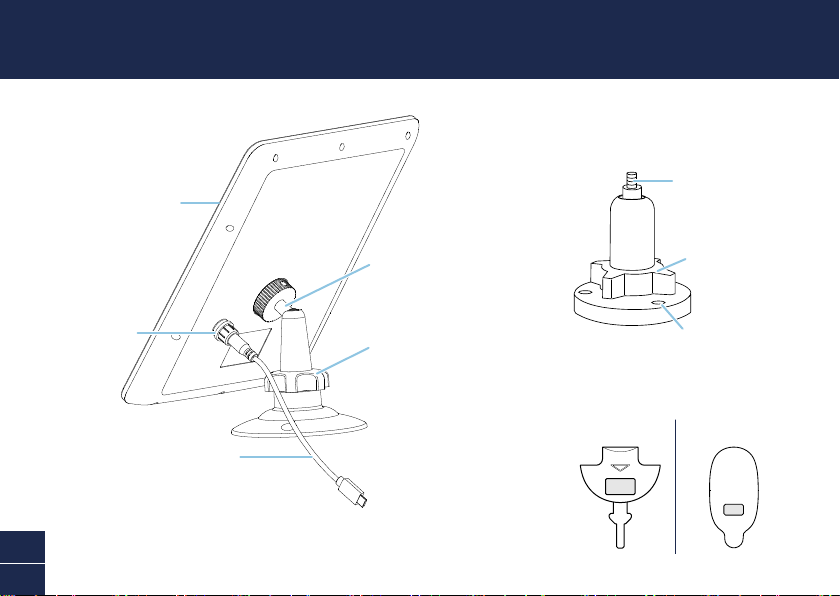
OVERVIEW
Solar panel
Solar port
Swivel head mount with solar
panel screw thread
Fully adjustable solar panel angle
to maximize sunlight exposure
Locking nut
Replacement camera port cover
Outdoor camera stand
USB charging cable
For connecting the solar panel to your
Swann Wire-Free Camera. Compatible
with the following models:
SWIFI-CAM, SWWHD-INTCAM
OPEN
For SWWHD-INTCAMFor SWIFI-CAM
Screws into camera
bottom mounting hole
Loosen to adjust
camera angle
Easily mounted to flat
surface using supplied
screws & plugs
For SWIFI-CAM (recommended) / SWWHD-INTCAM (optional)

3
EN
BEFORE YOU BEGIN
• The solar panel requires full, direct sunlight to charge your camera. Grey skies, rainy days, and
other inclement weather conditions may hinder the ability of the solar panel to generate power.
• For best results, the solar panel should be tilted in the direction that captures the most sunlight
over the course of the day. The optimum angle varies throughout the year, depending on the
season and your geographical location. As a general rule, in the northern hemisphere, the solar
panel should face south; in the southern hemisphere, the solar panel should face north. Not sure
which direction north or south sits? Download a free compass app to your phone.
• Avoid placing in a shady area where objects such as trees and buildings may block the sun. This
will substantially reduce the power output of the solar panel.
• The solar panel is designed to provide a “trickle charge”, topping up and maintaining the camera’s
battery charge level based upon the amount of sunlight received daily. If, during the day, the solar
panel does not receive enough sunlight (e.g., cloudy weather), it may not sufficiently charge your
camera and replenish any usage.
• Periodically clean the solar panel with a soft cloth and warm water. Keep the solar panel surface
clear of leaves and debris for optimum performance.

English
4
EN
INSTALLING THE SOLAR PANEL
1Attach the mounting bracket to a solid surface with the supplied screws. Make sure to allow
enough charging cable to reach your camera from the mounting location of the solar panel.
• If mounting to a wooden surface, screw the mounting bracket directly to the surface.
• If mounting to a masonry surface (bricks, concrete, or stucco), drill three holes and insert the
supplied wall plugs into holes. Then secure the mounting bracket to the surface with supplied
screws.

5
EN
INSTALLING THE SOLAR PANEL
2Attach the solar panel to the mounting bracket by aligning the solar panel with the threaded screw
on the swivel head mount, and then screwing in the solar panel until it is secured tightly.

English
6
EN
INSTALLING THE SOLAR PANEL
3The solar panel produces power only when it is exposed to sunlight. To generate the most power
and achieve best charging performance, tilt the solar panel towards the sun, away from cover and
shade.
PEAK SUNLIGHT HOURS
~10AM-3PM
Solar Panel
GOOD NOT OPTIMAL
Solar Panel
Loosen the locking nut slightly to adjust
solar panel angle. After adjusting its angle,
tighten back the locking nut to hold in place.
Performance is directly related to the amount and strength of
sunlight received. Setting the solar panel’s angle to suit the
location will give maximum charging rate.

7
EN
INSTALLING THE SOLAR PANEL
4Connect the solar panel to your camera, as shown below.
First, pull out the port cover on the back of your camera and replace with the supplied
replacement port cover which has a USB connector cutout. Use a paper clip or sim ejector tool to
insert the tab of the replacement port cover into the slot, if necessary. Make sure the port cover is
sealed properly; it should fit flush without gaps. Then, connect the round end of the USB charging
cable to the solar panel and the micro USB end to the camera.
Tighten screw cap to
secure connector
Replacement
port cover
USB charging cable
Reset
OPEN
SWWHD-INTCAM SWIFI-CAM
All done! The solar panel is now ready to charge your camera when the sun is out! Use the app
to check your camera’s charging status and battery level at any time.

English
8
ES
RESUMEN
Repuesto de la tapa de la toma de la cámara
OPEN
Para SWWHD-INTCAMPara SWIFI-CAM
Placa solar
Toma de placa solar
Soporte de cabezal giratorio con
tornillo roscado para placa solar
Ajuste fácilmente la orientación de
la placa solar para maximizar su
exposición a la luz solar
Tuerca de bloqueo
Soporte de la cámara al aire libre
Cable de carga USB
Para conectar la placa solar a su
cámara de Swann. Compatible con los
siguientes modelos:
SWIFI-CAM, SWWHD-INTCAM
Tornillos en el orificio de
montaje inferior de la cámara
Aflojar para ajustar el
ángulo de la cámara.
Fácil de montar en
superficie plana utilizando
tornillos y tapones
suministrados
Para SWIFI-CAM (recomienda) / SWWHD-INTCAM (opcional)

9
ES
ANTES DE EMPEZAR
• La placa solar necesita recibir luz directa del sol para cargar su cámara. Cuando el cielo está
nublado, llueve o hace mal tiempo la placa solar podría no generar electricidad.
• Para unos mejores resultados, la placa solar debe estar orientada hacia el sol. La orientación
óptima varía a lo largo del año, en función de las estaciones y de su ubicación. Por regla general,
la placa solar debe estar orientada hacia el Ecuador (en el hemisferio norte, la placa solar estaría
orientada hacia el sur; en el hemisferio sur, la placa solar estaría orientada hacia el norte). ¿No
está seguro en qué dirección al norte o al sur se encuentra? Descarga una aplicación de brújula
gratuita para tu teléfono.
• Evite instalarla en una zona sombreada. Las sombras de árboles y edificios reducirán en gran
medida la electricidad generada por la placa solar.
• La placa solar está diseñada para proporcionar una “carga lenta”, cargando y manteniendo el
nivel de batería de la cámara en función de la cantidad de luz solar recibida a diario. Si durante
el día la placa solar no recibe suficiente luz (por ejemplo, cuando está nublado), podría no
suministrar suficiente electricidad a la cámara para recargarla después de su uso.
• Cada cierto tiempo, limpie la placa solar con un trapo suave y agua tibia. Para un funcionamiento
óptimo, mantenga la superficie de la placa solar libre de hojas y residuos.

English
10
ES
INSTALACIÓN DE LA PLACA SOLAR
1Fije el soporte de montaje a una superficie sólida con los tornillos suministrados. Asegúrese de que
exista suficiente cable de carga desde la cámara hasta la ubicación del soporte de la placa solar.
• Si va a instalarlo en una superficie de madera, atornille el soporte de montaje directamente sobre
la superficie.
• Si va a instalarlo en una superficie de mampostería (ladrillos, cemento o estuco), taladre tres
orificios e introduzca los tacos suministrados en los mismos. A continuación, fije el soporte de
montaje a la superficie con los tornillos suministrados.
Otros manuales para SWWHD-INTSOL
2
Tabla de contenidos
Idiomas:
Otros manuales de Panel solar de Swann


