SuperCloset TRINITY Manual de usuario

INSTRUCTION MANUAL
TRINITY
SMART GROW CABINET
LED

INSTRUCTION MANUAL
DELUXE
SMART GROW CABINET
LED

WELCOME TO THE FAMILY
SUPERCLONER
CARBON AIR FILTERS
GROW LIGHT
HYGROMETER
INTERNAL
CIRCULATION
FAN
GROWING
SYSTEM
(HYDROPONIC OR SOIL)
Congratulations, and thank you for choosing SuperCloset.
You now have the world's best grow cabinet.
These instructions will guide you through the process of
setting up your Deluxe. Please read through the entire
instruction manual before you begin, including any and all
instructions that come with the individual components.
Lets take a look at the layout and components of your SuperCloset.

COMPONENTS
CARBON AIR FILTER KIND LED LIGHT POWER STRIP AIR PUMP WATER PUMP
INTERNAL CIRCULATION FAN SUPERPONICS 16 SOIL POTS SOIL POT TRAYS 1/4” AIR TUBE HOSE
AIR STONES 3” & 2” NET CUPS LOTUS NUTRIENTS SAMPLES Ph TESTING KIT
GFCI THERMOMETER/
HYGROMETER TDS METER NET TRELLIS, HOOKS, TIES T5 LIGHT
3” ELBOWS
2” ELBOWS
CLAY ROCKS 1” GROW PLUGS SUPERCLONER 50
SMART PLUG
OR
X2 X2
X4X2 X2
X2
X2
X6X8X6

GETTING READY
1
2
3
Carefully unbox your SuperCloset and remove all
contents from inside the cabinet.
Unpack the contents of the cabinet, as well as any
components packaged inside the cabinet reservoir.
Reference your Quality Assurance Checklist and
verify that you have all of the needed components
for your system.
Let’s start with unpacking the SuperCloset...
Prior to setup, make sure you have all of the necessary components by cross
referencing with the QAC (Quality Assurance Checklist). Take this time to
familiarize yourself with each of the components.

If you have any questions during the setup process, please call a SuperCloset representative at 1.877.476.9787
1. Make sure the cabinet is in its final location, as it will be more difficult to move
when fully assembled. Do not plug in any of the components just yet. Let’s get
everything in place first.
2. The cabinet comes with 4 Black Plastic Elbows (image a). Two 3” Elbows with
foam tape and two 2” Elbows with Foam Tape. One 2” Elbow will have an
extension.
3. The exterior Elbows will allow you to run the cords out of the cabinet with
minimal light leaks and allow for fresh air flow into the cabinet. The interior
Elbow will facilitate airflow between the Cloning Chamber and the
Veggie/Flower Chamber (image b).
4. Locate the Power Strip (image c). Locate the two screws on the center rear of
the cabinet. The power strip has holes on it that fit on these screws for
mounting (image d).
a. Insert the foam side of the two 3” Elbows into large holes
located in rear of the cabinet.
b. Insert the foam side of one 2” Elbow into the hole located
near the top in rear of the cabinet.
c. Detach the Coupling from the remaining 2” Elbow. Insert this
Elbow into the topside of the hole located in the interior shelf
of your cabinet. Reattach the Coupling to the Elbow from the
underside of this shelf (image b).
We are now ready to set up the SuperCloset
Use masking tape and a marker to label each component’s
power cord at the plug to help identify the components later in
the assembly.
SUPER GROW TIP:
a
b
c
d
X2

If you have any questions during the setup process, please call a SuperCloset representative at 1.877.476.9787
1. Locate and unpack the Custom Carbon Filters (image a).
2. Remove the four wing nuts on the back side of the fan (image b), then
remove the fan grill from the fan.
3. Locate the two large openings near the top of the back of the cabinet with the
four small surrounding holes (image C). With the help of a partner hold the
Carbon Filter and fan flush to the INSIDE back of the cabinet. Make sure to
place the four bolts through the four provided holes.
4. Have a partner place the fan grill on the outside of the cabinet on the four
filter fan bolts. Place a washer on each bolt, then secure with wing nuts
(image d). Repeat steps 1-4 for the second Carbon Filter/Fan.
5. Run the power cords for the Carbon Filter Fans through the nearest Elbow to
the back of the cabinet.
Installing your Custom Carbon Filters
NOTE: THE CARBON FILTER POWER CORD REMAINS INSIDE THE
CABINET, NOT THROUGH THE FAN HOLE OPENING.
a
b
c
d

If you have any questions during the setup process, please call a SuperCloset representative at 1.877.476.9787
1. Unpack KIND LED Grow Light (image a).
2. Locate your the Wire Hangers (image b).
3. Connect the wire hangers to each of the metal hangers on the light
(image c).
We have set the light on a convenient Yo-Yo system so the height can
be adjusted as your plants grow. To lower the light, simply press the
button located on the side of the Yo-Yo and adjust to the desired height.
To raise the light pull upward on the end of the Yo-Yo cord.
4. Place the Kind LED Light in the bottom of the cabinet. Lower the Yo-Yo
system until you can connect the Yo-Yo carabiners to the center of the
Wire Hangers (image d). Raise the light to the desired height.
5. Run the power cord from the LED light through the nearest Elbow
opening to the back of the cabinet.
Hanging your LED Light a
b
c
d

If you have any questions during the setup process, please call a SuperCloset representative at 1.877.476.9787
1. Locate the Internal Circulation Fan (image a). Note the “S” hook connected
to the base of the Fan. This hook will fit into the notches located on the
backside of the inner door frame (image b). Mount the Fan on one of the
lower notches. As your plants grow taller, move the Fan to the upper
notches. Ideally the Fan will blow air across the top of the plants. Thread
cord through the nearest Elbow opening.
2. Locate the Thermometer/Hygrometer (image f). Remove the battery cover
and remove the plastic safety blocker from the battery terminal. Use the
included Velcro Strips to affix your Thermometer/Hygrometer to the inside of
your cabinet. The best placement for this is towards the top of the cabinet,
either on the side or back wall.
2. Run the external probe to the outside of the cabinet, through the nearest
Elbow. Make sure the probe is not touching any surface on the out side of
the cabinet as this will provide false readings.
Setting up the SuperCloset a
b
c
If you have any questions during the setup process, please call a SuperCloset representative at 1.877.476.9787
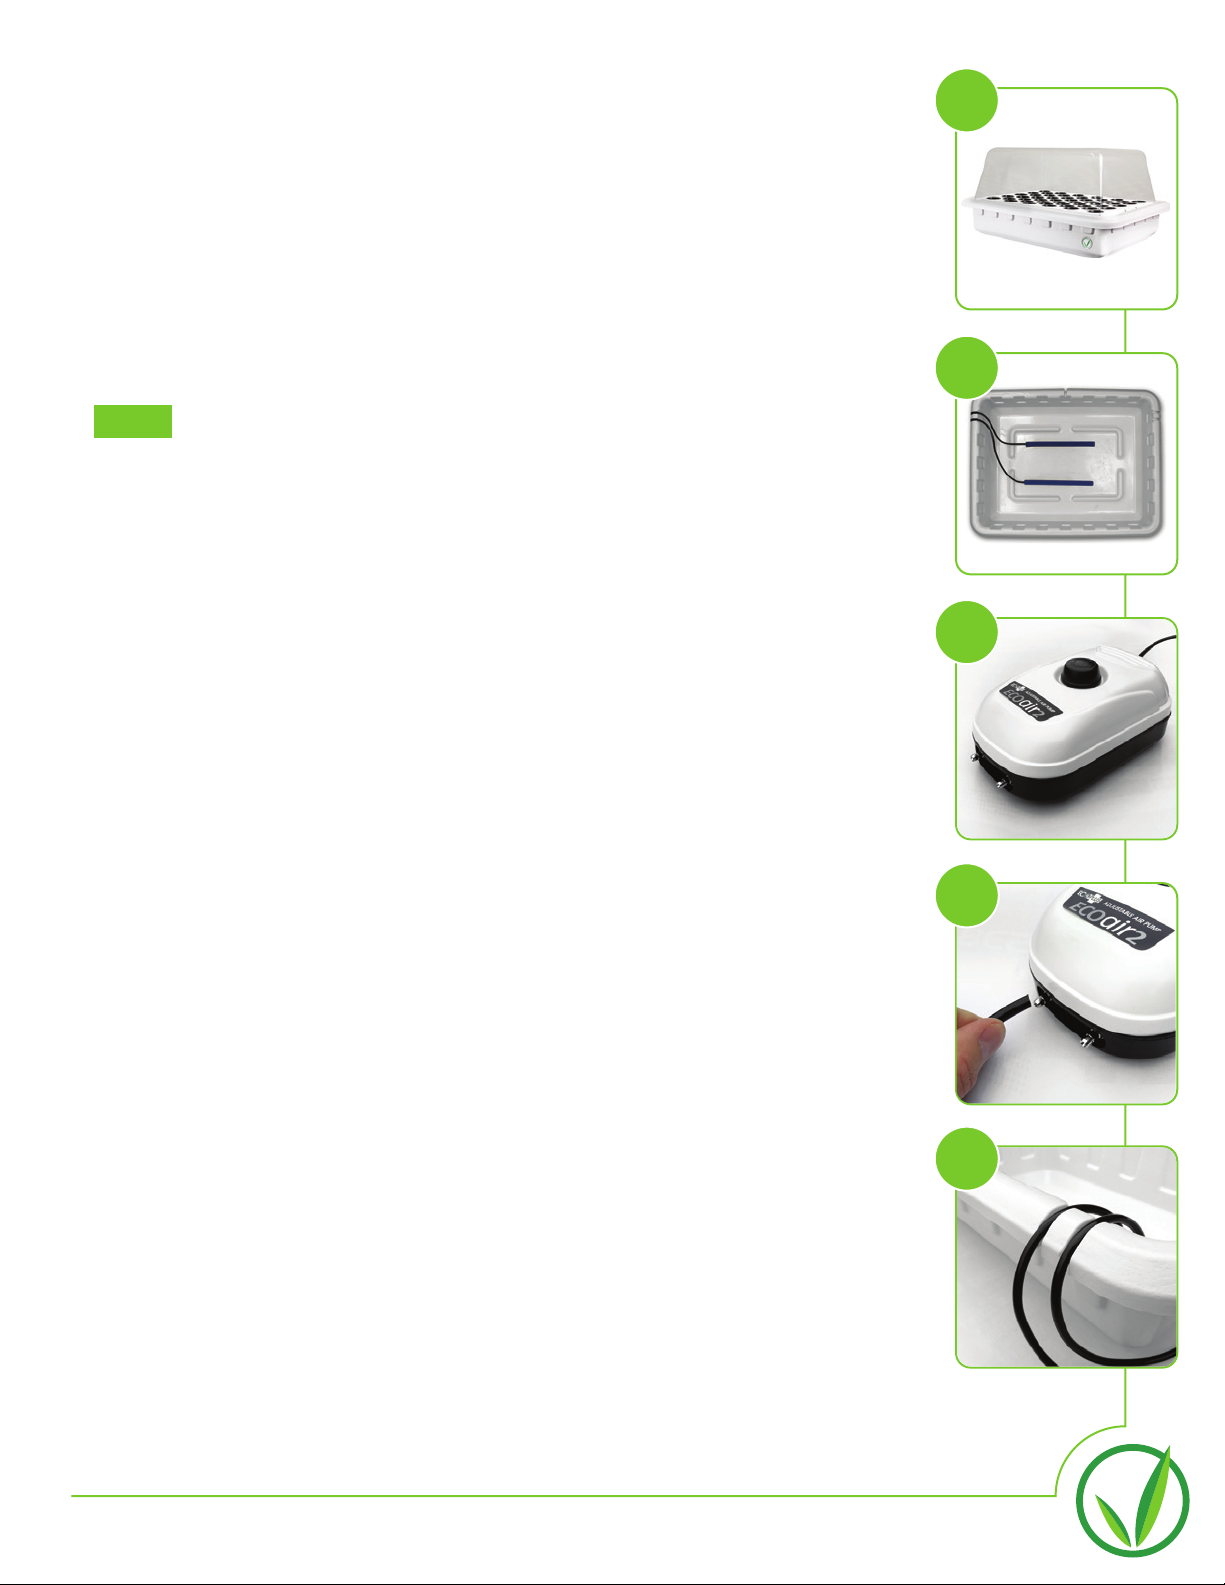
1. Locate the SuperCloner 50 (image a). Remove lid, and set aside. Remove
all contents, including the Air Pump, blue 12” Air Stones, and fifty Net
Cups.
2. Unwrap the Air Stones and lay them down inside of the SuperCloner
(image b).
3. Locate the Air Pump (image c) and place it next to the SuperCloner.
THIS PUMP SHOULD NEVER BE PLACED IN WATER!
4. Locate and attach the two black tubes (image d) to the metal nodes on the
front of the Air Pump. Run the other end of the black tubing through the
channels located on the rim of the reservoir (image e).
5. Connect the other end of the black tubing to the Air Stones. Once these
are connected, ensure the Air Stones remain flat on the floor of the
reservoir.
6. Turn the black dial on top of your Air Pump clockwise until it stops.
Replace the lid of the SuperCloner and insert the 2” net cups.
7. Position the SuperCloner 50 in the Cloning Chamber along with the Air
Pump. Run the Air Pump Power Cord out of the cabinet through the same
Elbow as the T5 Light Strip Power Cord. Do not plug in the Air Pump yet.
SuperCloner 50 Assembly
NOTE:
a
b
c
d
e
Este manual sirve para los siguientes modelos
1
Tabla de contenidos
Otros manuales de Kit de invernadero de SuperCloset


Manuales populares de Kit de invernadero de otras marcas

ACD PRESTIGE
ACD PRESTIGE MR3 H Manual de usuario

Vitavia
Vitavia VA0040-TRP Manual de usuario

VegTrug
VegTrug Nursery Manual de usuario

Riverstone Networks
Riverstone Networks Monticello 041315V Manual de usuario

STC
STC Easy Grow 6x12 Greenhouse Manual de usuario

CLIMA POD
CLIMA POD Spirit V7 Series Manual de usuario


