Stivr Pico G2 Manual de usuario

User
Manual
v1.0 11/06/2019
Strivr Training System
for use with Pico G2

Strivr is a registered trademark of Strivr Labs, Inc. Copyright ©2019 Strivr Labs, Inc.
All rights reserved.

Contents
System Setup..........................................................................................................................................................................................................1
Product Care & Maintenance........................................................................................................................................................................6
Facilitating Training ............................................................................................................................................................................................9
FAQ & Troubleshooting..................................................................................................................................................................................12
Contact Us ............................................................................................................................................................................................................14
Health & Safety Warnings.............................................................................................................................................................................15

User Manual
support.strivr.com 1
System Setup
System Setup
1. Designate a table or shelf near a power outlet to set up the VR training system on. You will need about a
32”x24” surface for five headsets.
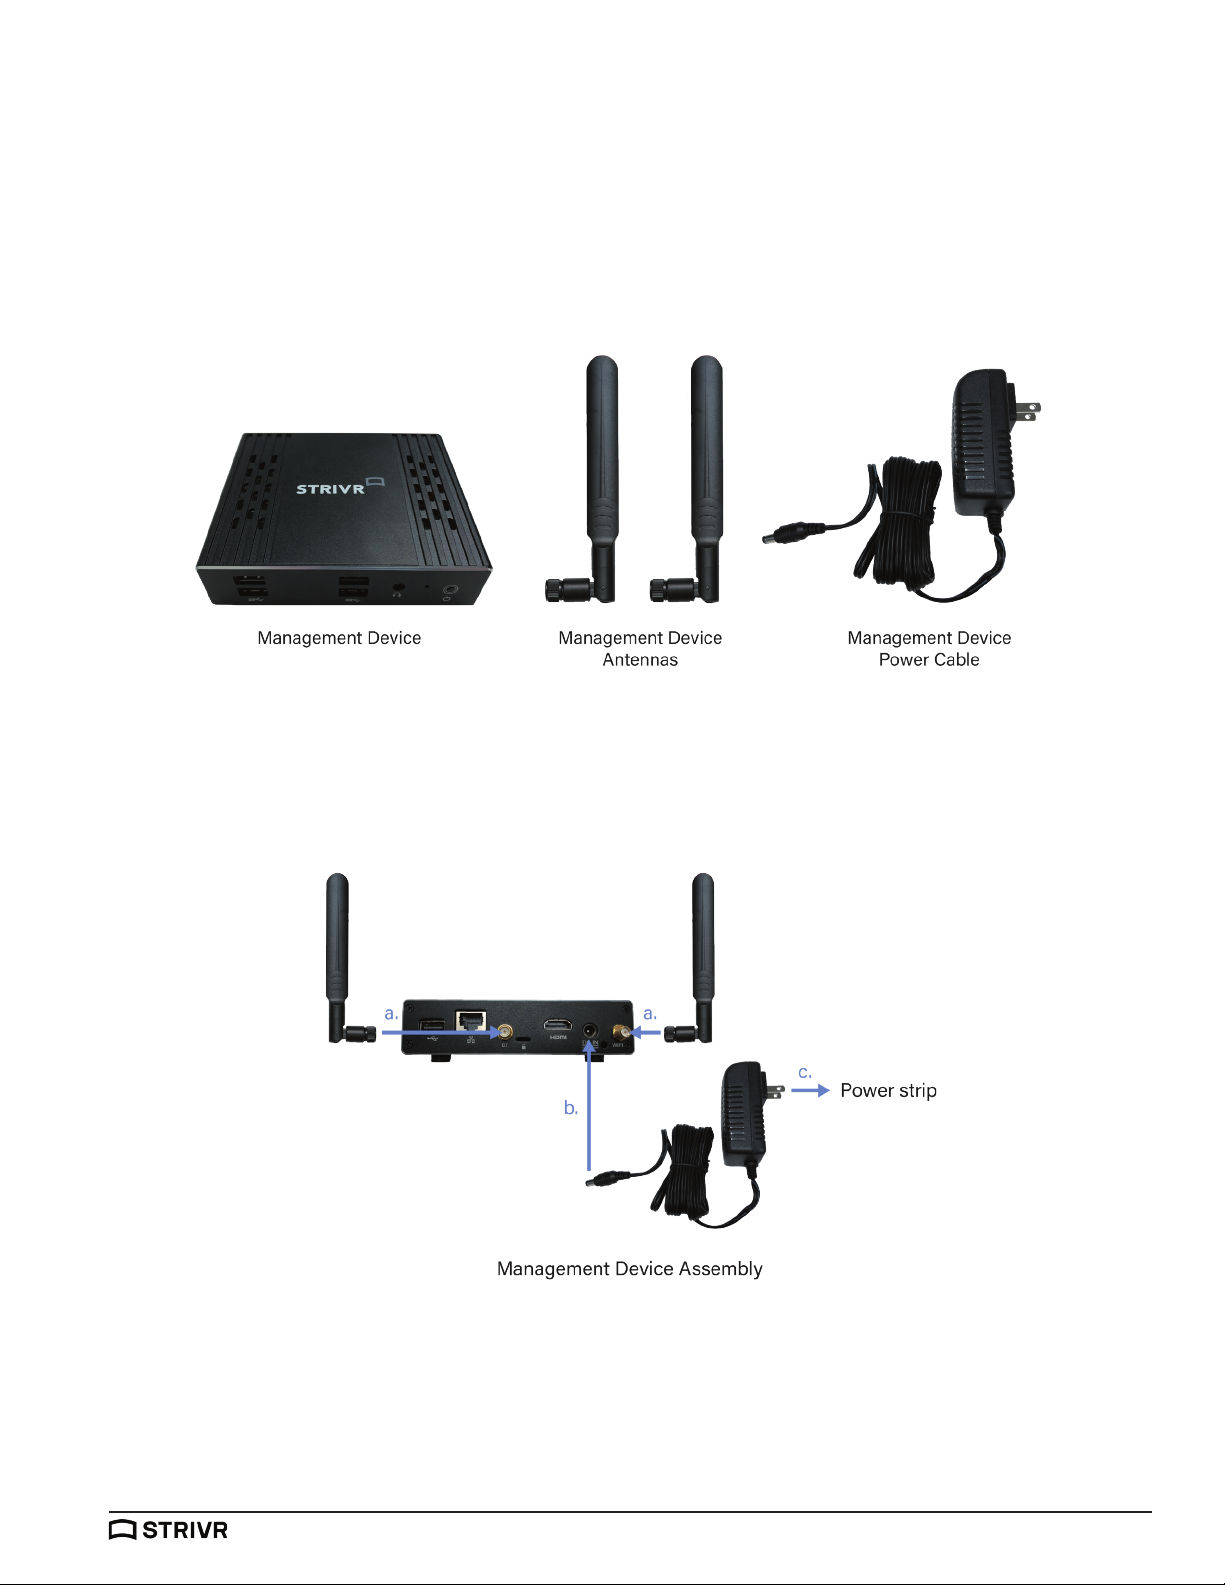
2. Locate the box containing the Management Device. Unbox the Management Device and the accessories
with it:
3. Assemble the Management Device using the diagram below:
a. Screw the Management Device Antennas onto the Management Device.
b. Plug the Power cable into the Management Device.
c. Plug the other end of the Power cable into a power strip.

User Manual System Setup
support.strivr.com 2
4. Check that a green light is illuminated on the front of the Management Device indicating it is powered
on.
5. Locate the box containing the USB hub. Unbox the USB hub and the accessories with it:
6. Assemble the USB hub using the diagram below:
a. Plug the IEC cable into the Transformer.
b. Plug the Transformer into the USB hub.
c. Plug the other end of the IEC cable into a power strip.
d. Plug the USB cable into the USB hub.

User Manual
support.strivr.com 3
System Setup
7. Plug the other end of the USB cable into the back of the Management Device (the side with the
antennas):
8. Locate the white USB-C cable(s). There will be one per headset. Plug each USB-C cable into the USB
hub (up to 5 per USB hub):
9. Locate the Pico G2 boxes. Inside each is a headset tethered to a controller.
10. Peel the protective plastic film o the lenses of each headset.

User Manual System Setup
support.strivr.com 4
11. For each controller, pull down on the lower half of it to reveal the battery compartment. If batteries are
not already inserted, insert two AAA batteries.
12. Plug a USB-C cable into each headset to charge:
13. Turn each headset on: press and hold the power button on the top of each headset for about 5 seconds,
or until the blue indicator light next to the Power button illuminates. Check to see that it is powered on
by holding the headset up to your eyes and the screen inside will illuminate.
Battery
compartment
USB-C cable
Tether
peg
NOTE: Be careful not to detach the tether. If you do, open the battery compartment cover and
loop it back around the small plastic peg. When you close the battery compartment cover, be
sure the tether cord is lined up with the hole at the bottom of the cover, allowing the cover to
close properly. See image below.

User Manual
support.strivr.com 5
System Setup
14. Connect the Management Device to Internet via one of the following methods:
a. Hard-wired via ethernet cable (instruction provided by your company if applicable)
Ethernet cable Management Device
NOTE: You may have an AT&T or Verizon LTE modem.
AT&T LTE
modem
Verizon LTE
modem
b. LTE Modem plugged into USB port on the front of the Management Device (will be included in box if
applicable to you)
c. If neither of the above apply you may have received separate instructions from your company.

User Manual System Setup
support.strivr.com 6
Storage Space
To ensure proper cooling:
• Never stack any of the electronic components on top of each other.
• Do not store in or on insulated/fabric areas.
• Do not store in direct sunlight.
If your system came with plastic bins for storage and transportation of the headsets, place each headset-
controller pair inside a section of the bin. Leave the Management Device and USB hub outside of the bins in
a permanent location.
Product Care & Maintenance
Powering on the Headset
To turn the headset on, press and hold down
the power button located on the top of the
headset for about 5 seconds or until the
indicator light next to the power button turns
blue. To check to see that it is powered on,
hold the headset up to your eyes and the
screen inside will illuminate. If the power
button is accidentally pressed during training,
the display will go to sleep. Short press it
again to turn the display back on and resume
training.
Volume
control
Power
Pico G2 Headset - Underside
Indicator
light Side strap
Charging port
Headphone
jack
15. If needed, check your final setup against the full schematic below:
Tabla de contenidos


