Sprint sp9127 Manual de usuario

1
Table of Contents
Important Safety Instructions...........................................................................................2
Parts Check List...................................................................................................................3
Handset Layout....................................................................................................................4
Base Unit................................................................................................................................5
GETTING STARTED.....................................................................................................................6
Installation of Battery Pack in Handset...............................................................................6
Setup.................................................................................................................................7
Ringer Selection..........................................................................................................8
Tone/PulseSelection....................................................................................................8
The Handset Display.........................................................................................................9
BASIC OPERATION................................................................................................................10
Making Calls.....................................................................................................................10
Volume Control................................................................................................................10
ChannelChanging..............................................................................................................10
UsingRedial........................................................................................................................11
Answering Calls................................................................................................................11
Flash.................................................................................................................................11
Hold......................................................................................................................................12
Page...................................................................................................................................12
ADVANCED OPERATION......................................................................................................13
Caller ID/Call Waiting ID...............................................................................................13
Receiving and Storing Calls.......................................................................................13
About Caller ID ....................................................................................................... 13
Review Caller ID .......................................................................................................13
Deleting Records From Call History.........................................................................14
Delete A Specific Call............................................................................................14
Delete All Calls........................................................................................................14
DialADisplayedNumber................................................................................................14
Store A Caller ID Record In Phone Book Memory.....................................................14
Display Screen Messages........................................................................................15
Phone Book..................................................................................................................16
Store Memory Numbers............................................................................................16
EditNumbersStoredInMemory..................................................................................17
Delete Numbers Stored in Memory...........................................................................17
Dial Memory Numbers..............................................................................................17
Message Waiting.......................................................................................................18
Headset Operation ....................................................................................................19
ADDITIONAL INFORMATION...............................................................................................20
Maintenance....................................................................................................................20
In Case of Difficulty..........................................................................................................21
WarrantyStatement.............................................................................................................23
FCC, ACTA and IC Regulations.....................................................................................25
RBRCTM Seal..................................................................................................................28
Technical Specifications..................................................................................................29

2
When using your telephone equipment, basic safety precautions should always be followed
to reduce the risk of fire, electric shock and injury, including the following:
1. Read and understand all instructions.
2. Follow all warnings and instructions marked on the product.
3. Unplug this product from the wall outlet before cleaning. Do not use liquid or aerosol
cleaners. Use a damp cloth for cleaning.
4. Do not use this product near water (for example, near a bath tub, kitchen sink or
swimming pool).
5. Do not place this product on an unstable surface, such as a table, shelf, or stand. The
product may fall, causing serious damage.
6. Slots and openings in the back or bottom of the Base Unit and Handset are provided
for ventilation. To protect them from overheating, these openings must not be blocked
by placing the product on a soft surface such as a bed, sofa or rug. This product should
never be placed near or over a radiator or heat register. This product should not be
placed in any area where proper ventilation is not provided.
7. This product should be operated only from the type of power source indicated on the
marking label. If you are not sure of the type of power supply in your home, consult
your dealer or local power company.
8. Do not allow anything to rest on the power cord. Do not install this product where the
cord may have anyone walking on it.
9. Never push objects of any kind into this product through slots in the Base or Handset
as they may touch dangerous voltage points or short out parts that could result in a risk
of fire or electric shock. Never spill liquid of any kind on the product.
10. To reduce the risk of electric shock, do not disassemble this product, but take it to an
authorized service facility. Opening or removing parts of the Base or Handset other
than specified access doors may expose you to dangerous voltages or other risks.
Incorrect reassembling can cause electric shock when the product is subsequently
used.
11. Do not overload wall outlets and extension cords as this can result in the risk of fire
or electric shock.
12. Unplug this product from the wall outlet and refer servicing to an authorized service
facility under the following conditions:
A. When the power supply cord or plug is damaged or frayed.
B. If liquid has been spilled onto the product.
C. If the product has been exposed to rain or water.
D. If the product does not operate normally by following the operating instructions.
Adjust only those controls that are covered by the operating instructions, as
improper adjustment of other controls may result in damage and often requires
extensive work by an authorized technician to restore the product to normal
operation.
E. If the product has been dropped and the Base and/or Handset has been damaged.
F. If the product exhibits a distinct change in performance.
13. Avoid using a telephone (other than cordless) during an electrical storm. There is a
remote risk of electric shock from lighting.
14. Do not use the telephone to report a gas leak in the vicinity of the leak.
15. Only put the Handset of your telephone next to your ear when it is in normal talk mode.
Important Safety Instructions
3
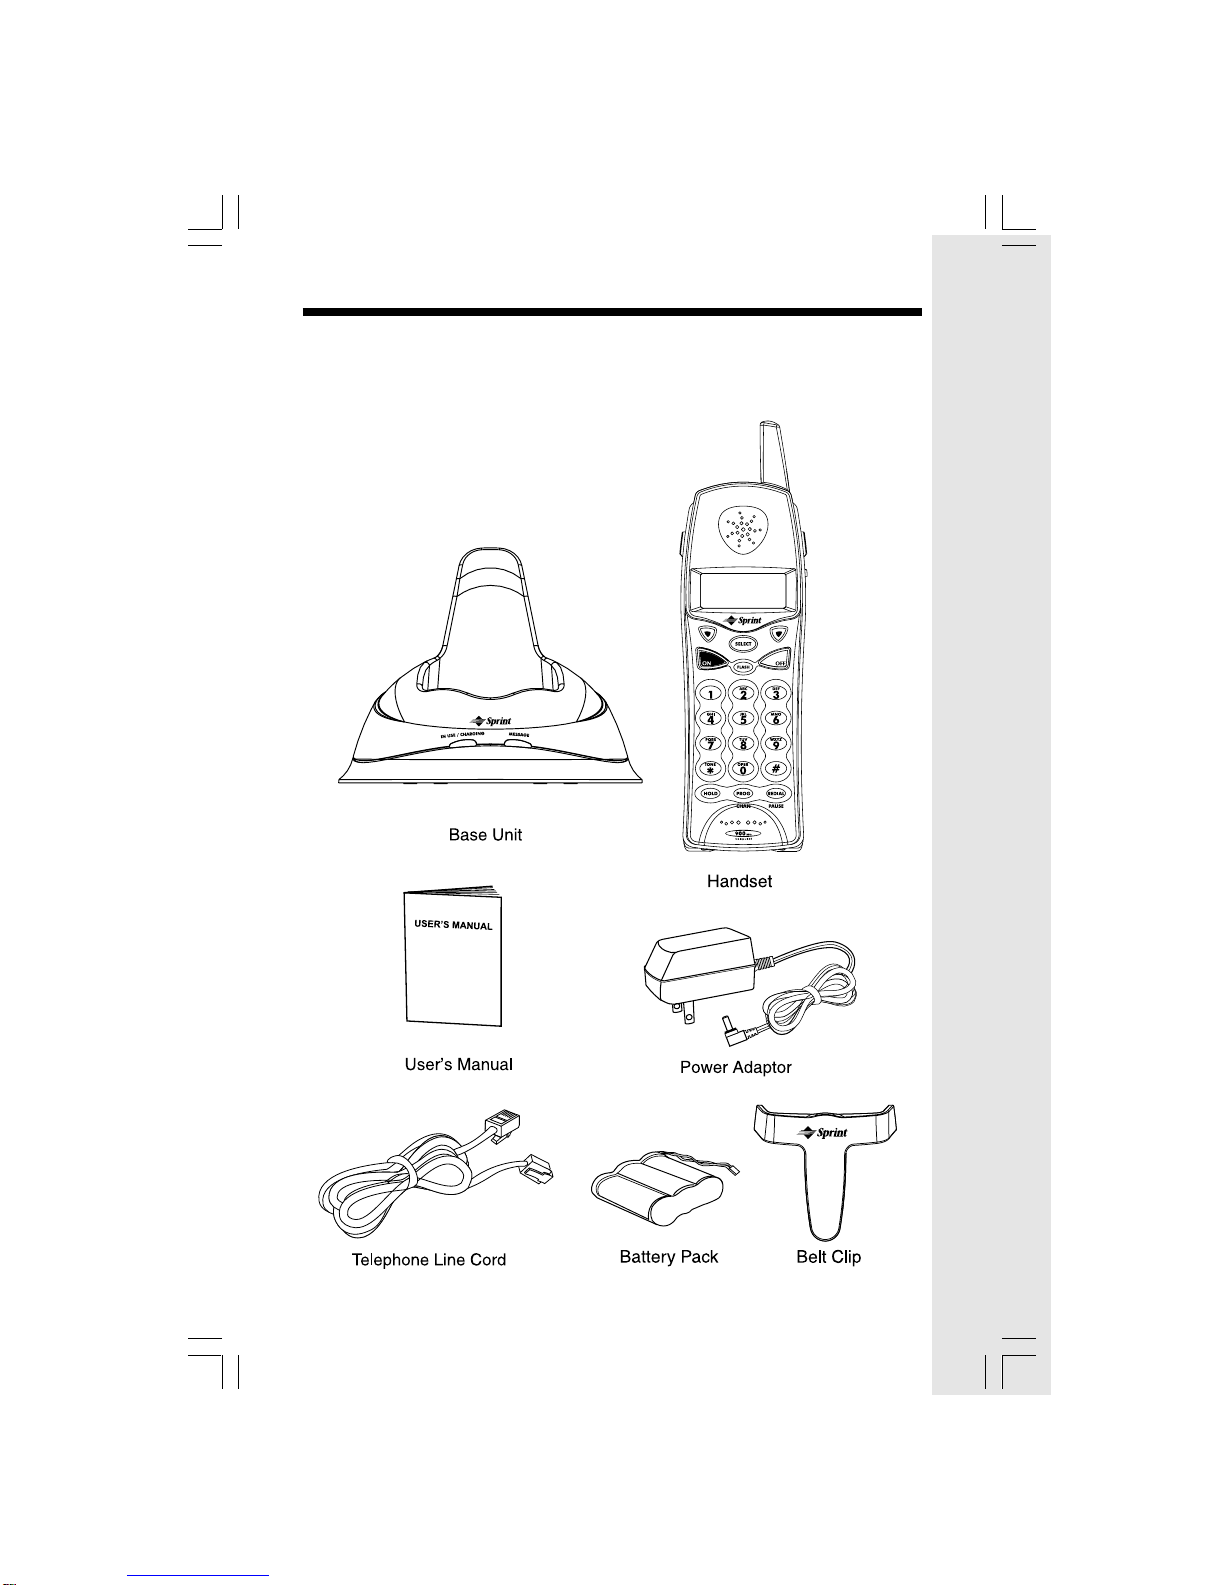
Parts Check List
1. Base Unit
2. Handset
3. User’s Manual
4. Power Adaptor
5. Telephone Line Cord
6. Battery Pack
7. Belt Clip
4
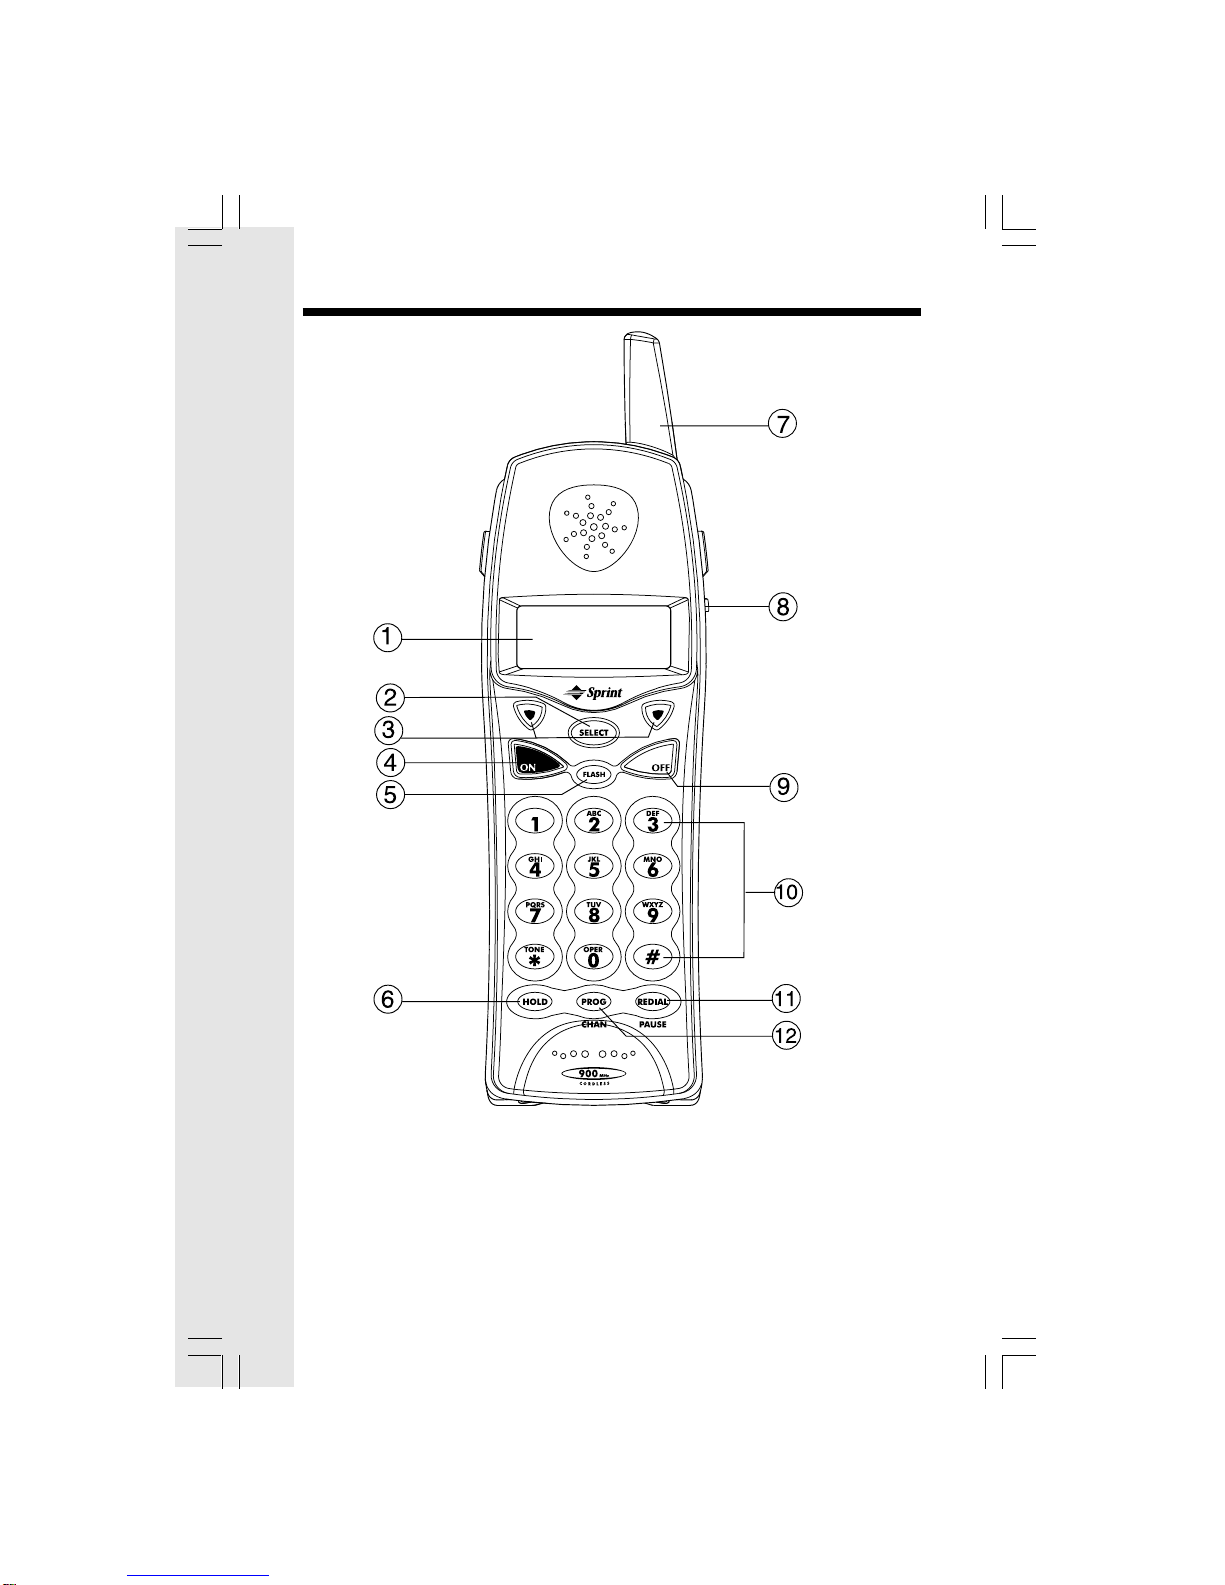
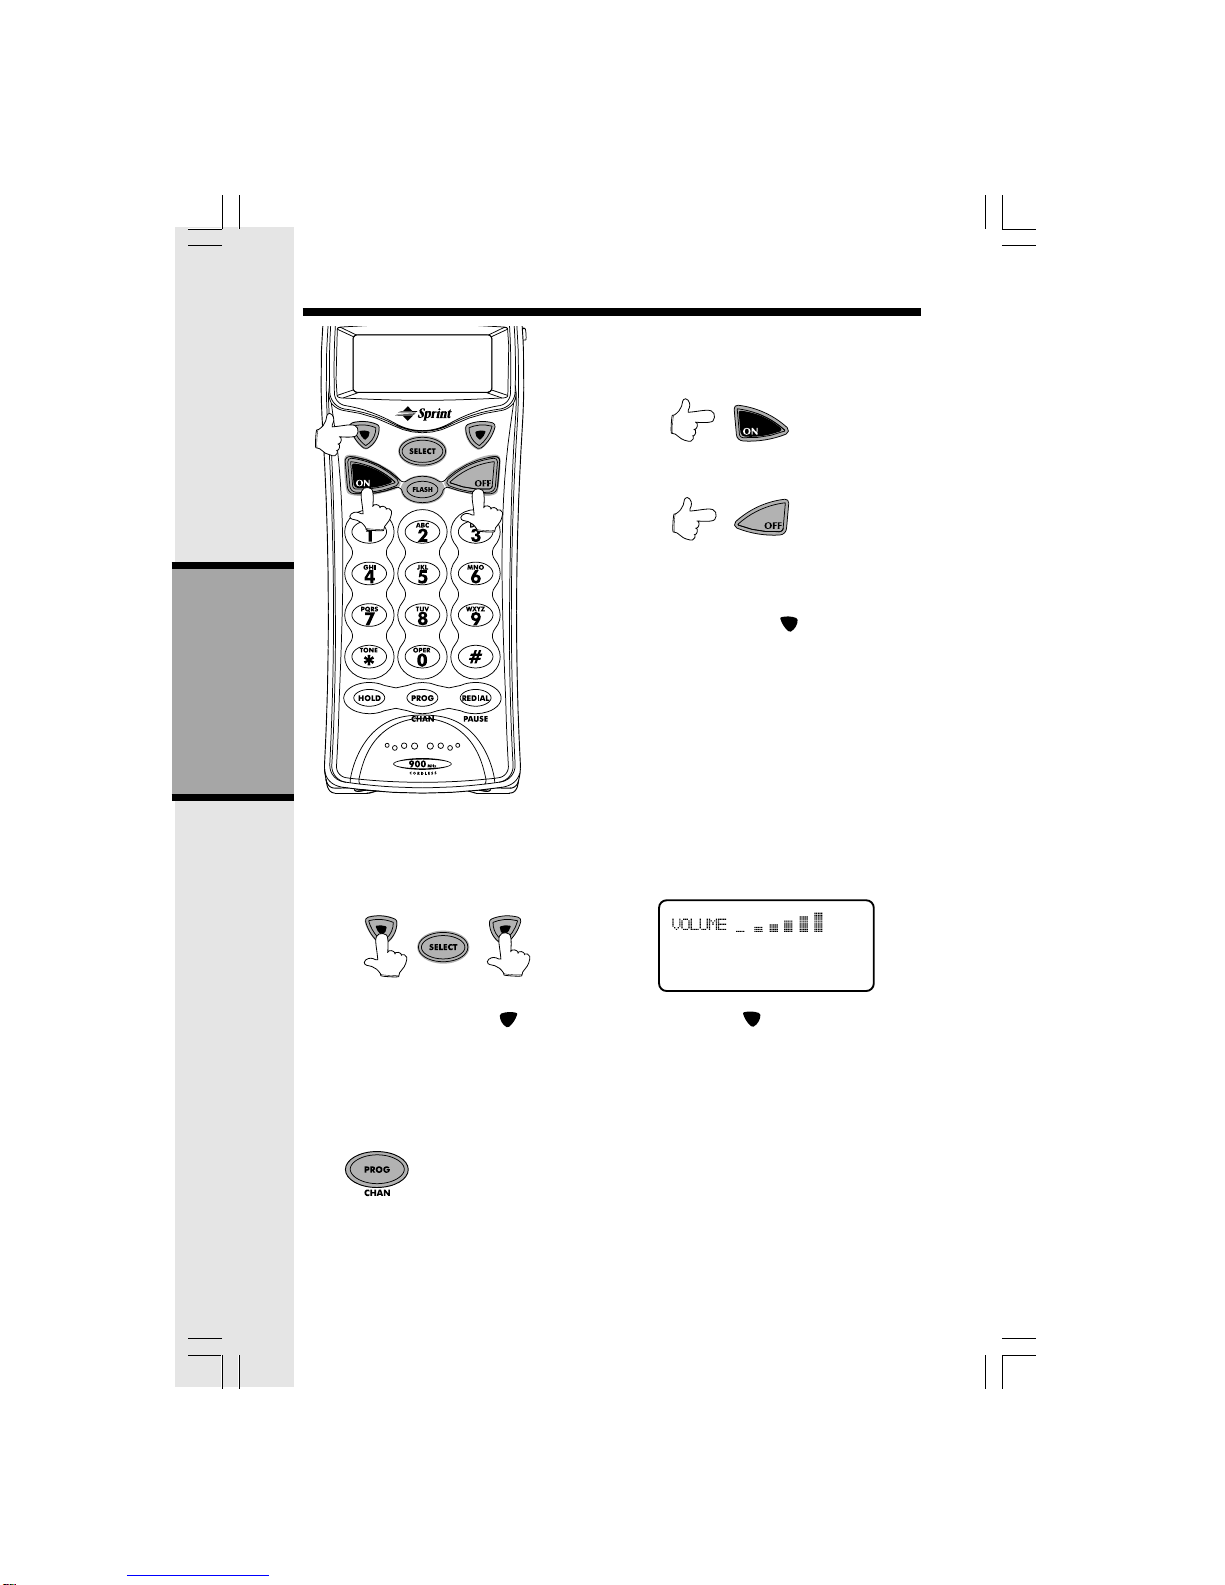
Handset Layout
1. LCD Display
2. SELECT
3. Navigation/Volume Keys
4. ON
5. FLASH
6. HOLD
7. Antenna
8. Headset Jack
9. OFF
10. Dialing Keys
11. REDIAL/PAUSE
12. PROGRAM/CHANNEL

5
Base Unit
1. Power Jack
2. Telephone Line Jack
3. IN USE/CHARGING LED
4. MESSAGE Indicator
5. PAGE
5
3
4
TEL. LINE
9V AC
1
2
6
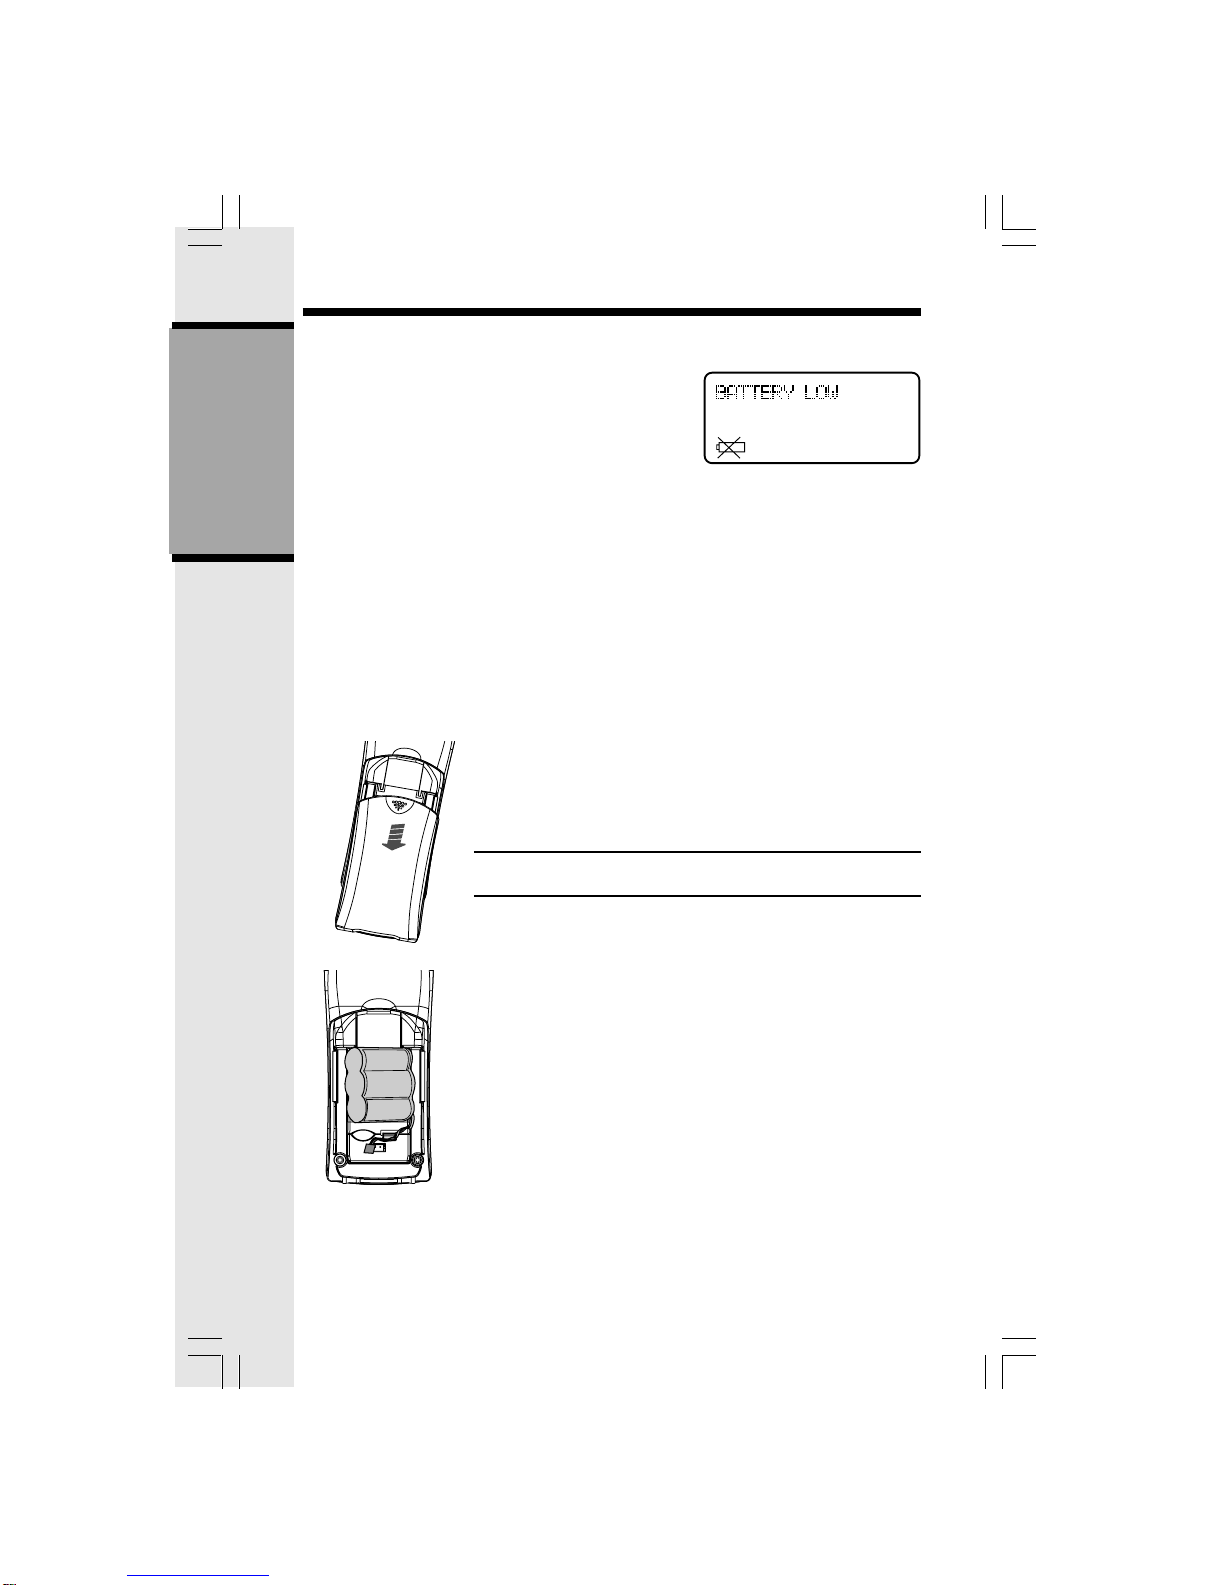
The Handset of your 9127 is powered by a rechargeable battery pack. It charges
automatically whenever the Handset is in the Base Unit. The battery pack needs charging
when:
• The low battery icon and message are displayed:
• A double beep sounds.
To charge the battery pack, place the Handset in the Base Unit. The IN USE/CHARGING
indicator will light to show the Handset is seated properly and the battery pack is charging. It
is recommended that the battery pack should be charged for at least 16 hours initially.
Afterwards, 8 hours of maintenance charging should be sufficient.
To install (or replace) the battery pack:
1. Remove the battery case cover by pressing on the ridged lines and sliding downward.
2. Discard the old battery pack by pulling firmly on the battery cords. Don’t put the old
battery pack in the trash or a fire - it could explode. Please recycle.
3. Snap in the new battery pack, with the wires in one of the lower corners. Insert the
battery plug into the socket, aligning the two holes in the plug with the socket pins.
4. Replace the battery case cover by sliding the cover
upwards.
5. Place the Handset in the cradle of the Base Unit to allow
it to charge for 16 hours.
CAUTION: To Reduce the Risk of Fire or Injury, Read and
Follow these Instructions:
IMPORTANT:
Do not dispose of this battery pack into household garbage. For
information on recycling or proper disposal, consult your local
solid waste collection or disposal organization.
1. Use only VTech rechargeable battery pack, or equivalent.
2. Do not dispose of the battery pack in a fire. The cell may
explode.
3. Do not open or mutilate the battery pack. Released electrolyte
is corrosive and may cause damage to the eyes or skin.
It may be toxic if swallowed.
4. Exercise care in handling batteries in order not to short the
battery with conducting materials such as rings, bracelets,
and keys. The battery pack or conductor may overheat and
cause burns.
To purchase replacement battery packs, call the Supplier at (800) 949-4357
Installation of Battery Pack in Handset
GETTING STARTED
7
GETTING STARTED
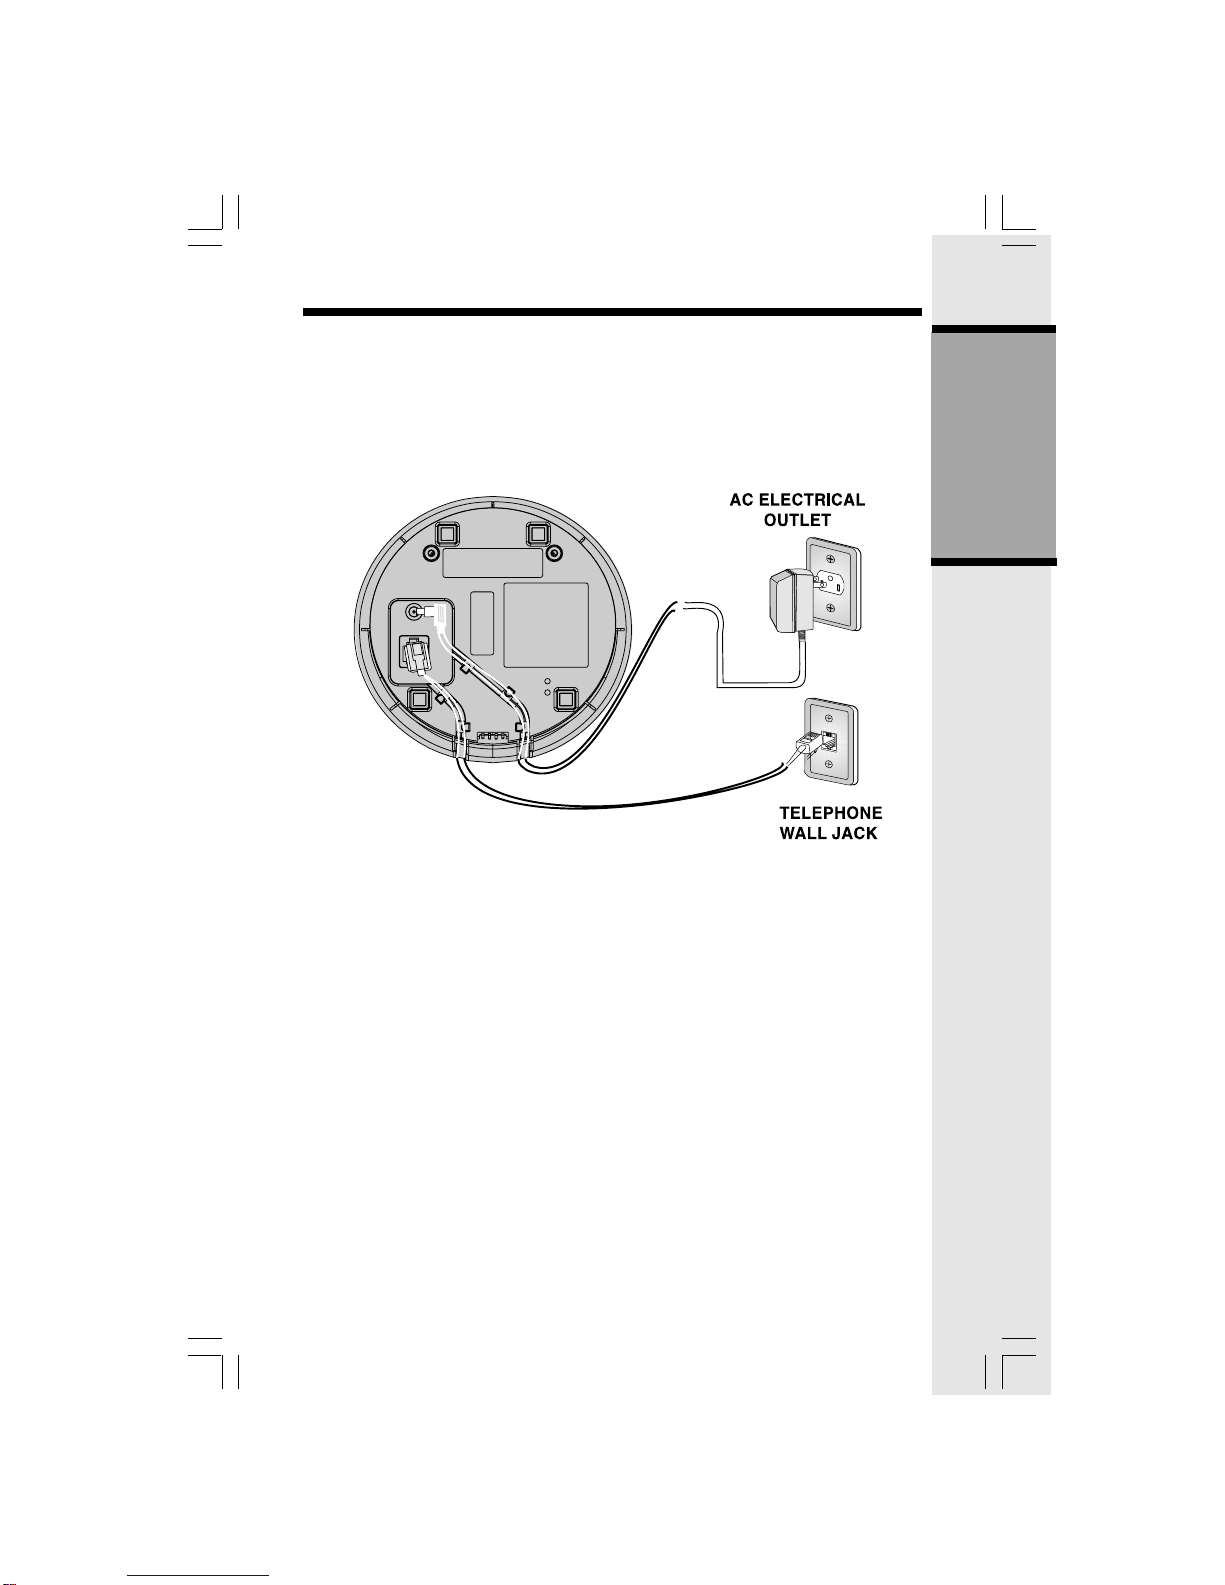
Setup
1. Plug the AC adaptor into an electrical outlet, and the AC connector to the bottom of the
Base Unit. If the Handset battery pack has not been charged previously, place the Handset
in the Base Unit cradle, and allow it to charge for 16 hours.
2. Connect the telephone line cord to the jack on the bottom of the Base Unit, and the other
end to the wall jack.
TEL. LINE
A fully charged battery pack will provide a maximum talk time
of 3.75 hours, with a maximum standby time of 3.75 days.
8
GETTING STARTED
Setup
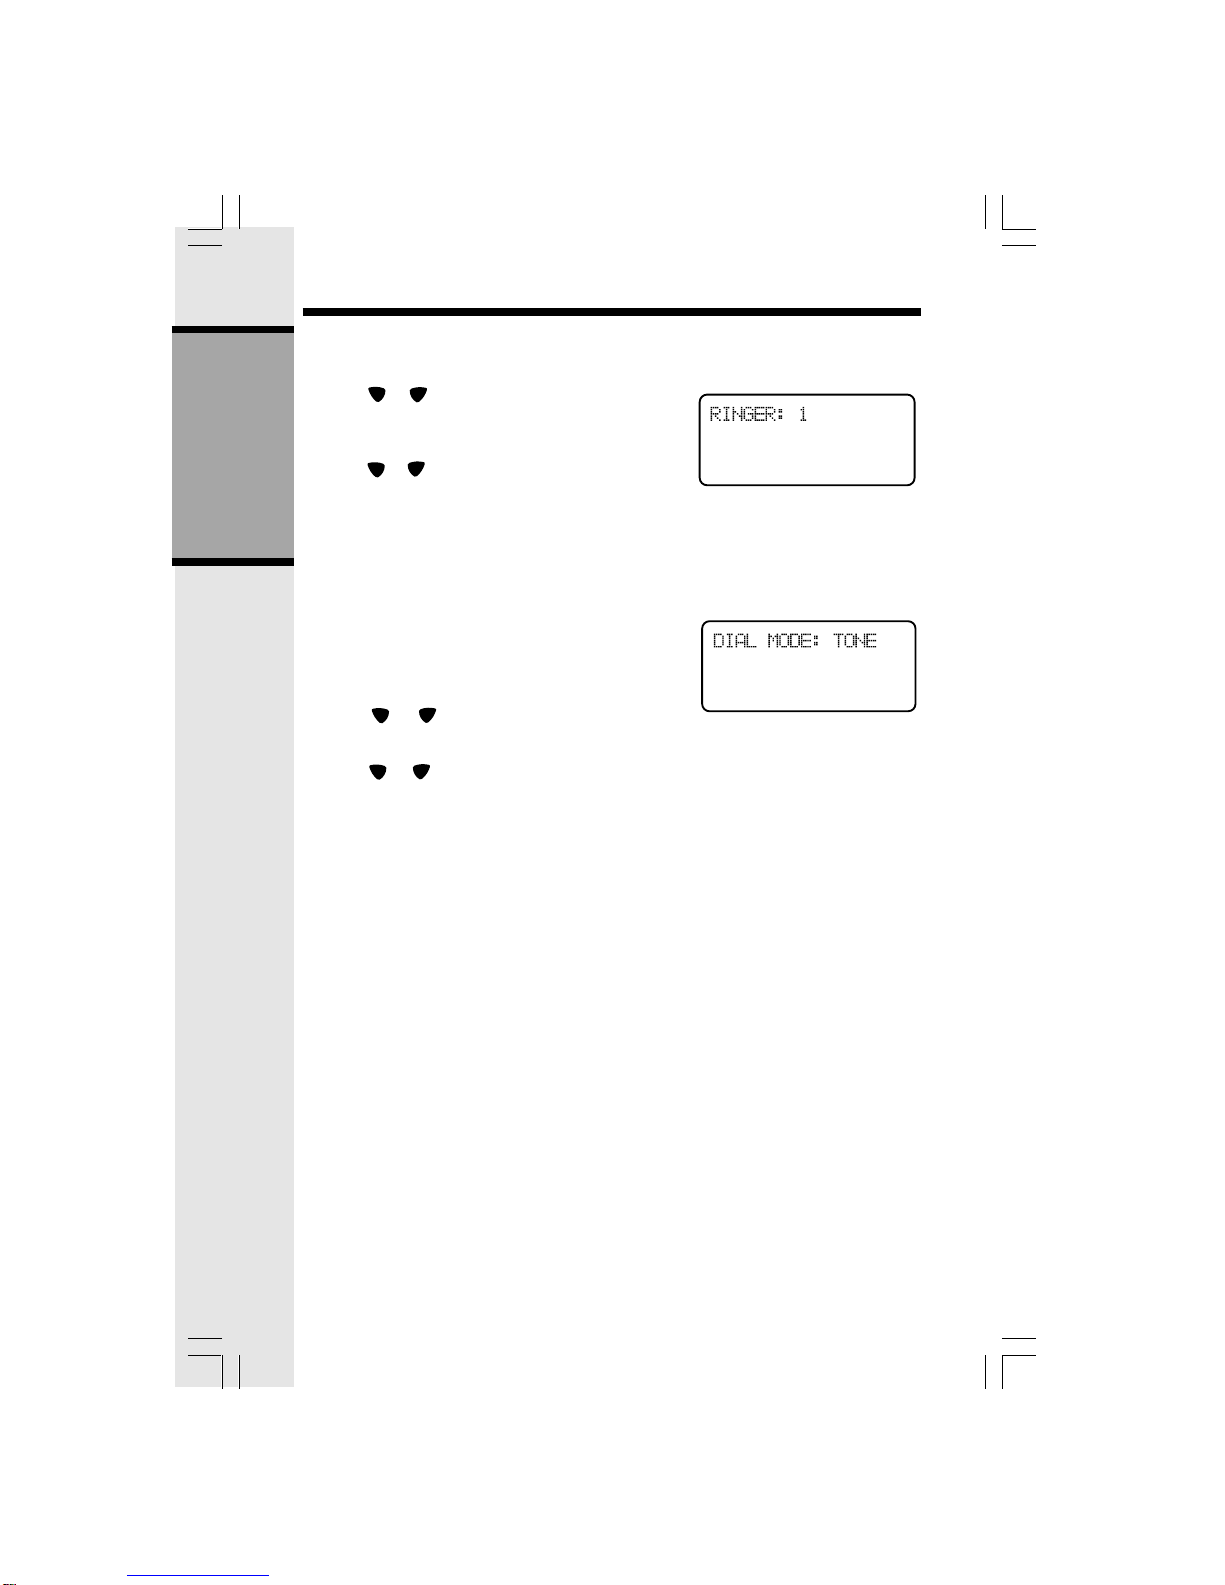
Ringer Selection
1. Press PROG/CHAN.
2. Press or until the screen displays RINGER:
and the current setting.
3. Press SELECT. The current selection will flash,
and you will hear a sample of the selected ring.
4. Press or to select a different ring style (there
are 4), or turn the ringer OFF.
5. Press SELECT to confirm your choice.
NOTE: If the ringer is set to OFF, the display will
showRINGER OFF in idle mode.
Tone/Pulse Selection
NOTE: Your 9127 is factory-preset for TONE
dialing.
1. To change dialing mode, press PROG/CHAN.
2. Press or until the screen displays DIAL
MODE: and the current setting.
3. Press SELECT. The current setting is flashing.
4. Press or to change the setting.
5. Press SELECT to confirm your choice.
9
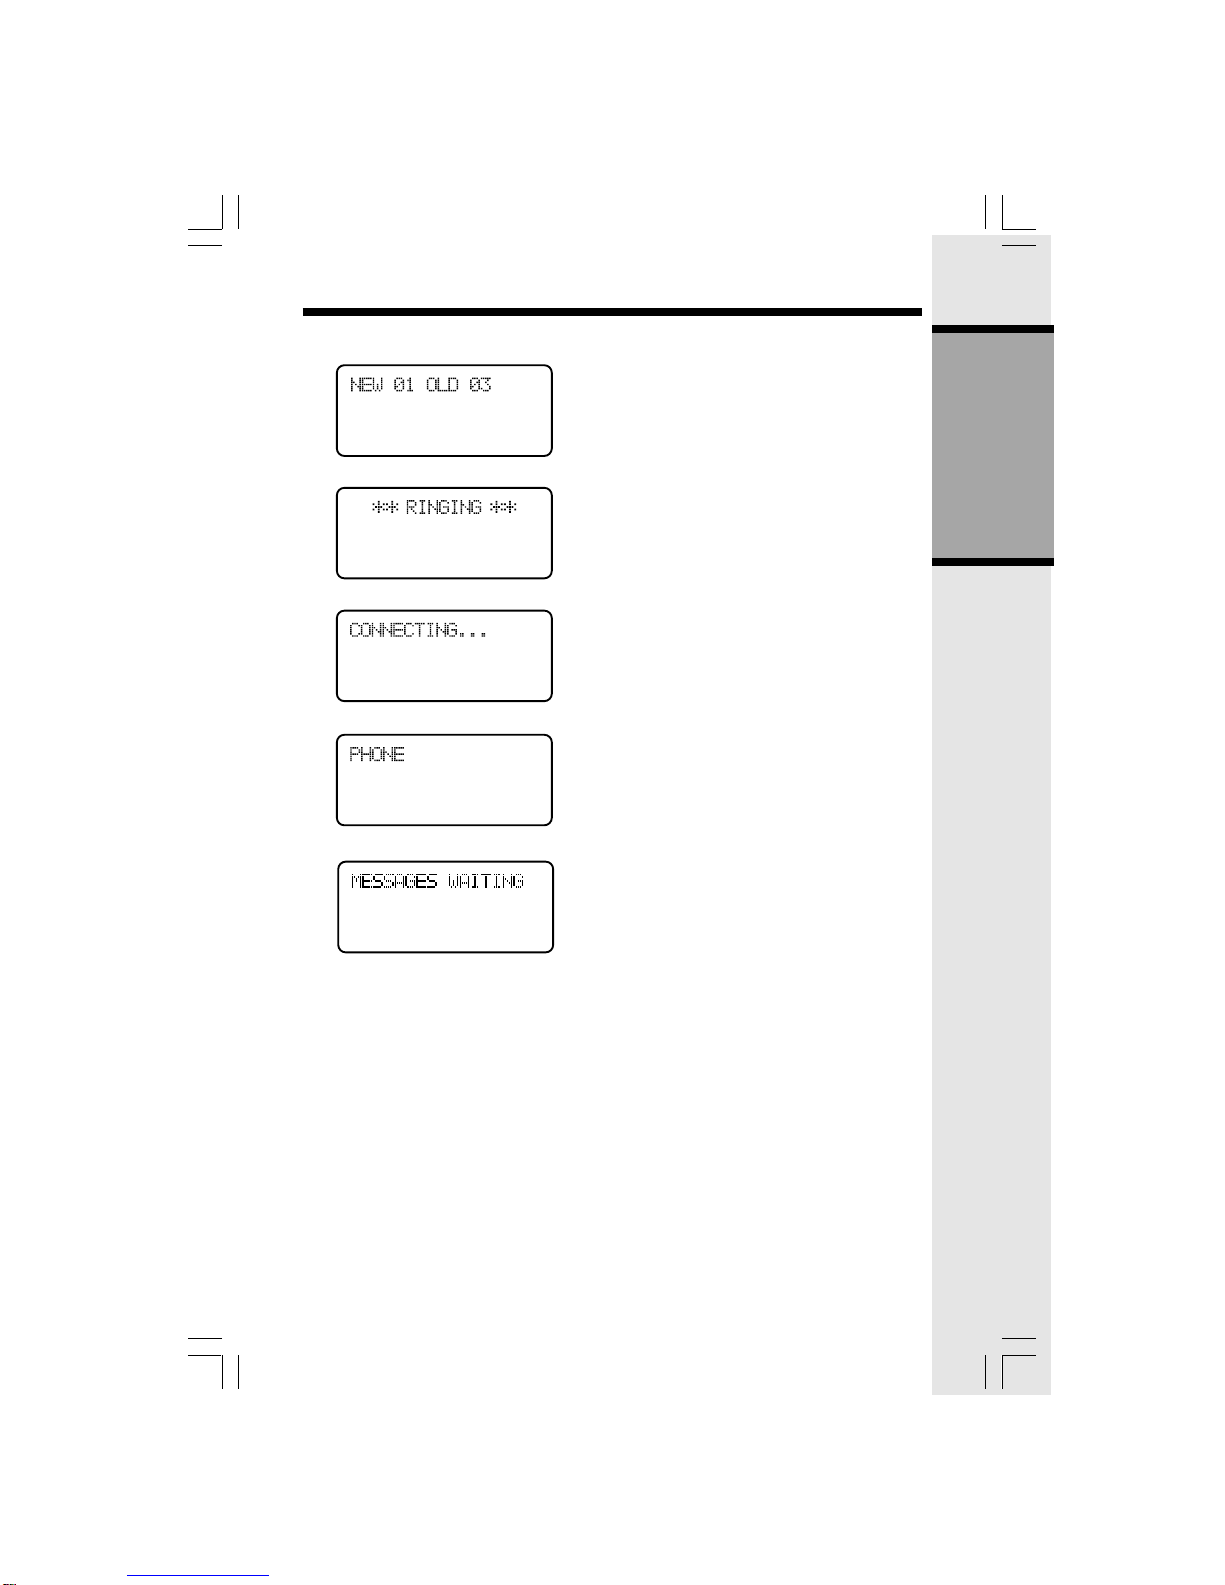
If the Display says: It Means:
The Handset is in idle mode.
Indicates incoming call.
Waiting for dial tone.
Handset is in use.
New messages have been received in
your Voicemail service.
The Handset Display
GETTING STARTED
10
Making Calls
Press ON. Dial the phone number.
Press OFF to end your call.
-OR-
Dial the phone number. Use the key to backspace
if you make a dialing mistake. Then press ON.
Press OFF to end your call.
When the Handset is in use, the IN USE/CHARGING
light on the Base Unit will flash. When the Handset is in
theBaseUnitcradle,theIN USE/CHARGING lightglows
steadily.
Volume Control
While you are on a call, press to raise the inbound volume and to lower it. The Handset
will display the relative volume setting as you adjust it. When you reach the maximum or
minimum volume setting, you will hear a double beep.
Channel Changing
If you experience noise or interference while on a call, you may be too
far from the Base Unit, or in an obstructed area. Try moving to a different
location. If this does not improve the transmission, press PROG/CHAN.
You can press this key more than once, if necessary.
NOTE: This feature only operates while you are on an active call.
BASIC OPERATION
Basic Operation
Este manual sirve para los siguientes modelos
1
Tabla de contenidos
Otros manuales de Teléfono inalámbrico de Sprint

Sprint
Sprint Handset Hoja de especificaciones

Sprint
Sprint sp2621 Manual de usuario

Sprint
Sprint 1733 Manual de usuario

Sprint
Sprint sp2603 Manual de usuario

Sprint
Sprint 2422 Manual de usuario

Sprint
Sprint 2.4 GHz Digital Spread Spectrum Dual Keypad Cordless Phone with Caller ID/Call... Manual de usuario

Sprint
Sprint 1930c Manual de usuario

Sprint
Sprint Spread Spectrum Cordless Telephone Manual de usuario

Sprint
Sprint 900MHz Digital Cordless Phone with Call... Manual de usuario

Sprint
Sprint SP1733 Manual de usuario


