Spowdi Pro MKII Manual de usuario

Doc number: 002 Revision: PA3English language (original)
Solar-powered water pump
Mobile Pro MKII
Service manual

2
Doc number: 002 Revision: PA3
Table of Content
1 How to read this manual ............................................................................ 3
2 Optimization................................................................................................ 4
2.1 Howtooptimizewaterowformorethan5mhead. ................................4
3 Troubleshooting ......................................................................................... 4
3.1 MKII system problems ...................................................................................4
3.1.1 Power button does not light up...................................................................... 4
3.1.2 PMB stop once or repeated times.................................................................. 5
3.2 Operation Problems .......................................................................................6
3.2.1 Reduced water ow.......................................................................................... 6
3.2.2 Water splashing out of air tube...................................................................... 7
3.2.3 Water level in pressure vessel after connecting to the drip line for
growing area..................................................................................................... 7
4 Membrane change..................................................................................... 10
5 Maintenance .............................................................................................. 15
5.1 DailyMaintenance........................................................................................15
5.2 Maintenanceschedule .................................................................................16
6 Warranty card ........................................................................................... 17
7 Service schedule........................................................................................ 18
8 Terms and conditions ............................................................................... 19
3
Doc number: 002 Revision: PA3
1 How to read this manual
The manual describes a general installation. For the system to work properly it needs
to fulll dierent requirements.
In order to better understand the requirements the Spowdi gure helps the reader:
Spowdi gure is happy when installation is correct.
Spowdi gure is sad when installation is NOT correct.
In the illustrations are dierent types of arrows:
Step by step.
Move according to arrow.

4
Doc number: 002 Revision: PA3
2 Optimization
2.1 Howtooptimizewaterowformorethan5mhead.
For more than 5m head, adjust the air regulator screw on the pump body. See chapter
3.2.3.1 (Pg. 7, in this manual).
3 Troubleshooting
3.1 MKII system problems
3.1.1 Power button does not light up
Problem: After connecting to solar panel with sucient sunlight and main switch is
turn on, Power button does not light up.
Check:
1 Make sure solar panel cable is connected to the PMB.
2 Make sure solar panel surface is not cover by any obstacles, even a thin grass on the
surface will aect performance of solar panel.

5
Doc number: 002 Revision: PA3
3 If power button still not light up. Let solar panel charge PMB for at least 1hour then
try again. Charge with power button (K) OFF and Main switch (N) ON.
4 If after charging and under strong sunlight (>750W/m2), power button still does not
light up, consult your local service center.
3.1.2 PMB stop once or repeated times
Problem: PMB run for a short while and stop
Check:
1 Make sure solar panel is not covered by any obstacles and facing towards sun.
2 This may due to battery pack power is completely at. Charge for 1hour and try
again. Charge with power button (K) OFF and Main switch (N) ON.
3 If after charging and under strong sunlight (>750W/m2), power button still does not
light up, consult your local service center.
K
N
ON
OFF
6
Doc number: 002 Revision: PA3
3.2 Operation Problems
3.2.1 Reducedwaterow
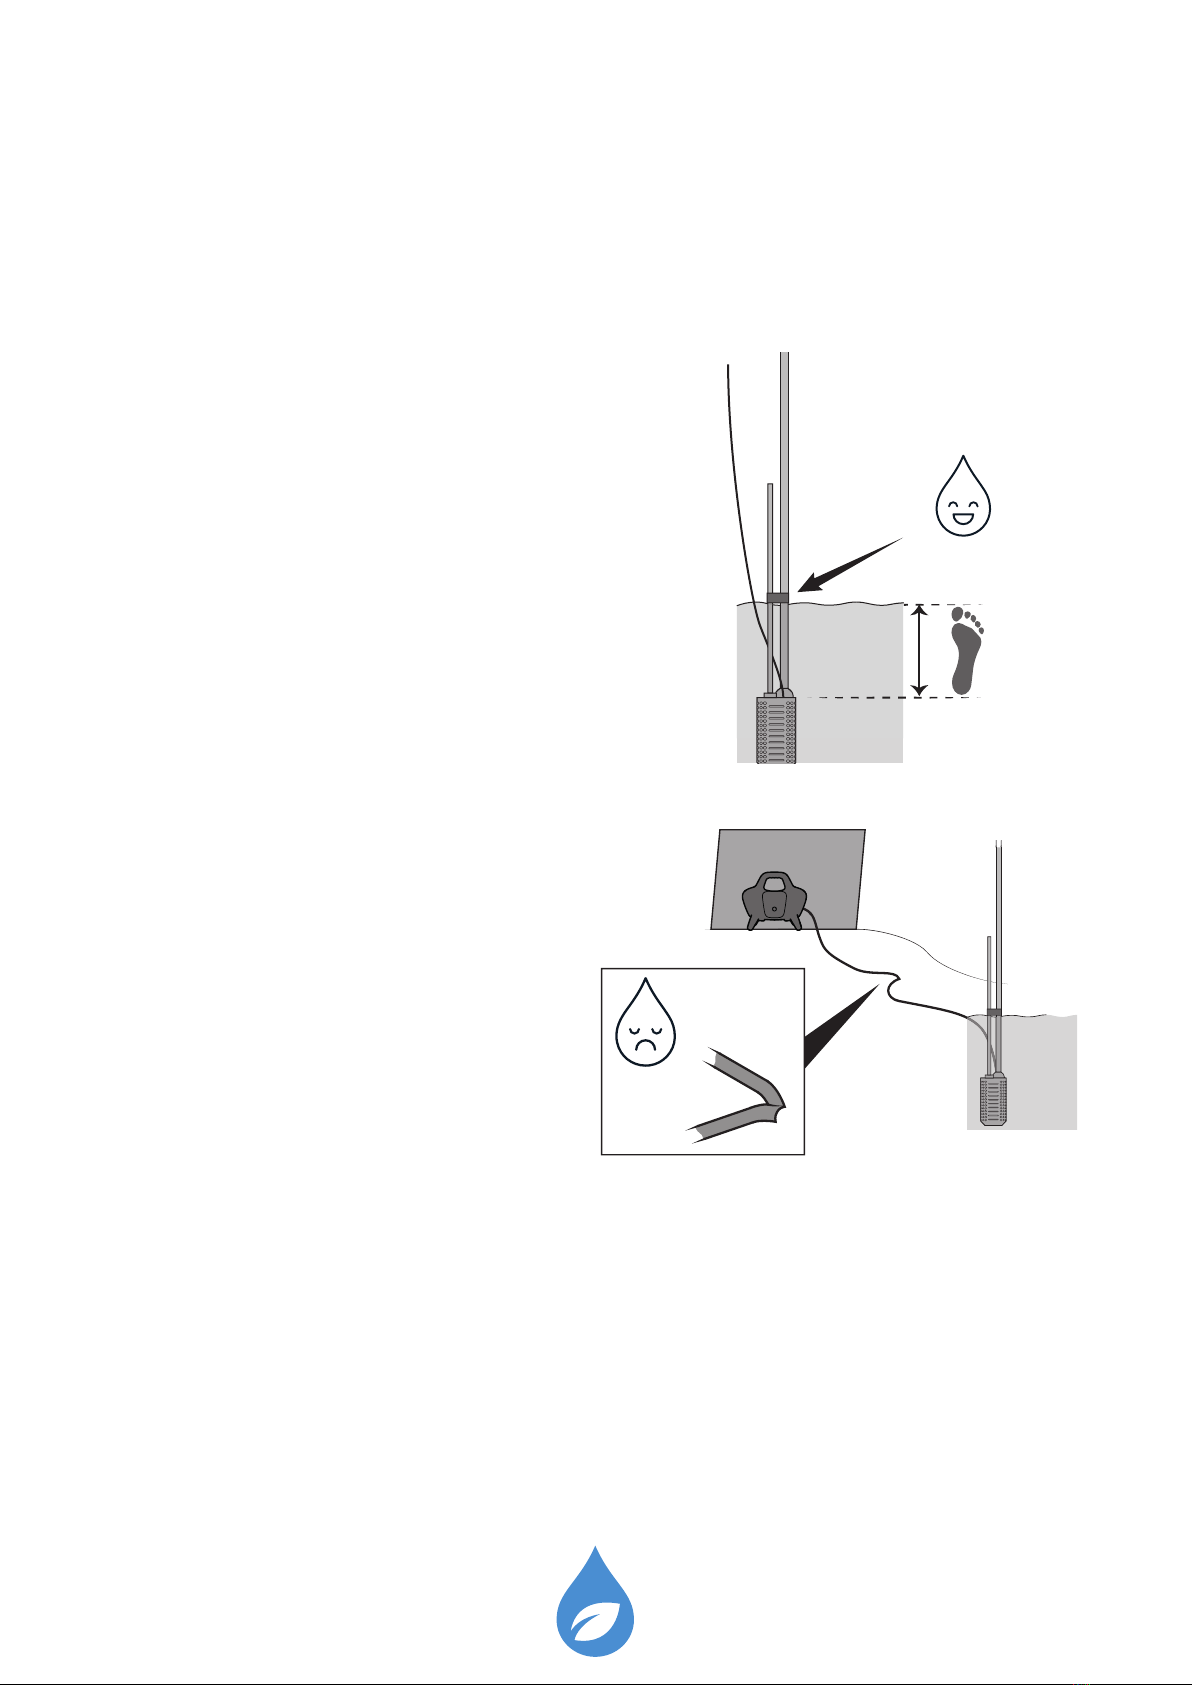
Problem: Water volume owing out the water extraction tube is signicantly reduced.
Check:
1 Make sure pump unit is 30cm below
water surface..
2 Make sure Ø8mm air hose is not bent.
3 Make sure there are no air and water
leakage from all connectors.
• Check for Air: Air outlet from back
of PMB, Ø8mm air hose connector,
Ø16mm air tube connector.
• Check for Water: Ø25mm water tube connector. If needed, the Ø25mm water tube
connector need to be uninstalled and installed again to make sure all tightness are
done properly. Check step by step installation of the Ø25mm water tube connector
referring in the MKII system installation manual chapter 7.3.2 (Pg. 13).
30 cm
7
Doc number: 002 Revision: PA3
3.2.2 Water splashing out of air tube
Problem: Water splashing out from the Ø16mm air tube
Check:
1 Membrane might be broken. See chapter 4 (Pg. 10, in this manual) for membrane
change instructions.
2 After membrane replacement is done, test system according to chapter 8 “How to
test system” (Pg. 14) in MKII system installation manual.
3.2.3 Wrong water level in pressure vessel after connecting to the drip line for
one growing area.
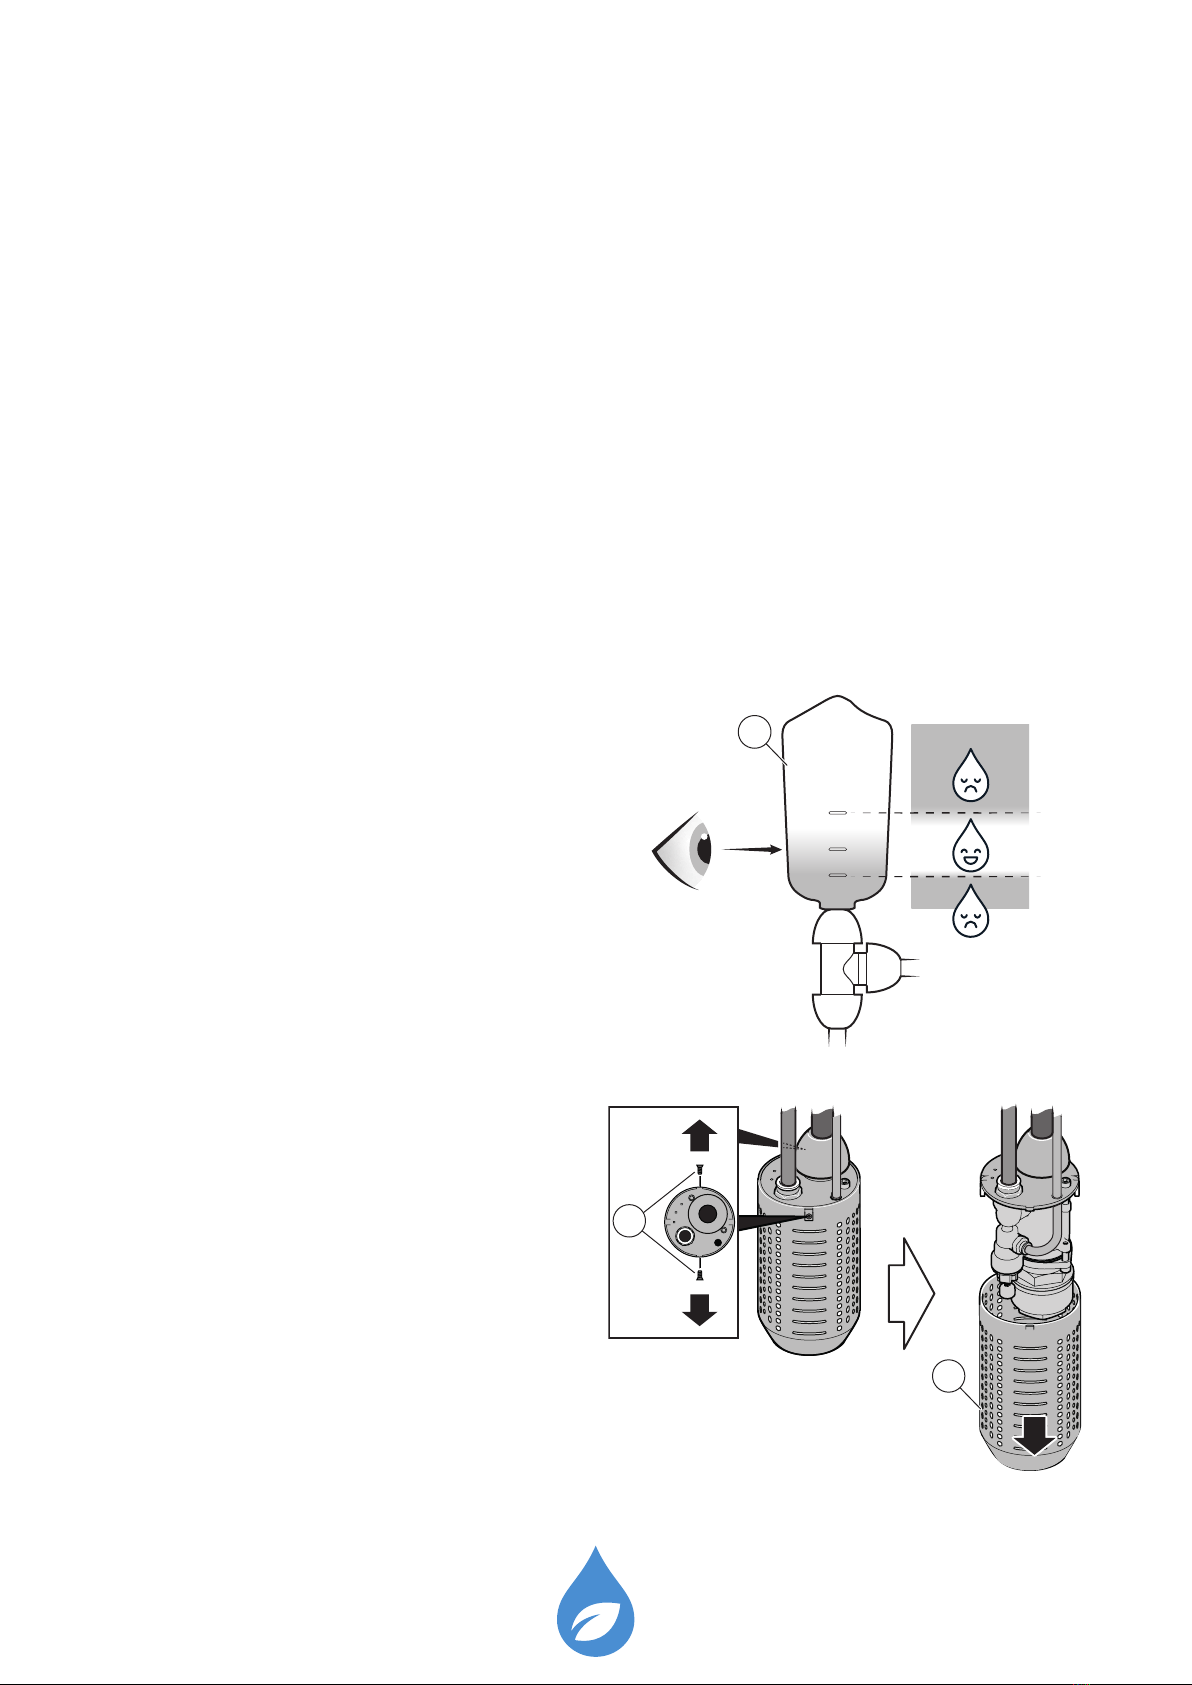
Problem: Water level in the pressure vessel (C) is not at the OK mark.
Check: Acceptable range is between MIN and MAX mark. If water level is below MIN
or above MAX follow instruction below.
3.2.3.1 Adjust air regulator screw
1 Turn OFF the PMB power button and
then main switch to stop the system.
2 Carefully, lift pump unit out of water.
3 Remove two at head screws (R) from
side of lter can.
Flat head screws are small so please
make sure you keep it safe.
4 Pull lter can (S) down and remove it.
MAX
OK
MIN
C
R
S

8
Doc number: 002 Revision: PA3
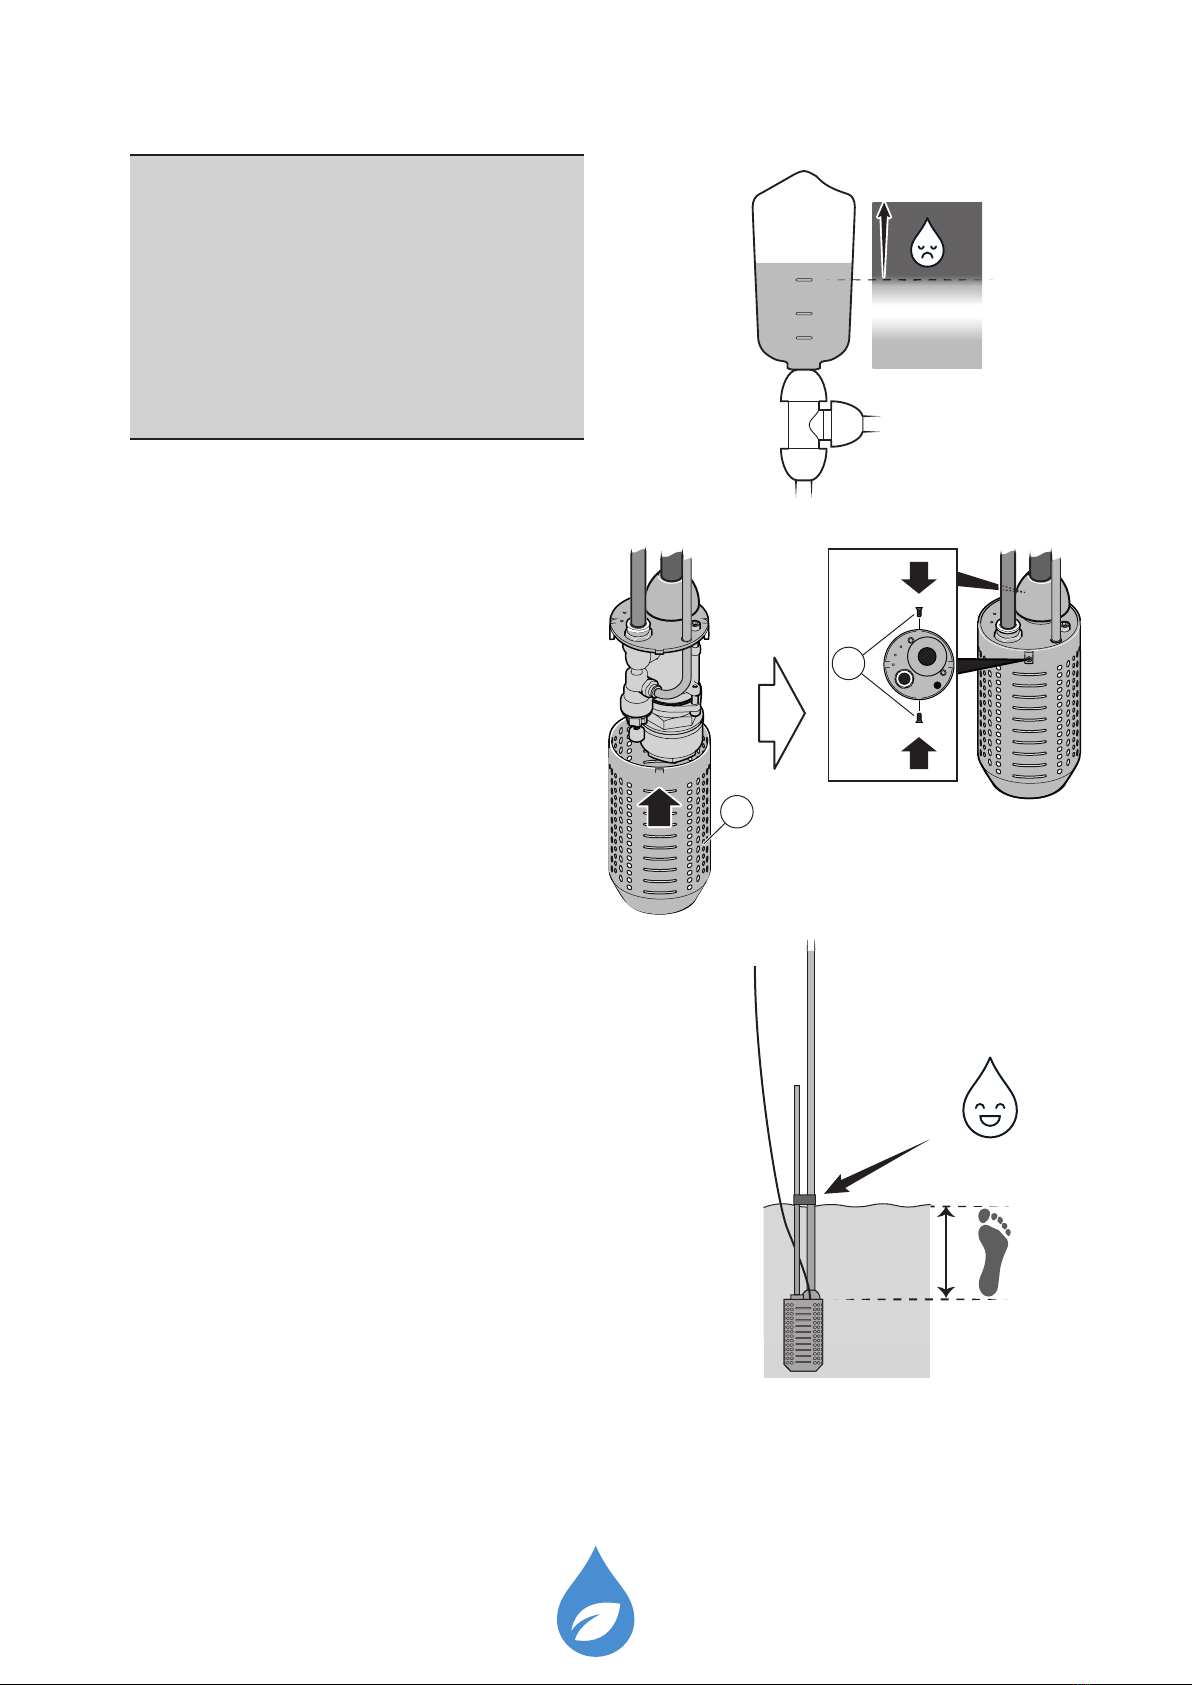
5 Adjust air regulator screw (W):
• Screw air regulator screw two turns
counter-clockwise if water level in
pressure vessel is too high.
• Screw air regulator screw two turns
clockwise if water level in pressure
vessel is too low.
6 Always make sure pump unit is 30cm
below water surface.
7 Turn ON the PMB main switch and then
power button to start the system.
8 Make sure your eye level is in line with
the water level in pressure vessel (C).
9 Repeat measurements and adjustments
until water level is within acceptable
range.
MAX
MIN
W
30 cm
MAX
OK
MIN
C
9
Doc number: 002 Revision: PA3
Note!
1. If no water is owing, refer to
chapter 8 ‘how to test system‘ in
MK II system installation manual.
2. Water level in pressure vessel
must never be above MAX level.
10 Put lter can (S) back on pump unit.
11 Fasten two at head screws (R).
12 Sink pump unit back in water 30cm
below water surface.
13 Check installation referring to Chapter 10 ‘Final check‘ (Pg. 17) in the MKII system
installation manual before operating the system.
MAX
OK
MIN
S
R
30 cm
10
Doc number: 002 Revision: PA3
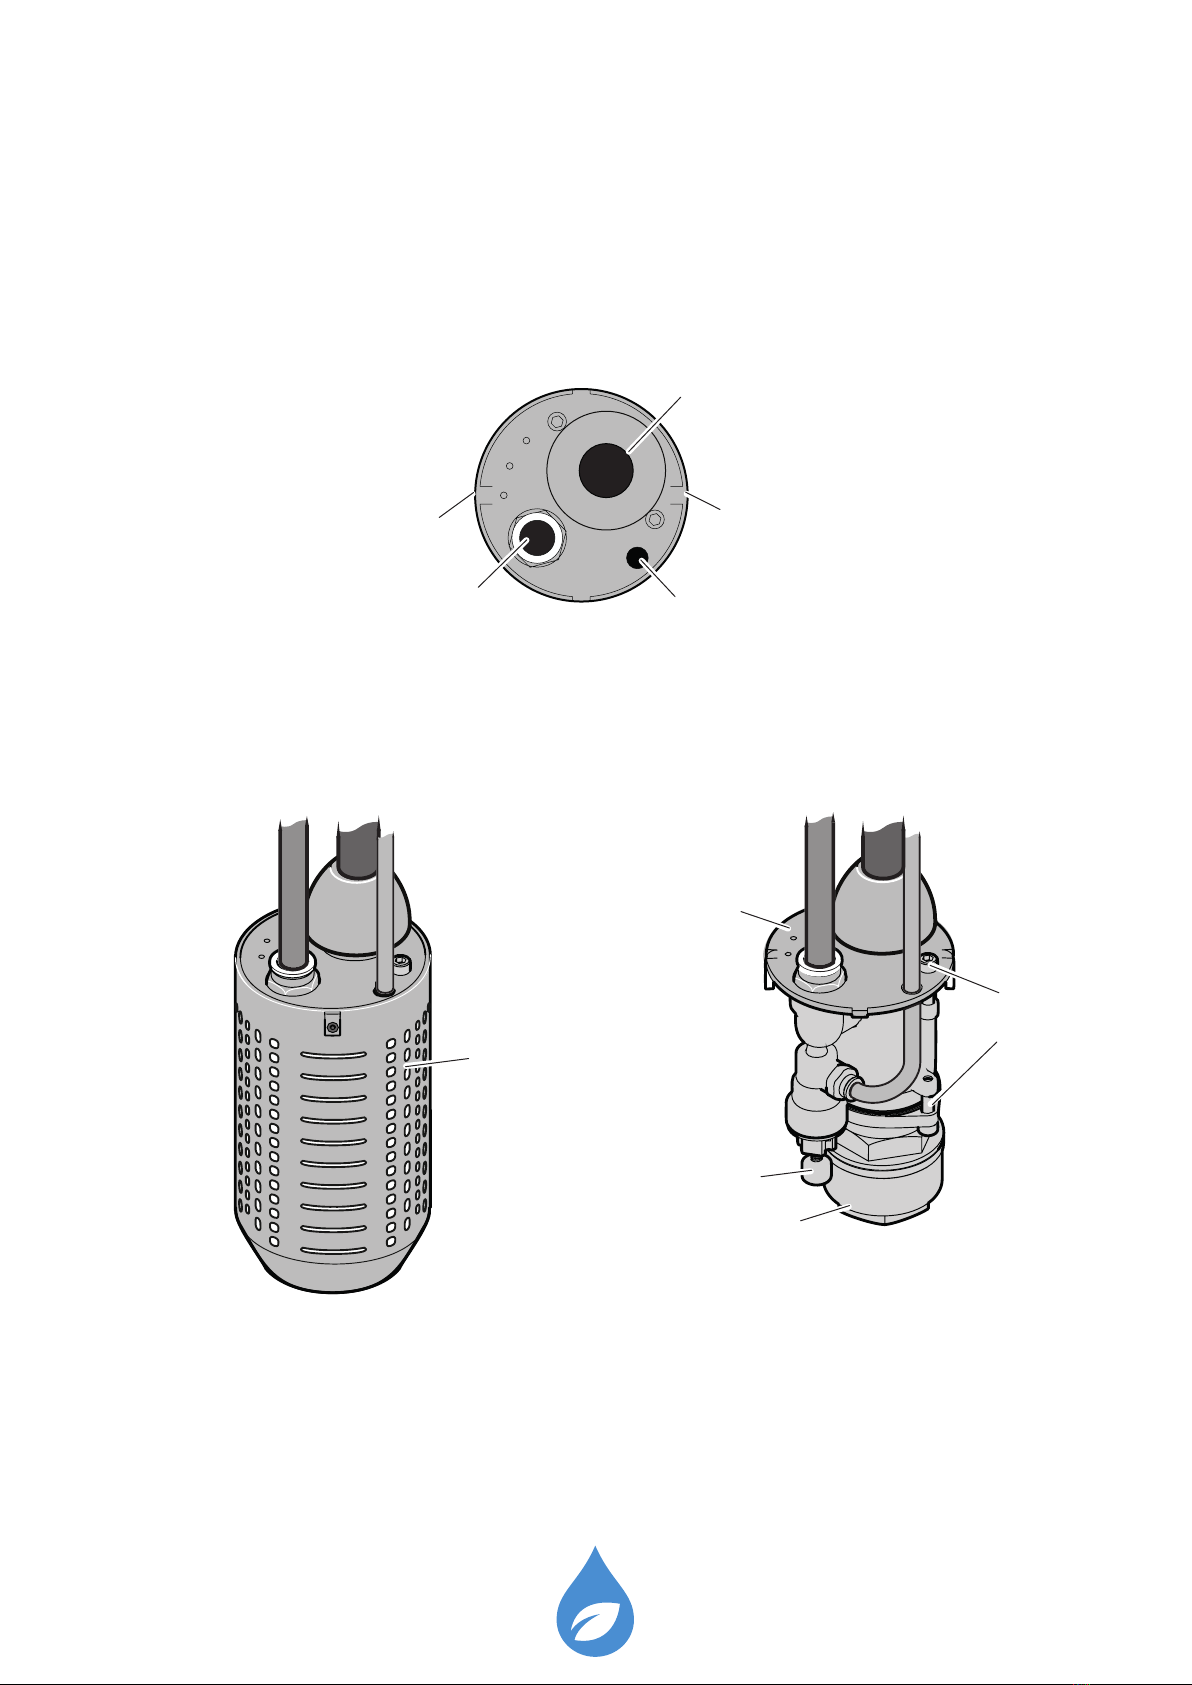
4 Membrane change
Pump unit overview
Top view
Side view
P - Quick connector
Ø16mm
With lter can Without lter can
O - Straight connector
Ø25mm
Q - Ø8mm Air hose hole
R - Flat head screw
R - Flat head screw
S - Filter can
T - Cap Screw
U - Top Flange
V - Check valve
W - Air regulator
Otros manuales para Pro MKII
2
Tabla de contenidos
Otros manuales de Bomba de agua de Spowdi


Manuales populares de Bomba de agua de otras marcas


Sykes AmeriPumps
Sykes AmeriPumps GP100M Guía de solución de problemas

DUROMAX
DUROMAX XP WX Series Manual de usuario

BRINKMANN PUMPS
BRINKMANN PUMPS SBF550 Manual de usuario

Franklin Electric
Franklin Electric IPS Manual de usuario

Xylem
Xylem e-1532 Series Manual de usuario

Milton Roy
Milton Roy PRIMEROYAL Manual de usuario