Spa Electrics Retro Universal Series Instrucciones de funcionamiento

POOL LIGHT (UNIVERSAL)
INSTALLATION
2
4
5
6
7
12
17
18
19
20
23
24
24
25
26
CONTENTS
FRESH WATER USE ONLY
NOT INTENDED FOR OPERATION OUT OF WATER
NOTICE
1
PRE-INSTALLATION CHECK
READ THIS FIRST
TOOLS REQUIRED
INCLUDED PARTS
INSTALLATION A: CONNECTION TO CABLE
B: ATTACH NICHE ADAPTOR
C: CONNECT LUMINAIRE
D: FIT LIGHT INTO NICHE
POST INSTALLATION CHECK
WINTERIZATION
TROUBLESHOOTING
ELECTRICAL GROUNDING
FCC COMPLIANCE STATEMENT
KEY DIMENSIONS
APPENDIX A

PRE-INSTALLATION CHECK
1CHECK POWER SUPPLY
POWER
SUPPLY
(TRANSFORMER)
DIRECT
POWER SUPPLY
? V AC 120V120V
1A: IF THE POOL LIGHTS ARE
DIRECTLY CONNECTED TO A
120V POWER SUPPLY, DO NOT
CONTINUE INSTALLATION
2A: IF THE POOL LIGHTS ARE
CONNECTED TO A TRANSFORMER
CHECK THAT IT MEETS STEP 2
REQUIREMENTS
1B: A 12V AC TRANSFORMER
MUST BE INSTALLED
BETWEEN THE 120V POWER
SUPPLY AND POOL LIGHT
2B: IF THE TRANSFORMER DOES
NOT MEET THE REQUIREMENTS,
IT WILL REQUIRE REPLACEMENT
↓ ↓
2ADD TRANSFORMER (if needed)
EXISTING TRANSFORMER MUST BE:
• UL Listed Isolating Low Voltage power supply,
evaluated for swimming pool use
• Installed as per current NEC wiring rules
• 12~14v AC output
• Minimum 50W per Retro Series Pool light
• In good working order
EXISTING TRANSFORMER MUST NOT BE:
• DC or ‘LED Driver’
• Electronic or Switch mode
• Weather damaged or in otherwise
pool condition
Spa Electrics recommends
“LVX” safety transformers for
use with Retro Universal lights
2

PRE-INSTALLATION CHECK
ELECTRICAL GROUNDING
DUE TO ITS PLASTIC HOUSING
DESIGN, THE RETRO UNIVERSAL
LUMINAIRE DOES NOT REQUIRE
GROUNDING / BONDING.
SEE PAGE 21 FOR MORE INFORMATION
RETRO UNIVERSAL CAN BE
FITTED TO PLUG CABLES
FROM 9/32” (7mm) UP TO
9/16” (14mm) DIAMETER
ENSURE BONDING IS SECURE AT BACK OF NICHE
DO NOT CUT THE BONDING CABLE
DO NOT DISTURB THE BONDING CABLE
WHEN WORKING WITH THE PLUG CABLE
THE RETRO UNIVERSAL
IS DESIGNED TO WORK WITH
10 inch OUTSIDE DIAMETER
NICHES
REFER TO APPENDIX A FOR A LIST OF NICHES RETRO UNIVERSAL
HAS BEEN UL TESTED WITH
3CHECK PLUG CABLE THICKNESS
4CHECK BONDING
5CHECK NICHE DIAMETER
Max Ø
9/32 inch
(14mm)
INSIDE
NICHE
BONDING
CABLE
POWER
CABLE
POWER
CABLE
10 inch OD
DIAMETER
(ACTUAL SIZE)
7mm inc
to 14mm
3

Congratulations on your purchase of a Spa Electrics Retro Universal Series Pool Light.
This light has been designed in conjunction with leading pool professionals across the
USA and manufactured solely in Australia.
The Retro Series Pool light is designed to quickly and easily replace existing
LOW VOLTAGE, 10” Pool Light (PAR 56) fittings from major brands.
Its patented cam-lock system allows for simple installation in situations where the
existing niche hardware has been damaged or is no longer serviceable.
For safe and proper installation, please read this manual in full before commencing
installation and use only the parts (screws, plugs, sealant etc) as provided.
For operating instructions, please refer to the MULTI PLUS Operating Manual. (Provided)
NOTE: The use of DC / Electronic (or Switch mode) power supplies is not permitted as they
can cause disruptions in the lights normal operation & in some cases damage the lights
internal electronic components. For more information, please contact Spa Electrics Inc.
The Retro Universal Light must be water cooled at all times. DO NOT switch the light
on until installation is complete and the light is fully submerged in water.
Ensure sufficient cable is coiled behind the light to allow for servicing (~12 to 24inch)
Ensure only circular cable not exceeding 9/16” (14mm) diameter is connected to the
Retro Universal Light. The use of Fig. 8 or non circular cable will not seal correctly
& will void the product warranty.
The Retro Universal LED Light does not contain any user serviceable parts, opening
the light will void the product warranty.
Pool chemicals & PH levels: Due to the corrosive nature of unbalanced pool
chemicals, Spa Electrics strongly recommend that your pool water is balanced prior
to installing your pool Lights or any plastic or stainless steel components, and tested
weekly to maintain these levels. pH levels should be maintained between 7.2- 7.6 at
all times to ensure the longevity of these components.
Failure to do so can result in chemical damage to the light housing and
pool fittings, including stainless steel components.
Please note: Lights or components found to have excessive chemical
damage will not be covered under our manufacturer’s warranty policy
READ THIS FIRST
WARNING
4

TOOLS REQUIRED
• The use of power tools during installation is not recommended as these
devices can cause faults and damage to light components.
• All installation steps should be carried out with manual tools only.
• The enclosed images are for illustrative purposes only. Appearances of parts
and assemblies may vary from the enclosed illustrations.
• Please contact your reseller if you have any questions regarding the correct
installation of this product.
IMPORTANT NOTES
PRODUCT SUPPORT & INFORMATION
For the most up to date installation information and contact information
for assistance in your region, please visit www.spaelectrics.com
Phillips head screwdriver
small Flat Blade screwdriver
WINTERIZATION
• Lights must be removed from pool wall and cable disconnected via plug
connection & stored in a safe place.
• Winterization Cover must be fitted to Plug Top prior to reinstalling into niche
for winter.
• Unless niche/conduit connection is adequately sealed (i.e. via included cable
gland components), pool water level must be drained down 12” below the
lowest light(s) position in pool wall.
• All conduits should be checked for accumulated water and drained if required.
• Follow instructions on page 14 OR consult your local pool professional for
complete pool winterization process.
5

CONNECTOR PLUG
The Plug comes in separate components for assembly
LIGHT ASSEMBLY
INCLUDED PARTS
1x WARRANTY
CARD
1x MULTIPLUS
MANUAL
1x INSTALLATION
MANUAL
REQUIRED PART (NOT INCLUDED)
UL LISTED ISOLATING LOW VOLTAGE POWER SUPPLY, EVALUATED FOR SWIMMING POOL USE.
Installed as per current NEC wiring rules. 12~14v AC output. Minimum 50W per Retro Series Pool Light.
Spa Electrics recommends “LVX” safety transformers for use with Retro Universal lights
NICHE ADAPTOR
LANOLIN
CONNECTOR PLUG COMPONENTS
Connector
Collar
Gland
Nut Large
Gland Nut
(also supplied)
Glands
x 3 sizes
provided
Connector
Barrel
Screw Terminal
End with filling
screws attached
NUT
CAM LOCK
CAPTIVE SCREW
=
Also included is a
Winterization Plug
Cap if required
for seasonal
upkeep.
6

A: CONNECTION TO CABLE
1REMOVE EXISTING LIGHT
3CABLE PREPARATION
2DISCONNECT EXISTING LIGHT
NOTE
IF CABLE LENGTH ALLOWS,
CUT CABLE BACK UNTIL
FRESH COPPER APPEARS.
STRIP POWER CABLE TO
SPECIFIED LENGTH
55/64”-3/4”
(22-19mm)
23/64” (9mm)
REMOVE EXISTING LIGHT FROM NICHE AND
BRING TO THE SURFACE FOR CONNECTION
ENSURE YOU DON’T DISTURB
THE BONDING CABLE
ALL CABLE CONNECTIONS ARE TO BE DONE
AT SURFACE LEVEL, AND OUT OF WATER
DISCONNECT LIGHT
FROM POWER CABLE
ENSURE BONDING CABLE
IS NOT CUT OR DISTURBED
CUT POWER CABLE
AS CLOSE TO BACK OF
EXISTING LIGHT AS POSSIBLE
WATER
LEVEL
POWER CABLE
TO LOW VOLTAGE TRANSFORMER
STOP! WARNING
ELECTROCUTION
CHECK POWER IS
TURNED OFF
FIRST
INSIDE
NICHE
BONDING
CABLE
POWER
CABLE
EXISTING
LIGHT
7

4START ASSEMBLY OF CONNECTOR PLUG
5CHOOSE THE APPROPRIATE GLAND
SELECT THE APPROPRIATE CABLE GLAND
FROM THE THREE SUPPLIED THAT SNUGLY
FITS THE EXISTING POWER CABLE
WITHOUT BULGING
FEED THE CONNECTOR COLLAR
ONTO THE CABLE, THEN FEED THE
APPROPRIATE GLAND NUT ONTO THE CABLE
Glands
x 3 sizes
provided
Connector
Collar
Gland
Nut
THE GLAND FITMENT SHOULD BE FIRM
OVER THE CABLE WITHOUT BULGING
OR DEFORMING THE GLAND
MEDIUM
GLAND
SMALL
GLAND
LARGE
GLAND
Large
Gland Nut
8
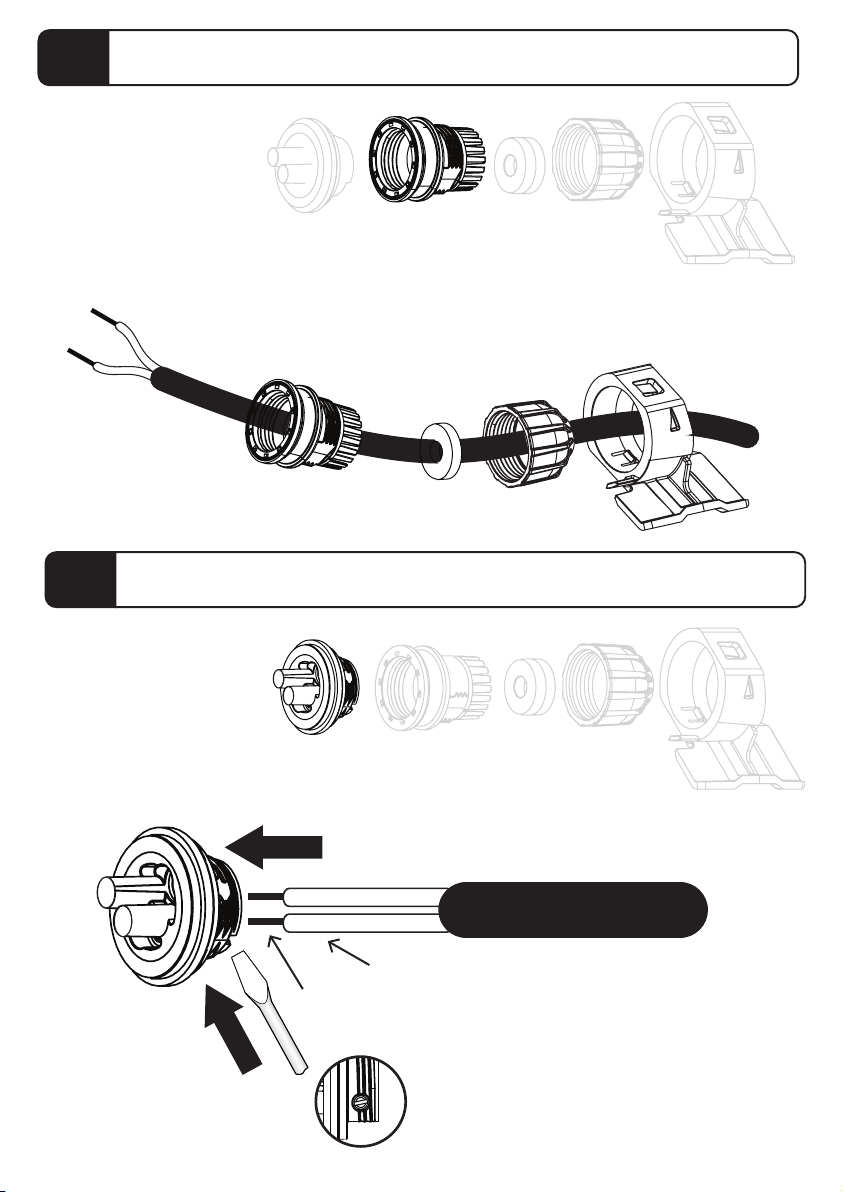
6CONTINUE ASSEMBLY OF CONNECTOR PLUG
7CONNECT THE SCREW TERMINAL END
CONNECTOR
BARREL
FEED THE CONNECTOR BARREL ONTO THE CABLE
SCREW TERMINAL END
1: FEED THE TWO STRIPPED CABLE ENDS THROUGH THE
TWO HOLES IN THE BACK OF THE SCREW TERMINAL END
2: USE A FLAT BLADE SCREWDRIVER
TO TIGHTEN THE FASTENERS ON
EITHER SIDE OF THE SCREW TERMINAL
2
1
1 3/16” (30mm)
9/32” (7mm)
9
Tabla de contenidos
Otros manuales de Iluminación subacuática de Spa Electrics


