Solaris smart 54w Manual de usuario

USER MANUAL

SOLARIS® SMART 54W™ 2
INDEX PAGE NO.
SAFETY INFORMATION 3-4
INTRODUCTION 5
INSTALLATION 6
AC POWER 7
FIXTURE OVERVIEW 8
DMX DATA LINK 9
CONNECTING AND USING DMX DATA LINK 10
FIXTURE OPERATION 10-11
TOKENS 11
FIXTURE MENU STRUCTURE CHART 12
DMX MODES CHARTS 12
MAINTENANCE 13
SMART 54W SPECIFICATIONS 14-15
INCLUDED ITEMS 16
TABLE OF CONTENTS

3SOLARIS® SMART 54W™
WARNING!
Read the safety precauons in this manual before installing
operang or servicing this product.
SAFETY NOTES
Read all the following Safety Notes before working with this product.
These notes include important informaon about the installaon, us-
age, and maintenance of this product.
This product contains no user-serviceable parts. Any reference to ser-
vicing in this User Manual will only apply to properly trained GLOW®
Professional cered technicians. Do not open the housing or aempt
any repairs.
All applicable local codes and regulaons apply to proper installaon of
this product.
PERSONAL SAFETY
· Avoid direct eye exposure to the light source while the product is on.
· Always disconnect this product from its power source before servicing.
· Always connect this product to a grounded circuit to avoid the risk of
electrocuon.
· Do not touch this product’s housing during operaon because it may
be very hot.
MOUNTING & RIG-
GING
· This product is for indoor use only! To prevent risk of re or shock, do
not expose this product to rain or moisture. (IP20)
· Mount this product in a locaon with adequate venlaon, at least 20
in (50 cm) from adjacent surfaces.
· Make sure there are no ammable materials close to this product while
it is operang.
· Always carry this product by the handles. Do not carry from the head.
· When hanging this product, always secure to a fastening device using
a safety cable.
SAFETY INFORMATION

SOLARIS® SMART 54W™ 4
POWER & WIRING
· Always make sure you are connecng this product to the proper volt-
age in accordance with the specicaons in this manual or on the prod-
uct’s specicaon label.
· Never connect this product to a dimmer pack or any rheostat.
· Never disconnect this product
OPERATION
· Do not operate this product if you see damage to the housing, lenses,
LED lights or cables. Have the damaged parts replaced by an authorized
technician at once.
· Do not cover the venlaon slots when operang to avoid internal
overheang.
· Do not aim this product toward the Sun. The lenses could concentrate
the solar energy and cause internal overheang.
· The maximum ambient temperature is 120 °F (49 °C). Do not operate
this product at a higher temperature.
· In case of a serious operang problem, stop using this product imme-
diately
In the unlikely event that your GLOW® product may require service, contact GLOW®
Technical Support.

5SOLARIS® SMART 54W™
The SOLARIS® Professional SMART 54W™ is a high-performance 3 X 54W cold white warm
white Led Par lighng xture. A compact design makes it ideal for Venue Installaons, Theat-
rical, Cinema, TV and Stage Use.
The xtures is deemed for its silent operaon achieved by temperature detectors and silent
fans. The Unit is made of a sturdy aluminum casng, designed to withstand touring applica-
ons as well as xed installaons.
The use of CW-WW (Cold White - Warm White) 3W LED allows you to reach almost idencal
Color tones as those achieved by the use of Convenonal lighng.
The Smooth Flicker Free operaon makes this xture Ideal for TV use.
The xture can be controlled using any DMX-compliant controller (3 Channel Mode | 2 chan-
nel mode) as well as automac operaon mode , sound to light mode and manual mode.
BEFORE USING THE PRODUCT FOR THE FIRST TIME
1. Read ’Safety informaon’ on page 4 before installing, operang or servicing the xture.
2. Unpack and ensure that there is no transportaon damage before using the xture. Never
aempt to operate a damaged xture.
3. If the xture is not going to be hard-wired to a mains supply, aach a local power plug to
the end of the supplied power cable.
4. Before operang, ensure that the voltage and frequency of the power supply match the
power requirements of the xture.
5. Refer to the GLOW® website for the most recent user documentaon and technical infor-
maon about this xture.
INTRODUCTION

SOLARIS® SMART 54W™ 6
INSTALLATION
The xture is designed for indoor use only and must be used in a dry locaon with adequate
venlaon. Ensure that none of the xture’s venlaon slots are blocked and ensure that the
xture is fastened to a secure structure or surface. Do not use the xture to illuminate sur-
faces less than 8 m (approx 26.) from the xture.
FASTENING THE FIXTURE TO A FLAT SURFACE
The xture can be fastened to a hard, xed, at surface that is oriented at any angle. Ensure
that the surface and all fasteners used can support at least 10 mes the weight of all xtures
and equipment they will support. Fasten the xture Securely. Do not place it on a surface or
leave it where it can be moved or fall over. If you install the xture in a locaon where it may
cause injury or damage if it falls, secure it as directed below with a securely anchored safety
cable that will hold the xture if the primary fastening method fails.
MOUNTING THE FIXTURE ON A TRUSS
The xture can be clamped to a truss or similar rigging structure in any orientaon. When
installing the xture hanging vercally down, you can use an open-type clamp such as a
G-clamp. When installing in any other orientaon, you must use a half-coupler clamp
that completely encircles the truss or pipe circumference. To clamp the xture to a truss:
1. Check that the rigging structure can support at least 10 mes the weight of all xtures and
equipment to be installed on it.
2. Block access under the work area.
3. Working from a stable plaorm, hang the xture on the
truss and fasten the rigging clamps onto the truss.
4. Secure the xture with a safety cable as directed below.
5. Check that the head will not collide with other xtures or objects.
SECURING WITH A SAFETY CABLE
Secure the xture with a safety cable (or other secondary aachment) that is approved for
the weight of the xture so that the safety cable will hold the xture if a primary aachment
fails. Loop the safety cable through and around a secure metal anchoring point.
WARNING! READ SAFETY INFORMATION ON
PAGE 3 BEFORE INSTALLING THE FIXTURE.
7SOLARIS® SMART 54W™
Socket outlets or external power switches used to supply the xture with power must be
located near the xture and easily accessible so that the xtures can easily be disconnect-
ed from power.
Do not insert or remove power cable to apply or cut power, as this may cause arcing at the
terminals that will damage the connectors.
Do not use an external dimming system to supply power to the xture, as this may cause
damage to the xture that is not covered by the product warranty.
The xture can be hard-wired to a building electrical installaon if you want to install it
permanently, or a power plug (not supplied) that is suitable for the local power out- lets
can be installed on the power cable.
If you replace power plug on the power cable, install a grounding type (earthed) plug with
integral cable grip that is rated minimum 250 V, 5 A.
The xture has an auto-ranging power supply that accepts AC mains power at 100-240 V
at 50/60 Hz. Do not apply AC mains power at any other voltage or frequency to the xture.
For protecon from electric shock, the xture must be grounded (earthed). The
power distribuon circuit must be equipped with a fuse or circuit breaker and
ground-fault (earth-fault) protecon.
AC POWER
WARNING! READ SAFETY INFORMATION ON
PAGE 3 BEFORE INSTALLING THE FIXTURE.
SOLARIS® SMART 54W™ 8
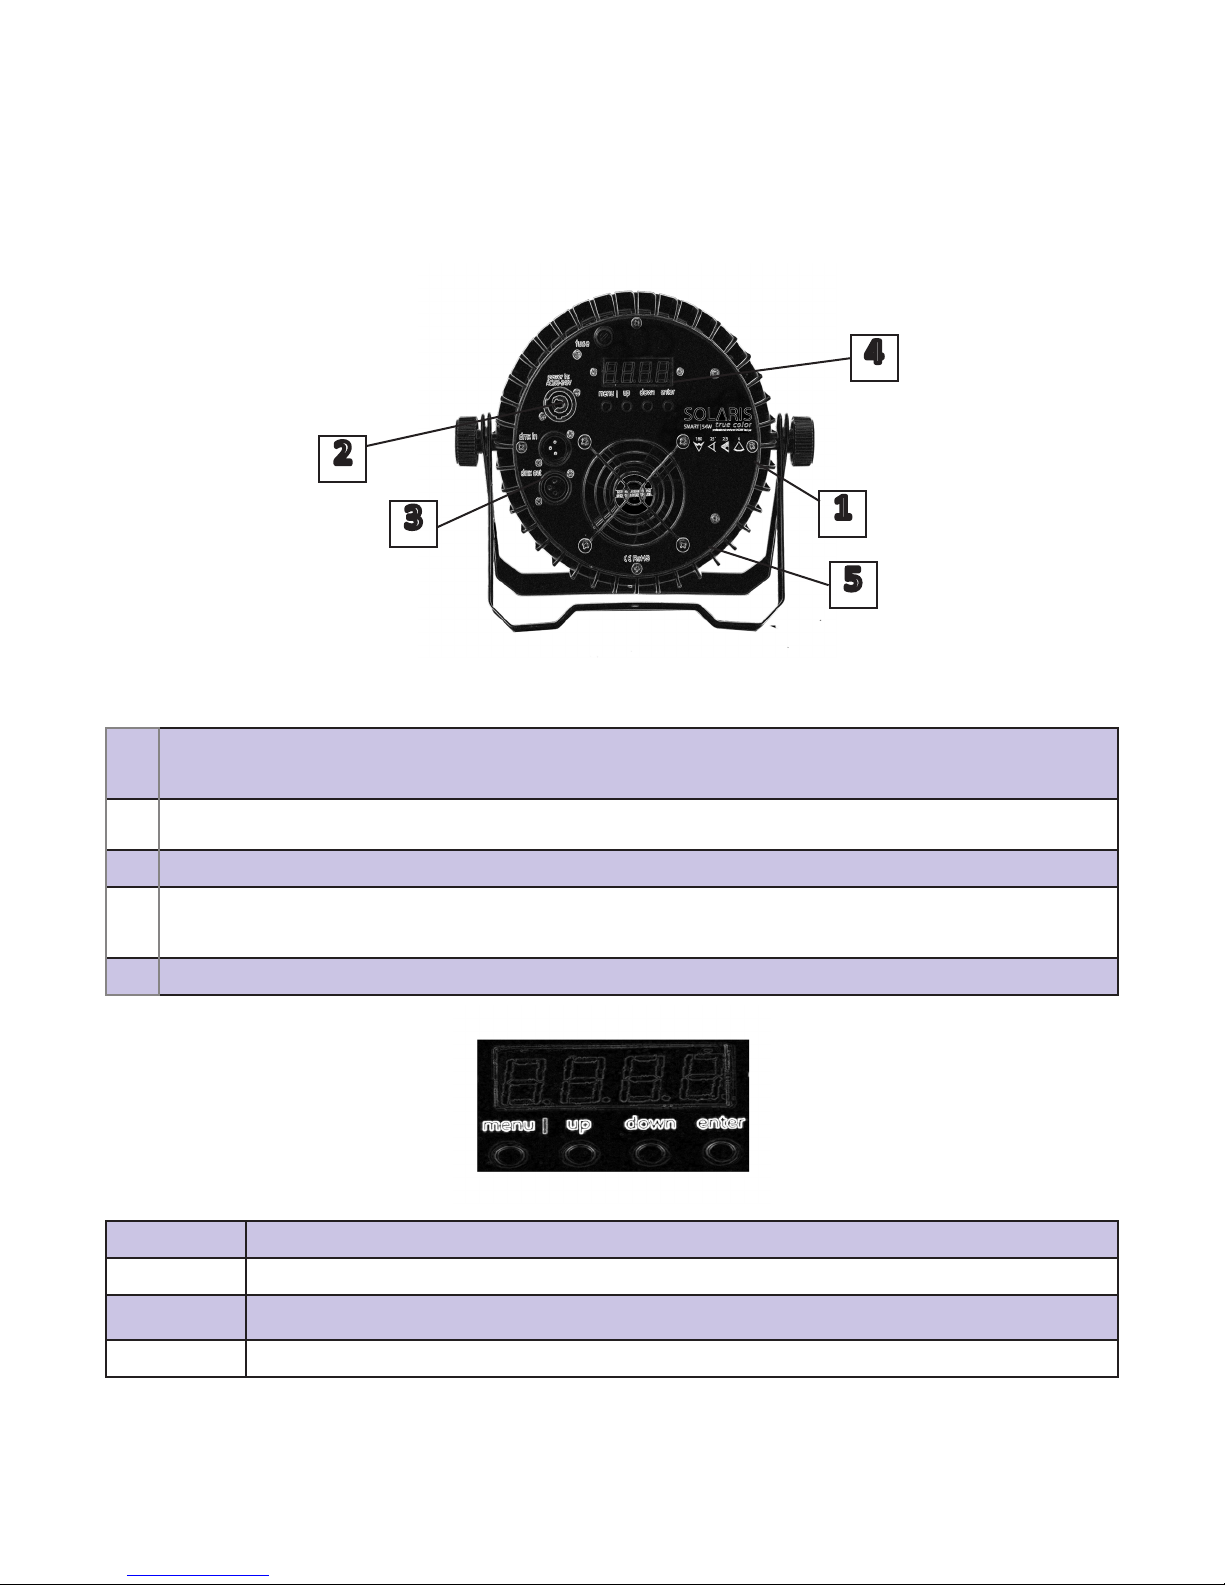
1Tokens® – symbol indicang the xture DMX personality, Beam Angle, Weight and
Power Supply
2Power Breakout cable with IP65 connectors input and output
3DMX data Link Input and Output XLR Connectors
4Digital Screen for accessing menu with 4 buons for navigaon: Menu, Up, Down
and Enter
5Aluminum body with fan and Heat sink
UP Press UP to change current value
DOWN Press DOWN to change current value
MENU Press MENU to toggle between modes
ENTER Use ENTER to save the parameter aer you made the desires adjustments
1
2
3
4
5
FIXTURE OVERVIEW

9SOLARIS® SMART 54W™
DMX DATA LINK
A DMX 512 data link is required in order to control the xture via DMX. The xture has
3-pin XLR connectors for DMX data input and output. The number of daisy-chained x-
tures is limited by the number of DMX channels required by the xtures in relaon to the
maximum 512 channels available in one DMX universe. Note that if independent control
of a xture is required, it must have its own DMX channels.
Fixtures that are required to behave idencally can share the same DMX address and
channels. To add more xtures or groups of xtures when the above limit is reached, add
a DMX universe and another daisy-chained link.
CONNECTING AND USING DMX DATA LINK
To connect the xture to data:
1. Connect the DMX data output from the controller to the rst xture’s male XLR
DMX input connector.
2. Connect the rst xture’s DMX output to the DMX input of the next xture and conn-
ue connecng xtures output to input.

SOLARIS® SMART 54W™ 10
FIXTURE OPERATION
This secon explains the xture sengs and ulies that the user has access to when us-
ing the control panel. Sengs are retained when the xture is powered o.
The SOLARIS® SMART 54W™ can funcon in dierent modes:
DMX 3 CHANNEL MODE. When operated in DMX 3 channel mode the xture back
screen will show A001 when rst accessed. By seng a value dierent from 001 you can
change the unit’s DMX address according to your lighng setup. Oponal DMX address
values are 1 to 512. When you reach the desired value, press ENTER to save your changes.
DMX 2 CHANNEL MODE. When operated in DMX 2 channel mode the xture back
screen will show d001 when rst accessed. By seng a value dierent from 001 you can
change the unit’s DMX address according to your lighng setup. Oponal DMX address
values are 1 to 512. When you reach the desired value, press ENTER to save your changes.
STANDALONE MODE COLOR BLENDING which allows you to manually change the pa-
rameters of the xture without using DMX data link. When operated in Standalone mode
the xture back screen will show either: u000 (Cold White), C000 (Warm White) when
rst accessed. By seng a value between 000-255, using the UP & DOWN buons below
the screen, you can control the desired amount of every color (CW-WW). When you reach
the desired value, press ENTER to save your changes.
You can also manually control strobe ashing by changing the values when the back
screen shows F000 (Strobe Flash). By seng a value between 000-255, using the UP &
DOWN buons below the screen, you can control the desired speed (strobe). When you
reach the desired value, press ENTER to save your changes.
Tabla de contenidos
Otros manuales de Foco de Solaris


