Smoke hollow 30166E Manual de usuario
Assembly and
owner’s manual
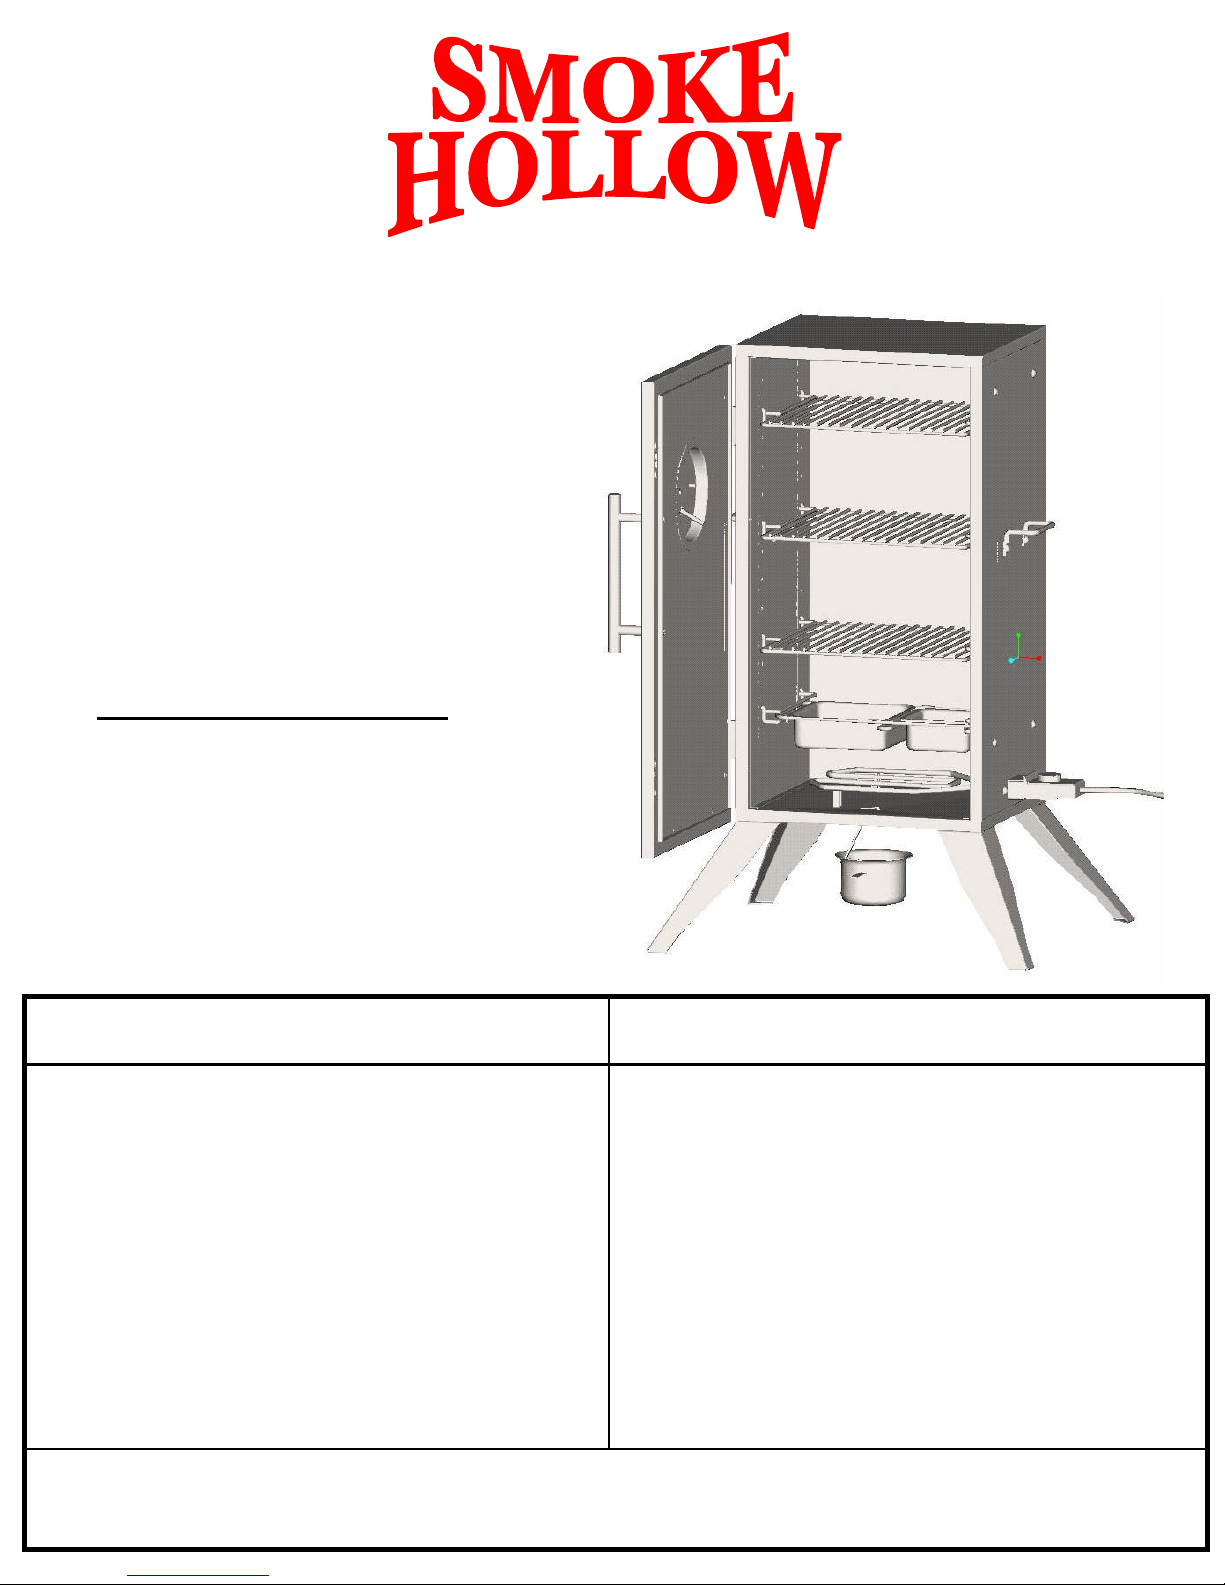
Smoke Hollow Model
30166E/30167E
Electric smoker
Failure to follow these instructions could result in fire, electric shock,
personal injury or death.
Outdoor use only.
Keep extension cord connection dry
and off the ground.
Do not touch hot surfaces during use.
Do not use smoker when raining.
Read all of these instructions and
keep them in a safe place for future
reference.
Household type.
Do not immerse in water .
Unplug from outlet when not in use
and before cleaning.
Do not move smoker while unit is
hot.
WarningImportant safeguards
Outdoor Leisure Products


Read and follow all assembly and operating, care and maintenance instructions in this manual to
avoid personal injury or property damage. The purpose of this symbol()is to call your attention
to possible hazards as you assemble and use your smoker. Please pay close attention to the
information that follows the symbol.
¾This smoker is designed for outdoor use only. Do not operate this smoker indoors or in an
enclosed area.
¾Keep this smoker away from swimming pools, hot tubs, etc. Do not use this smoker in the rain
or on wet surfaces. Do not immerse cord, controller, plug or heat element in water or any other
liquid. Use of this smoker on a wet surface, in the rain or if the smoker has been exposed to
moisture can result in electric shock.
¾Do not leave smoker unattended when in use.
¾Smoker should be placed in an area where children and pets cannot come into contact with it.
When in use, close supervision should be used.
¾To prevent accidental electric shock, this smoker should always be used on a GFCI (Ground
Fault Circuit Interrupter) outlet or circuit.do not plug this appliance into an indoor circuit.
¾Always use a 3-wire grounded outlet wired for 120 volts which is GFCI protected at 15 or 20
amps. If in doubt, contact a qualified electrician. Do not operate any other appliances or electrical
devices on the same circuit as the smoker.
¾Proper clearance of 5 feet between the smoker and combustible material should be maintained
at all times when this smoker is in use.
¾Do not store or use smoker near gasoline or other flammabel liquids, gases or where flammable
vapors may be present.
¾Use smoker on hard, level, non-combustible, stable surface (concrete, ground, etc.). Never use
smoker on wooden or other surfaces that could burn.
¾A drip pan, ash guard or mat designed for use with smokers for easy clean up of drippings that
can cause discoloration or surfaces will not prevent fires from occuring on wooden or other
combustible surfaces.
¾For household use only. Do not use this product for other than its intended purpose.
¾Before plugging unit into electric outlet, smoker should be completely set up with wood in place,
liquid in water pan and food on grills. Always unplug the cord from the outlet when finished
cooking.
¾Smoker should be located in an outdoor area that is protected from the wind.
¾Do not place smoker on or near a gas or electric burner, or heated oven.
¾Do not use an extension cord unless absolutely necessary. If you must use an extension cord,
the following precautions should be used:
Use the shortest length possible 12/3 or 14/3 grounded-type extension cord with a rating of at
least 15 amps.
Warning
Save this manual and read all instructions and warnings!
1

The cord should be marked with suffix letter “W-A” and with a tag stating “Suitable for Use
with Outdoor Appliances.”
Keep cord connection dry and off the ground. Do not allow cord to touch hot surfaces and place
it in such a manner so it will not be tripped over or tugged on by children or pets.
¾Do not operate this smoker if:
The cord or plug is damaged.
The electric element has been damaged in any manner.
The smoker has malfunctioned.
The smoker has been exposed to moisture or if grease and drippings were not cleaned from the
element after each use. Refer to “Care and Maintenance” section of this manual.
The GFCI circuit trips when the electric element is plugged into the electric outlet.
¾Do not wear loose clothing or allow hair to hang freely when operating smoker.
¾Always wear shoes when operating smoker.
¾Use caution when reaching into or under smoker. Always wear oven mitts/gloves to protect
your hands from burns. Avoid touching hot surfaces.
¾Use extreme caution when adding liquid to the water pan being careful not to spill any liquid
onto the electric element. Follow instructions in “Adding Water During Cooking” section of this
manual.
¾Water pan should always be used when smoking. Do not allow liquid in water pan to
completely evaporate. Check water pan periodically and add water if level is low. Follow
instructions in “Adding Water During Cooking” section of this manual.
¾Unplug the smoker from electric outlet when not in use. Allow smoker to cool completely
before cleaning. Make sure embers, coals or ashes are completely extinguished in a non-
combustible metal container.
¾Do not use smoker if the electric element has been exposed to moisture. Do not clean electric
element with a water spray or the like. Failure to adhere to this safety warning could result in the
electric element shorting out and in some cases, exploding. Clean the electric element as
instructed in the “Care and Maintenance” section of this manual.
¾Use caution when assembling or operating your smoker to avoid cuts and scrapes from sharp
edges of metal parts.
¾Store the smoker indoors in a dry location that is out of the reach of children.
¾Use caution when lifting or moving the smoker to avoid strains and back injuries.
¾We recommend that you have a fire extinguisher designed for use with electrical appliances on
hand. Consult your local authority to determine the proper size and type of fire extinguisher.
¾Use caution and common sense when operating your smoker.
¾Failure to follow safety warnings and guidelines in this manual could result in personal
injury or property damage.
Warning
Save this manual and read all instructions and warnings!
2

Electric Smoker Assembly Instructions
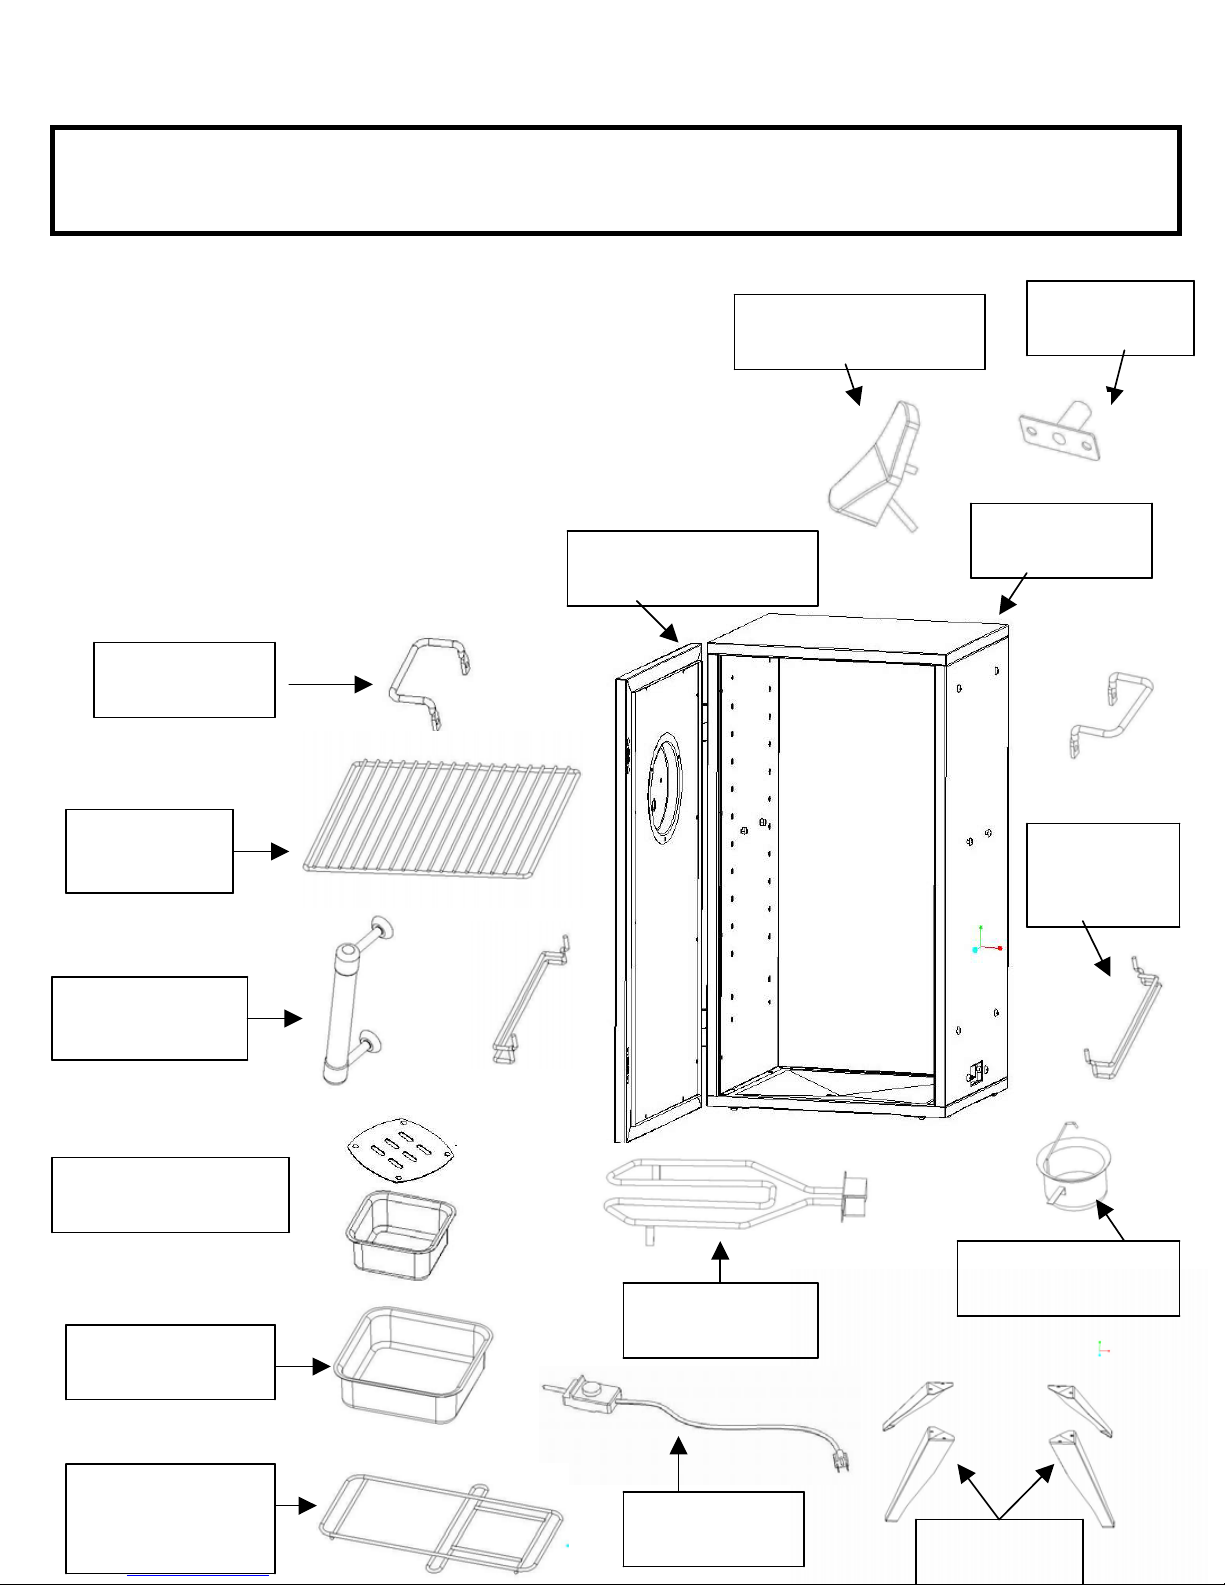
Assembly Step 1- Identifying 30166E parts
Check your package contents for these parts, make sure you have all of
the parts listed below. If not, please call us at 866-475-5180
Water pan and
wood chip box
rack (1pc) C008
Grease cup
(1pc) C012
Wood chip box
with lid (1 set) C006
Legs (4pcs)
C011
Heat element
(1 set) C010
Side handles
(2pcs) C003
Water pan
(1pc) C007
Side rack
supports
(8pcs) C013
Cooking grids
(3pcs) C004
Hardware bags(30166E):
Smoker cabinet
(1 set) C001
Air vent tube
(1 set) C015
Name plate with Heat
indicator(1set) C014
Door handle
and spacers
(1set)C005
Controller
(1 set) C009
Replacement door
assembly(1set) C002
A: 1/4-20x5/8” bolts(8)
Part no: C016
B: 10-24 x1” bolts(2)
10-24 flange nuts (2)
Part no: C017
C: 10-24x5/8” bolts(4)
Part no: C018
D: 10-24 x1/2” bolts(2)
10-24 flange nuts (2)
Part no: C019
3
E: 10-24 x3 1/4” bolts(2)
10-24 lock washer (2)
Part no: C020
Electric Smoker Assembly Instructions
Assembly Step 1- Identifying 30167E parts
Check your package contents for these parts, make sure you have all of
the parts listed below. If not, please call us at 866-475-5180
Water pan and
wood chip box
rack (1pc) C008
Grease cup
(1pc) C012
Wood chip box
with lid (1 set) C006
Legs (4pcs)
C011
Heat element
(1 set) C010
Side handles
(2pcs) C022
Water pan
(1pc) C007
Side rack
supports
(8pcs) C013
Cooking grids
(4pcs) C004
Hardware bags(30167E):
Smoker cabinet
(1 set) C001
Air vent tube
(1 set) C015
Name plate with Heat
indicator(1set) C014
Door handle
Kit (1set)C021
Controller
(1 set) C009
Replacement door
assembly(1set) C002
A: 1/4-20x5/8” bolts(8)
Part no: C016
B: 10-24 x1” bolts(2)
10-24 flange nuts (2)
Part no: C017
C: 10-24x5/8” bolts(4)
Part no: C018
D: 10-24 x1/2” bolts(2)
10-24 flange nuts (2)
Part no: C019
E: 10-24 x2 3/4” bolts(2)
10-24 lock washer (2)
10-24 flat washer (2)
Part no: C023
4
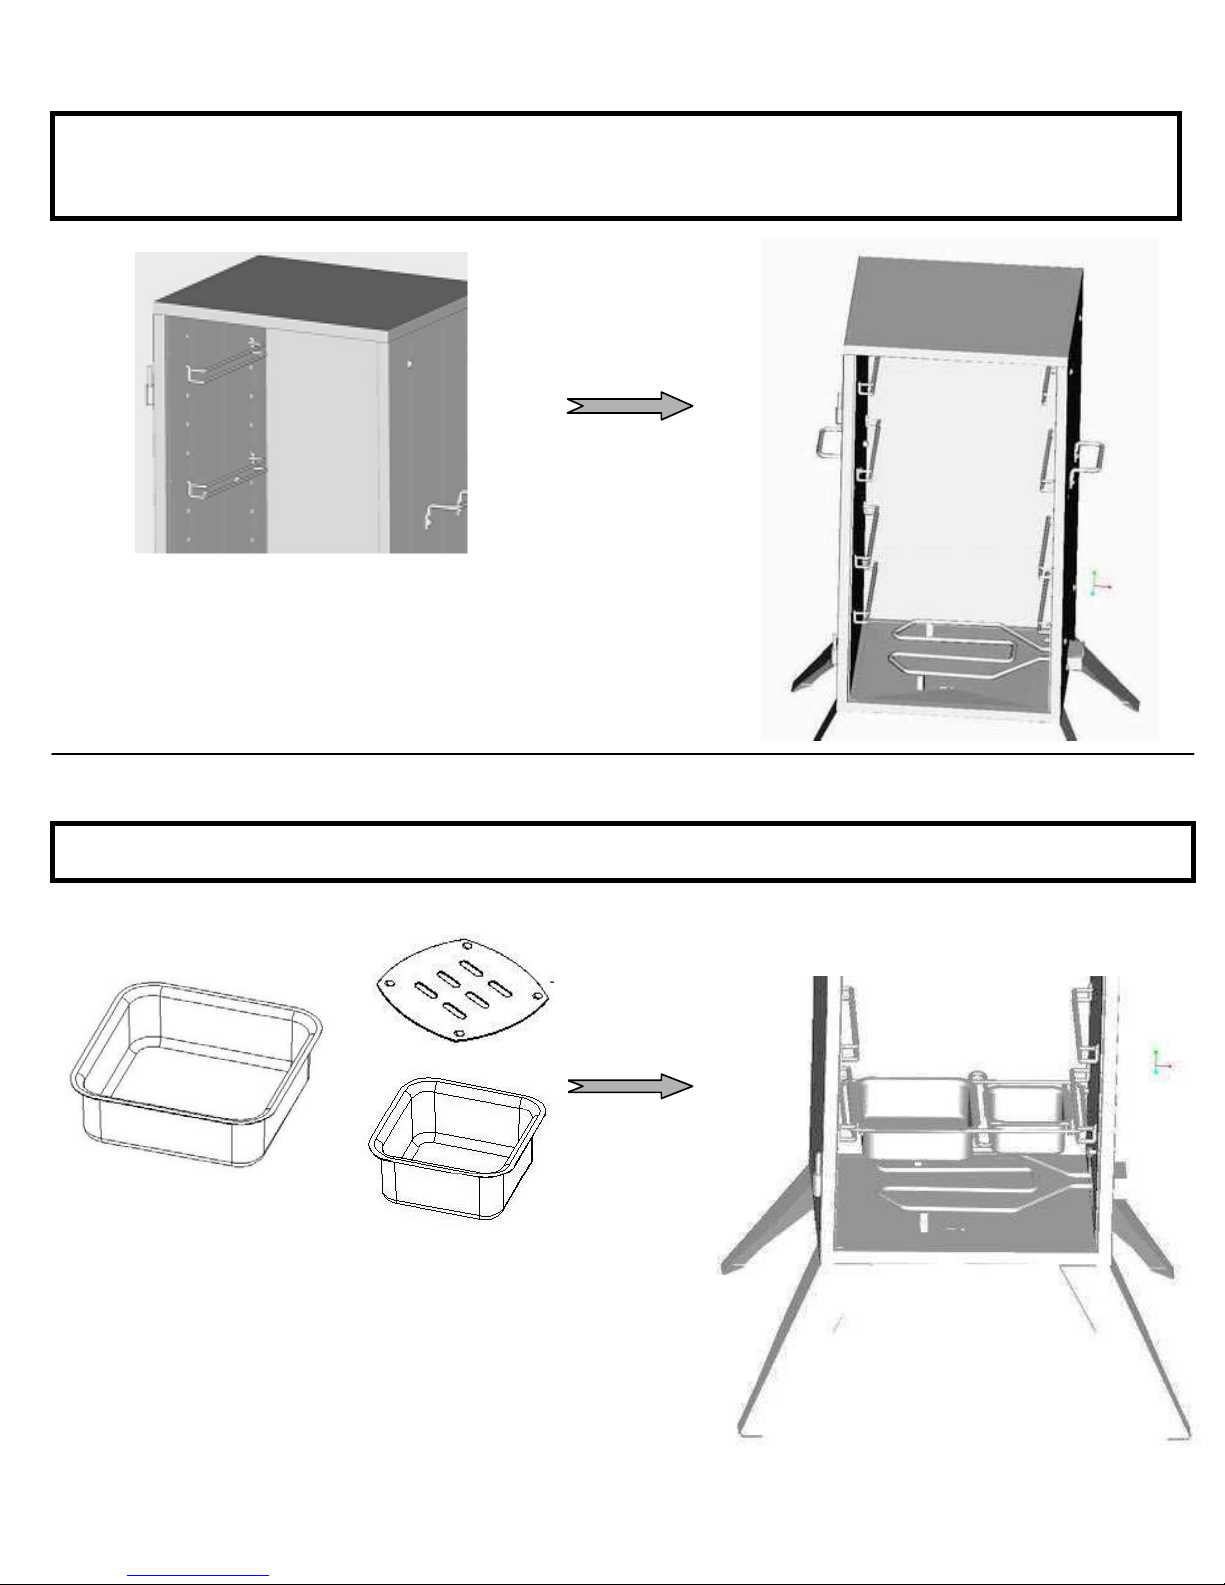
Electric Smoker Assembly Instructions
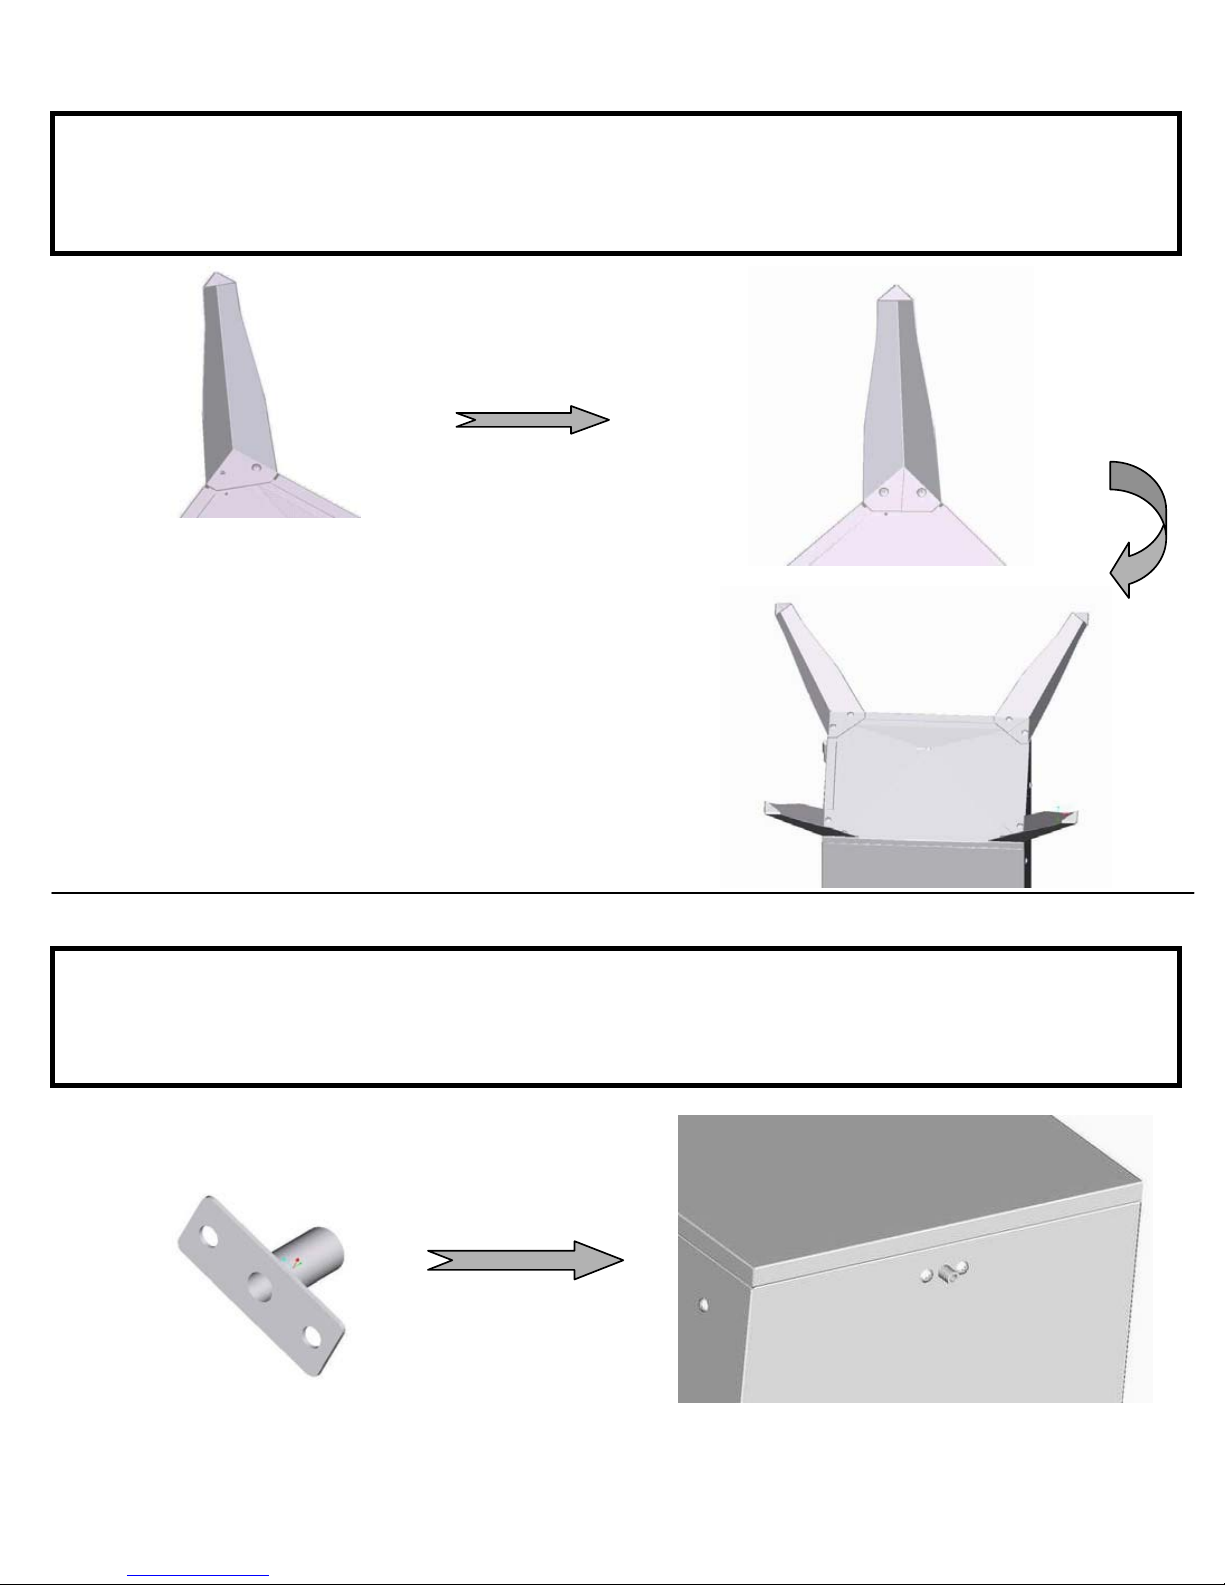
Assembly Step 2- Legs
Locate these parts: The legs (4pcs), Hardware bag A;
Hardware bag A : 1/4-20x5/8” bolts(8pcs)
Tools: Phillips head screwdriver
1. With the cabinet in the upright position,begin by
removing the door panel from the cabinet assembly
by lifting it from the hinges. Set the door panel
aside,this will make assembly much easier.
2. For each leg, line up the holes and insert
the bolts, nuts are pre-welded to the cabinet.
3. Securely tighten the bolts.
4. Turn over the cabinet.
1. For air vent tube, line it up with back
panel holes on the inside of smoker cabinet. 3. From inside the cabinet, slide
lock washers onto bolts and thread
nuts onto bolts. Securely tighten
nuts.
Assembly Step 3- Air vent tube
2. Insert two bolts from the outside
of the cabinet.
Locate these parts: Air vent tube (1 set), Hardware bag B;
Hardware bag B : 10-24 x1” bolts(2pcs)/10-24 flange nuts(2pcs)
Tools: Phillips head screwdriver/ 3/8” wrench
5
Electric Smoker Assembly Instructions
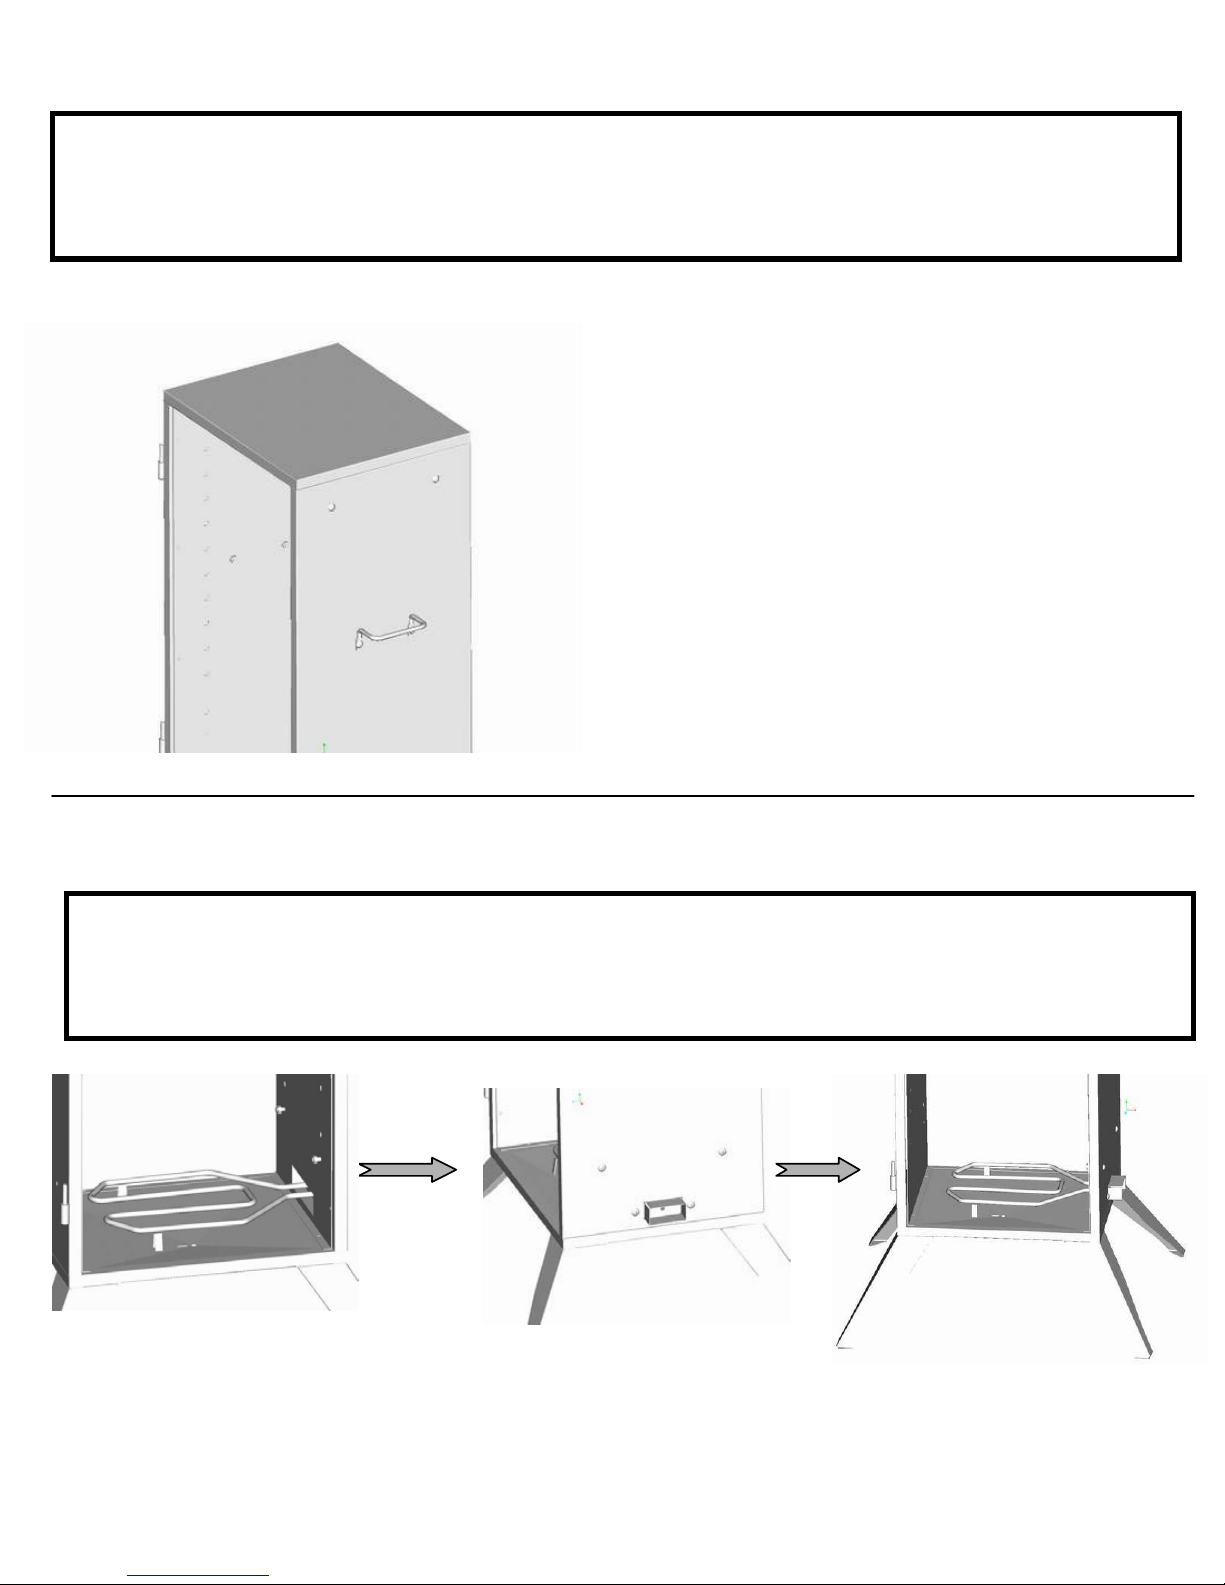
Assembly Step 4- Side handles
1. Line up the side handle with the
corresponding holes on the side of
the cabinet as shown. The handles
must be positioned upright with the
bolt holes on the side as shown.
2. Insert the bolts from the outside
and the lock washers and nuts from
the inside of cabinet.
3. Securely tighten.
1. Position the heat element inside the
cabinet and push the bracket through the
opening in the right side panel.
3. Apply flange nuts and securely tighten.
Assembly Step 5- Heat element
2. Insert two bolts from the outside of
cabinet.
4. Complete steps for both sides of
the cabinet assembly.
Locate these parts: Side handles (2pcs), Hardware bag C;
Hardware bag C : 10-24x1/2” bolts/ (4pcs)
Tools: Phillips head screwdriver/ 3/8” wrench
Locate these parts: Heat element (1 set), Hardware bag D;
Hardware bag D : 10-24 x1/2” bolts(2pcs)/ 10-24 flange nuts (2pcs)
Tools: Phillips head screwdriver/ / 3/8” wrench
6
Electric Smoker Assembly Instructions
Assembly Step 6- Side racks
Locate these parts (30166E): side racks (8pcs)
(30167E): side racks (10pcs)
1. Insert the rack supports into the mounting
holes inside the smoker cabinet as shown.
Locate these parts: water pan(1pc)/wood chip box with lid(1set)/bottom rack (1pc)
1. Place water pan and wood chip box
with lid on bottom rack.
Assembly Step 7- Water pan/Wood chip box/Bottom rack
2. Position the bottom rack and wood
chip box and water pan into the
lowest side rack.
2. Put two pieces of side racks on lowest position to
hold the water pan and wood chip box rack.
water pan wood chip box with lid
7
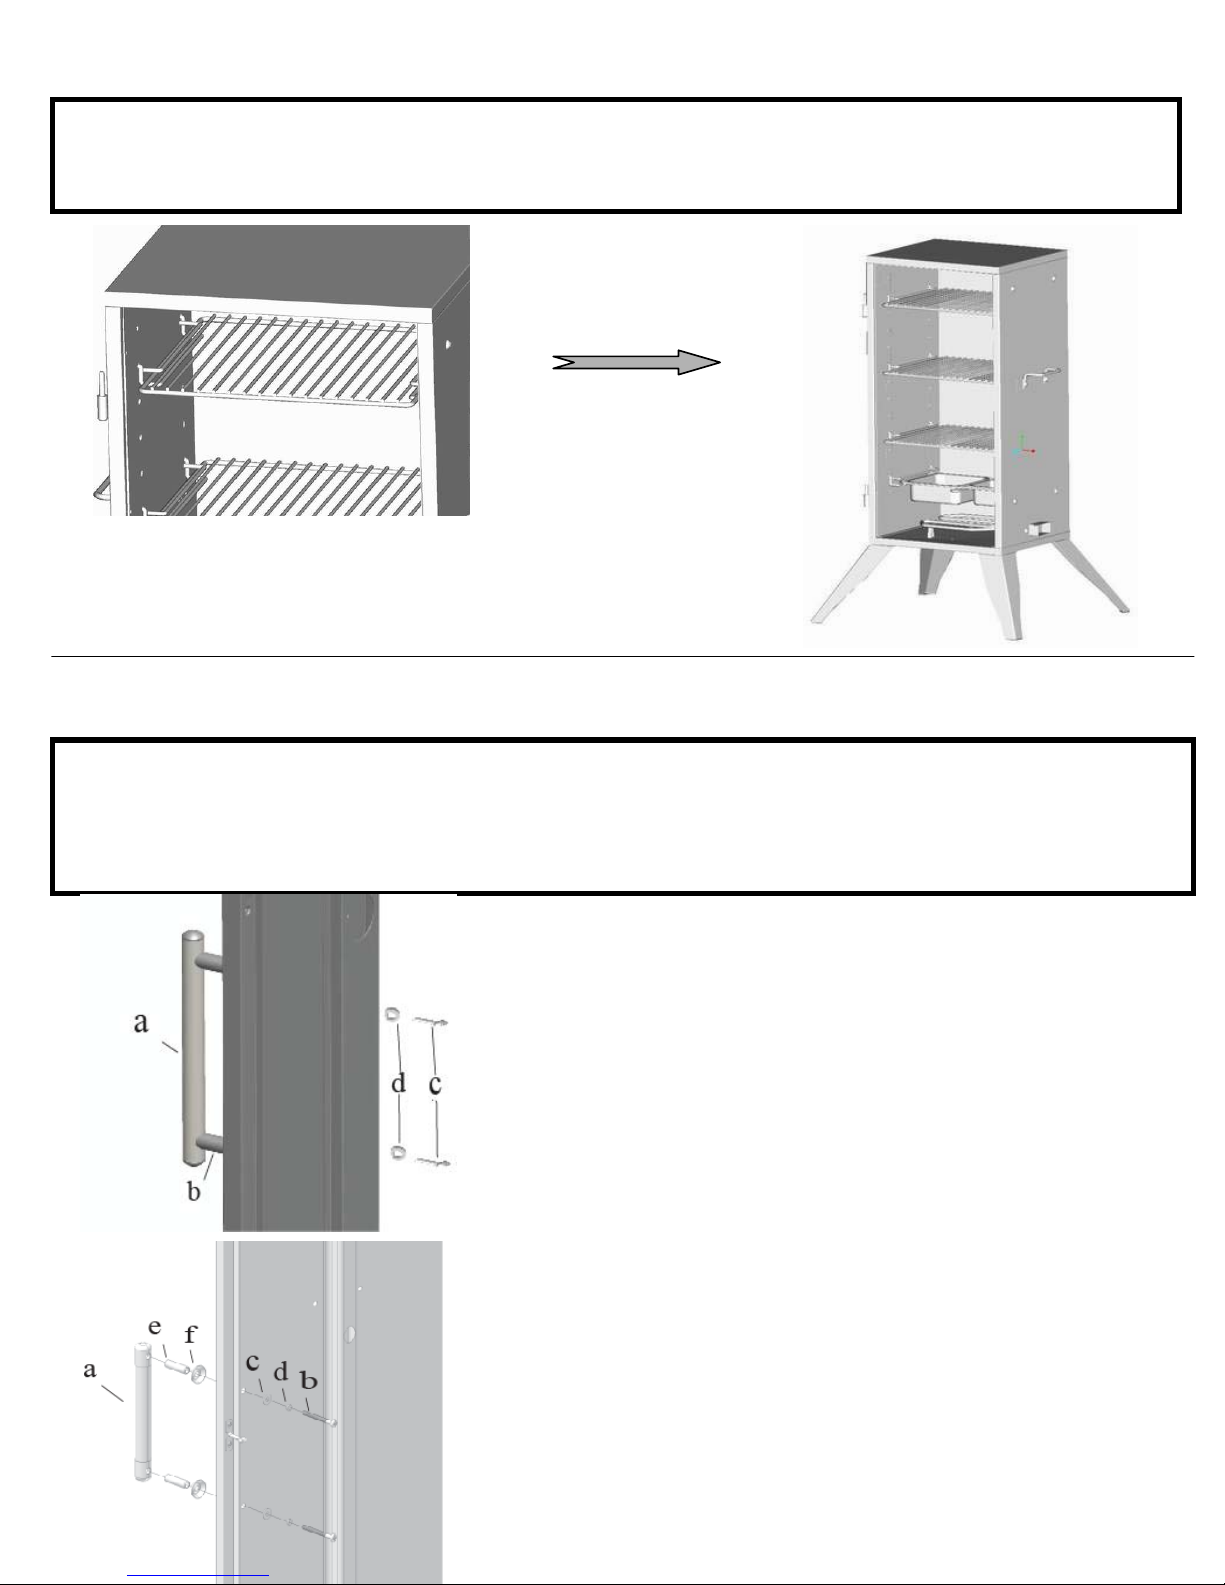
Electric Smoker Assembly Instructions
Assembly Step 8- Cooking grids
Locate these parts (30166E): cooking grids (3pcs)
(30167E): cooking grids (4pcs)
1. Insert the cooking grids into rack supports as desired.
2. Assemble the door handle components.
Assembly Step 9- Door handle
2. Make sure all cooking grids are level.
3 (30167E). With a flat washer (c) and lock
washer (d) on a bolt (b), insert each bolt through
the door from the inside. From the outside place a
cap (f) and spacer (e) over each bolt. Then thread
the bolts into the handle (a).
1. Re-mount the door panel by sliding the door’s
hinge pin into the cabinet’s hinge seats.
Locate these parts(30166E): Door handle (1set), Hardware bag E;
(30167E): Door handle kit (1 set) , Hardware bag E;
Tools: Phillips head screwdriver
8
3 (30166E). With a lock washer (d) on a bolt
(c),insert each bolt through the door from the
inside. From the outside place a spacer (b) over
each bolt. Then thread the bolts into the handle (a).
4. Securely tighten two bolts.
30166E
Door handle
30167E
Door handle
Este manual sirve para los siguientes modelos
1
Tabla de contenidos
Otros manuales de Fumador de Smoke hollow

Smoke hollow
Smoke hollow 30168E Manual de usuario

Smoke hollow
Smoke hollow ES3018M Manual de usuario

Smoke hollow
Smoke hollow 34166G Instrucciones de instalación

Smoke hollow
Smoke hollow WS30C Manual de usuario

Smoke hollow
Smoke hollow 3016DEW Manual de usuario

Smoke hollow
Smoke hollow Smoke-Tronix CAB4017 Manual de usuario

Smoke hollow
Smoke hollow SH36GW Instrucciones de instalación

Smoke hollow
Smoke hollow 30167G Suplemento

Smoke hollow
Smoke hollow GS3018M Manual de usuario

Smoke hollow
Smoke hollow ES230B Manual de usuario


