SMAX Technology GB1 Manual de usuario

w w w . s m a x . c o m . t w
Ver 1.2
GB1 2MP Box Camera, 2.8~12mm Vari-Focal Lens
User
Manual

w w w . s m a x . c o m . t w
CONTENTS
Chapter I.
Chapter 2.
Chapter 3.
1.1. Read Before Use 1
1.2. Physical Description 2
1.3. Safety Instructions 4
1.4. Package Contents 5
1.5. Electromagnetic Compatibility 6
2.1. Hardware Installation 7
2.2. SMAX Finder Installation 8
2.3. Ready to Use 9
3.1. Network Deployment 10
3.2. Using Web Browsers 14
3.3. Using RTSP Players 15
Chapter 4.
Chapter 5.
3.4. Using Mobile APP 16
3.5. Using VMS 17
4.1. Main Page 22
4.2. Client Settings 23
5.1. System Setup 24
5.2. Network Setup 28
5.3. Video & Audio Setup 38
5.4. SD Card Setup 51
5.5. Event Setup 55
5.6. Maintenance 61
5.7. Device info 64

w w w . s m a x . c o m . t w
CONTENTS
Chapter 6.
6.1. URL Commands 66
6.2. Technical Specifications 81
6.3. Onvif Supports List 83
6.4. Liability 94
6.5. Copyright 95

P 01
w w w . s m a x . c o m . t w
Chapter I.
1.1. Read Before Use
This network camera is a professional
equipment for surveillance purpose. Please
comply with each national laws to prevent
from any relevant privacy violations before use.
In order to operate this network camera, it
require a basic knowledge of network
structure. For further use of project application,
it requests an advance level of knowledge in
lens optics selection, network structure design,
storage planning and software capability.
This product service may be different since the
diversity of distributors. We suggest to
purchase SMAX product from SMAX direct
distributors or system integrators to get the
most complete after service.
Please first check the package contents are
complete with nothing missing. Then, carefully
read through all attentions and instructions
before use.
P 02
w w w . s m a x . c o m . t w
Chapter I.
DC iris Lens
MicroSD/SDHC Card Slot
DIDO Terminal Block
DC 12V
Ethernet 10/100
RJ45 port
Video Output
Audio In
RCA port
Audio Out
RCA port
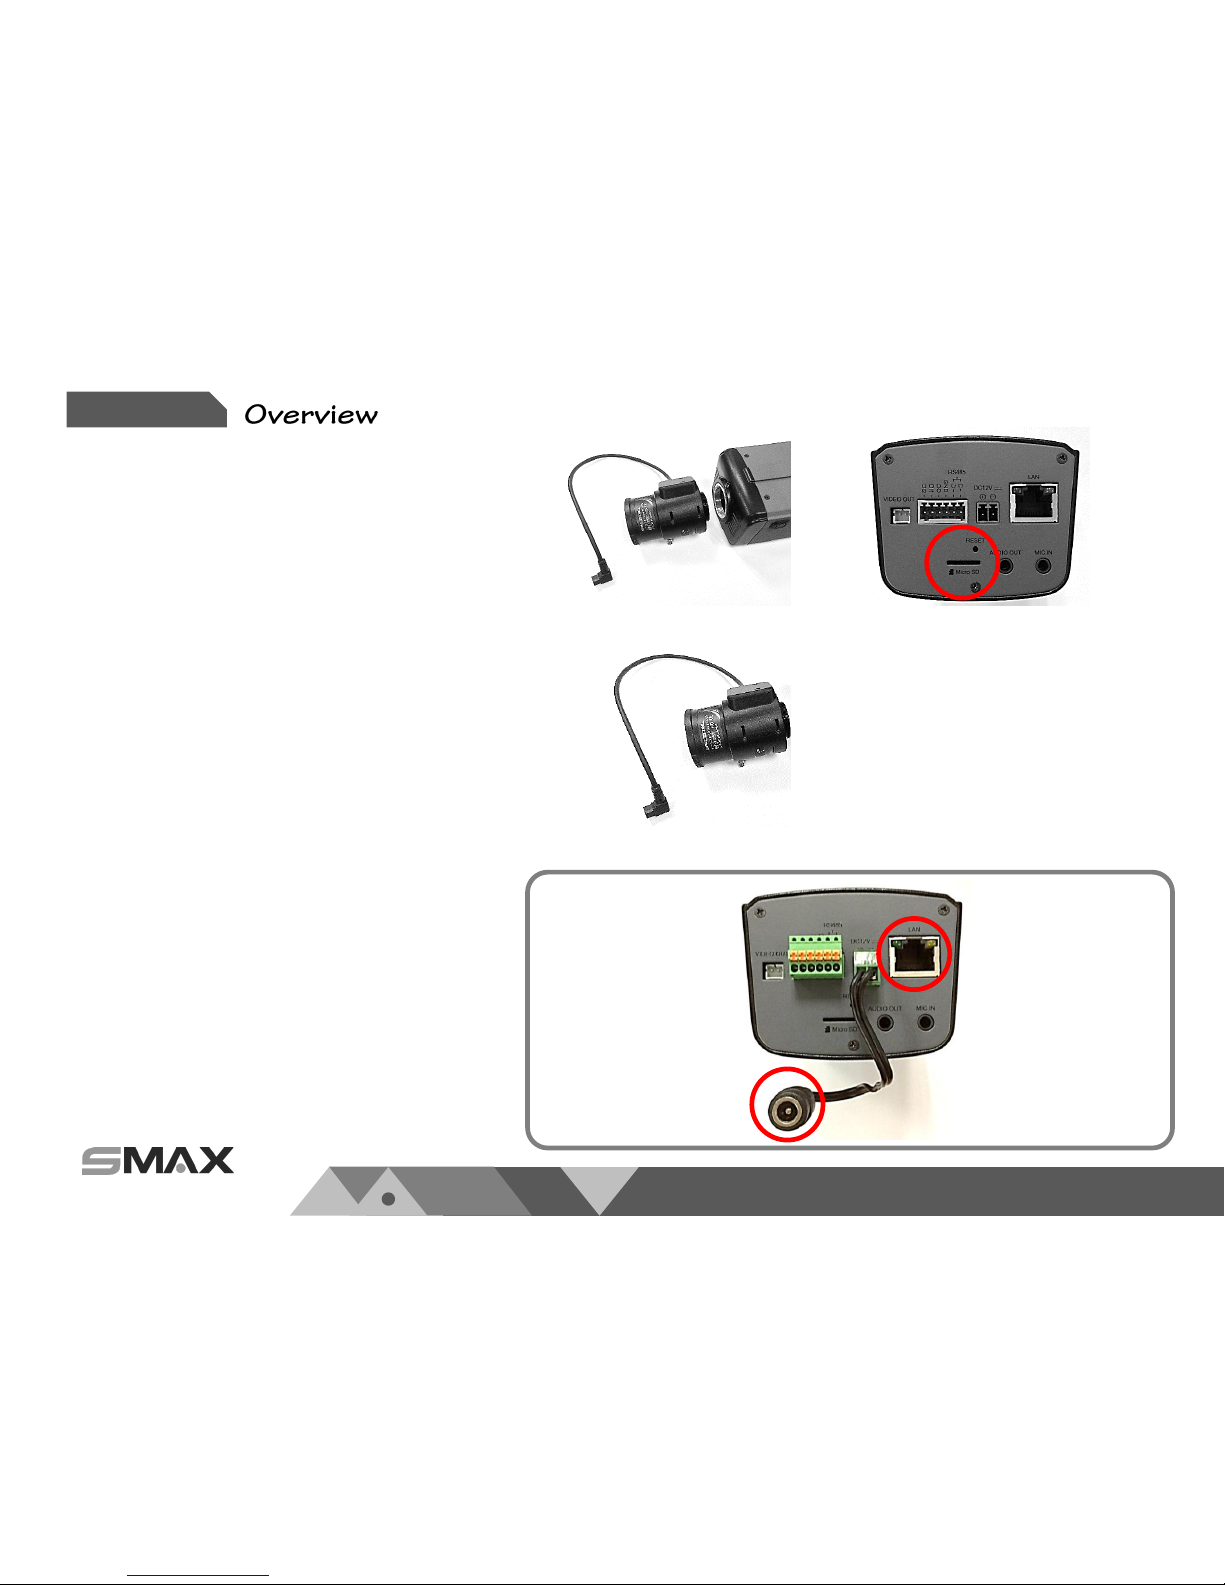
1.2. Physical Description
1.2.1. Mechanical and hardware interface
GB1 is design to attach with external lens. SMAX
provide a DC-iris vari-focal lens to connect with. Its
light sensor can detect and control the IR-LED On/Off.
It can also attach with other type of lens that meet the
CS mount standard.
GB1 accepts both POE or DC 12Vas power supply.
Please noted that the DC 12V adapter is an extra
accessory which does not include in this package.
GB1 supports two ways audio function which can
connect with an external speaker and microphone.
GB1 has micro SD/SDHC card slot built in for recording
storage function.

P 03
w w w . s m a x . c o m . t w
Chapter I.
Digital Input
Pin
Notes
Specifications
Trigger is “Off”, DO connect to GND
Trigger is “On”, DO is floating
Max load:
30mA,30VDC
Trigger
H
CAMERA DO
GND
GND
Power
RL
Digital Output
Pin
Notes
Specifications
DI is floating, trigger is “high”
DI is high, trigger is “low”
Max current input:
30mA
Trigger
DI
GND
GND
H
L
SW
Power
RL
CAMERA
Suggested Component Value:
Power(VDC)
RL(Ω)
3.3V
100Ω
5V
200Ω
12V
510Ω
Item
Description
1
RS485
-
2
RS485+
3
GND
4
DO
5
DI
1
6
DI 2
7
GND
1.2. Physical Description
1.2.2. Digital Input (DI) & Digital Output (D0)

P 04
w w w . s m a x . c o m . t w
Chapter I.
1.3. Safety Instructions
Please carefully read through below safety instruction to prevent any damage of camera and person or any
reason that will cause the invalid of the warranty.
Network camera is a highly delicate electronic equipment. Please do not stumble or falling from high. It
will cause damage to the camera.
Please do not store the camera in a environment that the temperature or humidity are exceed camera’s
specification. Please also prevent from the direct expose of the sun light.
Network camera is not a toy. Please prevent from the use of the child for any accident possibility.
Please be careful when operate this network camera to prevent from any possibility that cause the
device or components to invade your body.
Please do not disassemble the camera to prevent from any abnormal function or operation.
When place the camera in a high humidity or wet environment, please select the IP66/67 level products.
Or else, please pus the camera in a outer housing box to prevent from damage.
Please do not put any wire or cable within the camera device to prevent from damage.
Cause of heat is a normal situation when operate network camera, please prevent direct contact when
the camera is in use for a while.
Please do not attach DC/AC power directly to the camera’s DI/DO port.
Please check the correct direction when insert the SDHC card into camera device.
Please contact your sales channel or find a regional SMAX distributor for any warranty issues.

P 05
w w w . s m a x . c o m . t w
Chapter I.
Description Qty
Network Camera 1
Lens 1
Bracket 1
Tools package (Screw Kit…etc.) 1
CD:
A. Software:
SMAX Finder x 1
SMAX VMS64 x 1
B. Doc:
Datasheet,
User Manual,
Quick Installation Guide
1
Network Camera
Lens
CD
1.4. Package Contents
P 06
w w w . s m a x . c o m . t w
Chapter I.
1.5. EMC(Electromagnetic Compatibility)
FCC Statement
This device compiles with FCC Rules Part 15. Operation is subject to the following two conditions.
(1.) This device may not cause harmful interference, and
(2.)This device must accept any interference received, including interference that may cause undesired
operation.
This equipment has been tested and found to comply with the limits for a Class A digital device,
pursuant to Part 15 of the FCC Rules. These limits are designed to provide reasonable protection
against harmful interference when the equipment is operated in a commercial environment. This
equipment generates, uses, and can radiate radio frequency energy and, if not installed and used in
accordance with the installation manual, may cause harmful interference to radio communications.
Operation of this equipment in a residential area is likely to cause harmful interference, in which case
the user will be required to correct the interference at his own expense.
CE Mark Warning
This is a Class A product. In a domestic environment, this product may cause radio interference, in
which case the user may be required to take adequate measures.

P 07
w w w . s m a x . c o m . t w
Chapter 2.
Setup 1.
Setup 2.
Inset micro SD card in the back of
the camera if necessary.
Please attach the lens to the camera
and plug in the iris control plug as
below picture.
Setup 4.
Setup 5.
Setup 3. Please attach the bracket to the
camera and adjust viewing angle and
focus as your desire.
*. The network camera
supports both PoE power
or DC 12V power supply.
Please connect this network camera
to a *PoE switch, PoE injector, or DC
12V power supply. Make sure all
connection is stable .
Please connect the network cable to
network Camera.
Setup 6. Please fix the camera on the wall or
ceiling with the bracket.
Setup 7. Please make sure all setup
procedures of this network camera
is complete. Then process to the
next step of network accessing.
2.1. Installation
Please follow below instructions to setup
your network camera.
Tabla de contenidos
Otros manuales de Cámara IP de SMAX Technology


