
Skyline Exhibits DesignView Manual
1
DesignView Presentation System is a product of Skyline Exhibits
Patents Pending
©2011 Skyline Exhibits
DesignView
®
Presentation System
SET UP
INSTRUCTIONS
TABLE OF CONTENTS
SET UP ........................................................................................................... 2
DRAPE............................................................................................................ 3
IMAGE PROJECTION....................................................................................... 5
TAKEDOWN ................................................................................................ 10
SCREEN REPLACEMENT................................................................................. 12
REMOVAL ...................................................................................................... 12
INSTALLATION ............................................................................................... 13
APPENDIX - NEC PROJECTOR................................................................................14
PN 32675-F
2
DesignView Presentation System is a product of Skyline Exhibits
Patents Pending
©2011 Skyline Exhibits
DesignView
®
Presentation System
SET UP
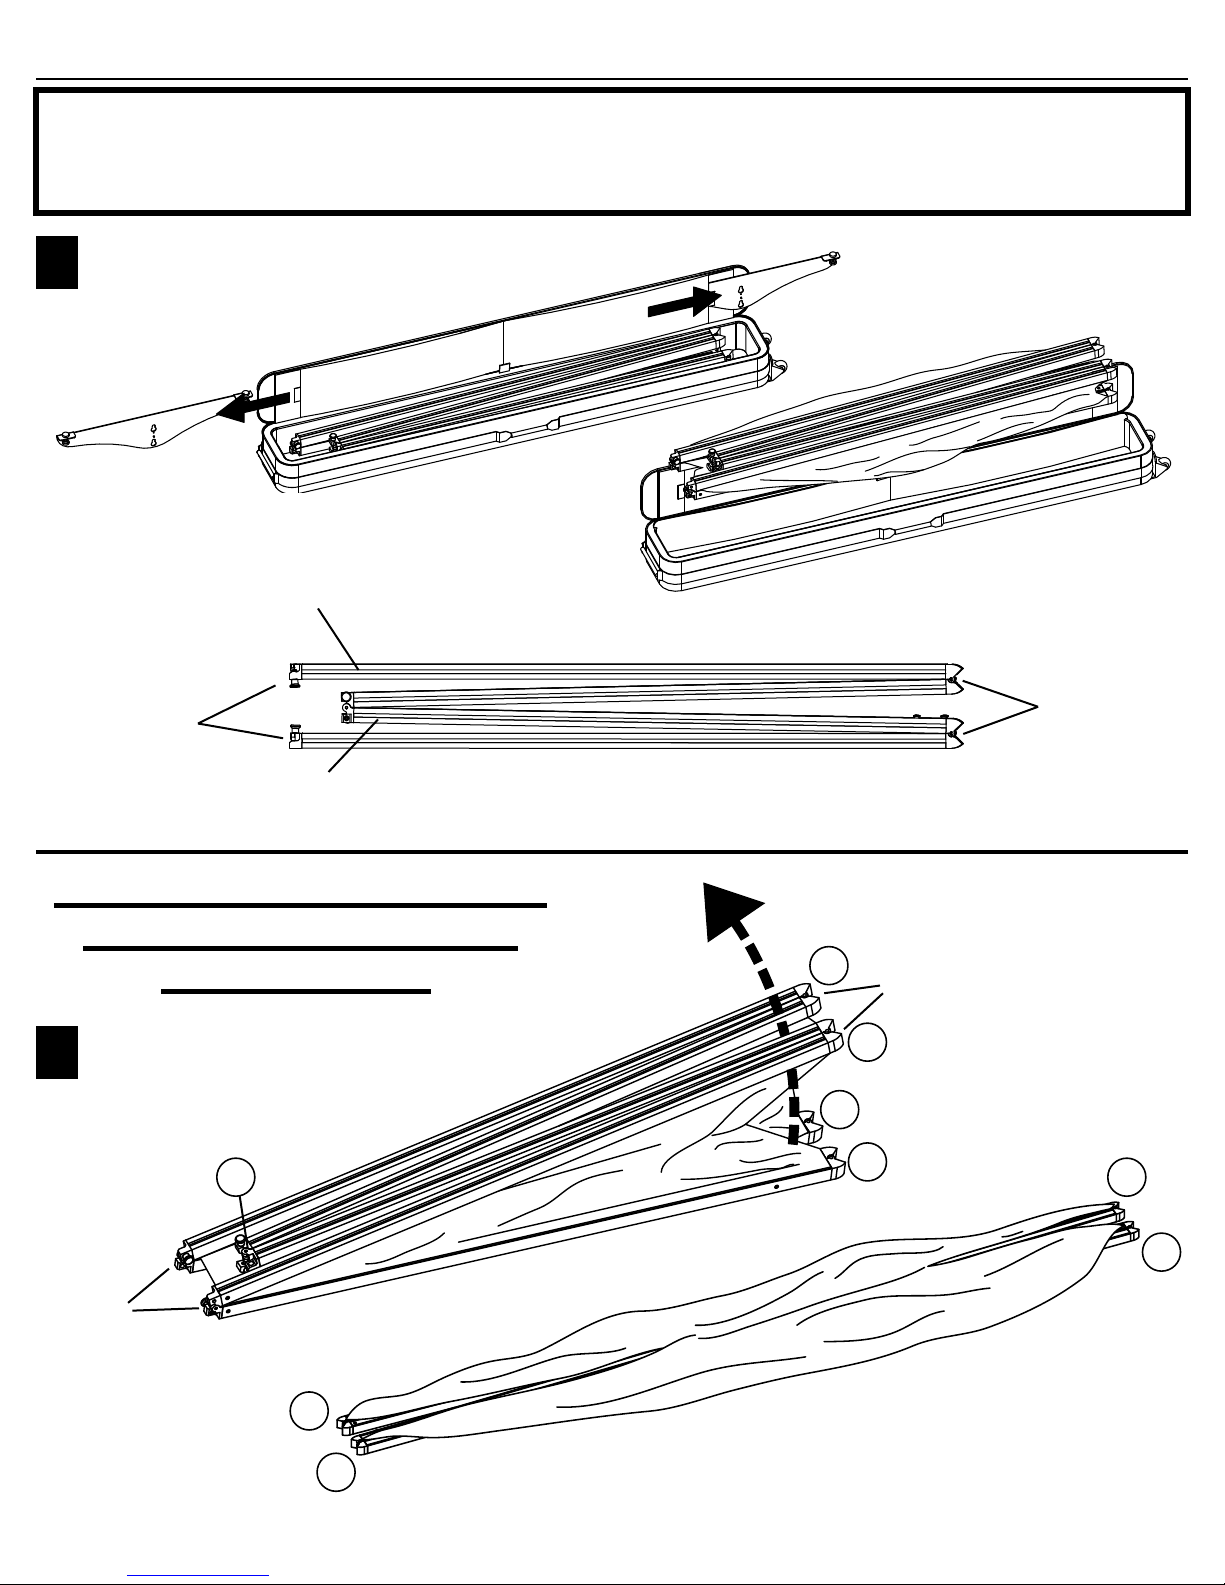
Long Sections are
horizontals
Hinges
Hinges
Lift up on the top 2 corners
and unfold the unit 180º.
Frame Orientation
When unfolded in this
manner, the front of the
unit with the fabric, will
be on top
Short Sections
are verticals
Unpack parts.
Put feet aside.
1
2
Corners
180º
Before setting up the DesignView Presentation System for the first time,
read these instructions carefully. Although this product has been designed
for safety, injury could occur if certain precautions are not followed.
Lay frame and fabric on a drop
cloth or clean area to avoid
soiling the fabric.
1
1
2
2
4
4
5
5
3
Corners
3
DesignView Presentation System is a product of Skyline Exhibits
Patents Pending
©2011 Skyline Exhibits
DesignView
®
Presentation System
SET UP
52
5
5
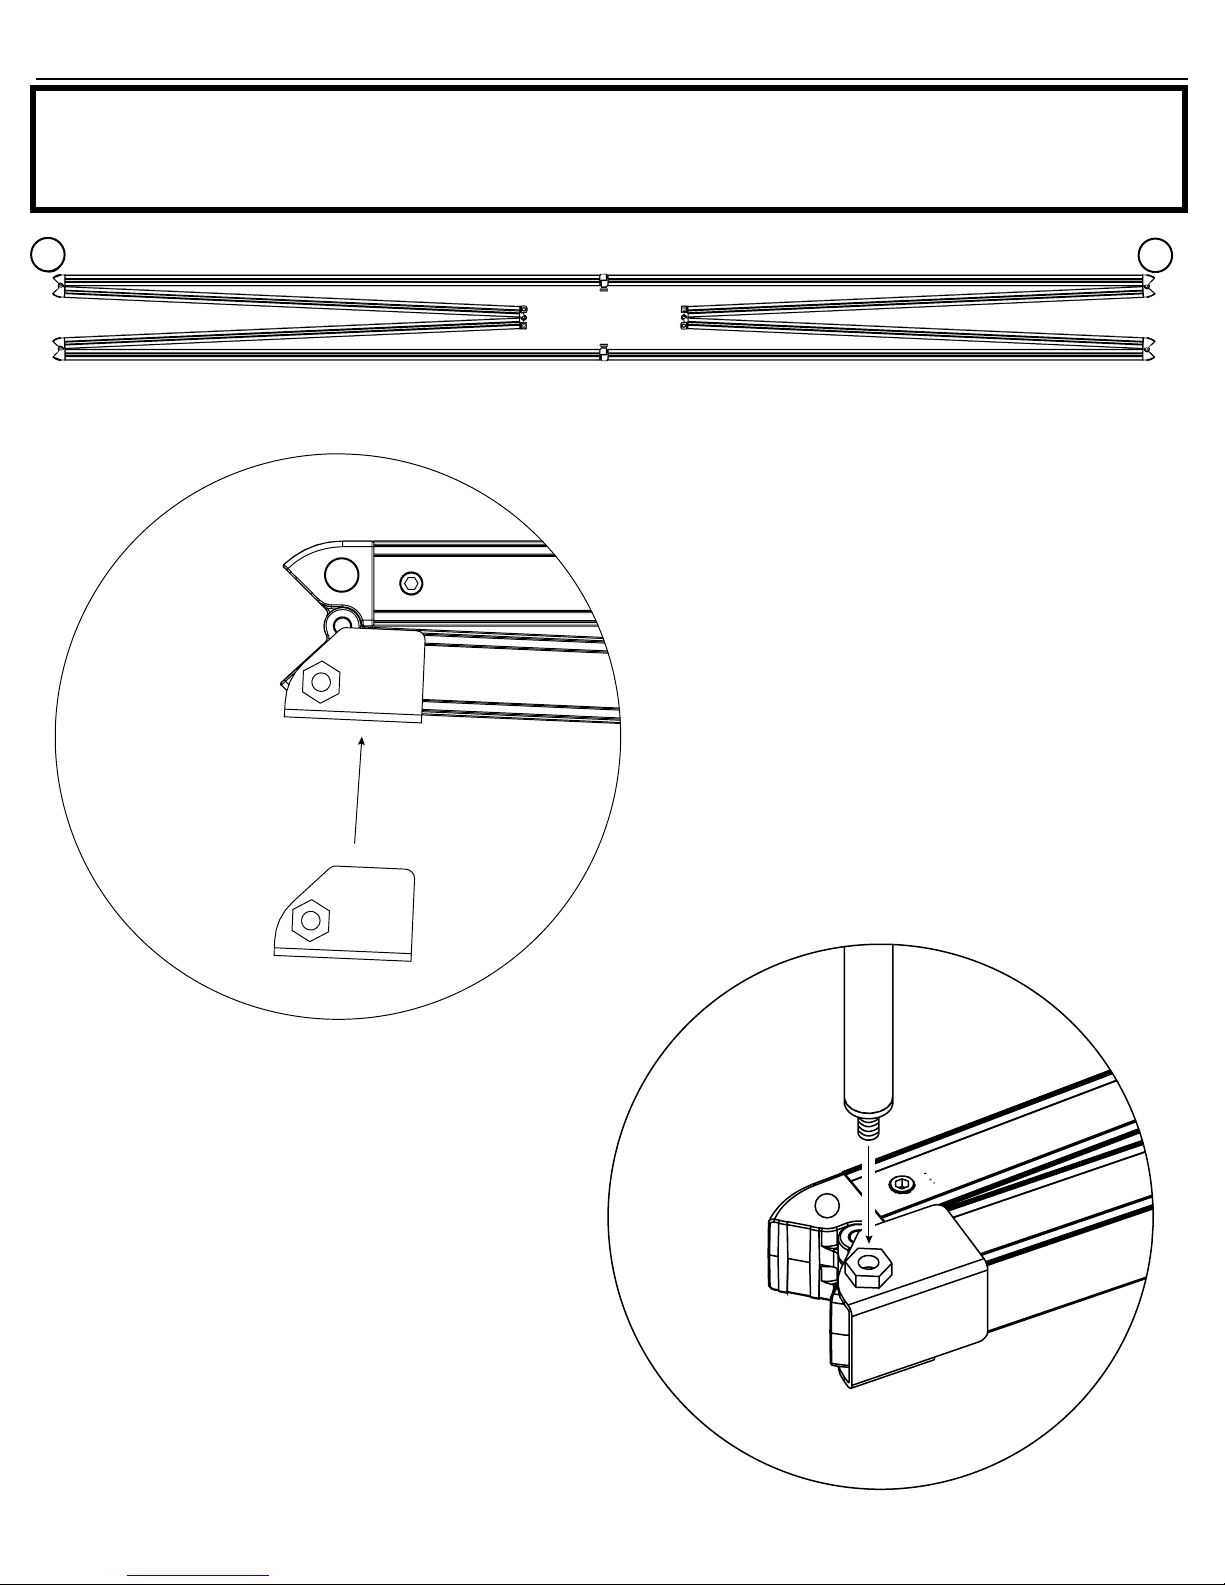
1) Clean frame where the brackets will be installed
with alcohol swab.
2) Remove tape from both brackets (first time only),
and press firmly to install on corners numbered 2
and 5. Make sure the bracket is not protruding past
the corners.
For best adhesion results, apply corner
brackets 24-72 hrs before using the Design-
View System.
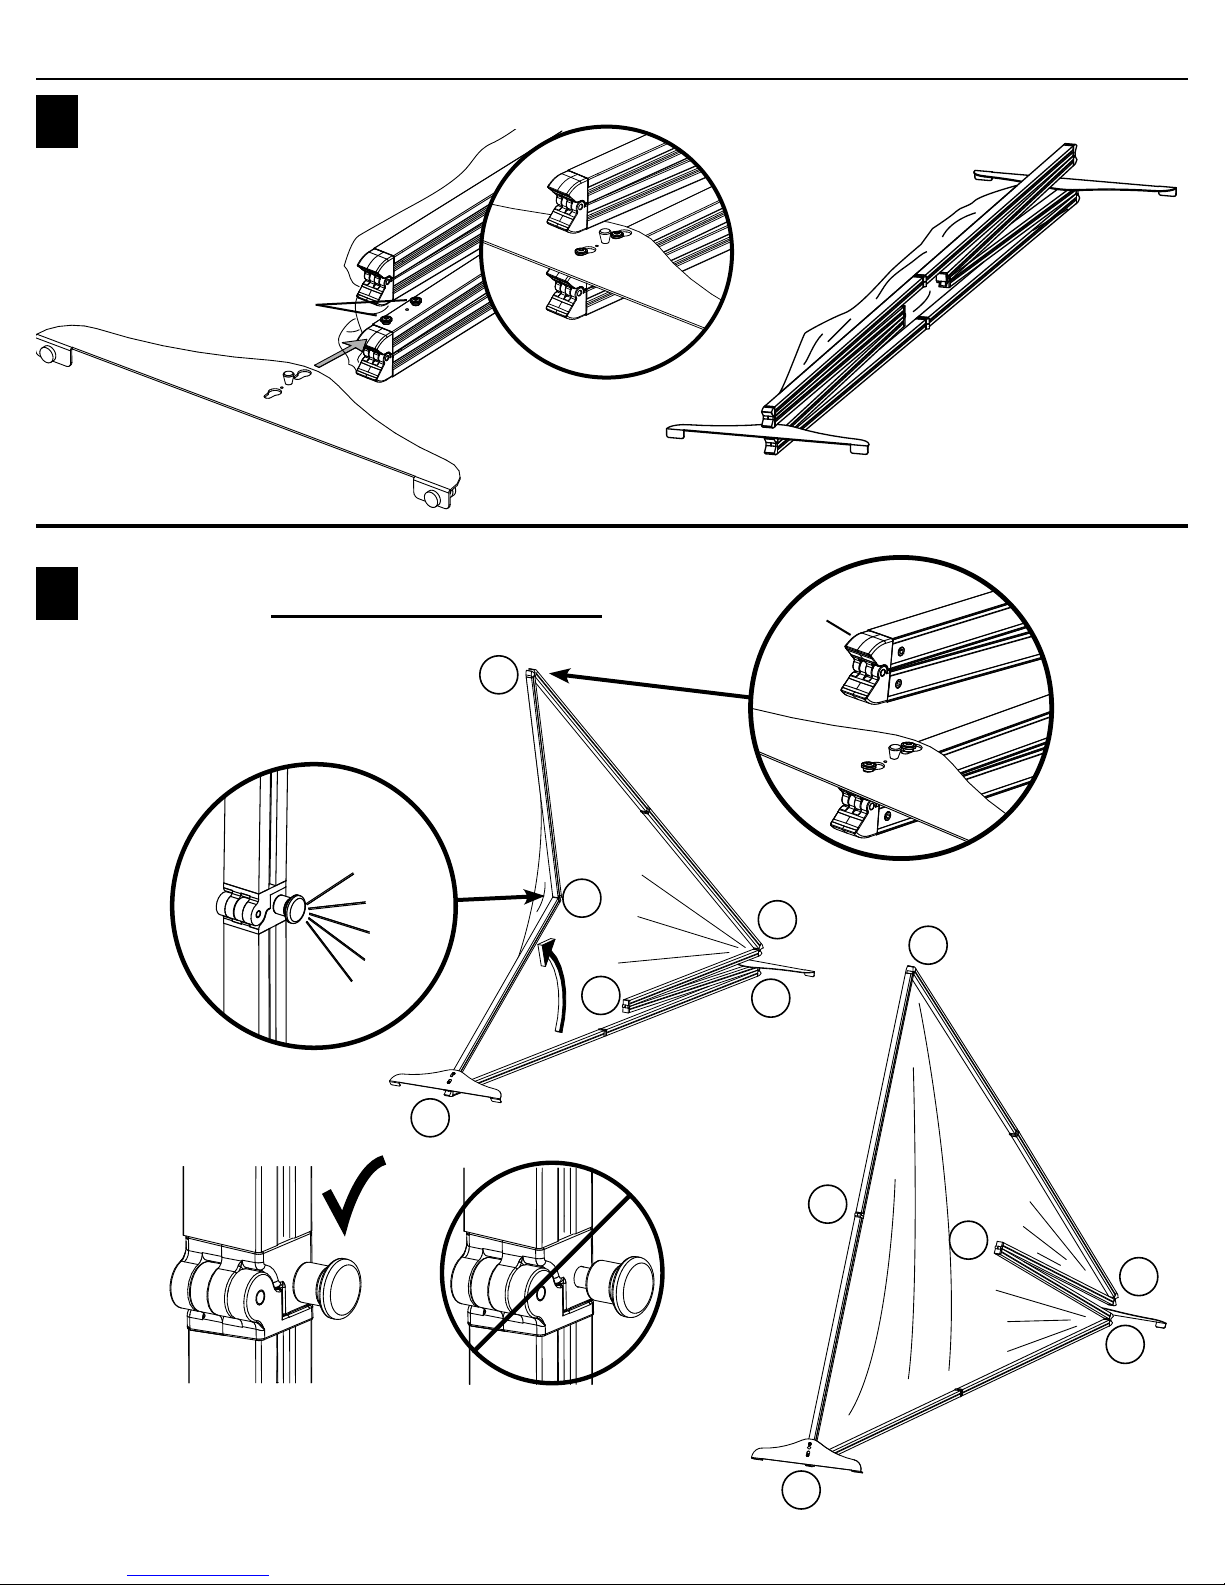
FABRIC DRAPE: Recommended for brighter venues. (optional) The drape will be in-
stalled after the frame is unfolded, before it’s tipped up to put the feet on.
2
5
5
Place frame with the graphic side down
DRAPE
3) Thread the first pole into the nut, making
sure it is straight, or cross threading may occur.
Tighten pole down.
4
DesignView Presentation System is a product of Skyline Exhibits
Patents Pending
©2011 Skyline Exhibits
DesignView
®
Presentation System
SET UP
DRAPE
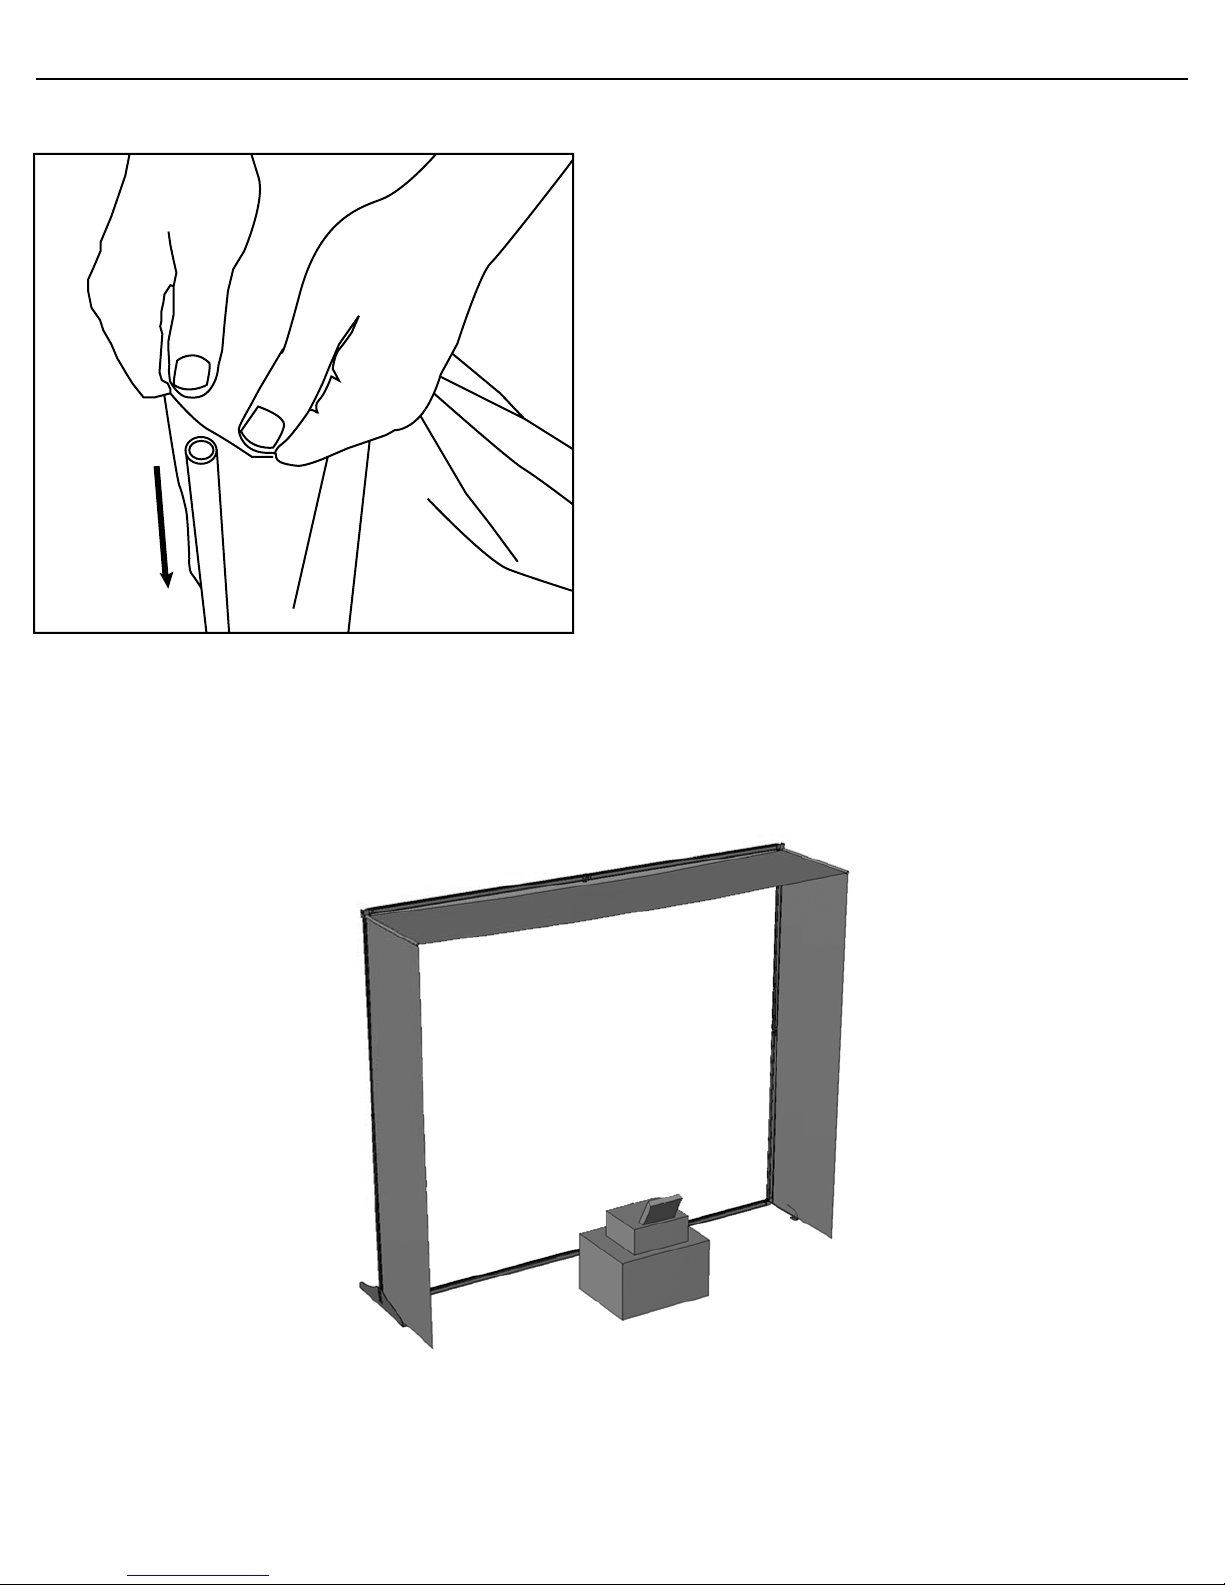
4) Slide fabric banner over first pole
5) Insert second pole into fabric on opposite corner.
6) Proceed to thread the second pole into the nut,
making sure it is both straight & tight. (Corner #2)
7) Attach the feet and unfold the frame per set-up
instructions.
5
2
BACK
VIEW
5
DesignView Presentation System is a product of Skyline Exhibits
Patents Pending
©2011 Skyline Exhibits
DesignView
®
Presentation System
SET UP
3
4
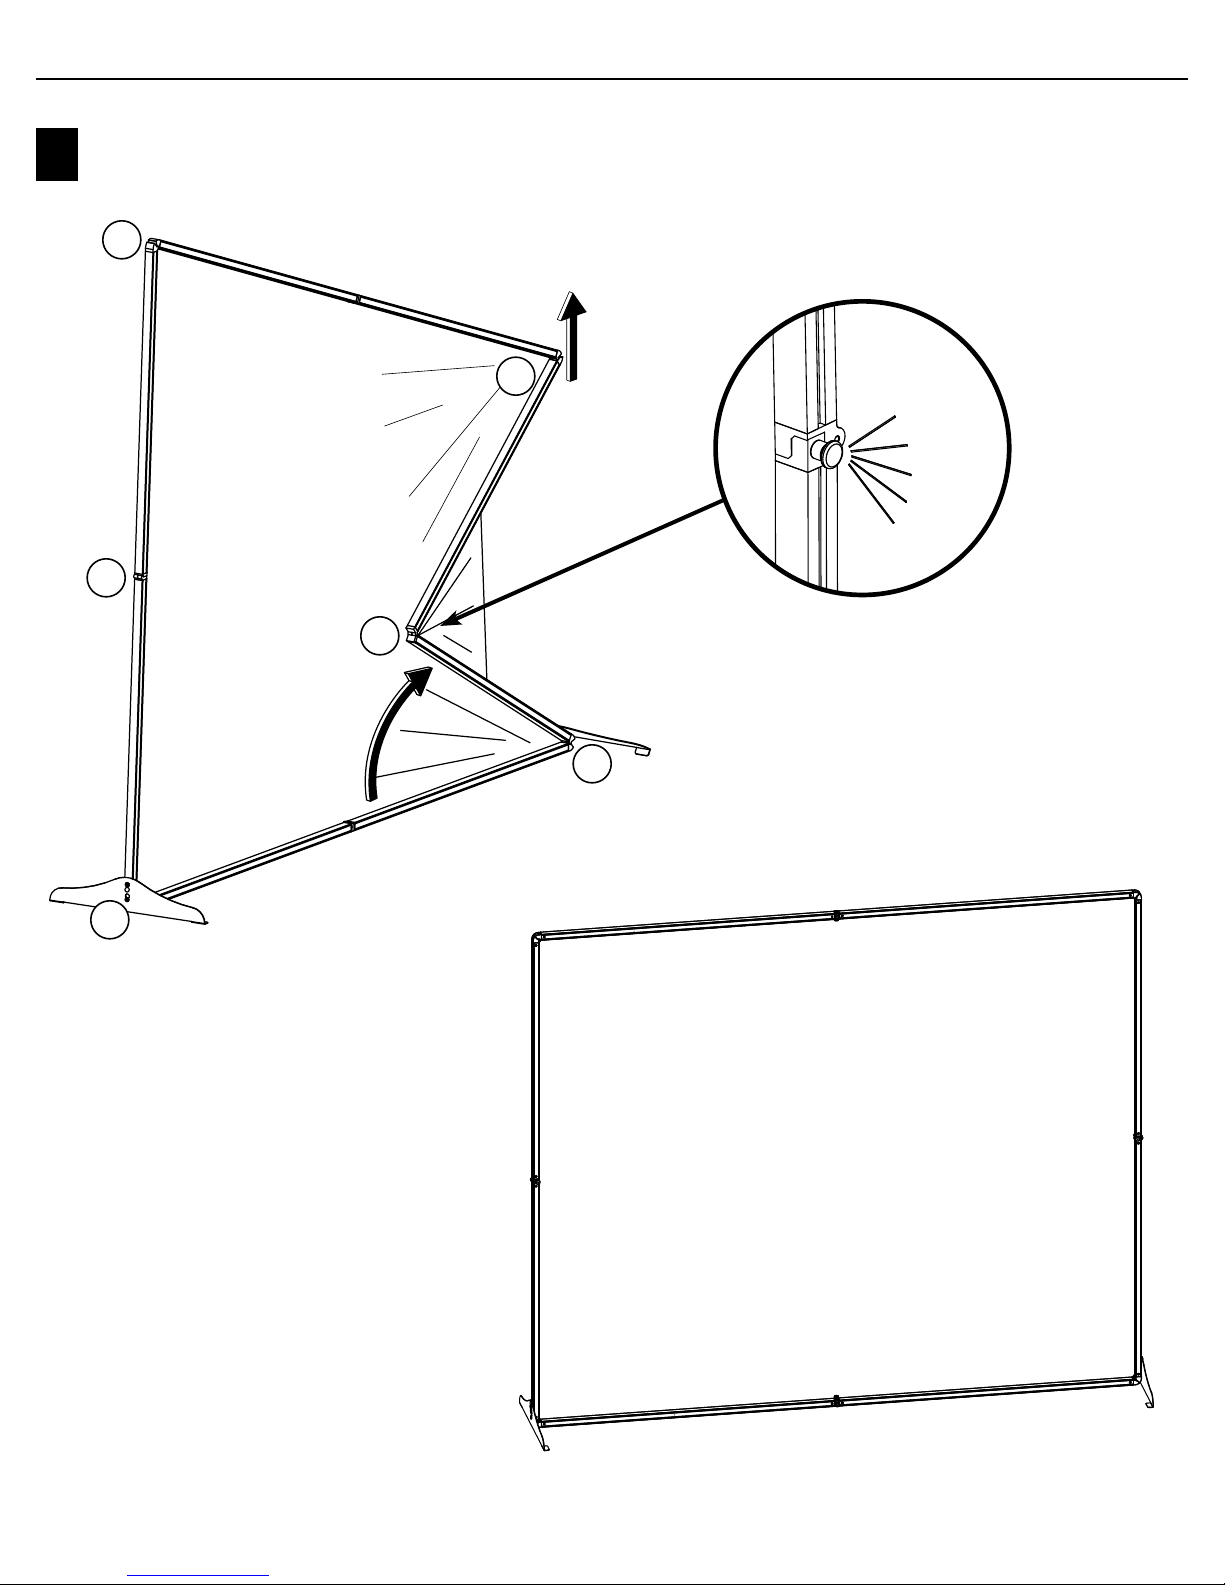
Rotate frame so that the fabric is to the
front and the button heads face up.
Install feet onto the button heads of
the lower vertical frame sections
Button
Heads
Lift one of the upper corners of the frame (above the feet) to
unfold that side. Only unfold one side at a time. Pull hinge
to the outside of the frame until you hear 2 clicks and the
locking knob is fully engaged.
U
p
p
e
r
C
o
r
n
e
r
Yes No
2
2
5
5
4
4
1
1
3
3
6
6
2
Clicks
6
DesignView Presentation System is a product of Skyline Exhibits
Patents Pending
©2011 Skyline Exhibits
DesignView
®
Presentation System
SET UP
2
Clicks
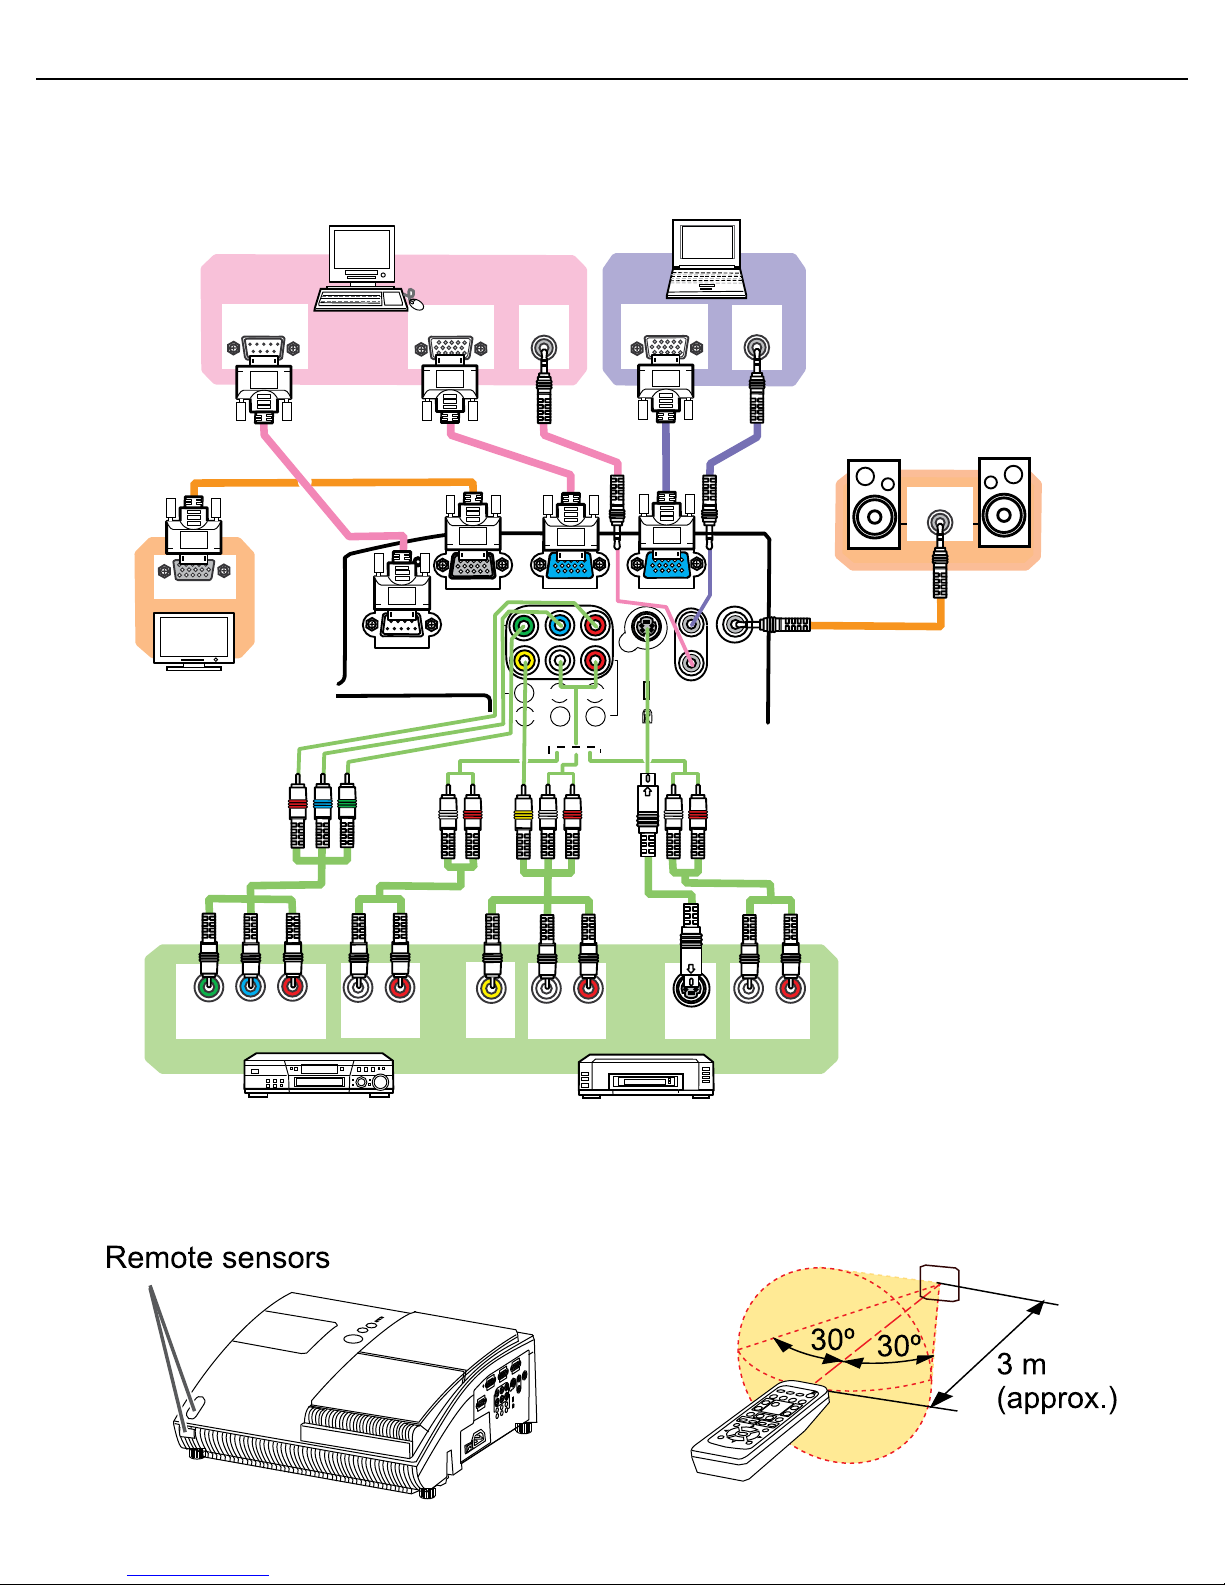
5Repeat Step 4 for the last vertical side.
2
5
4
1
3
6

7
DesignView Presentation System is a product of Skyline Exhibits
Patents Pending
©2011 Skyline Exhibits
DesignView
®
Presentation System
IMAGE PROJECTION
Steps to set up the Dukane Projector
1.
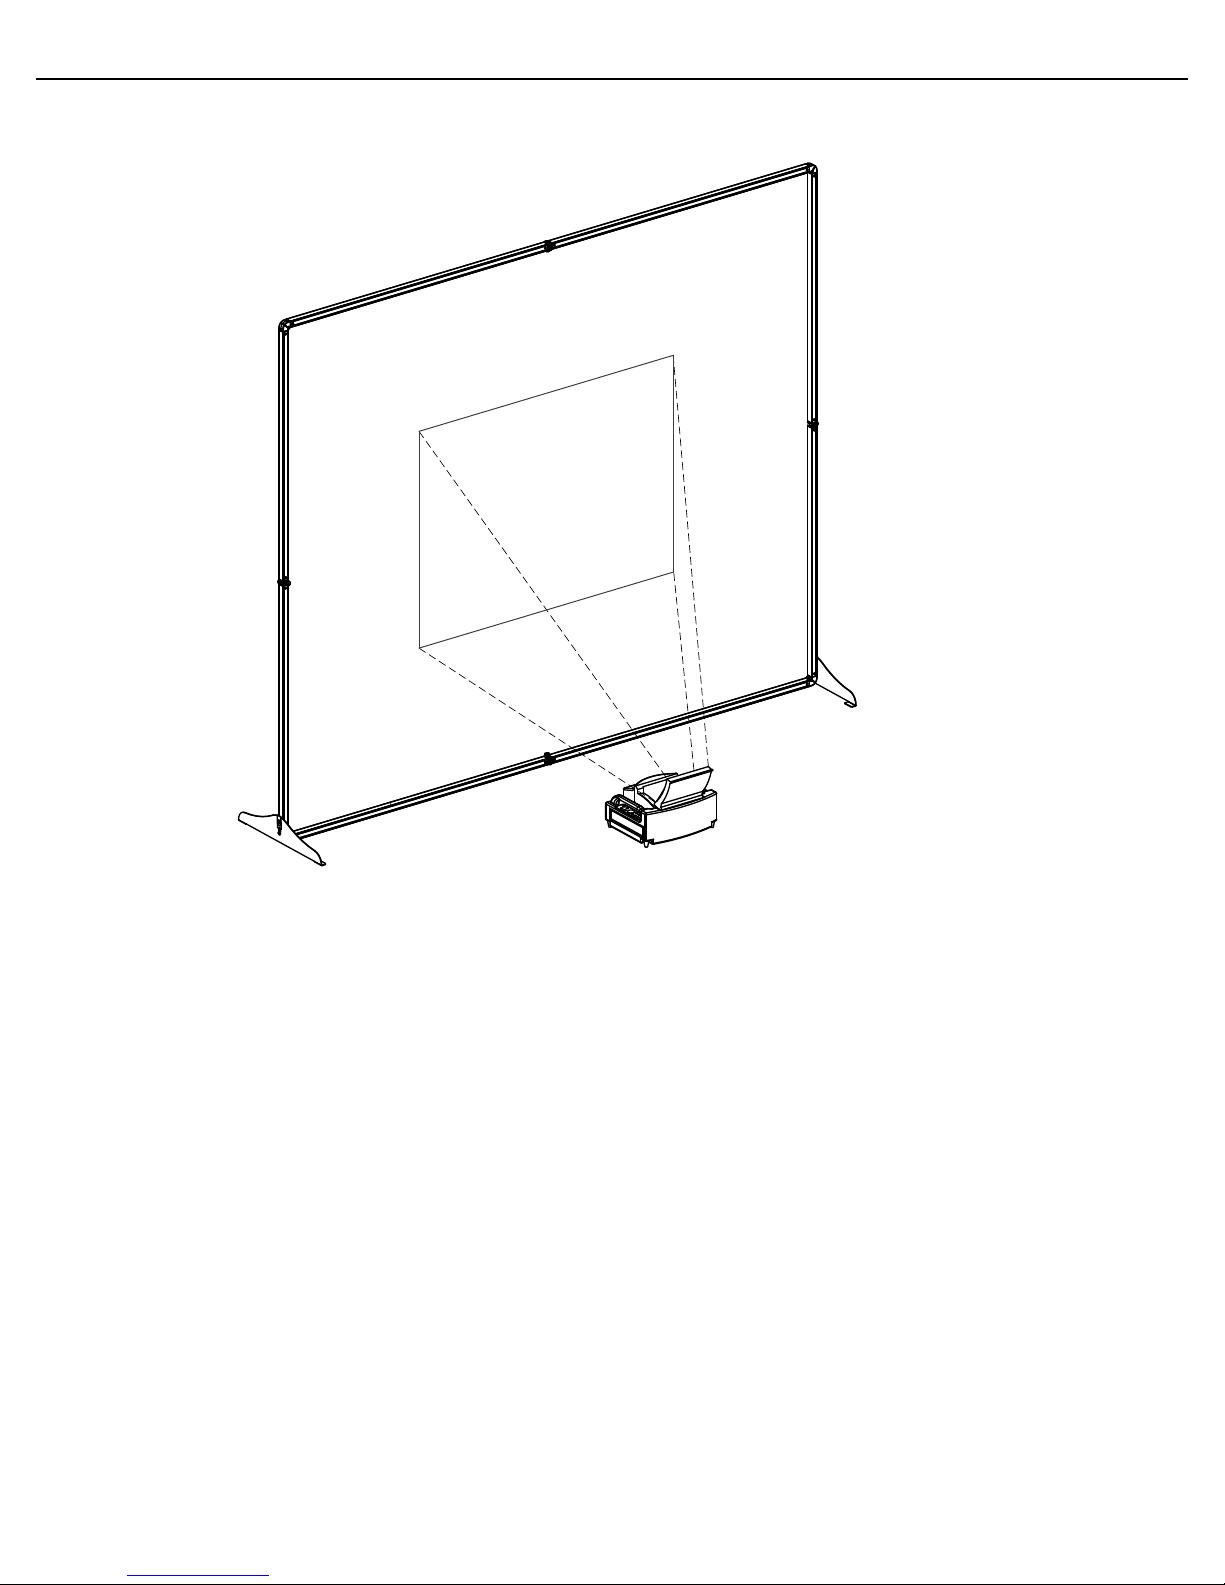
Place the projector on the surface you will be using to project from (floor or projector case) behind (or
in front of) the projection screen. The projector should be centered on the projection area (white space) and
parallel to the screen.
2.
Determine the distance between the projector and the projection screen by referring to the set up grid below.
CHOOSE YOUR VIDEO
SIZE
APPROXIMATE EXHIBIT SPACE NEEDED - DISTANCE
FROM SCREEN TO FAR SIDE OF PROJECTOR
Diagonal Video Size When
Fabric Is Stretched On Frame Projector On Floor Projector On Case
50” (127 cm) N/A 17” (43 cm)
66.7” (169 cm) N/A 23” (58 cm)
75” (191 cm) N/A 26” (66 cm)
92” (234 cm) 31” (79 cm) N/A
100” (254 cm) 34” (86 cm) N/A
For example, if your projection area (white space) is a diagonal video
size of 100” (254 cm), place the rear of your projector (distance A)
34” (86 cm) away from the screen.
The projector should be placed on the case for the three smallest screen sizes.
3.
Plug power cord into projector and AC outlet.
Dukane 8101H Projector Support Resources:
1.
These quick Start instructions are meant to serve as a supplemental reference during your trade show set up. Please
refer to the instructions enclosed with your projector before you set it up for the first time as they include more
detailed information on how to set up and operate your projector safely and more effectively.
• Dukane provides directions in a Concise User manual as well as in a more comprehensive booklet and CD
formats.
2.
If you are unable to resolve issues by reviewing these instructions please review the Dukane website at
http://www.dukane.com/av/service/default.asp
3.
Call Toll-free Support During Business Hours 800-676-2487.
Emergency Technical Support After hours 630-632-5244 or 630-464-0783
A
(14”)
8
DesignView Presentation System is a product of Skyline Exhibits
Patents Pending
©2011 Skyline Exhibits
DesignView
®
Presentation System
IMAGE PROJECTION
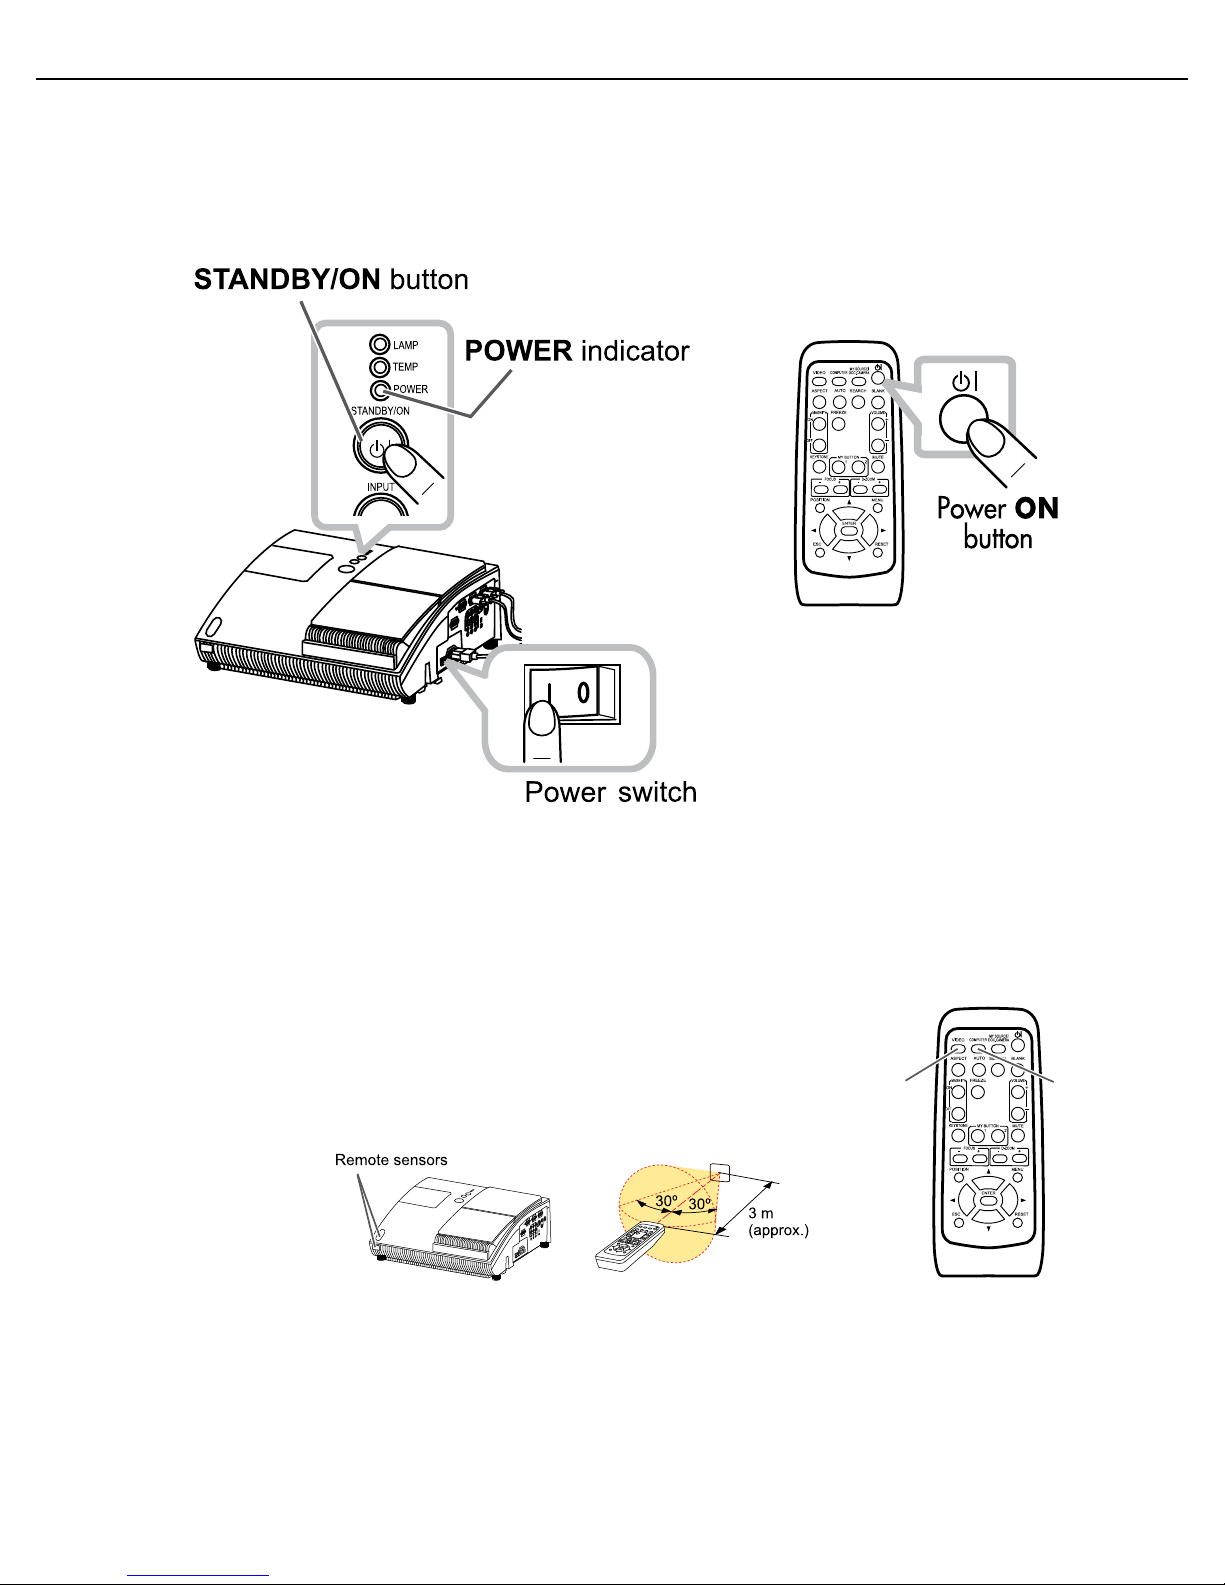
4.
Connect the projector to your image source, such as a computer or DVD player.
5.
Prepare the remote control by making sure it has batteries. Always point the remote control to the active
sensor in the front of the projector, to assure it receives the signal. (For details, review the Operating Guide on the
MONITOR OUT COMPUTER IN2 COMPUTER IN1
CONTROL AUDIO
OUT
S-VIDEO
Y CB/PB CR/PR
VIDEO L R
AUDIO IN3
AUDIO IN
1
2
RGB OUT
AUDIO
OUT
AUDIO
OUT
RS-232C
Y CB/PBCR/PR
COMPONENT VIDEO OUT
RL
TUOOIDUA
RL
TUOOIDUA
RL
TUOOIDUA
S-VIDEO
OUT
VIDEO
OUT
RGB OUT
AUDIO IN
RGB IN
Desktop PC Laptop
Speakers
Monitor for
Desktop PC
(with an amplifier)
VCR/DVD
players
9
DesignView Presentation System is a product of Skyline Exhibits
Patents Pending
©2011 Skyline Exhibits
DesignView
®
Presentation System
IMAGE PROJECTION
CD.)
6.
Turn on the main power switch by pressing the projector Power Switch to the “I” position. Then
press the Power “STANDBY/ON” button on the top of the projector OR the Power “ON”
button on the remote control for a minimum of two seconds, until the power indicator light turns green.
Wait a couple seconds after the power indicator lights up to use the control buttons.
7.
Move the projector closer to or farther from the screen, until the image fits outside
of the screen borders. Note that as the size of the image increases or decreases, the displayed
image will move up or down. Smaller images will move less than larger ones. The screen
height may have to be changed using the adjustable feet, if the projector is moved.
The distance between the screen and projector cannot be changed without changing image size.
8.
To Display and switch the image, press the VIDEO or COMPUTER
button on the remote to see the image from one of the active input ports.
Each time you press the button, the port is switched (when there are two or
more signals going into the projector.) Make sure that the remote control
is pointed at the sensor in the projector to assure it receives the signal.
NOTE: If screen proportion is off, press function key F8 on the computer
(the function key used may vary, depending on the computer.) The most
COMPUTERVIDEO
common resolution is 1024 x 768.
9.
To adjust from front to rear projection:

10
DesignView Presentation System is a product of Skyline Exhibits
Patents Pending
©2011 Skyline Exhibits
DesignView
®
Presentation System
IMAGE PROJECTION
VIDEO
DOC.CAMERA
KEYSTONE
ASPECT SEARCH BLANK
MUTE
MYBUTTON
POSITION
12
ESC
ENTER
MENU
RESET
COMPUTER MYSOURCE/
AUTO
MAGNIFY
VOLUME
ON
OFF
FREEZE
FOCUS D-ZOOM
- + - +
KEYSTONE
MUTE
MY BUTTON
POSITION
1 2
ESC
ENTER
MENU
RESET
FOCUS D-ZOOM
- + - +
ENTER
MENU
Arrow buttons
Arrow buttons
FOCUS +
FOCUS –
D-ZOOM +D-ZOOM –
• Press the MENU button on the remote to access the
EASY MENU.
• Select the MIRROR option and use the up/down
arrow buttons to choose H-Invert.
11.
SELECT THE ASPECT RATIO.
Press the ASPECT button on the remote control to switch to the
appropriate aspect ratio. Standard DesignView screens
10.
ADJUST THE PROJECTOR FOCUS AS NEEDED.
Use the FOCUS + and FOCUS – buttons on the projector or remote control to adjust the
screen focus.
are set up for a 4:3 ratio.
12.
ZOOM by using the D-ZOOM + and the D-ZOOM - buttons on the remote control to adjust the
screen size.
13.
Adjust the projected picture position by pressing the POSITION button on the remote control
& using the arrow buttons. Press the POSITION button when finished.
(NOTE: If your image size is at 100%, the image position may not shift.)
14.
FITTING THE PROJECTED IMAGE TO THE PROJECTION AREA IN YOUR
SCREEN:
Press the MENU button on the remote to access the EASY MENU (pictured
below left.) Select the PERFECT FIT option and press ENTER. You will see the
adjustment dialog box (pictured below right.)
a.
Choose the corner to adjust using the arrow buttons & press ENTER.
b.
Use the arrow buttons to adjust the position of the corner.
c.
Press ENTER when you reach the desired location to exit the adjustment of the corner.
Tabla de contenidos


