ServerLIFT SL-350X Manual de usuario

17453 N 25th Ave | Phoenix, AZ 85023 | TEL: 602.254.1557 | FAX: 602.254.1975
Operator’s Manual
www.serverlift.com
Serial #:
ServerLIFT
Manual Crank Lift

SL-350X®ServerLIFT Operator’s Manual
www.serverlift.com
2ServerLIFT SL-350X®Data Center Lift Operator's Manual
ONLY ORIGINAL SERVERLIFT
REPLACEMENT PARTS SHALL BE
USED FOR ANY REPAIR.
NOTICE
As a certied ISO:9001 and ISO:14001
manufacturer, ServerLIFT has made a commitment
to our customers, suppliers, and community, to
continuously improve and to deliver products and
services that meet or exceed the highest standards
for quality and minimizing environmental impact.

www.serverlift.com
SL-350X®ServerLIFT Operator’s Manual
3ServerLIFT SL-350X®Data Center Lift Operator's Manual
Contents
05-2020 P/N: SL-3 r.D07
Shipping/Receiving:
Service & Support:
Sales:
© ServerLIFT Corporation. All Rights Reserved.
Information in this document subject to change without notice.
Introduction 4
Included with SL-350X® ServerLIFT Device 4
Legend 5
Set Up 7
Before you begin 7
Pre-operation Inspection 7
Function Tests 7
Instructions 11
Before operating the ServerLIFT 11
Operating Steps 11
Stabilizer Brake Operation 12
Applying Load To The Platform 13
Front Caster Swivel Lock Operation 13
Safety Directions 14
Attachments 15
PL-500X™ Platform Extension 15
LE-500X™ Lift Extension 22
RL-500™ Platform Riser 26
RS-500X™ Rail Lift 27
Maintenance 31
Schedule of Maintenance 31
Stabilizer Brake Boot Replacement 32
Winch and Cable Inspection 32
Pulley Inspection 33
Specications 34
Features 34
Dimensions and Capacity 35
Troubleshooting 36
Warranty 39
CE Declaration 41
ServerLIFT Corporation
17453 N 25th Ave | Phoenix, AZ USA 85023
(602) 254-1557 | Fax: (602) 254-1975

SL-350X®ServerLIFT Operator’s Manual
www.serverlift.com
4ServerLIFT SL-350X®Data Center Lift Operator's Manual
Included with the SL-350X device
(1) SL-350X
(1) Shipping Pallet
[includes retaining hardware]
(1) Shipping Ramp
Introduction
CAUTION:
!
Read and completely understand the contents of this Operator’s
Manual before operating the ServerLIFT device. Failure to read,
understand, and follow instructions in this manual may result in
property damage and/or personal injury. If you do not understand
any part of this manual or if you have any questions please contact
ServerLIFT Service & Support.
IMPORTANT: Keep these instructions with the ServerLIFT device.
• Do not stand or ride on any part of the ServerLIFT device.
• Never lift or move the ServerLIFT device with a pallet truck, jack, or
forklift. Use the pallet, ramp, and packaging originally received with
the unit for transporting it.
• Keep hands, ngers and clothing clear of platform and mast when
equipment is in motion.
Never operate the ServerLIFT device while charging
Never unwind the SL-350X ServerLIFT
device past the bottom of travel
(1) Operator’s Manual
(1) Canvas Bag for Tie Down Straps
(2) Adjustable Tie Down Strap with hooks
(1) Ratchet with (2) sockets, 10 and 17 mm
www.serverlift.com
SL-350X®ServerLIFT Operator’s Manual
5ServerLIFT SL-350X®Data Center Lift Operator's Manual
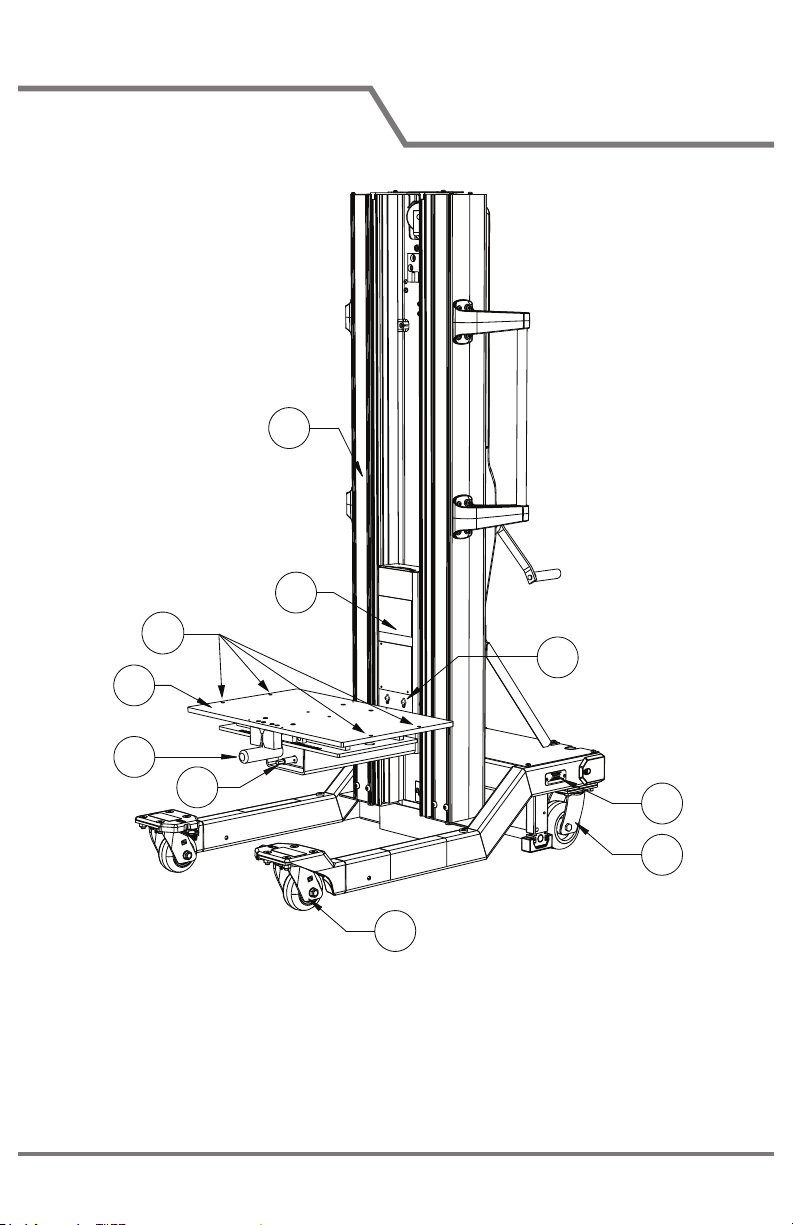
Legend
1. Vertical Mast
2. Equipment Platform and
Easy-Tilt Glide Shelf
3. Strap Hooks
4. Platform Mast
5. Easy-Glide Shelf Handle
6. Casters - Swivel/Lock
7. Casters - Free Swivel
8. Serial Number Plate
9. Platform SmartTILT
Adjustment
10. Accessory Attachment Holes
6
7
5
2
8
9
1
3
4
10

SL-350X®ServerLIFT Operator’s Manual
www.serverlift.com
6ServerLIFT SL-350X®Data Center Lift Operator's Manual
11. Pallet Bolt Holes
12. Winch (Up/Down) Handle
13. Stabilizer Brake Release Pedal
14. Stabilizer Brake Pedal
15. Stabilizer Brake Pad
16. Operator’s Manual Sleeve
17. Handle Bars
Legend
12
13
15
16
17
14
11

www.serverlift.com
SL-350X®ServerLIFT Operator’s Manual
7ServerLIFT SL-350X®Data Center Lift Operator's Manual
Check ServerLIFT device and included attachments (if applicable)
for signs of damage. Fully document any damage, including Tip
N' Tell activations, with photos, location, and description. Promptly
contact ServerLIFT Service & Support if any damage is present.
SAVE PALLET, RAMP, HARDWARE
AND PACKING CARTON!
They are needed for moving the ServerLIFT unit to other locations.
1. Read and understand the contents of this manual carefully.
2. Locate the serial number plate. Record unit serial number on
front page of Operator's Manual for future reference.
3. Perform Pre-operation Inspection.
4. Perform Function Tests.
Set Up
Stabilizer Brake Function Test
See Stabilizer Brake Operation (page 12) for additional details.
1. Press down red Stabilizer Brake Pedal until it locks in place.
The Stabilizer Brake should remain in DOWN position.
Function Tests are designed to discover malfunctions before machine
is used. Tests should be performed before normal operation. Before
testing, select an area that is solid, level and free of obstructions.
Note: After testing, if malfunctions are discovered, the
machine must be removed from service. Repairs to the
machine may only be made by or under the directions of a
service technician qualied by ServerLIFT.
Before you begin
Pre-operation Inspection
Function Tests

SL-350X®ServerLIFT Operator’s Manual
www.serverlift.com
8ServerLIFT SL-350X®Data Center Lift Operator's Manual
2. Attempt to move the ServerLIFT machine. It should be locked in
place and not be able to move. If it rolls at all, or Stabilizer Brake
does not lock in DOWN position, contact ServerLIFT Service
and Support.
3. Press green pedal to release and allow pedals to return to UP
positions. If operating correctly, proceed to next Function Test.
Set Up
Note: If operating correctly, engaging the Brake will very
slightly lift the back of the ServerLIFT machine up o
the ground. Applying additional force may be required to
engage the Brake at the point where it lifts the unit and
locks in place. If too much force is needed, or the Brake
does not lift the back wheels up, contact ServerLIFT Service
and Support.
Winch Function Test
1. Engage Stabilizer Brake.
2. Rotate Winch Handle
CLOCKWISE to move
Platform UP. Test full range
of motion up and down.
Platform will stop moving
in fully extended and fully
retracted positions. If
Platform does not travel full
range of motion consistently,
contact ServerLIFT Service
& Support.
Note: When raising Platform, Winch should produce a
loud, sharp clicking noise. Load will remain in position
when Winch Handle is released. When lowering Platform
(unwinding Winch) no noise should be produced.
While a load will remain in position when the handle is
released, for extra safety it is recommended to turn Winch
Handle clockwise until at least two clicks are heard.
RAISELOWER

www.serverlift.com
SL-350X®ServerLIFT Operator’s Manual
9ServerLIFT SL-350X®Data Center Lift Operator's Manual
Set Up
• DO NOT turn Winch Handle past top or bottom of platform
travel. Excessive unwinding will detach Handle and
damage cable.
• ALWAYS hold Handle when lowering/ unwinding.
• Always be sure that Winch is holding load before releasing
Winch Handle.
• NEVER allow Winch to unwind freely. Freewheeling
will cause uneven cable wrapping around Winch Drum,
damage cable, and may cause death or serious injury.
• Operate with hand power only. Do not operate ServerLIFT
device with a motor of any kind. If Winch Handle cannot be
cranked easily with one hand, it is probably over-loaded.
!
WARNING
Platform Mast extends higher than Platform. When raising
Platform, be aware of ceiling height, cable trays, sprinklers, lights,
and other overhead obstructions.
!
CAUTION

SL-350X®ServerLIFT Operator’s Manual
www.serverlift.com
10ServerLIFT SL-350X®Data Center Lift Operator's Manual
Set Up
SmartTILT Platform™/Easy-Glide Shelf™ Function Test
1. Engage Stabilizer Brake.
2. Raise Platform to a comfortable
working height.
3. Push down on handle to unlock
and allow movement of Easy-
Glide Shelf. Shelf will shift sideways
up to 6" (15 cm) in each direction.
There are multiple incremental
adjustment locations.
4. Test full movement of Easy-
Glide Shelf in both directions. If
shelf does not travel entire range
of motion consistently or does not
lock at incremental adjustment
locations, contact ServerLIFT
Service and Support.
5. Return Shelf to neutral (center)
position.
6. Test operation and range
of motion of the SmartTILT
Platform by using the included
ratchet and 10 mm socket to
slowly adjust the Platform angle
UP and DOWN. Stop as soon
as adjustment resistance is
felt. Optionally use a level to
measure the angle which should
be approximately 0.5 degrees
DOWN and 1.5 degrees (or
more) UP.
7. Return Shelf to neutral
(center) position.
8. Lower Platform down.
Release Stabilizer Brake.
Ratchet LEFT
to adjust
angle
DOWN
Ratchet RIGHT
to adjust
angle
UP
10 mm
DOWN UP
Platform Tilt Angle
Adjustment Rod
NEVER raise or lower
platform with shelf out of
neutral (center) position.
!
DANGER
NEVER over-adjust the SmartTILT
Platform angle. Adjust angle slowly
and STOP as soon as resistance to
the angle adjustment can be felt.
!
WARNING
Tabla de contenidos
Manuales populares de Sistema de elevación de otras marcas

morse
morse 82H-124 Manual de usuario

Braun
Braun NL955 Series Manual de usuario

haacon
haacon 1889.10 Manual de usuario

Protekt
Protekt AT 252 Manual de usuario

R. Beck Maschinenbau
R. Beck Maschinenbau HS 600 Manual de usuario

Nova Technology International, LLC
Nova Technology International, LLC NAS Series Manual de usuario

Genie
Genie Z-60/34 Manual de usuario

Screen Technics
Screen Technics INTERFIT Vertical Up Lift Manual de usuario

Mortuary Lift
Mortuary Lift ULTIMATE 1000 Manual de usuario

Custom Equipment
Custom Equipment Hy-Brid 3 Series Manual de programación

Custom Equipment
Custom Equipment Hy-Brid Lifts 2 Series Manual de programación

Hy-Brid Lifts
Hy-Brid Lifts HB-P3.6 Manual de programación


