Select Brands MIC-66 Manual de usuario

2

3
IMPORTANT SAFEGUARDS
When using electrical appliances especially when children are present, basic safety precautions should always be followed to reduce the
risk of re, electric shock, and/or injury to persons, including the following:
1. READ ALL INSTRUCTIONS.
2. Do not touch hot surfaces. Metal parts will become hot. Use any handles or knobs.
3. To protect against electrical shock, do not place cord, plug or appliance in water or other liquid.
4. Close supervision is necessary when any appliance is used by or near children.
5. Unplug from outlet when not in use and before cleaning. Allow to cool completely before moving, putting on or taking off parts, or
before cleaning.
6. Do not operate any appliance with a damaged cord or plug, or after the appliance malfunctions or has been damaged in any manner.
Return appliance to the nearest authorized service facility for examination, repair or adjustment.
7. The use of accessory attachments not recommended by the appliance manufacturer may cause injury.
8. Do not use outdoors.
9. Do not let cord hang over edge of table or counter or touch hot surfaces.
10. Do not place on or near a hot gas or electric burner, or in a heated oven.
11. To disconnect, unplug appliance from wall outlet. Never pull on the power cord to disconnect.
12. Extreme caution must be used when moving an appliance containing hot oil, water or other hot liquids.
13. Do not use appliance for other than intended use.
14. Do not operate while unattended.
SAVE THESE INSTRUCTIONS

4

5
This appliance is for HOUSEHOLD USE ONLY. It may be plugged into an AC electrical outlet (ordinary household current). Do not use any other electrical
outlet.
DO NOT OPERATE APPLIANCE IF THE LINE CORD SHOWS ANY DAMAGE, OR IF APPLIANCE WORKS INTERMITTENTLY OR STOPS WORKING
ENTIRELY.
A short power-supply cord is to be provided to reduce the risk resulting from becoming entangled in or tripping over a longer cord. Longer
extension cords are available and may be used if care is exercised in their use. If an extension cord is used,
1. The marked electrical rating of the extension cord should be at least as great as the electrical rating of the appliance, and
2. The cord should be arranged so that it will not drape over the countertop or tabletop where it can be pulled on by children or tripped
over unintentionally.
POLARIZED PLUG
This appliance has a polarized plug (one blade is wider than the other). To reduce the risk of electric shock, this plug is intended to t into
a polarized outlet only one way. If the plug does not t fully into the outlet, reverse the plug and try again. If it still does not t, contact a
qualied electrician. Do not attempt to modify the plug in any way.
LINE CORD SAFETY TIPS
1. Never pull or yank on cord or the appliance.
2. To insert plug, grasp it rmly and guide it into outlet.
3. To disconnect appliance, grasp plug and remove it from outlet.
4. Before each use, inspect the line cord for cuts and/or abrasion marks. If any are found, this indicates that the appliance should be
serviced and the line cord replaced.
5. Never wrap the cord tightly around the appliance, as this could place undo stress on the cord where it enters the appliance and cause
it to fray and break.
6
IMPORTANT
During the rst few minutes of initial use, you may notice smoke and/or a slight odor. This is normal and should quickly disappear. It will
not recur after appliance has been used a few more times.
For your safety, always read and follow the Use and Care Manual before attempting to use any electric appliance.
BEFORE USING:
1. Carefully unpack the bubble wafe maker. Remove all packaging materials, including those which may be inside the product.
2. Wipe exterior surfaces with a soft, damp cloth to remove dust particles collected during packing and handling. Dry thoroughly. Do
not use abrasive cleaners. Clean the interior with a warm, soapy cloth. Rinse with a clean, damp cloth and dry thoroughly. NEVER
IMMERSE THE BUBBLE WAFFLE MAKER, CORD OR PLUG IN WATER OR ANY OTHER LIQUID.
Solid surface countertops can be easily scratched, cracked, scorched, or damaged, especially when exposed to heat. To prevent possible
damage, consider using a trivet under this appliance.
OPERATING INSTRUCTIONS
1. Place the bubble wafe maker on a at, level, heat-resistant surface. Close the lid and lock the latch on the handle.
2. Plug the power cord into a 120V AC electrical outlet. This appliance should always be operated on a separate 120V ~ 60 Hz wall
outlet to ensure that the electrical circuit is not overloaded.
3. Once the bubble wafe maker has been plugged in, the power light will illuminate and the appliance will begin heating up. Allow the
bubble wafe maker to preheat for approximately two minutes until the power light turns off. CAUTION: Do not touch the bubble
wafe plates or any metal surfaces. Surfaces are extremely hot.
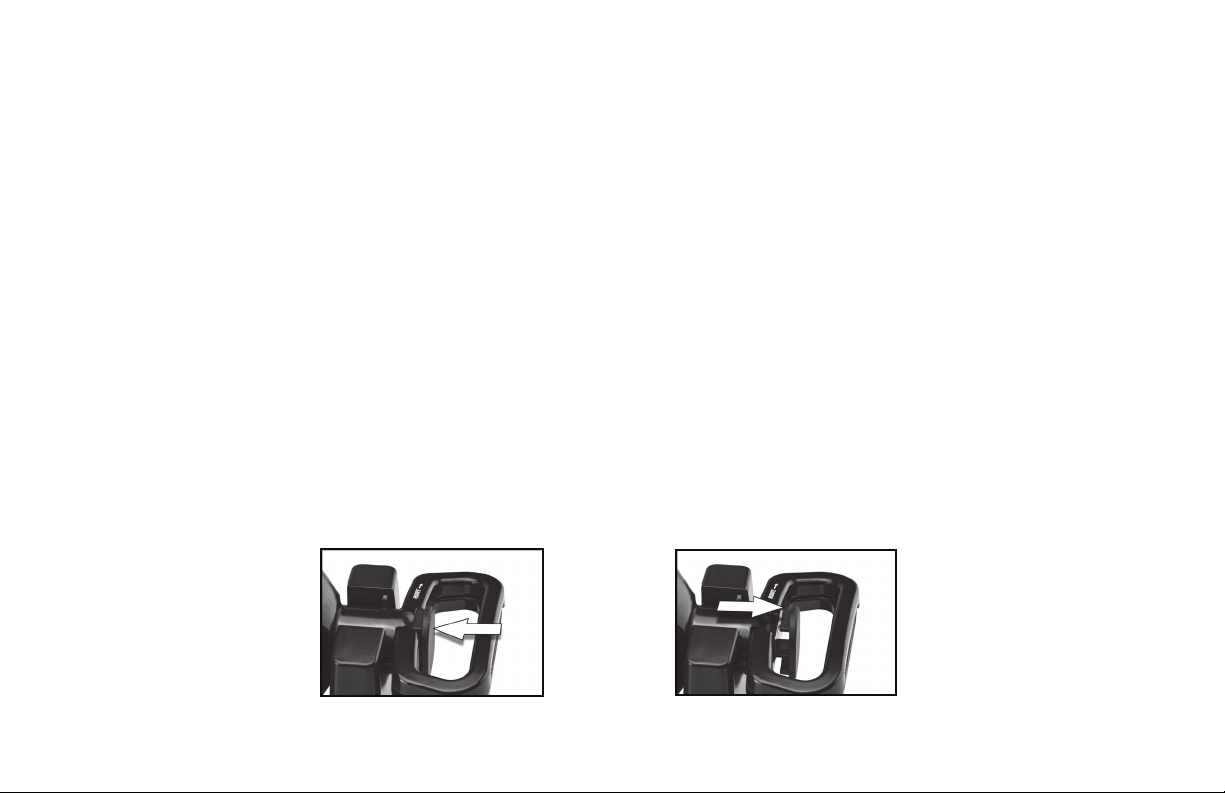
4. Unlock the latch by pulling it towards you and lift the lid by the handle to the fully opened position. Apply a coating of cooking spray
or oil on both the upper and lower bubble wafe plates. NOTE: Latch must be in unlocked position to open lid.
Latch in Locked Position Latch in Unlocked Position

7
5. Using a spouted measuring cup, pour batter into the bubble wafe maker ensuring that each Mickey-shaped well is lled and that
the bottom cooking plate is thinly covered with batter. NOTE: Do not overll the bubble wafe maker as it may overow as the batter
expands.
6. Close the lid by the handle and lock the latch by pushing it back towards the power light. Make sure the bubble wafe plates cannot
be opened.
7. Once the lid is closed and locked, immediately rotate the bubble wafe maker 180˚. This allows the bubble wafe batter to ll in the
bubble wells on the top cooking plate.
8. Allow the wafe batter to cook for 2 to 3 minutes, then rotate the bubble wafe maker handle back to place the lower lid at the original
position. NOTE: Depending on recipe variations, it is advised to adjust cooking times as needed to achieve a fully cooked bubble
wafe that remains pliable.
9. Unlock the latch, carefully lift the lid by the handle and remove the bubble wafe using a heat resistent plastic or wooden utensil.
Never use metal utensils, as these will damage the nonstick coating. Use CAUTION when handling the wafe, as it will be HOT.
NOTE: If you plan to roll and ll the bubble wafe, drape over a rolling pin or glass immediately after it comes out of the wafe maker,
when it is soft and easily pliable. The wafe will rm up as it cools.
10. After removing the wafe, repeat steps 4 through 9 to make more bubble wafes.
11. When nished using the appliance, disconnect the plug from the wall outlet.
12. Allow the appliance to cool down completely before moving, cleaning or storing.

8
BUBBLE WAFFLE BAKING HINTS AND SUGGESTIONS
• When pouring batter into the cooking plates, do not overll. It is advised to use a spouted measuring cup to more accurately ll the
Mickey-shaped wells.
• When preparing the bubble wafe batter, be aware that it will be a thinner consistency than regular wafe batter.
• Use your favorite traditional wafe recipes- just slightly thin the consistency for better bubble wafe results.
• Be sure to remove the bubble wafe from the appliance before it browns signicantly to avoid a cracked or rigid bubble wafe.
• The bubble wafe can be rolled into a cone shape and inserted into the paper bubble wafe holders that are provided with the
appliance. Once inside the holder, the bubble wafe can be lled with a variety of ingredients, such as ice cream, fresh berries,
cookies and other favorite toppings.
• If you plan to roll and ll the bubble wafe, drape over a rolling pin or glass immediately after it comes out of the wafe maker, when
it is soft and easily pliable. The wafe will rm up as it cools.
• Bubble wafes can also be served laying at on a plate or in a bowl and covered with a variety of toppings.
• Click the link on the following QR code to learn how to make a bubble wafe:

9
CLEANING AND STORAGE
This appliance requires little maintenance. It contains no user-serviceable parts. Do not attempt to repair it yourself. Any servicing that
requires disassembly, other than cleaning, must be performed by a qualied appliance repair technician.
TO CLEAN:
Be sure the bubble wafe maker is unplugged and completely cool before cleaning. Wipe the exterior with a clean, damp cloth. Do not use
abrasive cleaners or harsh chemicals. Do not submerge cord, plug, or appliance in water or other liquids. Clean the interior with a warm,
soapy cloth. Rinse with a clean, damp cloth and dry thoroughly. Do not use abrasive cleaners or harsh chemicals. Do not use sharp or
metal objects to clean as they may damage the non-stick or other surfaces. Clean appliance after every use.
TIP: Should any batter become baked onto the bubble wafe plates, pour a small amount of cooking oil onto the batter. Allow it to soak
for about 5 minutes so the batter will soften. Wipe away with a damp paper towel or soft cloth.
TO STORE:
Be sure all parts are clean and dry before storing. Store appliance in its box or in a clean, dry place. Never store it while it is hot. Never
wrap cord tightly around the appliance; keep it loosely coiled.

10
BUBBLE WAFFLE RECIPE
BUBBLE WAFFLES:
Ingredients:
• 3/4 cup all-purpose our
• 1 teaspoon baking powder
• 1 1/2 teaspoons cornstarch
• 1/8 teaspoon salt
• 1 large egg
• 1/2 cup granulated sugar
• 1/4 cup whole milk
• 1/4 cup water
• 2 teaspoons vanilla extract
• 2 tablespoons unsalted butter, melted
• Optional ingredients for serving: whipped cream, ice cream, sliced strawberries, fresh raspberries or blueberries,
powdered sugar, chocolate sauce, sprinkles, etc.
Directions:
1. Preheat bubble wafe maker for approximately two minutes until the power light turns off.
2. In a small mixing bowl, whisk together our, baking powder, cornstarch and salt.
3. In a separate medium sized mixing bowl, whisk together the egg, sugar, milk, water, vanilla and melted butter. Add the our mixture
and whisk until smooth.
4. Pour batter slowly into the bubble wafe maker, lling the Mickey-shaped wells. It is recommended to use a spouted measuring cup.
5. Close the bubble wafe maker lid, lock the latch and immediately rotate the bubble wafe maker 180˚ and bake for 2 to 3 minutes.
6. Rotate wafe maker back 180˚ to its original position, unlock latch and open lid to remove wafe.
7. If you plan to roll and ll the bubble wafe, drape over a rolling pin or glass immediately after it comes out of the wafe maker, when
it is soft and easily pliable. The wafe will rm up as it cools.
8. Roll the bubble wafe into a cone, lay at on a plate or serve in a bowl with your favorite toppings.
Tabla de contenidos
Otros manuales de Máquina para hacer wafles de Select Brands


