Secap SI1000 Manual

Operator Guide
TM
Desktop Inserting System
SI1000

SV62138 Rev. A April 2008 ©2008 SECAP Inc.
All rights reserved. This book may not be reproduced in whole or in part in
any fashion or stored in a retrieval system of any type or transmitted by any
means, electronically or mechanically, without the express, written permission
of SECAP.
We have made every reasonable effort to ensure the accuracy and usefulness
of this manual; however, we cannot assume responsibility for errors or omissions
or liability for the misuse or misapplication of our products.
Due to our continuing program of product improvement, equipment and material
specifications as well as performance features are subject to change without
notice.
E-Z Seal is a registered trademark of Pitney Bowes.
Statement of FCC Compliance
This equipment has been tested and found to comply with the limits for a Class
A digital device, pursuant to part 15 of the FCC rules. These limits are designed
to provide reasonable protection against interference when the equipment is
operated in a commercial environment. This equipment generates, uses, and
can radiate radio frequency energy and, if not installed and used in accordance
with the instruction manual, may cause interference to radio communications.
Operation of this equipment in a residential area is likely to cause interference,
in which case the user will be required to correct the interference at his own
expense.
Canada
This class A digital apparatus complies with Canadian ICES-003.
Cet appareil numérique de la classe A est conforme á la norme NMB-003 du
Canada.
CAUTION: Changes or modifications to this equipment not expressly approved
by the party responsible for compliance (SECAP) could void the user’s authority
to operate the equipment.

3
SI1000 Operator Guide (SV62138 Rev. A)
Contents
1. Introduction
Important Safety Information.......................................................4
About Your Machine ....................................................................5
Machine Configurations ..............................................................5
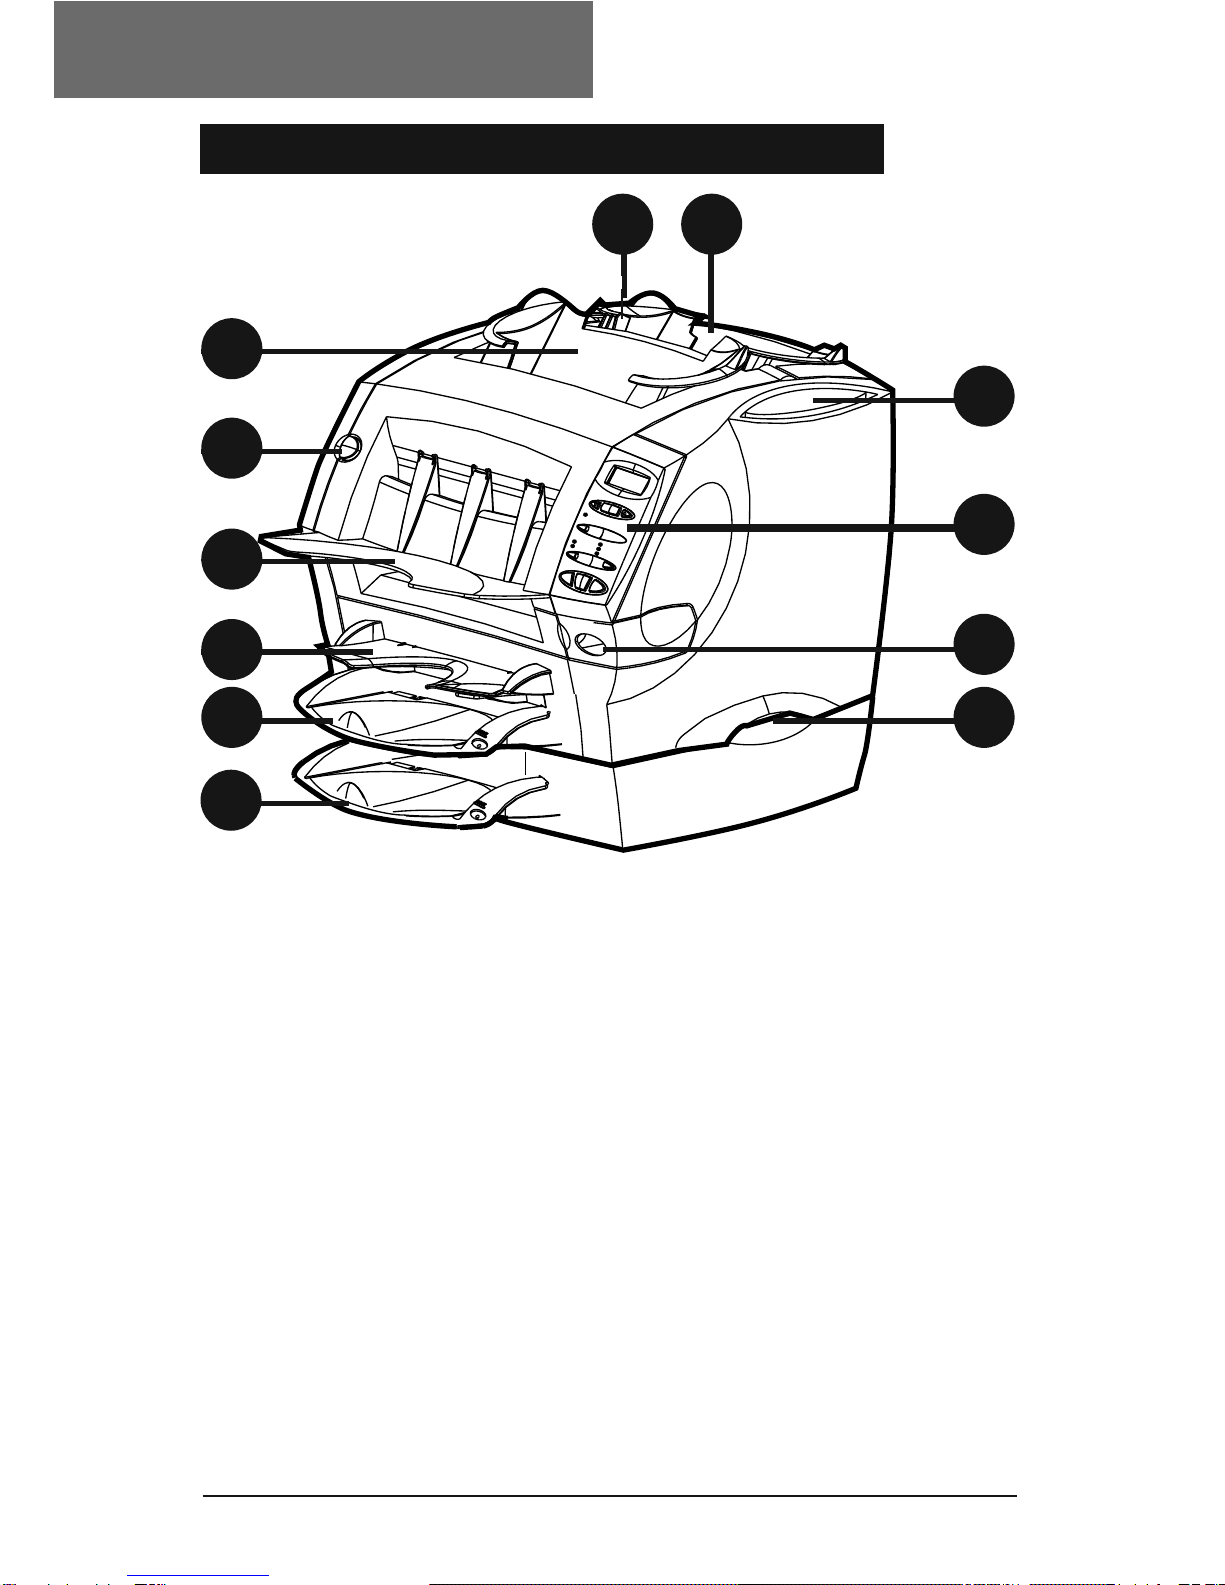
Machine Controls, Indicators and Features ................................6
The Controls ...............................................................................8
2. Preparing and Loading
Connecting Power and Turning On ...........................................10
Filling the Moistener..................................................................11
Loading the Sheet Feeders (Feeders A1 and A2) ....................12
Loading the Envelope Feeder (Feeder B) .................................13
Loading the Insert Feeder (Feeder C).......................................14
3. Running Jobs
Job Listing.................................................................................15
Job 1: One Folded Sheet into an Envelope ..............................17
Job 2: One Folded Sheet, No Envelope (Fold Only) .................18
Job 3: One Folded Sheet + One Insert into an Envelope .........19
Job 4: One Insert into an Envelope...........................................21
Job 5: Two Folded Sheets into an Envelope .............................22
Job 6: Two Collated, Folded Sheets into an Envelope ..............23
Job 7: Two Folded Sheets, No Envelope (Fold Only)................24
Job 8: Two Collated, Folded Sheets, No Envelope
(Fold Only)..............................................................................25
Job 9: Two Folded Sheets and an Insert into an Envelope .......26
Job 10: Two Collated, Folded Sheets and an Insert into an
Envelope.................................................................................28
The Manual Feeder M...............................................................30
4. Advanced Menu Options
Reset Counter...........................................................................31
Change Paper Size ...................................................................32
Move the Address in the Window..............................................32
Sheet Double Detect On/Off .....................................................33
Insert Double Detect On/Off......................................................34
Safe Seal On/Off.......................................................................34
5. Reference
Error Messages.........................................................................35
General Troubleshooting ...........................................................39
Clearing Material Jams .............................................................40
Getting Help .............................................................................41
Ordering Supplies .....................................................................42
Material Specifications ..............................................................43
Machine Specifications .............................................................44
Index .....................................................................................45
Page

4SI1000 Operator Guide (SV62138 Rev. A)
Safety
• Please read all the instructions in this manual before you attempt
to operate your SI1000. Save all instructions.
WARNING! Always use the power cord sup-
plied with your machine and plug it into a prop-
erly grounded wall outlet that’s located near the
machine and easily accessible. Failure to properly
ground the machine can result in severe personal
injury and/or fire.
• DO NOT use a wall outlet controlled by a wall switch or one that
is shared with other equipment.
• Do not use an adapter plug on the line cord or wall outlet.
• Do not remove the ground pin from the line cord.
• Make sure the area in front of the wall outlet into which the ma-
chine is plugged is free from obstruction.
• DO NOT route the power cord over sharp edges or trap it be-
tween pieces of furniture. Make sure there is no strain on the
power cord.
• To reduce the risk of fire or electrical shock, DO NOT attempt to
remove covers or disassemble the inserter. The cabinet encloses
hazardous parts. Refer servicing to qualified personnel.
• Keep fingers, long hair, jewelry and loose clothing away from
moving parts at all times.
• Never reach into the machine while it is running. Avoid touching
moving parts or materials while the machine is in use. Before
clearing a jam, be sure all machine mechanisms come to a com-
plete stop.
• Know your equipment, especially how to stop it in the event of an
emergency.
• When removing jammed material, avoid using too much force to
protect against minor personal injury and damage to the equip-
ment.
• Use the equipment only for its intended purpose.
• Always follow the specific occupational safety and health stan-
dards prescribed for your workplace.
CAUTION! If you relocate an SI1000 that has the
optional Second Sheet Feeder A2 installed, re-
move it from the Second Sheet Feeder first—that
is, as you lift it clear, make sure it fully disengages
from the Second Sheet Feeder. Obtain help if
necessary.
Important Safety Information
1. INTRODUCTION

5
SI1000 Operator Guide (SV62138 Rev. A)
Your new SI1000 is a compact folding and inserting machine de-
signed to speed the process of mail creation.
It has a minimal number of user adjustments and an intuitive, easy-
to-use control panel. This greatly simplifies machine operation and
will enhance the productivity of your mailing operation.
There are two configurations of the SI1000 available. The basic
model is supplied with an insert feeder and one sheet feeder. The
second configuration is supplied with an insert feeder and two sheet
feeders.
Introduction
Machine Configurations
About Your Machine
Configuration 1
Basic machine with insert
feeder and one sheet feeder
insert feeder
Configuration 2
Machine with insert feeder
and a 2nd sheet feeder added
2nd sheet
feeder
insert feeder

6SI1000 Operator Guide (SV62138 Rev. A)
1 2
3
4
5
6
7
12
11
10
9
8
1. Insert Cover E Release Button (Blue Button Marked E)
Press this button to release the insert cover if a jam occurs in
this area of the machine. The display prompts you if you need to
open this cover to remove jammed material.
2. Insert Feeder (Not on All Models)
Use this feeder to add additional inserts to your envelope.
Material fed from this feeder cannot be folded by the inserter.
However, this feeder is especially suited to feeding pre-folded or
thicker inserts.
3. Operating Guide Slot
Store this Operating Guide in the slot provided so that it doesn’t
get lost and is readily available when you need it.
4. Control Panel
This is where you enter commands and where the machine in-
forms you of its status. See pages 8 and 9 for a full explanation
of what each button does.
Machine Controls, Indicators and Features
Introduction

7
SI1000 Operator Guide (SV62138 Rev. A)
5. Moistener Tank
This tank contains E-Z Seal®solution or water to moisten and
seal envelope flaps. It slides out to the right for refilling and has
an oval level indicator window at the front so you can easily
check fluid level.
6. Lifting Handles (One Each Side)
Always lift the SI1000 using the side handles. DO NOT lift the
machine by any of the feeders or the stacker.
7. Second Sheet Feeder A2 (Optional)
You can add this feeder to the machine to enable folding and
inserting of a second sheet into the envelope. It functions in
exactly the same way as the standard sheet feeder, A1.
IMPORTANT: When you use both sheet feeders
A1 and A2 together, always load the address bear-
ing sheet into sheet feeder A2. If you fail to do this,
the address won’t show in the envelope window.
Always load sheets into feeder A2 face down and
bottom edge first, that is, with the bottom edge of
the sheet furthest into the machine.
8. Standard Sheet Feeder A1
This feeder enables folding and inserting of a sheet into the
envelope. Always load sheets into this feeder face down and
bottom edge first.
9. Manual Feeder M
Use this feeder to manually feed stapled sets of up to three
sheets each. The machine waits for you to feed each set by
hand into this feeder before it folds and inserts the set automati-
cally. Always feed sheets into this feeder face down and bottom
edge first, that is, with the bottom edge of the sheet furthest into
the machine.
10. Stacker
The machine delivers finished pieces to this area.
11. Front Cover D Release Button (Blue Button Marked D)
Press this button to release the front cover if a jam occurs in
this area of the machine. The display prompts you if you need to
open this cover to remove jammed material.
12. Envelope Feeder B
This feeder feeds envelopes into the inserting area where they
are filled with sheets or inserts from other feeders.
Introduction

8SI1000 Operator Guide (SV62138 Rev. A)
Feeder A1
Menu / Enter
no yes
Feeder A2
2nd Page
Seal
No Seal
Trial Piece Stop
Start
Envelope Fdr B
Insert Fdr C
Fold Only
1. Display
Shows the current status of your SI1000 and displays prompts
or error messages which help you in operating the machine.
2. Menu/Enter
Press this button to enter the menu options. Options available
are:
• Reset Counter
• Change Paper Size. Choose 11” (letter size) or 14” (legal
size)
• Move Address in Window
• Turn Sheet Double Detection On/Off
• Turn Insert Double Detection On/Off
• Turn Safe Seal On/Off
3. yes and no buttons
Once you’ve entered the menu using Menu/Enter, press these
buttons to answer yes or no to prompts.You also use them to
change (increase or decrease) settings offered by menu op-
tions.
1
2
3
4
57
6
The Controls
Introduction

9
SI1000 Operator Guide (SV62138 Rev. A)
4. Selection Buttons and Indicator Lights
Press these buttons to step through the feeders and options
that are available on your machine.
Depending on your model configuration, some indicator lights
and associated feeders may be inoperable. If your model
doesn’t have a second sheet feeder, for example, the indicators
associated with this feeder will not light. This is normal.
A green indicator shows that a feeder or function is selected for
use.
A red indicator shows that you selected an invalid (impossible)
combination of functions. Simply correct the error in selection and
the indicator(s) will change back to green.
An unlit indicator means that the feeder or function is turned OFF.
5. Trial Piece
After you’ve set up a job using the control panel, you must run
a trial piece. If you press Start before running a trial piece, the
machine display will prompt you to run a trial piece first.
Press this button to run one fully collated piece as programmed
via the control panel. The envelope will not seal regardless of
whether the system has been told to seal or not. This allows
you to inspect the processed job to make sure that everything is
inserted correctly and that the address appears in the window.
The trial piece also allows the system to calibrate itself and set
its double detect feature, if selected.
IMPORTANT: Running the trial piece is an es-
sential function for the machine to perform. You
must do it before a start every time you use a
new batch of material. This allows the system to
re-calibrate in case different batches of material
vary slightly.
6. Start
Press to begin automatic operation.
7. Stop
Press to stop automatic operation at the end of the next cycle.
About the Sleep Mode
After 10 minutes of inactivity, the system enters a power-saving
“sleep mode” and displays Powersave On. Pressing any button
will wake the machine up. The machine remembers the last job
setup.
Introduction

10 SI1000 Operator Guide (SV62138 Rev. A)
This chapter explains how to connect and load the machine.
Once you understand the subjects covered in this chapter, you can
quickly set up and use the machine for a variety of jobs as explained
later in Chapter 3, Running Jobs.
IMPORTANT: Before running a job, make sure your material meets
our published specifications (see Specifications on page 43). This
helps assure reliable operation and greatest productivity.
WARNING! Read all the safety information on page 4 before con-
necting the machine.
Connect the power cord to the socket on the back of the machine.
Plug the power cord into a suitable power outlet. Make sure the
power outlet is near the machine and is easily accessible.
Turn the power switch ON. After a few seconds, the display shows
Ready.
When turned ON, the machine remembers the last job setup, but
resets the item counter back to zero automatically.
Loading
2. PREPARING AND LOADING
Connecting Power and Turning On
IMPORTANT: When the machine is first turned ON, the message
“Check Moistener’” appears on the display until any other button is
pressed. This is only a reminder. As an additional reminder, this mes-
sage appears every 1,000 cycles at the end of a batch or when the
Stop button is pressed.
Tabla de contenidos