Schaefer Waycool WC-1HP-DHL Manual de usuario

Portable Evaporative Cooling Fans
Designated Hazardous Location WayCool®
Model WC-1HP-DHL
USER’S MANUAL
Class I: Hazardous location is one in which flammable gases or vapors may be present in the air in sufficient quantities to be explosive or
ignitable.
Class II: Are those areas made hazardous by the presence of combustible dust.
Class III: Are areas where there are easily-ignitable fibers or flyings present, due to the types of materials being handled, stored, or processed.
Division 2: Not normally present in an explosive concentration (but may accidentally exist).
Testing/Certifications Standards: Electrical Equipment for Use in Class I and Class II, Division 2 and Class III Hazardous (Classified) Locations.
[UL 1604, Third Edition, October 6, 1995, Including: Bulletins dated 3/22/95 & 5/17/96]
Non-Incendive Electrical Equipment for Use in Class I, Division 2 Hazardous Locations [CSA C22.2 No. 213-M1987]
Electrical Fans [UL-507, Ninth Edition, 9/24/01 and Fans and Ventilators [CSA C22.2 No. 113-M1989. Sixth Edition]
Certified for Class I
,
Division 2
,
Grou
p
D Class II
,
Grou
p
s F & G & Class III Hazardous
(
Classified
)
Locations
ETL certified for United States
and Canada

2
INTRODUCTION---------------------------------------------------------------------------------------------------------3
Why use evaporative coolers in your work place?---------------------------------------------------- 3
How evaporative cooling works?-------------------------------------------------------------------------- 4
ABOUT THIS MANUAL------------------------------------------------------------------------------------------------ 5
SAFETY INFORMATION---------------------------------------------------------------------------------------------- 6
SAFETY RECOMMENDATIONS----------------------------------------------------------------------------------- 8
WC-1HP-DHL SPECIFICATIONS---------------------------------------------------------------------------------- 10
WC-1HP-DHL UNIT DESCRIPTION------------------------------------------------------------------------------- 11
WATER SUPPLY SYSTEM------------------------------------------------------------------------------------------ 11
COOLING PAD ASSEMBLY----------------------------------------------------------------------------------------- 14
BLOWER AND DUCTWORK-----------------------------------------------------------------------------------------15
CONTROL-----------------------------------------------------------------------------------------------------------------16
OPERATION AND MAINTENANCE-------------------------------------------------------------------------------- 17
Unit Placement and Other Considerations-------------------------------------------------------------- 17
Unpacking and Initial Setup--------------------------------------------------------------------------------- 18
Regular Cleaning---------------------------------------------------------------------------------------------- 19
Normal Startup------------------------------------------------------------------------------------------------- 20
Normal Shutdown----------------------------------------------------------------------------------------------20
TROUBLESHOOTING------------------------------------------------------------------------------------------------- 21
Cooling Pads not Wetting----------------------------------------------------------------------------------- 21
Foaming--------------------------------------------------------------------------------------------------------- 21
Line Clogs or Obstructions---------------------------------------------------------------------------------- 21
Splattering out Front------------------------------------------------------------------------------------------ 22
Leaking out Bottom------------------------------------------------------------------------------------------- 22
General-------------------------------------------------------------------------------------------------------------------- 23
Warranty------------------------------------------------------------------------------------------------------------------- 24
TABLE OF CONTENTS

3
WHY USE EVAPORATIVE COOLERS IN YOUR WORKPLACE?
• The WayCool®evaporative cooler requires little space, has a low initial cost, is
inexpensive and simple to operate and requires minimal scheduled maintenance.
• Due to the design and construction of the cooling pads, cooling efficiency is
normally maintained near optimum throughout the life of the pads, which can easily
last for about two seasons with proper care.
• In many cases, evaporative coolers are a better solution than mechanical
refrigeration systems because they are more economical to operate and maintain
and do not use environmentally sensitive and costly refrigerants.
INTRODUCTION

4
HOW EVAPORATIVE COOLING WORKS
Figure WC-1HP-DHL.02 - Evaporative Cooling Principle
Evaporative cooling is the same process your body uses to cool itself. When you perspire, and air moves
across your skin, a portion of the perspiration (water) evaporates. Evaporation requires heat to change liquid
water-to-water vapor and this heat is taken from your skin, producing the cooling effect.
In an evaporative cooler, the cellulose cooling pads take the place of your skin, water instead of perspiration
wets them and a fan moves the air. The air blows across the cooling pads and evaporates moisture. Heat is
drawn from the pads and the air, dropping the air temperature and producing the cooling effect. The cooled
air is then forced through a building or space and displaces the warm air out building openings, cooling the
surroundings. In addition, air velocity increases the cooling effect as it moves over the skin of people in the
airflow path.
WayCool®evaporative coolers are portable and use the latest technology to provide large volumes of cool
air, efficiently and inexpensively for cooling small to medium size areas. Simply adding more units can
accommodate larger areas. With proper sizing and application, a WayCool®portable evaporative cooler can
lower the effective air temperature by up to 20°. Even in high humidity, the efficiency of the WayCool®
evaporative cooler provides effective cooling.
INTRODUCTION

5
The intent of this manual is to help you in two ways: to provide you with step-by-step instructions for quick and
easy assembly of your product and to serve as a reference for simple maintenance and questions regarding
your product.
Important! Read ALL instructions carefully before starting your WayCool®.
Important! Pay particular attention to all SAFETY information.
All information, illustrations and specifications in this manual are based on the latest product information
available at the time of printing. We reserve the right to make changes at any time without notice.
ABOUT THIS MANUAL

6
Warning and Danger Decals have been placed on the equipment to warn of potentially dangerous situations.
Care should be taken to keep this information intact and easy to read at all times. Replace missing or damaged
safety decals immediately.
Using the equipment for purposes other than specified in this manual may cause personal injury and/or damage
to the equipment.
Safety-Alert Symbol
This is a safety-alert symbol. When you see this symbol on your equipment, be alert to the potential
for personal injury. This equipment is designed to be installed and operated as safely as possible…
however, hazards do exist.
Signal words are used in conjunction with the safety-alert symbol to identify the severity of the warning.
CAUTION indicates an imminently hazardous situation, which, if not avoided,
COULD cause damage to your equipment or equipment failure.
WARNING indicates a potentially hazardous situation, which, if not avoided, COULD
result in death or serious injury.
SAFETY INFORMATION

7
ETL LISTED
3019762 CONFORMS TO
UL STD 307
UL STD 1804
CERTIFIED TO
CSA C22.2 STD NO. 113
CAN/CSA C22.2 STD NO. 213
Follow Safety Instructions
Carefully read all safety messages in this manual and on your equipment safety decals. Follow
recommended precautions and safe operating practices.
Keep safety decals in good condition. Replace missing or damaged safety decals.
Decal Descriptions
This diagram shows the proper location of the safety decals as shipped from the factory. Replace
damaged or missing decals. Make sure the decals are easy to see at all times.
START UNIT WARRANTY WAR
Figure WC-1HP-DHL.03 - Decals
START UNIT - WARRANTY -
Turn water pump on 5-10 minutes before running blower VOID IF YOU RUN THE PUMP
to wet evaporative cooling pads. WITHOUT WATER.
SHUT DOWN -
Turn pump off and run only blower until evaporative
cooling pads are dry. This prolongs the life of the pads. CLEANING -
Clean pads a minimum of once every
CAUTION – ALWAYS TURN OFF AT SWITCH AND DIS- two weeks. Remove pads from unit
CONNECT POWER BEFORE REMOVING EVAPORA- and clean with garden hose only -DO
ORATIVE COOLING PADS FOR CLEANING OR INTERNAL NOT use chemicals or high pressure hose.
MAINTENANCE.
A
TTENTION!
The unit is suitable for
outdoor locations, but cannot be
used with an extension cord.
WARNING!
The motor in this unit is equipped
with automatic thermal protection.
The motor can start up or shut
down automatically. Ensure power
is removed before removing
protective grates and pads.
WARNING!
This unit can ONLY be use in the Hazardous Locations listed on this label.
The unit is certified for Not-Normally Hazardous Locations:
Class1, Division 2, Group D
Class 2, Division 2, Groups F & G
Class 3 Locations
As described by the “National Fire Protection Association”
Codes NFPA 597 and NFPA 599
Please review these codes to fully understand permitted applications
and locations prior to use of this product
SAFETY INFORMATION

8
READ AND SAVE THESE INSTRUCTIONS!
• This is an electric device with moving components. There is the possibility of
fire, electric shock, or injury to persons. Ensure all the safety recommendations
are adhered to in order to minimize this risk.
• Disconnect all power and unplug the unit before you inspect, clean or perform
maintenance on the components of the unit.
• Never reach into the unit when it is running; you could become entrapped by
the v-belt or injured by the rotating fan blades.
• Do not service the electrical components unless you are certified to do so.
• The metal frame edges are sharp; don't run your hand along them. Be careful
and wear gloves when you reach under the frame to inspect the PVC pipes and
mesh socks.
• A GFCI (Ground Fault Circuit Interrupter) is required for use with this unit.
• If pads and grates are removed for servicing, they must be replaced prior to
operating unit.
• Unit cannot be used with a solid-state control device.
• An extension cord can not be used with this unit.
• Units can only be used in an environment it has been certified for.
Table of Contents
SAFETY RECOMMENDATIONS

• Height and Width – 33” X 33” wide X 54” high (with casters and directional blower duct)
• Shipping Weight - 265 pounds
• Blower - Double-Inlet Centrifugal
• Motor - 1 HP, 115V, 60 HZ
• Pump - Submersible pump, Vane Type, 280 GPH (Gallons Per Hour)
• Pump Filter - Washable Polyethylene Filter
• Pump Discharge Filter - 480 Micron Stainless Steel
• Reservoir Capacity - 24 Gallons
• Optional Water Supply - Standard ¾" hose connection (garden hose size)
• Housing - High impact ABS plastic w/UV protection
• Evaporation Media - Chemically treated cellulose paper
Figure WC-1HP-DHL-04.Waycool Evaporative Cooler Overview
W
C-1HP-DHL SPECIFICATIONS
A
ctual WC-1HP-DHL
W
ayCool®
V
aries slightly from unit
shown here.

10
The WayCool®evaporative cooler is a completely self-contained, portable unit capable of delivering 40 MPH
velocity of air with a temperature drop of up to 20°. The unit is composed of:
• Level-controlled water supply system
• Cooling pad assembly
• Motor-driven blower and ductwork
• Controls
• Frame and housing
The bottom is made of high impact ABS plastic and holds approximately 24 gallons at normal operating level
(about 5" deep).
A float-operated valve automatically maintains proper water level when the unit is connected to a water
supply.
The bottom rests on, and is fixed to, an aluminum cradle. The bottom, in turn, is secured to the aluminum
frame. Four casters (2 locking, 2 regular) are attached to the underside of the aluminum cradle.
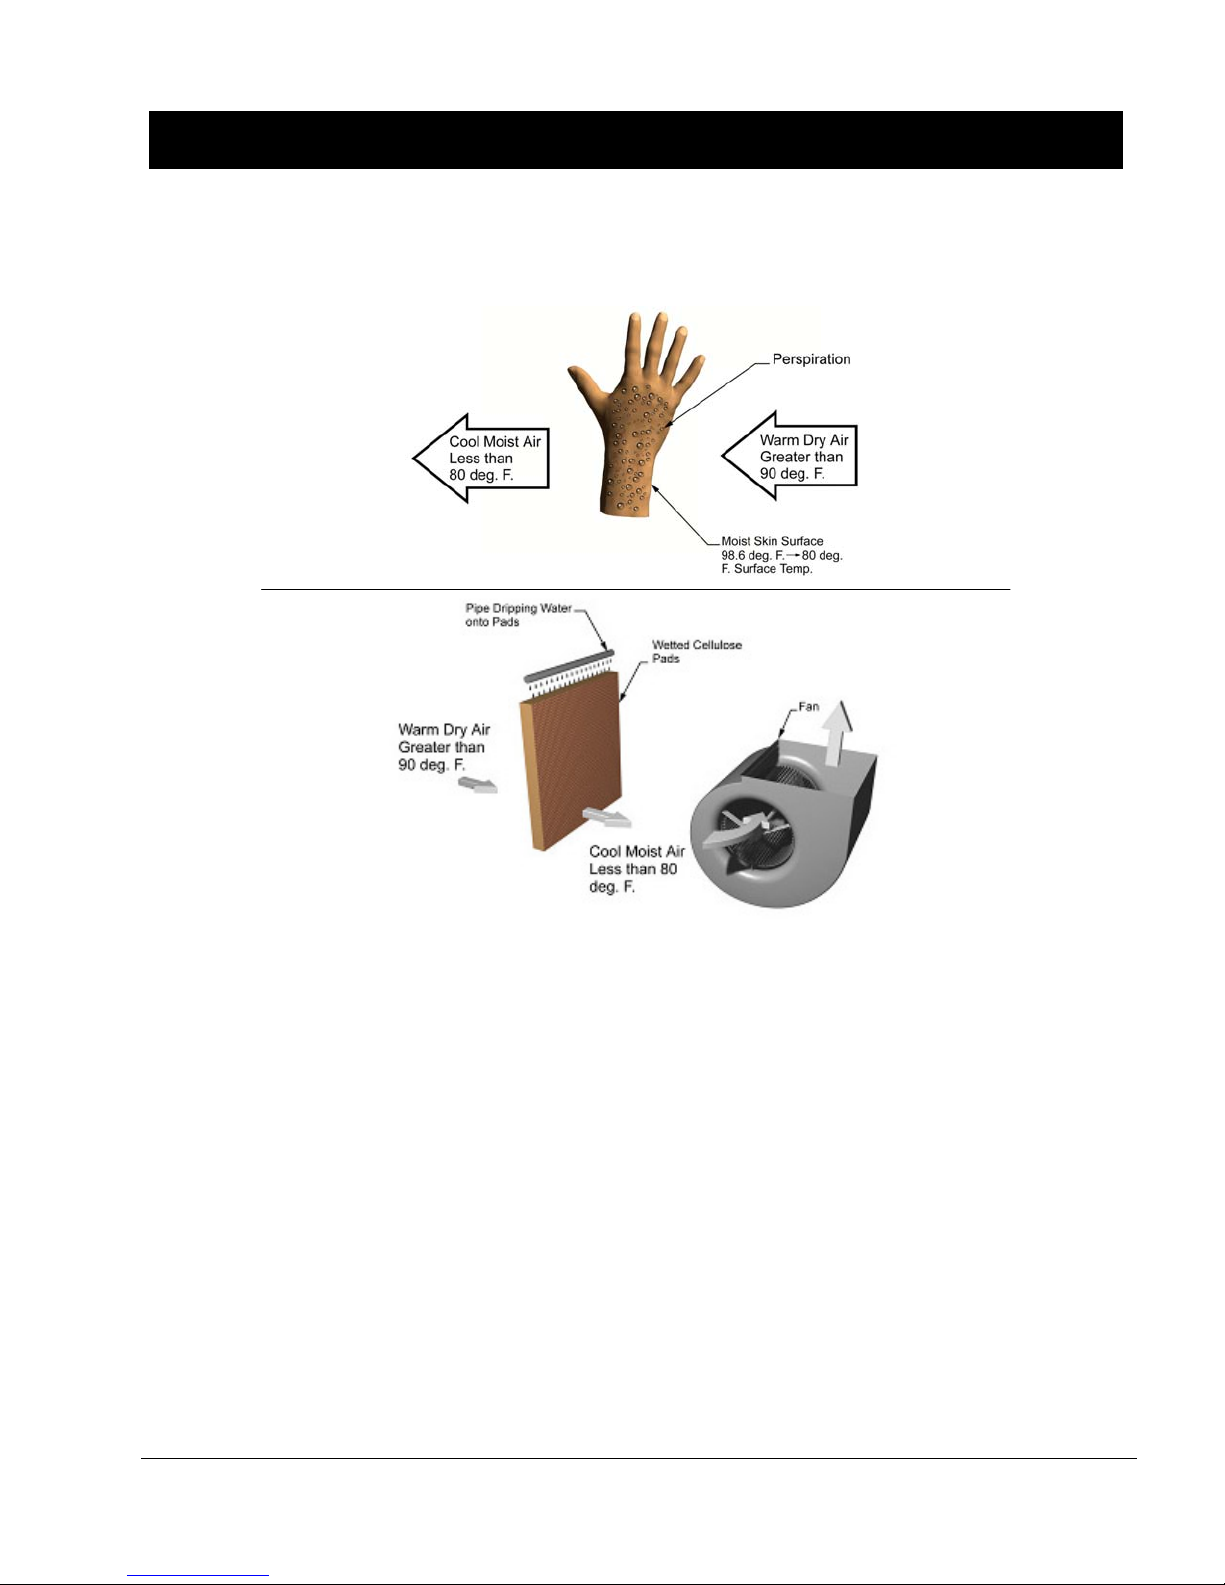
A pump draws water from the bottom and discharges it through the vinyl hose to the PVC pipes located
above the cooling pads. The PVC pipes distribute water onto the top of the cooling pads; saturating them.
Excess water drips back into the bottom through the holes in the cooling pad support channels.
The cellulose cooling pads sit in support channels and are held in place by plastic retaining grates. The
grates also help prevent damage to the cooling pads. Two pad sections fit in each side of the unit (total eight
sections) to totally enclose the unit.
The blower is hung from the top of the frame and powered by a belt driven 1HP electric motor. The blower
draws room air through the cooling pads where it picks up moisture and cools by evaporation. The blower
then discharges the cooled air.
Note: It is important the cooled space has sufficient air openings so the warmer air can flow out and
be replaced by the cooled air. A closed-in space or high humidity will reduce the cooling effect. See
Unit Placement and Other Considerations in the “Operations and Maintenance” section of this
manual.
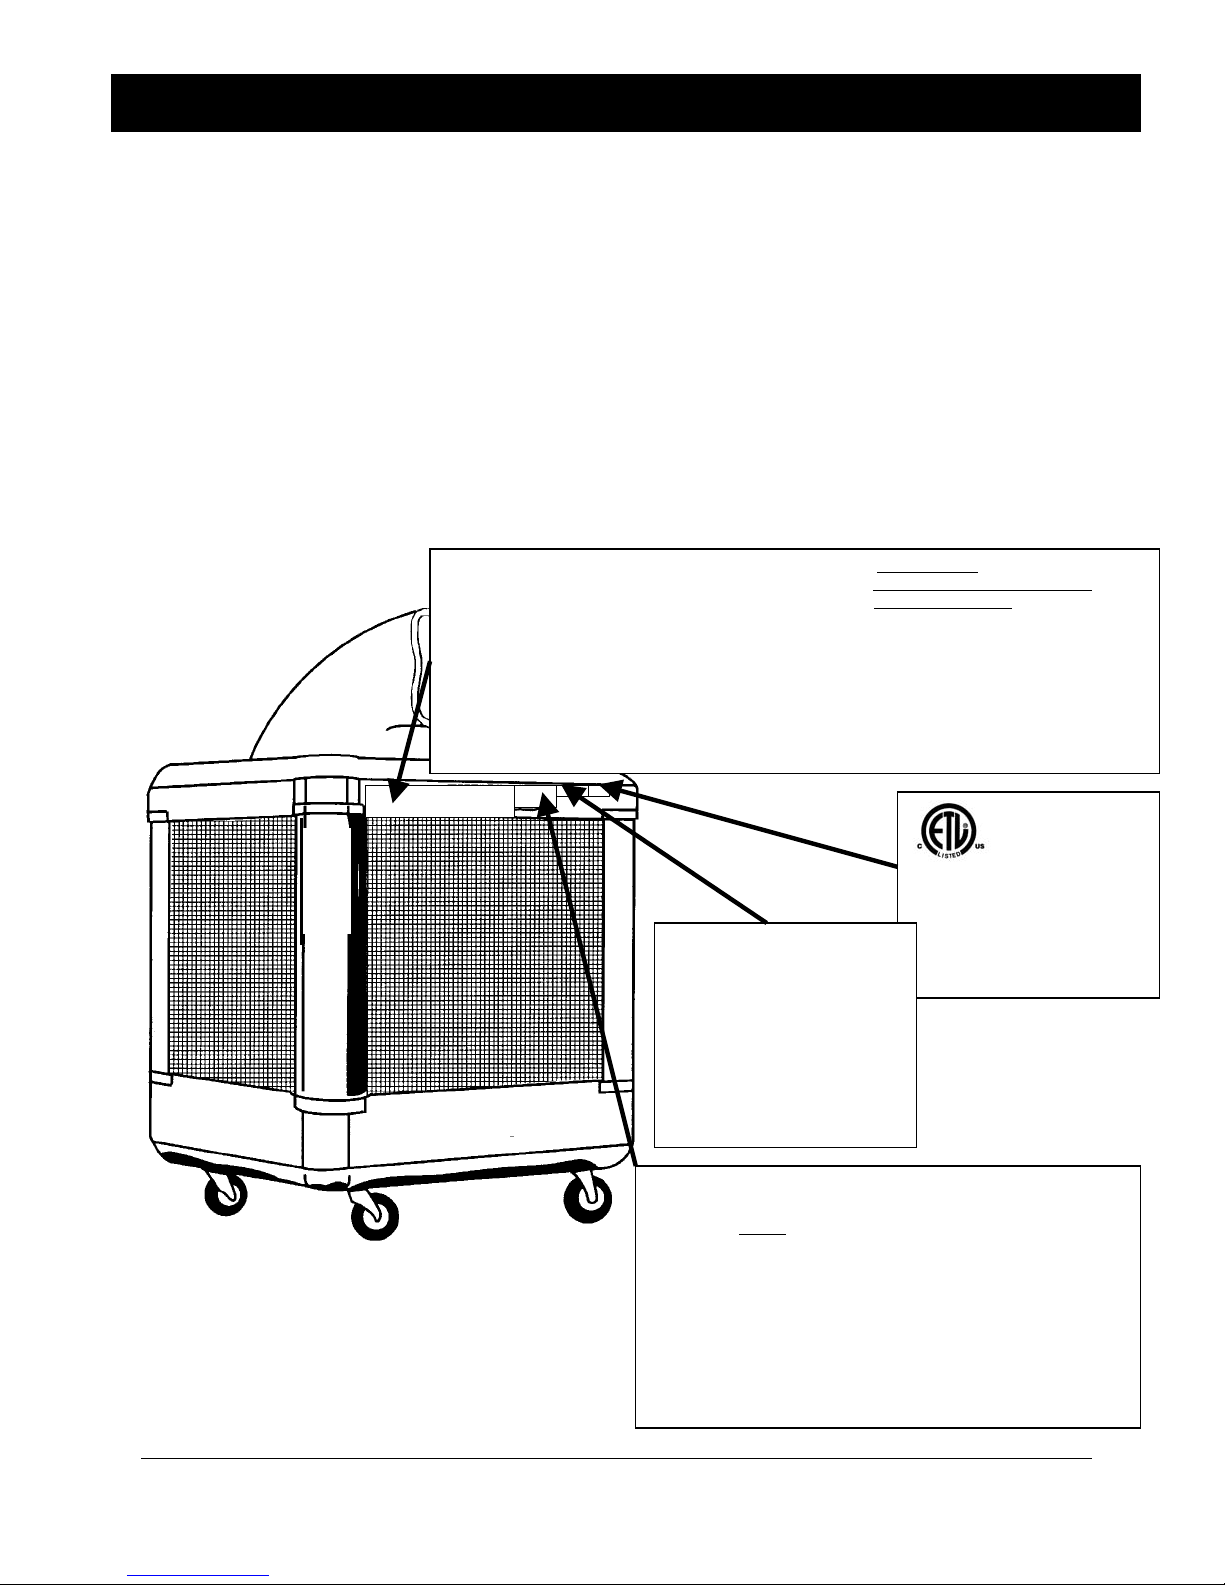
A screen covers the discharge duct to prevent foreign objects from entering the blower. A threaded rod
screws through a threaded brace above the screen to hold the blower duct in position. A plastic knob
secures the blower duct to the rod. The blower duct is made of a tough, durable plastic and can be manually
rotated 360 degrees to provide cool air in any direction without moving the unit.
Note: Water weighs about eight pounds per gallon, so when the unit is full, it weighs over 375
pounds. During setup and before startup, place the unit in the desired location and then fill the
bottom. Do not attempt to lift the unit once it is filled and be careful to avoid spills when moving it;
even over smooth ground. Do not try to push it over rough or soft ground as you can overstress the
wheels and frame and cause structural and component damage, which is not covered by warranty.
W
C-1HP-DHL UNIT DESCRIPTION
Tabla de contenidos
Otros manuales de Admirador de Schaefer

Schaefer
Schaefer TW30W Manual de usuario

Schaefer
Schaefer MOB4851-2 Manual de usuario

Schaefer
Schaefer VAF1500A Manual de usuario

Schaefer
Schaefer CS102 Manual de usuario

Schaefer
Schaefer MOB36612-2 Manual de usuario

Schaefer
Schaefer WayCool 1HP - Series Manual de usuario

Schaefer
Schaefer PFM126P13 Manual de usuario

Schaefer
Schaefer Versa-Kool Series Manual de usuario

Schaefer
Schaefer 20CFO-SWDS Manual de usuario

Schaefer
Schaefer VAF3000P Manual de usuario


