
RoyalTek RMP-8200 Manual de usuario

Cinema on–the–GO !
RMP-8200
User’s Manual

2
Table of Contents
Introduction........................................................................................ 3
What is inside the box:.......................................................................3
Overview.............................................................................................................3
System Requirement:.......................................................................................4
Getting Started.................................................................................4
Insert the battery...............................................................................................4
Power adaptor ...................................................................................................5
Connections....................................................................................... 7
Connecting to a Notebook or Perosonal Computer ..................................7
Via Micro SD card/T Flash card......................................................................9
Connecting to a Composite Video Device....................................................9
Remote control................................................................................................10
Intended Use....................................................................................................10
Powering Off....................................................................................................12
Adjusting Image Size......................................................................................11
Control the Brightness...................................................................................12
Control Volume................................................................................................13
Using ....................................................................................................15
Main Menu........................................................................................................15
Video and Audio File Support ...........................................................16
Photo View .................................................................................................18
Settings .......................................................................................................19
A/V in ...........................................................................................................22
Office Viewer ..............................................................................................23
Product Specification...................................................................28
Trouble Shooting.............................................................................29
Support................................................................................................30
3
Introduction
Thanks for purchasing RoyalTek’s product.
What is inside the box:
lRMP-8200 CINEMA ON-THE-GO
lAC/DC Power adaptor(EU/UK/US plugs)
lRechargeable battery
lUSB cable
lA/V cable
lTripod
lRemote control
lCarry Pouch
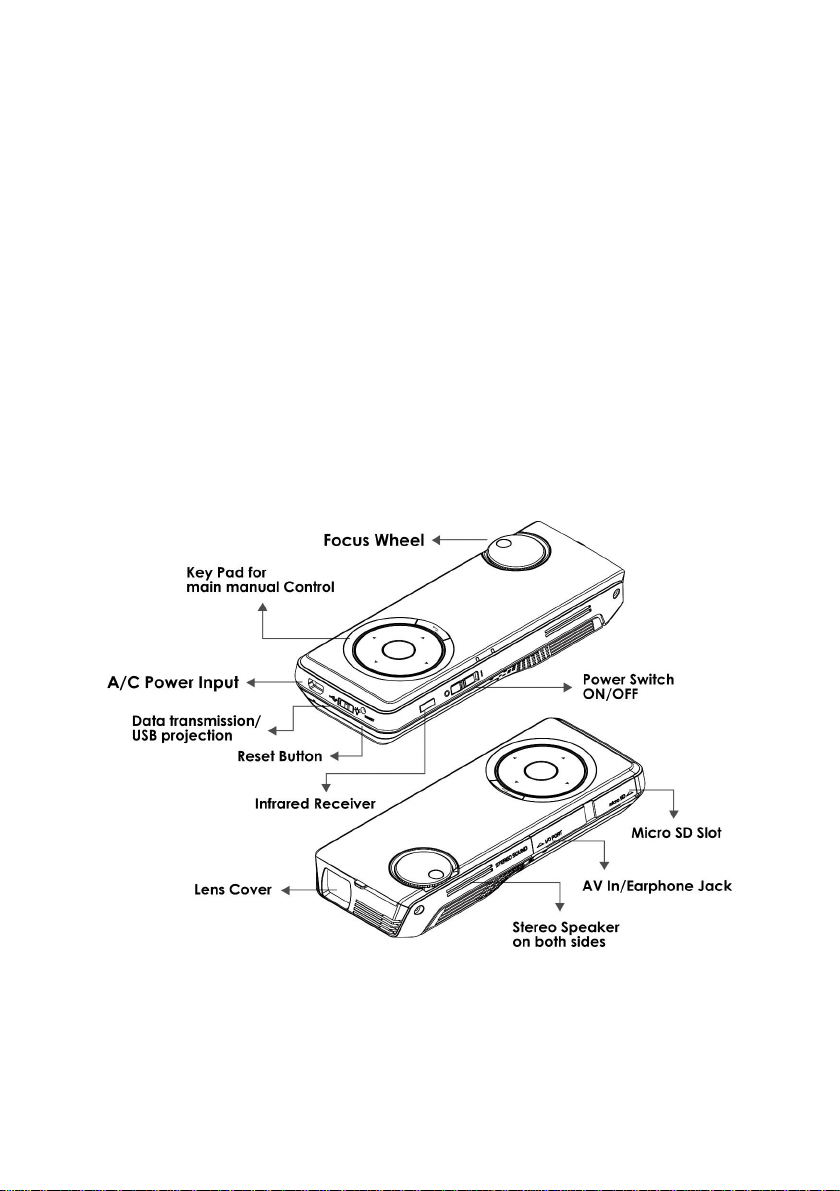
Overview
System Requirement:
lWindows 7, Vista (32bits & 64bits), XP (32bits & 64bits)
lUSB port (1.1 or above, 2.0 recommended)
4
Getting Started
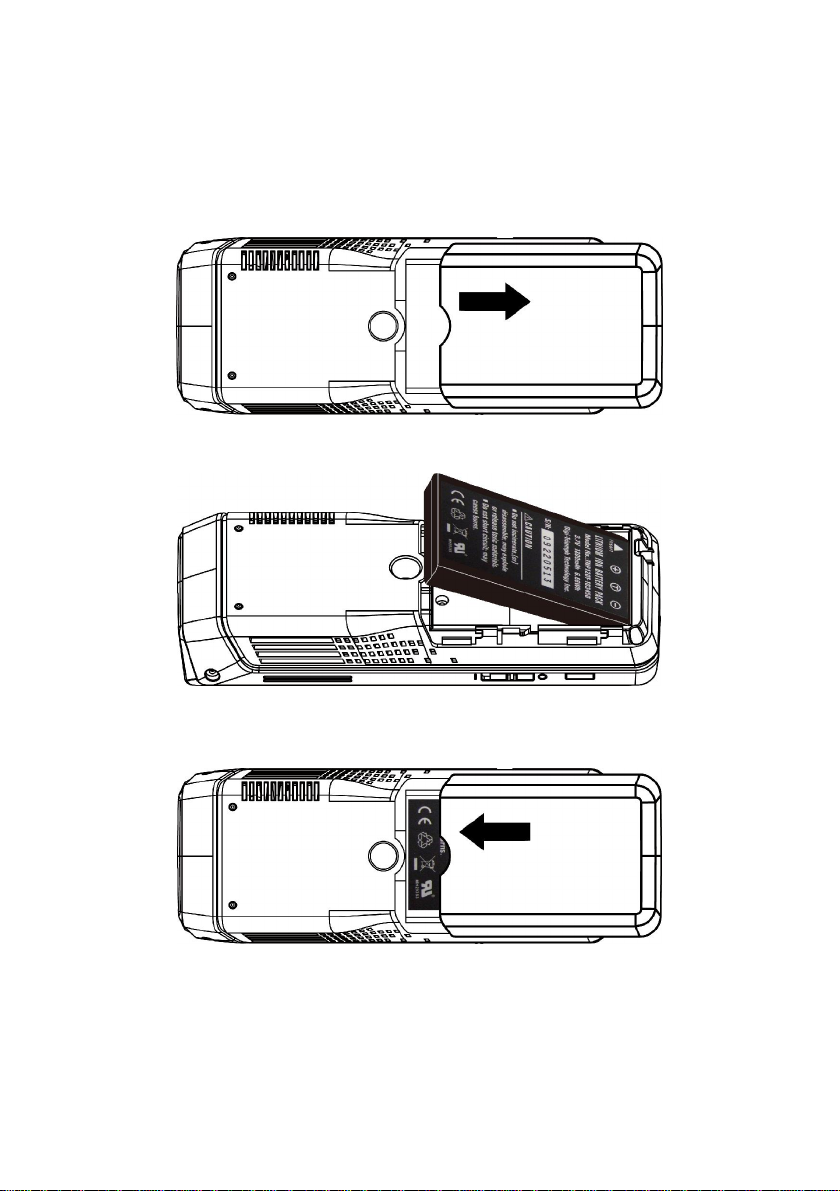
Insert the battery
1. Slide the battery cover.
2. Insert the battery.
3. Replace the battery cover and slide it up gently until hearing a click.

5
Slide the lens cover to the other side
Switch on the power button. From “O” side to “I”.
Before you use, we suggest you to fully charge the battery.
It will take around 2.5 hoursfor battery charging.
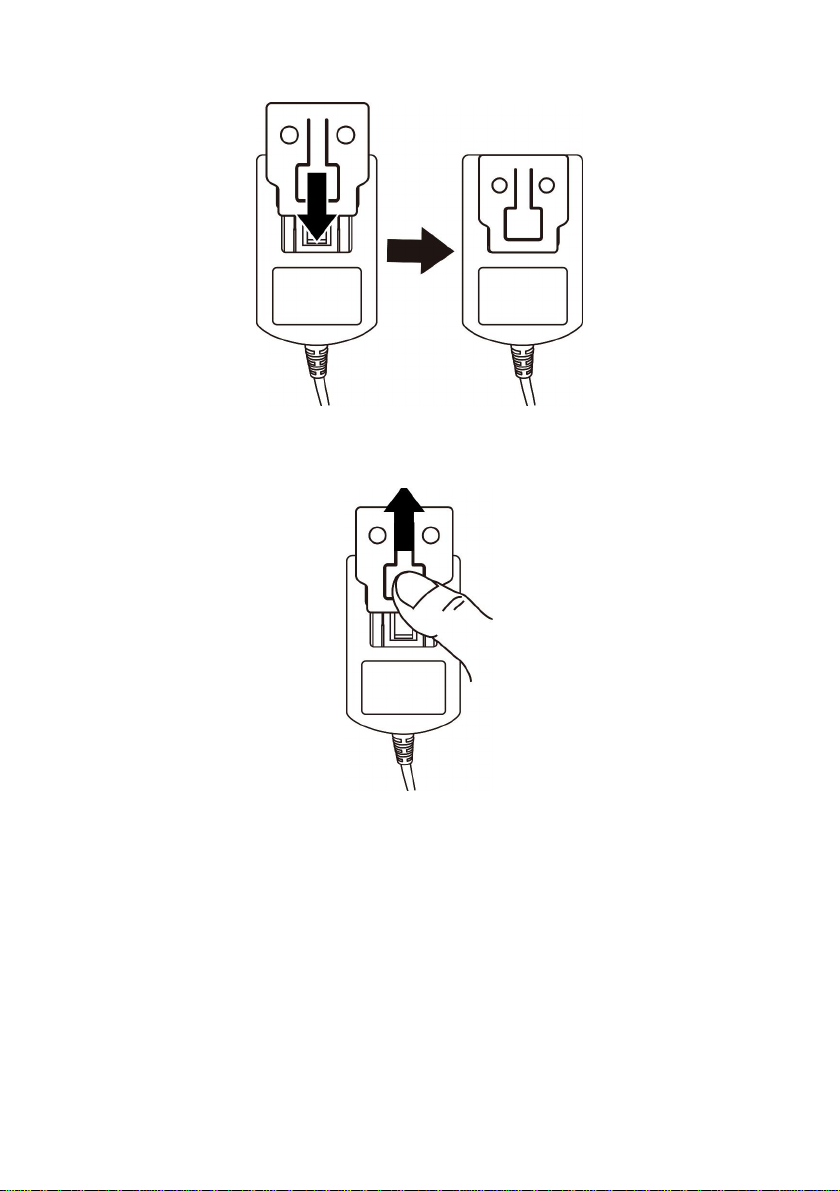
Power adaptor
1. Select the correct plug for your environment.
6
2. Connect the plug to the power adapter.
To disconnect, please push the button and push out the plug.
Notes:
If The RMP-8200 CINEMA ON-THE-GO power is off, allow 3 hours for the
battery to fully recharge. The battery will stop charging if The RMP-8200
CINEMAON-THE-GO power is on to avoid damage caused by high operating
temperature. The battery can also be charged by connecting The RMP-8200
CINEMAON-THE-GO to a computer USB port. This method will fully charge
the battery in six hours. The battery has a lifespan and ages every time it is
fully charged and discharged. The battery will gradually loose charge capacity
as it ages. Therefore, as the battery ages the battery life will decrease due to
natural loss.

7
Connections
The RMP-8200 CINEMAON-THE-GO is designed to project with built-in memory
or via expandable Micro SD card slot or connecting to other media devices.
Connecting to a Notebook or Personal Computer
Use the USB cable to connect The RMP-8200 CINEMA ON-THE-GO to
desktop computers, laptop computers, ultra-portable computers for data
transfer.
Turn on the power and read the main menu as follows:
Push the switch to side. Connect USB cable to your PC

8
When the main menu disappears, the connection succeeded and home screen
shows.
You can proceed with the data transfer.
Note:
To conserve power, The RMP-8200 CINEMA ON-THE-GO will stop projecting
an image while connected to a computer USB port.
Via Micro SD card/T Flash card
Store the files you wish to project in a Micro SD or T/F card.
lInsert the Micro SD Card/T Flash card
Pull back the cover and insert the memory card.
The memory card's electrical contacts should face up.

9
lRemove the memory card
Pull back the cover and push to release the memory card.
When the main menu disappears, the connection succeeded and you can
proceed with the data transfer.
Note:
To conserve power, The RMP-8200 CINEMA ON-THE-GO will stop projecting
an image while connected to a computer USB port.
To project, switch to side as and unplug USB cable.
The main menu will show.

10
Connecting to a Composite Video Device
Use the A/V cable to input video from camcorders, digital cameras, DVD
players, smart phone with TV-out function and digital media players into the
AV input on The RMP-8200 CINEMA ON-THE-GO .
a. Connect the AV cable to The RMP-8200 CINEMA ON-THE-GO ’sAV input.
b. Connect the other end of theAV cable to the video device’s audio
and video outputs.
Some video devices do not have the standard audio and video connections
and may require anAV cable specified by the vendor. TheAV cable allows you
to connect yourvideo device to your TV monitor or your projector.Also may be
purchased from the video device vendor. When you have theAV cable, use
the cable adapter to connect the video device cable and The RMP-8200
CINEMAON-THE-GO cable.
Tabla de contenidos
Otros manuales de Proyector de RoyalTek


