Rollplay 6V DIZZY DRIVER Instrucciones de montaje

Read and understand the entire manual before assembly and operation. The vehicle must be
assembled by an adult who has read and understands the instructions.
Made in China.
Styles and colors may vary. Do not return to store. Call 1-888-982-9309 for assistance and
replacement parts.
IMPORTANT:
Save this manual with your sales receipt.
Owner’s Manual and Assembly Instructions
Model #: W407AC, W407AC-B, W407AC-P
6V Dizzy Driver

Introduction
Thank you for purchasing this Rollplay vehicle. We hope the rider enjoys
it for miles to come. Please read this instruction guide carefully before
assembling and operating the vehicle. Please have your model number
and serial number ready before calling. Please have proof of purchase.
Keep your sales receipt or register your product at
www.rollplay.com.
Please contact Rollplay Customer Service with any questions.
Hours: 9 AM - 5 PM (CST), Monday - Friday
Phone: 1-888-982-9309
Email: customerservice@rollplay.com
Web: www.rollplay.com
Specifications:
BATTERY 6V 4AH
MOTOR 6V 15W
AGE 18 Months - 3 Years
MAX WEIGHT 25 kg (55 lbs)
PRODUCT SIZE 82.2 x 49.3 x 48.3 cm (32.4” x 19.4” x 19”)
SPEED 2 km/h (1.25 MPH)
RECHARGE TIME 8-12 Hours
TYPICAL RUN TIME 1-2 Hours
CHARGER OUTPUT DC 7.0V0.7A

IMPORTANT!
YOU MUST CHARGE THE BATTERY
FOR 24 HOURS BEFORE FIRST USE!
Charge the battery after each use.
Charge the battery at least once a month, even if the vehicle is not in use.
DO NOT RETURN THIS ITEM
TO THE STORE!
Call Customer Service if you need assistance or replacement parts. Please
have your model number and serial number ready before calling. Please
have proof of purchase. Keep your sales receipt or register your product at
www.rollplay.com as we may require proof of purchase.
1-888-982-9309
Read this entire manual to ensure
proper assembly and safe operation
of the vehicle.

4Table of Contents
Safety..........................................................5
Parts ..........................................................7
Charging Instructions ...............................8
Assemble the Rear Wheel Panel..............9
Assemble the Decorative Wheels ..........10
Assemble the Front Drive Wheel / Steering Rod ........... 11
Assemble the Front Drive Wheel / Steering Rod ........... 12
Assemble the Battery..............................17
Assemble the Dashboard .......................13
Assemble the Steering Wheel ................14
Assemble the Windshield .......................15
Assemble the seat .................................. 16
Operation Instructions ............................18
Maintenance ............................................19
General Care ............................................20
Troubleshooting Guide............................21
FCC Information ......................................22
Service and Repairs ...............................23
Warranty ...................................................24
Product Registration ...............................25

5
Safety
WARNING: SAFETY RIDING RULES
The user must follow all safety rules and guidelines, or serious injury or death may
occur to the user.
• Always use common sense and safe practices when using the vehicle. The user
must be at least 18 months old and weigh no more than 25 kg (55 lbs).
• This product contains small parts that are for adult assembly only. Keep small
children away when assembling. Remove and dispose of all protective material
and plastic bags before assembly.
• Riders must always wear a tted helmet that complies with U.S. Consumer
Product Safety Commission (CPSC) Standard 16 CFR 1203.
• Only sit on the seat in the vehicle.
• Do not allow more than one rider.
• Do not overload the vehicle. Do not remove the weight restriction decals.
• Do not pull the vehicle with another vehicle or similar device.
• Keep body parts such as hands, legs, hair and clothing away from moving parts.
Moving parts can cause serious injury.
• Always wear shoes in the vehicle.
• Do not operate near streets or motor vehicles.
• Do not operate near drop-offs such as steps, steep inclines or hills. Operate on
relatively level ground.
• Do not operate near water, swimming pools or other uids.
• Do not operate in dangerous weather conditions such as rain or snow.
• Do not operate near loose dirt, mud, sand or ne gravel.
• Do not operate near ammable vapors (gasoline, paint thinner, acetone, etc.).
• Always use the vehicle in a safe, secure environment with adult supervision.
PREVENT INJURIES AND DEATHS:
NEVER LEAVE CHILD UNATTENDED. ALWAYS keep child in view when child is in
vehicle. Direct adult supervision is REQUIRED.
NEVER use in roadways, near cars, on or near steep inclines or steps, swimming
pools or other bodies of water.
ALWAYS wear shoes
ALWAYS sit on the seat
RISK OF FIRE. Do not bypass.

6Safety
(Continued)
WARNING: BATTERY SAFETY
• Battery posts, terminals and related accessories contain lead and lead compound
(asic) chemicals known to the state of California to cause cancer, reproductive
harm, and are toxic and corrosive. DO NOT open the battery.
• Contact exposure to battery leakage (lead acid) may cause serious injury.
Immediately contact your doctor if exposure occurs. If the chemical is on the skin,
ush immediately with cool water for 15 minutes. If the chemical is swallowed,
immediately give the person water or milk. Do not give water or milk if the person
is vomiting or has decreased alertness. Do not induce vomiting.
• Tampering with or modifying the electric circuit system may cause shock, re or
explosion. It could permanently damage the system. Keep the charger housing
closed to prevent exposed wiring, which may cause electric shock.
IMPORTANT: Before using the vehicle for the rst time, the battery must be
charged for a full 24 hours (no more than 30 hours).
WARNING: ADULT SUPERVISION
REQUIRED
• Before using the vehicle, the rider must understand the vehicle controls and safety
issues.
• It is the responsibility of the adult to educate the child and to determine if the child
is capable of understanding the vehicle controls.
• An adult must ALWAYS directly supervise the use of this vehicle.
• NEVER leave a child unsupervised in the vehicle.

7
Parts
1. Main Body
2. Windshield
3. Dashboard
4. Steering Wheel Support Tube
5. Steering Wheel
6. Rear Wheel Panel
7. Battery
8. Battery Compartment Cover
9. Seat
10. Front Drive Wheel
11. Support Wheel (L and R)
12. Position Limit
13. Decorative Wheels (4)
14. Decorative Wheel Connectors (4)
15. Front Wheel Caps (2)
16. Rear Wheel Caps (2)
17. Steering Rod Assembly
18. Rear Wheels (2) (Pre-assembled)
19. Rear Axles (2) (Pre-assembled)
20. Rear Axle Clamps (2) (Pre-
assembled)
21. Manual
Located in Blister Pack:
22. Steering Wheel Screw (2)
23. Square Nut (2)
24. Type A Screw (26 + 2 spares)
25. Washer Head Screw (7+ 2 spares)
26. Blister Pack
1
2
3
4
5
6
7
8
9
10 13
22
23
25
24
26
21
12
11
11
13
13
13
14
14
14 16
17
18
19
19
20
16
14
15
15
•Phillips screwdriver
Not Included:
22
23

8Charging Instructions
ONLY AN ADULT SHOULD HANDLE THE BATTERY AND CHARGER.
To Charge the Battery:
1. Ensure the vehicle is stopped and turned
off.
2. Unlock and remove the battery
compartment cover.
3. Locate the red battery connector (A) that
attaches directly to the battery.
4. Connect the red battery connector to the
red battery charger connector (B).
5. Plug into a 120 V outlet.
To Reconnect the Battery:
6. Unplug the battery charger from the
outlet.
7. Unplug the red battery connector from
the red charger connector (B) by pushing
down on the red clip on the battery
connector.
8. Connect the red battery connector (A) to
the red engine connector (C).
9. Replace the battery compartment cover
and tighten lock.
Note: It is not necessary to remove the
battery for charging. However, if the battery
does not reach the outlet, it can be removed
for charging. Always push down on the
red clip on the battery connector before
connecting or unplugging.
YOU MUST CHARGE THE BATTERY FOR HOURS
BEFORE THE FIRST USE!
A B
C
9
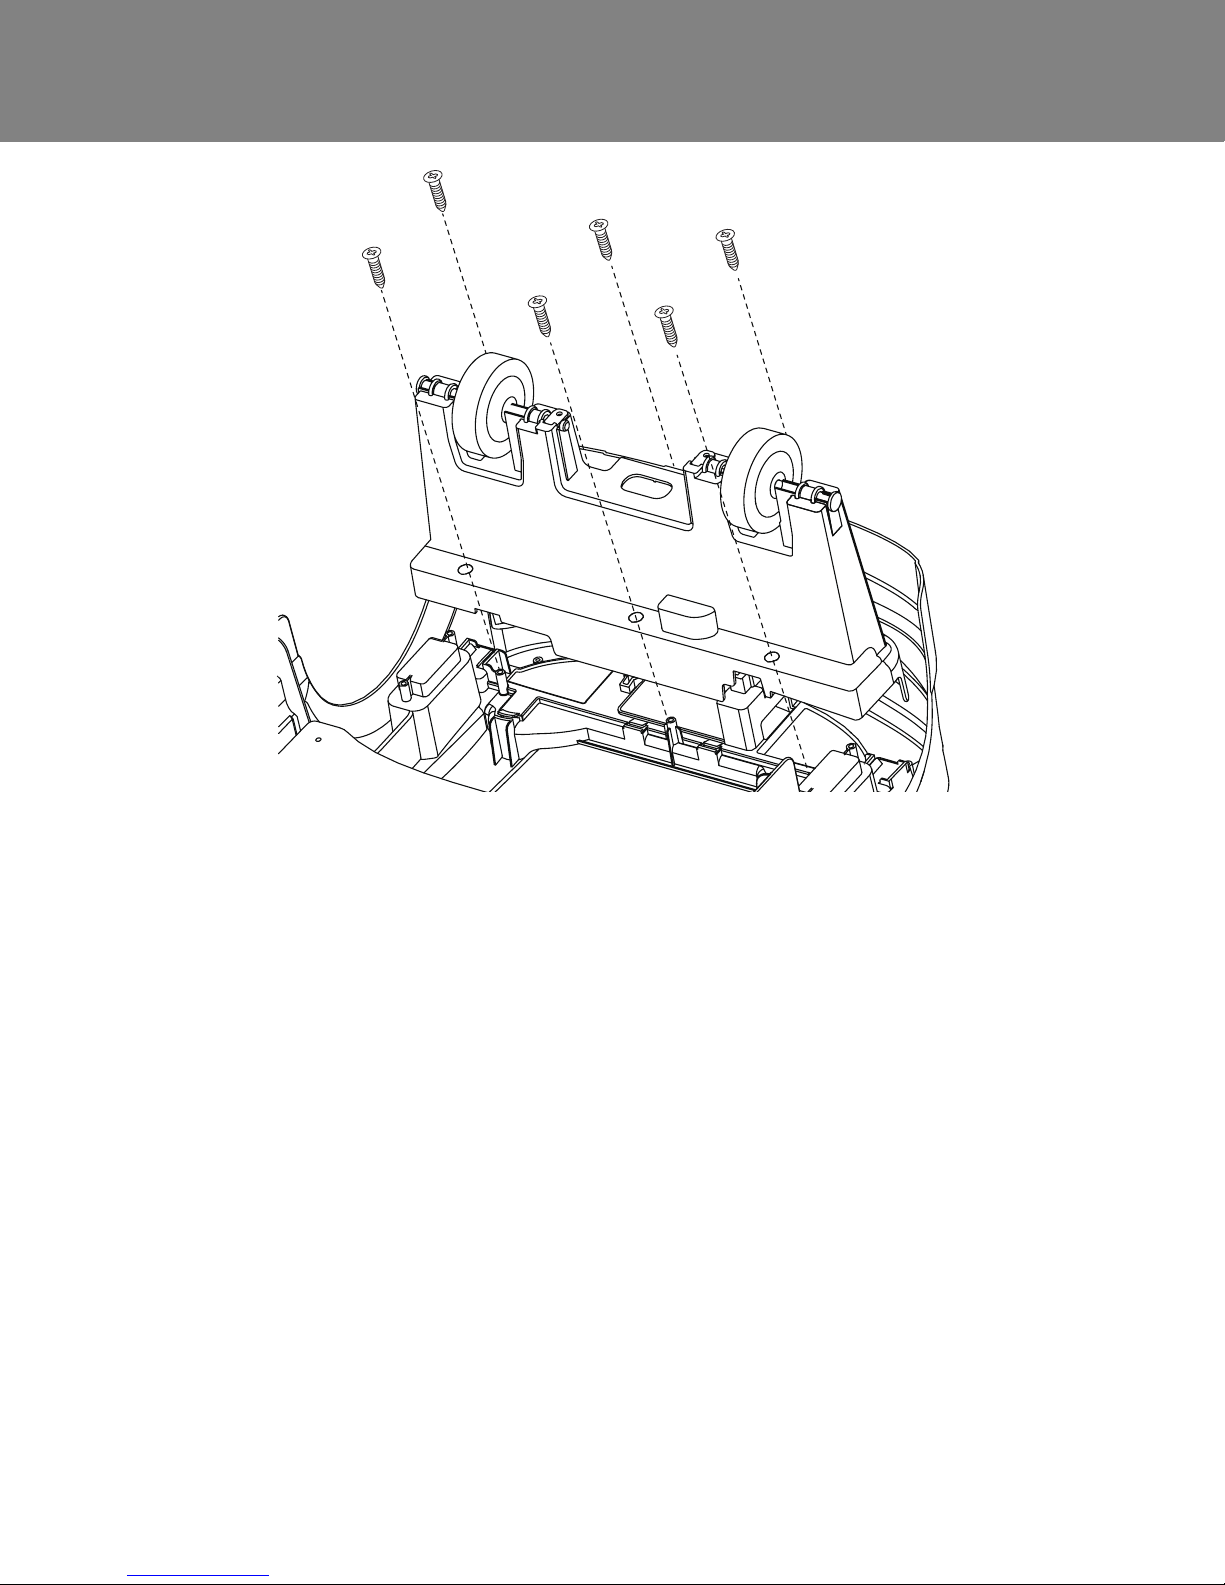
Assemble the Rear Wheel Panel
1. Remove the battery before assembly.
2. To assemble the rear wheel panel (6), ip the body of the car onto its back.
3. Align the 6 holes on the rear wheel panel with the holes on the back of the car
body. Insert the panel into the car body. Be careful of not to pinch or cut any of
the wires while assembling.
4. Use 6 Type A screws (24) to secure the panel in place.

10 Assemble the Decorative Wheels
1. Once the wheel assembly is
complete, slide the decorative
wheel assembly until it
completely clicks into the front
and rear wheel caps (15 and
16).
2. Align the holes on the wheel
seats with the holes under the
car body, and use two Type A
screws (24) for each wheel to
affix them to the body.
1. Algin the 3 holes on the
decorative wheel connector
(14) with the holes on the
inside of the decorative wheel
(15).
2. Note that the slot on the
connector must be aligned
with the plastic tab on the
wheel to properly t, and the
connector will click into place.
3. Insert 3 Type A screws (24)
into the holes, and tighten
with a screwdriver.
4. Repeat for the other wheels.
Front Decorative Wheel Rear Decorative Wheel
Este manual sirve para los siguientes modelos
3
Tabla de contenidos
Otros manuales de Vehículo eléctrico de Rollplay


