
Roadstar CLR-600/LIGHT Manual de usuario

www.roadstar.com
CLR-600/LIGHT
User manual
Bedienungsanleitung
Manuel d’instructions
Manuale d’istruzioni
Manual de instrucciones
Gebruiksaanwijzing
Návod k použití
Návod na použitie

INDEX
English Page 1
Deutsch Seite 4
Français Page 7
Italiano Pagina 10
Español Página 13
Nederlands Page 16
Čeština Strana 19
Slovenský Strana 22
Your new unit was manufactured and assem-
bled under strict ROADSTAR quality control.
Thank-you for purchasing our product for your
music enjoyment. Before operating the unit, ple-
ase read this instruction manual carefully. Keep
it also handy for further future references.
Votre nouvel appareil a été fabriqué et monté
en étant soumis aux nombreaux tests ROA-
DSTAR. Nous espérons que cet appareil vous
donnera entière satisfaction. Avant de vous a-
donner à ces activités, veuillez lire attentive-
ment ce manuel d’instructions. Conservez-le à
portée de main à fin de référence ultérieure.
Ihr neues Gerät wurde unter Beachtung der
strengen ROADSTAR Qualitätsvorschriften ge-
fertigt. Wir danken Ihnen für den Kauf unseres
Produktes und wünschen Ihnen optimalen Hör-
genuss. Bitte lesen Sie diese Bedienungsanlei-
tung durch, und heben Sie sie auf, um jederzeit
darin nachschlagen zu können.
Vuestro nuevo sistema ha sido construido se-
gún las normas estrictas de control de calidad
ROADSTAR. Le felicitamos y le damos las gra-
cias por su elección de este aparado. Por favor
leer el manual antes de poner en funcionamien-
to el equipo y guardar esta documentación en
case de que se necesite nuevamente.
Il vostro nuovo apparecchio é stato prodotto ed
assemblato sotto lo stretto controllo di qualità
ROADSTAR. Vi ringraziamo di aver acquistato
un nostro prodotto per il vostro piacere
d’ascolto. Prima di procedere all'utilizzo dell'ap-
parecchio, leggete attentamente il manuale
d’istruzioni e tenetelo sempre a portata di mano
per futuri riferimenti.
Seu novo aparelho foi construido e montado
sob o estrito controle de qualidade da ROA-
DSTAR. Agradecemos por ter comprado nosso
produto para a sua diversão. Antes de usar e-
sta unidade é necessário ler com atençâo este
manual de instruções pare que possa ser usa-
da apropriadamente; mantenha o manual ao
seu alcance para outras informações.
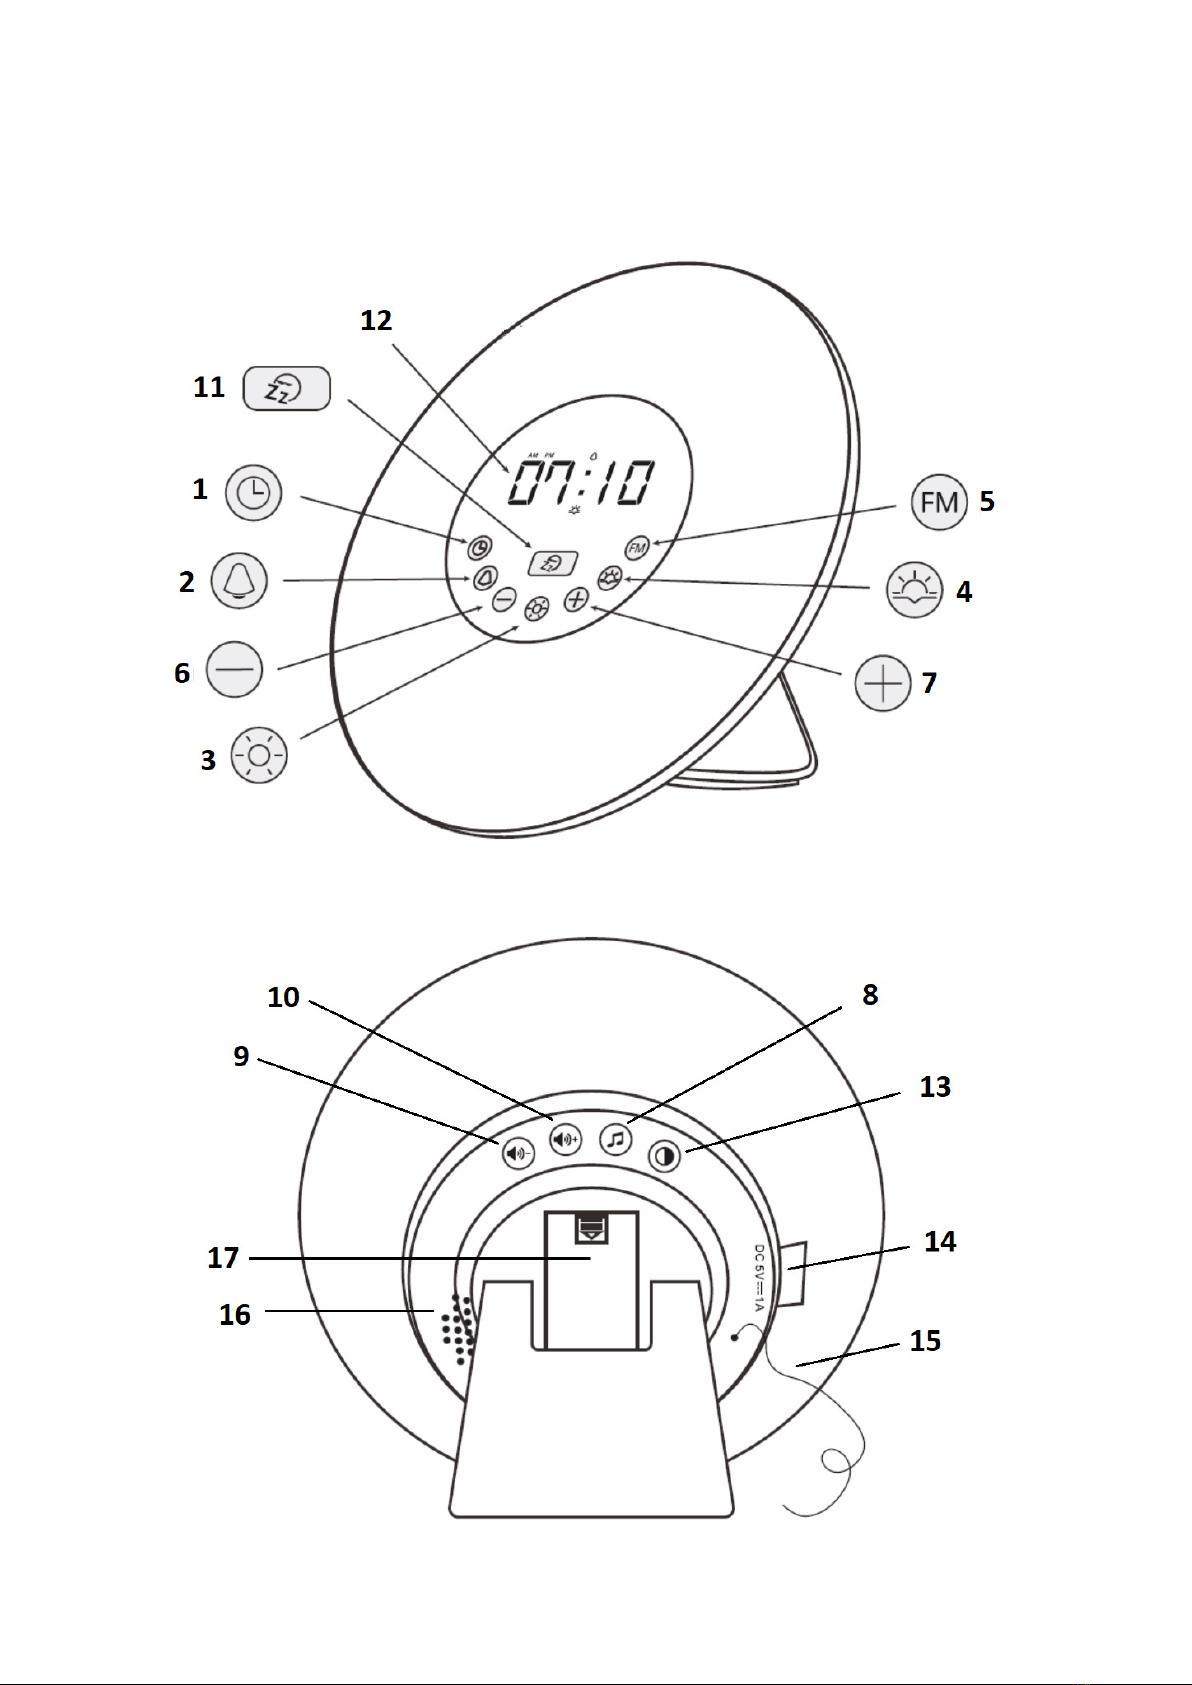
CLR-600/LIGHT
TOP
REAR

1 English
LOCATION OF CONTROLS
1. CLOCK SETTING / 12-24H SETTING
2. ALARM
3. LIGHT
4. SUNSET
5. FM RADIO ON-OFF / SCAN
6. - (DOWN)
7. + (UP)
8. NATURE SOUNDS - FM SELECTOR
9. VOLUME -
10. VOLUME +
11. SNOOZE
12. DISPLAY
13. DISPLAY BRIGHTNESS
14. DC INPUT
15. ANTENNA
16. SPEAKER
17. BATTERY COMPARTMENT
POWER SOURCE
AC POWER: To power on your product, plug the AC/DC adaptor into the DC plug (14) at the
back of the unit and into a wall AC power outlet.
Check that the rated voltage of your appliance matches your local voltage.
BATTERY BACK-UP POWER FAILURE PROTECTION
This radio has a battery back up circuit that will keep the correct time and alarm settings in
the event of a temporary power interruption. Install 2 x “LR03” batteries (not included), into
the battery compartment located on the bottom of the unit (17).
CLOCK SETTING
(The first time you plug the radio, the hour on the display will begin to blink, please proceed
directly to step 3).
When the radio is OFF:
1. Press the [CLOCK] button (1) to select 12 or 24 h;
2. Press and hold [CLOCK] button (1);
3. Use the [+ / -] buttons (6/7) to adjust the hour;
4. Confirm with the [CLOCK] button (1);
5. Use the [+ / -] buttons (6/7) to adjust the minutes;
6. Confirm with the [CLOCK] button (1).
DISPLAY BRIGHTNESS SETTING
Press repeatedly the [DISP BRIGHTNESS] (13) to select desired level (LOW, HIGH, OFF).
TO USE THE RADIO
1. Press the [FM] button (5) to power on;
2. The first time you power on the radio, press and hold the [FM] button (5) to start auto-
matic scan;
3. Use the [+ / -] buttons (6/7) to select the desired radio station;
4. Adjust the volume with the [VOL+ / VOL-] buttons(9/10) to the desired level;
5. To power off the radio, press the [FM] button (5).
Note: For a better reception reorient the antenna (15).

2
English
ALARM SETTING
SUNRISE LIGHT SIMULATION:
30 minutes before wake up time, the light will increase its brightness gradually.
At alarm time the nature sound or radio will be played for 5 minutes.
To set the alarm, when the radio is OFF:
1. Press and hold [ALARM] button (2);
2. Use the [+ / -] buttons (6/7) to adjust the hour;
3. Confirm with the [ALARM] button (2);
4. Use the [+ / -] buttons (6/7) to adjust the minutes;
5. Confirm with the [ALARM] button (2);
6. Press [SOUND] button (8);
7. Use the [+ / -] buttons (6/7) to select the desired “wake up sound” (1-6 nature sounds, 7
last listened FM radio station);
8. Confirm with the [SOUND] button (8);
9. Adjust the volume with the [VOL+ / VOL-] buttons(9/10) to the desired level.
ACTIVATE / DEACTIVATE ALARM SETTINGS:
In stand-by, press repeatedly the [ALARM] button (2) to activate / deactivate the alarm (the
alarm icon will appear / disappear).
ALARM OFF:
During Alarm on:
Press any button except the [SNOOZE] button (11) to deactivate the alarm sound (the
Alarm setting remains).
Press [SNOOZE] button (11) to postpone the alarm for 5 minutes.
Press and hold [LIGHT] button (3) to switch OFF sunrise light simulation.
SUNSET LIGHT SIMULATION
30 minutes before sunset time, the light will light up and will decrease its brightness gra-
dually.
To set the sunset time, when the radio is OFF:
1. Press and hold [SUNSET] button (4);
2. Use the [+ / -] buttons (6/7) to adjust the hour;
3. Confirm with the [SUNSET] button (4);
4. Use the [+ / -] buttons (6/7) to adjust the minutes;
5. Confirm with the [SUNSET] button (4).
ACTIVATE / DEACTIVATE SUNSET SETTING:
In stand-by, press repeatedly the [SUNSET] button (4) to activate / deactivate the setting
(the alarm icon will appear / disappear).
LIGHT
When the radio is OFF:
1. Press [LIGHT] button (3);
2. Use the [+ / -] buttons (6/7) to adjust the brightness;
3. Second touch on [LIGHT] button (3) to start automatic light color changing mode;
4. Use the [+ / -] buttons (6/7) to stop automatic light color changing mode and select the
desired color;
5. Third touch on [LIGHT] button (3) to switch OFF the light.

3 English
TECNICAL SPECIFICATIONS
Power Supply: AC 230V ~ 50Hz (AC/DC 5 V = 1A adaptor).
Radio Frequency Coverage
FM: 87.5 - 108 MHz.
Speaker
Output Power: 1 x 1 Watt RMS.
Specifications and design are subject to possible modifications without notice due to impro-
vement.
This marking shown on the product or its literature, indicates that it should not be disposed with o-
ther household wastes at the end of its working life. To prevent possible harm to the environment or
human health from uncontrolled waste disposal, please separate this from other types of wastes
and recycle it responsibly to promote the sustainable reuse of material resources. Household users
should contact the retailer where they purchased this product, or their local government office, for
details of where and how they can take this item for environmentally safe recycling. Business users
should contact their supplier and check the terms and conditions of the purchase contract. This pro-
duct should not be mixed with other commercial wastes for disposal.
CORRECT DISPOSAL OF THIS PRODUCT
(Waste Electrical & Electronic Equipment)
WARNINGS
The exclamation point within the triangle is a warning sign alerting the user of important instruc-
tions accompanying the product.
The lightening flash with arrowhead symbol within the triangle is a warning sign alerting the user
of “dangerous voltage” inside the unit.
To reduce the risk of electric shock, do not remove the cover. No user serviceable parts inside
the unit. Refer all servicing to qualified personnel.
This unit operates on 230V ~ 50Hz. If the unit is not used for a long period of time, remove the
plug from the AC mains.
Ensure all connections are properly made before operating the unit.
This unit must not be exposed to moisture or rain.
This unit should be positioned so that it is properly ventilated. Avoid placing it, for example, close
to curtains, on the carpet or in a built-in installation such as a bookcase.
Do not expose this unit to direct sunlight or heat radiating sources.

4
Deutsch
ORT DER BEDIENELEMENTE
1. CLOCK SETTING / 12-24H SETTING (UHREINSTELLUNG)
2. ALARM
3. LIGHT (LICHT - LAMPE)
4. SUNSET (SONNENUNTERGANG)
5. FM RADIO ON-OFF / SCAN (UKW RADIO EIN - AUS / SENDERSUCHE)
6. - (MINUS)
7. + (PLUS)
8. NATURE SOUNDS - FM SELECTOR (AUSWAHL NATURTON ODER UKW)
9. VOLUME - (LAUTSTÄRKE -)
10. VOLUME + (LAUTSTÄRKE +)
11. SNOOZE (VERSCHIEBEN)
12. DISPLAY (ANZEIGE)
13. DISPLAY BRIGHTNESS (BILDSCHIRMHELLIGKEIT)
14. DC INPUT (DC BUCHSE)
15. ANTENNA (ANTENNE)
16. SPEAKER (LAUTSPRECHER)
17. BATTERY COMPARTMENT (BATTERIEFACH)
STROMQUELLEN
WECHSELSTROM: Sie können Ihr Radio mit Strom versorgen, indem Sie das Netzkabel in
den Netzstecker (14) an der Rückseite des Gerätes und dann in die Steckdose an der Wand
stecken. Prüfen Sie, dass die Nennspannung des Geräts mit Ihrer lokalen Spannung über-
einstimmt. Stellen Sie sicher, dass das Netzkabel vollständig in das Gerät eingesetzt ist.
STÜTZBATTERIE ZUM SCHUTZ GEGEN STROMAUSFALL
Dieses Radio hat einen eingebauten Stützbatterie-Schaltkreis, der bei einem zeitweiligen
Stromausfall die Einstellungen der genauen Uhrzeit und der Weckzeit aufrechterhält. Setzen
Sie 2 Batterien “LR03”, in das Batteriefach auf der unteren Seite des Gerätes ein (17).
UHREINSTELLUNG
(Wenn Sie das Radio zum ersten Mal anschliessen, beginnt die Stunden zu blinken. Bitte
gehen Sie direkt zu Schritt 3).
Wenn das Radio ausgeschaltet ist:
1. Drücken Sie die Taste [CLOCK] (1), um 12 oder 24h auszuwählen;
2. Drücken und halten Sie die Taste [CLOCK] (1);
3. Verwenden Sie [+ / -] (6/7), um die richtige Stunde einzustellen;
4. Drücken Sie die Taste [CLOCK] (1), um zu bestätigen;
5. Verwenden Sie [+ / -] (6/7), um die richtige Minuten einzustellen;
6. Drücken Sie die Taste [CLOCK] (1), um zu bestätigen.
RADIO BENUTZEN
1. Drücken Sie zum Einschalten die Taste [FM] (5);
2. Wenn Sie das Radio zum ersten Mal einschalten, drücken und halten Sie die Taste [FM]
(1), um den automatischen Suchlauf zu starten
3. Verwenden Sie [+ / -] (6/7), um den Radiosender auszuwählen;
4. Ändern Sie die Lautstärke mit die [VOL+ / VOL-] (9/10) auf die gewünschte Pegel;
5. Drücken Sie die Taste [FM] (5) zum Ausschalten des Radios.
Hinweis: Richten Sie die Antenne (15) für einen besseren Empfang aus.

5 Deutsch
ALARMEINSTELLUNG
SONNENAUFGANG SIMULATION
30 Minuten vor dem Aufwachen wird die Helligkeit des Lichts allmählich erhöht.
Zur Alarmzeit wird der Naturton oder das Radio 5 Minuten lang abgespielt.
So stellen Sie den Alarm ein, wenn das Radio ausgeschaltet ist:
1. Drücken und halten Sie die Taste [ALARM] (2);
2. Verwenden Sie [+ / -] (6/7), um die Stunden einzustellen;
3. Drücken Sie die Taste [ALARM] (2), um zu bestätigen;
4. Verwenden Sie [+ / -] (6/7), um die Minuten einzustellen;
5. Drücken Sie die Taste [ALARM] (2), um zu bestätigen;
6. Drücken Sie die Taste [SOUND] (8);
7. Wählen Sie mit die Tasten [+ / -] (6/7) den gewünschten „Weckton“ (1-6 Naturton, 7
zuletzt gehörte UKW-Radiosender);
8. Drücken Sie die Taste [ALARM] (2), um zu bestätigen;
9. Verwenden Sie [+ / -] (6/7), um die richtige Minuten einzustellen.
ALARMEINSTELLUNGEN AKTIVIREN / DEAKTIVIEREN:
Im Standby-Modus, drücken Sie wiederholt die Taste [ALARM] (2), um die Einstellungen zu
aktiviren / deaktivieren.
ALARM AUS
Während des Alarm an:
Drücken Sie eine beliebige Taste außer der Taste [SNOOZE] (11), um den Alarm zu
deaktivieren (der Alarm stoppt, aber die Einstellung bleibt bestehen).
Drücken Sie die Taste [SNOOZE] (11) um den Alarm für 5 Minuten zu verschieben.
Halten Sie die [LIGHT] -Taste (3) gedrückt, um die Sonnenaufgangslichtsimulation au-
szuschalten.
SONNENUNTERGANGSSIMULATION
30 Minuten vor Sonnenuntergang leuchtet das Licht auf und verringert seine Helligkeit all-
mählich.
So stellen Sie die Sonnenuntergangszeit ein, wenn das Radio ausgeschaltet ist:
1. Drücken und halten Sie die Taste [SUNSET] (4);
2. Verwenden Sie [+ / -] (6/7), um die Stunden einzustellen;
3. Drücken Sie die Taste [SUNSET] (4), um zu bestätigen;
4. Verwenden Sie [+ / -] (6/7), um die Minuten einzustellen;
5. Drücken Sie die Taste [SUNSET] (4), um zu bestätigen.
SIMULATION AKTIVIREN / DEAKTIVIEREN:
Im Standby-Modus, drücken Sie wiederholt die Taste [SUNSET] (4), um die Einstellungen
zu aktiviren / deaktivieren.
LICHT
Wenn das Radio ausgeschaltet ist:
1. Drücken Sie die [LIGHT] -Taste (3) um das Licht einzuschalten;
2. Verwenden Sie die Tasten [+ / -] (6/7), um die Helligkeit einzustellen;
3. Drücken Sie erneut die Taste [LIGHT] (3), um den Modus zum automatischen Ändern
der Lichtfarbe zu starten;
4. Verwenden Sie die Tasten [+ / -] (6/7), um den Modus zum automatischen Ändern der
Lichtfarbe zu beenden und die gewünschte Farbe auszuwählen;
5. Drücken Sie zum dritten Mal auf die Taste [LIGHT] (3), um das Licht auszuschalten.

6
Deutsch
TECHNISCHE DATEN
Stromversorgung: AC 230V ~ 50Hz (AC/DC 5V = 1A adapter).
Radiofrequenzbereich
FM: 87.5 - 108 MHz.
Lautsprecher
ausgangsleistung: 1 x 1 Watt RMS.
Ausführung und Spezifikationen unterliegen unangekündigten Änderungen.
Die Kennzeichnung auf dem Produkt bzw. auf der dazugehörigen Literatur gibt an, dass es nach seiner Leben-
sdauer nicht zusammen mit dem normalen HaushaltsmüIl entsorgt werden darf. Entsorgen Sie dieses Gerat bitte
getrennt von anderen Abfallen, um der Umwelt bzw. der menschl i chen Gesundhei t ni cht durch unkontrol l i
erte Mül l besei ti gung zu schaden. Recycel n Si e das Gerät, um di e nachhaltige Wiederverwertung von stoffli-
chen Ressourcen zu fördern. Private Nutzer sollten den Händler, bei dem das Produkt gekauft wurde, oder die
zuständigen Behörden kontaktieren, um in Erfahrung zu bringen, wie sie das Gerät auf umweltfreundliche Weise
recyceln können. Gewerbliche Nutzer sollten sich an Ihren Lieferanten wenden und die Bedingungen des Ver-
kaufsvertrags konsultieren. Dieses Produkt darf nicht zusammen mit anderem Gewerbemüll entsorgt werden.
KORREKTE ENTSORGUNG DIESES PRODUKTS
(Elektromüll)
SICHERHEITSHINWEISE
Das Ausrufszeichen im Dreieck weist den Benutzer auf wichtige Bedienungs- und Wartungsanweisun-
gen (Service) in diesem Handbuch hin, die unbedingt zu befolgen sind.
Um die Gefahr elektrischer Schläge auszuschliessen, Gehäuse auf keinen Fall abnehmen.
Im Innem befinden sich keine vom Benutzer selbst instandsetz-baren Teile. Reparaturen dürfen nur
von einer autorisierten Fachwerkstatt durchgeführt werden.
Dieses Gerät ist für 230V ~ 50Hz Netzspannung ausgelegt. Bei längerer Nichtbenutzung des Geräts
ziehen Sie den Stecker aus der Steckdose.
Setzen Sie das Gerät weder Feuchtigkeit noch Regen aus.
Schalten Sie das System erst dann ein, wenn Sie alle Verbindungen genau geprüft haben.
Stellen Sie das Gerät so auf, dass immer eine ungestörte Frischluftzufuhr sichergestellt ist. Es ist zum
beispiel keinesfalls auf Teppiche und in der Nähe von Gardinen zu stellen oder in Bücherregale einzu-
bauen.
Setzen Sie das Gerät weder direkter Sonneneinstrahlung noch Wärmequellen aus.

7 Français
EMPLACEMENT DES COMMANDES
1. CLOCK SETTING / 12-24H SETTING (RÉGLAGE DE L’HORLOGE)
2. ALARM (ALARME)
3. LIGHT (LUMIÈRE)
4. SUNSET (COUCHER DU SOLEIL)
5. FM RADIO ON-OFF / SCAN (RADIO FM MARCHE - ARRÊT / BALAYAGE)
6. - (PRÉCÉDENT)
7. + (SUIVANT)
8. NATURE SOUNDS - FM SELECTOR (SÉLECTEUR SONS DE NATURE OU FM)
9. VOLUME -
10. VOLUME +
11. SNOOZE (REPETER L’ALARME)
12. DISPLAY (ÉCRAN)
13. DISPLAY BRIGHTNESS (LUMINOSITÉ DE L’ÉCRAN)
14. DC INPUT (FICHE DC)
15. ANTENNA (ANTENNE)
16. SPEAKER (HAUT-PARLEUR)
17. BATTERY COMPARTMENT (COMPARTIMENT DES PILES)
SOURCES D'ALIMENTATION
ALIMENTATION CA: Pour alimenter l’appareil, il suffit de brancher le cordon d'alimentation
dans la fiche DC (14) située à l'arrière du boitier et dans une prise de courant CA murale.
Vérifiez que la tension nominale de l`appareil correspond à la tension locale. Vérifier que le
cordon d'alimentation est complètement inséré dans l'appareil.
PILE DE PROTECTION CONTRE LES COUPURES D’ALIMENTATION
Cet appareil radio est équipé d’un circuit de réserve sur pile pour préserver les programma-
tions et l’heure du réveil en cas d’interruption temporaire de l’alimentation électrique.
Installez 2 piles “LR03”, dans le compartiment des piles situé en dessous de l’appareil (17).
RÉGLAGE DE L'HORLOGE
(La premiére fois que vous branchez la radio, l’heure sur le display commencera à clignoter,
passez directement à l’étape 3).
Quand la radio est éteinte:
1. Appuyer sur le bouton [CLOCK] (1) pour choisir 12 ou 24 h;
2. Appuyer et maintenir enfoncé le bouton [CLOCK] (1);
3. Utilisez les boutons [+ / -] (6/7) pour sélectionner l’heure;
4. Appuyez sur [CLOCK] (1) pour confirmer;
5. Utilisez les boutons [+ / -] (6/7) pour sélectionner les minutes;
6. Appuyez sur [CLOCK] (1) pour confirmer.
UTILISER LA RADIO
1. Appuyez sur le bouton [FM] (5) pour la mise sous tension;
2. Lors de la première mise sous tension de la radio, appuyez et maintenez enfoncé le
bouton [FM] (5) pour lancer le balayage automatique;
3. Sélectionnez la station de radio à l’aide de [+ / -] (6/7);
4. Réglez le volume avec les boutons [VOL+ / VOL-] (9/10) au niveau souhaité;
5. Pour éteindre la radio, appuyez sur le bouton [FM] (5).
Remarque: Pour une meilleure réception, réorientez l'antenne (15).
Tabla de contenidos
Idiomas:
Otros manuales de Despertador de Roadstar


